
Devon CLI
The devonfw-ide is shipped with a central command devon. The setup will automatically register this command so it is available in any shell on your system. This page describes the Command Line Interface (CLI) of this command.
Devon
Without any argument the devon command will determine your DEVON_IDE_HOME and setup your environment variables automatically. In case you are not inside of a devonfw-ide folder the command will echo a message and do nothing.
[/]$ devon
You are not inside a devon IDE installation: /
[/]$ cd /projects/my-project/workspaces/test/my-git-repo
[my-git-repo]$ devon
devonfw-ide has environment variables have been set for /projects/my-project in workspace main
[my-git-repo]$ echo $DEVON_IDE_HOME
/projects/devon
[my-git-repo]$ echo $JAVA_HOME
/projects/my-project/software/java
Commandlets
The devon command supports a pluggable set of commandlets. Such commandlet is provided as first argument to the devon command and may take additional arguments:
devon «commandlet» [«arg»]*
Technically, a commandlet is a bash script located in $DEVON_IDE_HOME/scripts/command. So if you want to integrate another tool with devonfw-ide we are awaiting your pull-request.
Every commandlet takes the following generic arguments:
| Argument(s) | Meaning |
|---|---|
|
run in non-interactive mode (do not ask any questions). |
|
be quiet and avoid output. |
Command-wrapper
For many commandlets the devon command acts as a wrapper.
Similar to mvnw or gradlew you can use it as a proxy command.
Therefore devon mvn clean install will be the same as mvn clean install.
The benefit when using devon as wrapper is that it will even work when the command (mvn, node, npm, etc.) is not on your PATH variable or even not yet installed.
We see the main benefit in this for writing portable scripts that you may commit to your git repository and that will then run everywhere and will lazily install the required tools on the fly.
In your daily usage you can and surely should avoid to always type devon as prefix to every command.
However, when you automate and want to avoid "command not found" errors, you can simply prefix the command with devon.
Commandlet overview
The following commandlets are currently available:
aws
The aws commandlet allows to install and use aws cli.
The arguments (devon aws «args») are explained by the following table:
| Argument(s) | Meaning |
|---|---|
|
install aws cli on your machine. |
Azure CLI
The Azure CLI commandlet allows to install and use Azure CLI.
Call devon az «args» is more or less the same as calling az «args» but with some advanced features and ensuring that Azure CLI is properly set up for your project.
ATTENTION: Currently this feature is new and therefore experimental. It may change in incompatible ways in the next releases until we reach a stable state. We hope that all is working fine for you. However, do not expect everything to work out of the box.
The arguments (devon az «args») are explained by the following table:
| Argument(s) | Meaning |
|---|---|
|
setup Azure CLI (install and verify) as per above flow. |
|
call Azure CLI with the specified arguments. Call |
Configuration File
The configuration file is located at conf/.azure.
Don’t forget to set the environment variables of your IDE with devon before setting new configurations for Azure.
build
The build commandlet is an abstraction of build systems like maven, gradle, yarn, npm, etc.
It will auto-detect your build-system (via existence of files like pom.xml, package.json, etc.). According to this detection, it will simply delegate to the according commandlet of the specific build system. If that build-system is not yet available it will be downloaded and installed automatically.
So devon build allows users to build any project without bothering about the build-system. Further specific build options can be configured per project. This makes devon build a universal part of every definition of done. Before pushing your changes, please always run the following command to verify the build:
devon build
You may also supply additional arguments as devon build «args». This will simply delegate these arguments to the detected build command (e.g. call mvn «args»).
Docker
The Docker commandlet allows to install and use Docker. On Windows WSL 2(Windows Subsystem for Linux) has to be installed properly as a prerequisite. In case of using Rancher Desktop the process of enabling WSL and installing a WSL distribution will be handled by Rancher Desktop. This commandlet also offers the installation of Rancher Desktop, which works on Windows, Mac and Linux. To run the tools installed and managed by Rancher Desktop it is necessary to have Rancher Desktop up and running. To assure that you are able to use these tools directly after startup, you can add Rancher Desktop to the startup programs of your Operating System. Such instructions will be given below inside the sections for Windows, Mac and Linux.
ATTENTION: Currently this feature is new and therefore experimental. It may change in incompatible ways in the next releases until we reach a stable state. We hope that all is working fine for you. However, do not expect everything to work out of the box. In case you are facing issues (e.g. network problems with Cisco AnyConnect, etc.) please give us feedback so we can improve.
The arguments (devon docker «args») are explained by the following table:
| Argument(s) | Meaning |
|---|---|
|
setup Docker (install and verify) as per above flow. |
|
call docker with the specified arguments. Call |
Setup
The Docker commandlet will install Docker Desktop or Rancher Desktop automatically. This depends on how the variable DOCKER_EDITION was set. We chose to set Rancher Desktop as standard for our installation, due to it being license free compared to Docker Desktop while offering a similar tool set. Please read the document docker-desktop-alternative motivating why we added Rancher Desktop to the docker commandlet or read the section 'Docker Desktop' if you want to use Docker Desktop instead.
Docker Desktop
Docker Desktop can still be used by setting the variable DOCKER_EDITION equal to "DOCKERDESKTOP". This can be done by your projects ide-admin in the settings file. If you want to switch from Rancher Desktop to Docker Desktop, then add a line with the following content "DOCKER_EDITION=DOCKERDESKTOP" (without the quotes around the allocation) to the file devon.properties located at the path ${DEVON_IDE_HOME}/conf/devon.properties.
Rancher Desktop
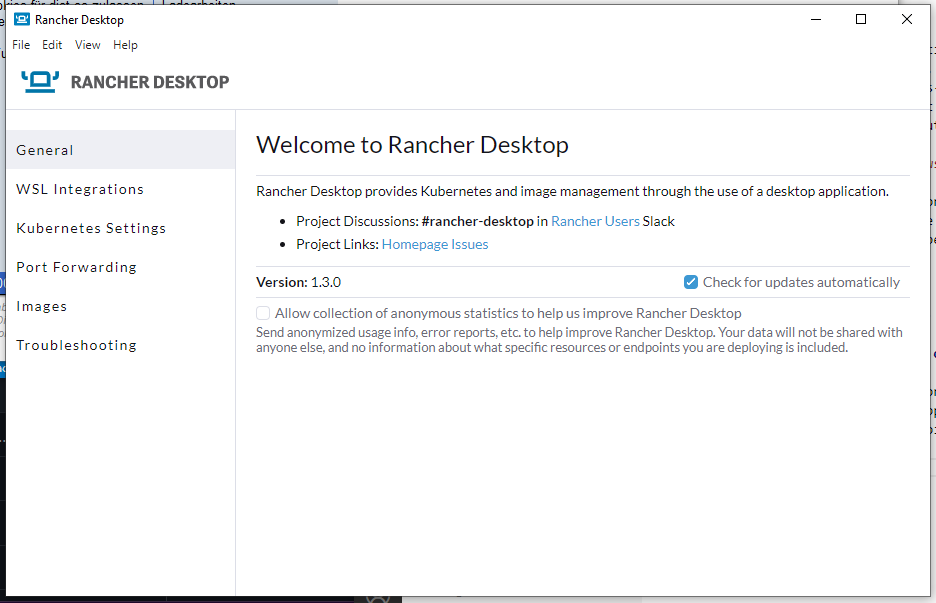
The installation of Rancher Desktop will be handled with the help of a graphical user interface. After starting the installation process from your shell you may see a small progress window for a few seconds before the installer starts.
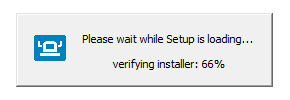
After that you may need to wait for around half a minute until the installer of Rancher Desktop pops up. Then, when you accepted the Licence Agreement

the installation process starts, which will look like this:
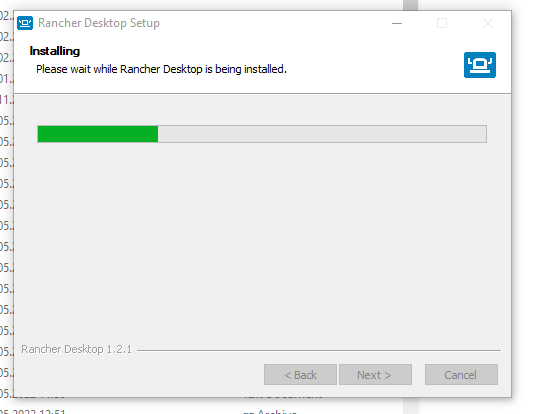
After successfull installation please start Rancher Desktop and go to the menu point "Kubernetes Settings". Under "Container Runtime" choose dockerd(moby) to enable the docker-cli.

If you use Windows, then make sure to go to the Settings named "WSL Integration". There you can choose the WSL Shells you want Rancher Desktop to work on.
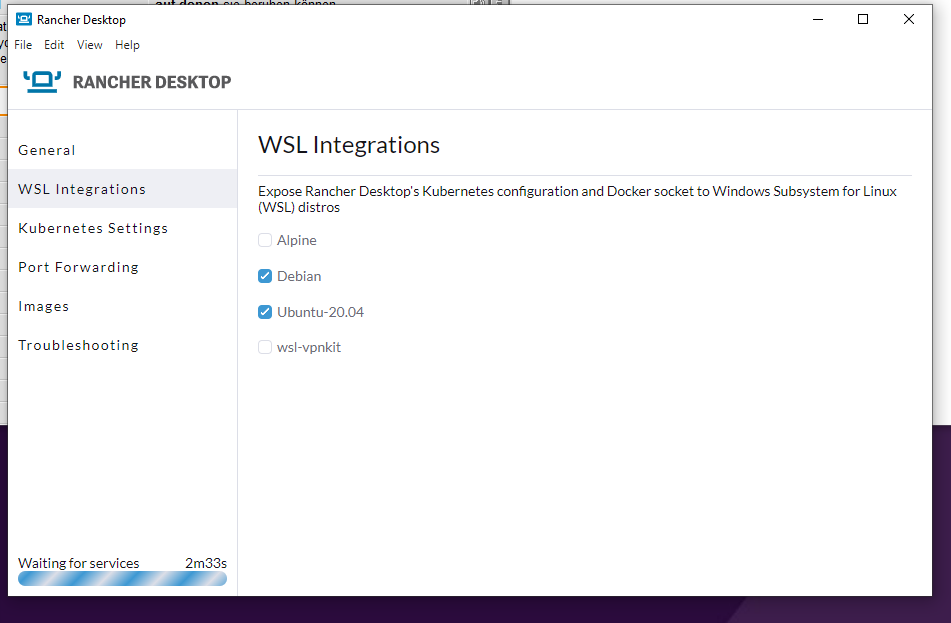
Besides that the tools like docker or kubectl should directly work with CMD or Powershell.
Please note that besides the sandbox concept of devonfw-ide this is a global installation on your system. When uninstalling devonfw-ide, you may have to manually uninstall Docker and Kubernetes, or Rancher Desktop if you do not need it anymore. At least uninstalling Rancher Desktop should leave way less remains if you did not install one of the related software Rancher Desktop offers separately.
If you are connected to a VPN you may run into problems while trying to start Rancher Desktop on Windows. E.g. Rancher Desktop will load for a long time as indicated by the progress bar on the lower left side of the Rancher Desktop GUI.
To fix this common issue related to WSL2, we included this wsl-vpnkit to the installation of Rancher Desktop. If you still run into problems, then please disconnect from your VPN, start Rancher Desktop and wait untill the progress bar disappears
or, when using Windows, untill you see a small blue Rancher Desktop icon in your Notification Area (in the following picture it is on the right bottom of the screen next to the taskbar).

After that you can reconnect to your VPN.
If you still run into problems, while using Kubernetes, one possible workaround with git-bash in Windows is to use a wsl-distribution.
For this you can download and install the wsl distribution Ubuntu (latest LTS version, in the following example 20.04 LTS) and then prefix troublesome commands with wsl -d ubuntu20.04.
So to run kubectl get pods you can execute wsl -d ubuntu20.04 kubectl get pods.
If you set this distribution as main wsl-distribution via "wsl --set-default ubuntu20.04",
then you will only need "wsl " as prefix afterwards.
So wsl -d ubuntu20.04 kubectl get pods reduces to "wsl kubectl get pods".
If you have to deal with this for multiple commands, simply start a shell inside ubuntu via WSL and keep working there:
wsl -d ubuntu20.04
devon
kubectl get pods
...
requirements
Running Docker and especially Kubernetes on your machine in the background will require quite some resources. This will allocate at least 2GB of additional RAM.
You will need at least 8GB of total RAM while we recommend to use 16GB+.
You may also tune and scale it to your needs. When using Docker Desktop (Windows or MacOS) simply go to the resources tab in the settings. It will depend on your usage frequency if you want to have it running in the background all the time. This is a balance between resource utilization and convenience. If you use Docker and Kubernetes on your local machine on a daily basis this makes sense.
In case you only use Docker rarely, you can save resources by stopping it when not needed after it has been installed.
Windows and macOS
For Windows 10 you can use the following Instructions on how to set startup programs for Windows 10, so that Rancher Desktop starts with your OS.
To enable or disable autostart, you can launch Docker Desktop on Windows or MacOS go to the Preferences (gear icon in the title bar). Then in the General tab you can check or uncheck the option Start Docker Desktop when you login (see also here). When autostart is disabled and you launch Docker Desktop it will notice and ask you to start the service or do this automatically for you.
On Windows you can also manually tweak this:
-
Hit
[windows][r] -
Enter
services.msc -
Confirm with
OK -
In the services app search for the Docker Desktop Service in the list and select it.
-
Now you can start or stop the service by clicking on the according link text.
-
Also when right clicking on Docker Desktop Service and selecting
Optionsfrom the context-menu, you can change the start type toautomaticormanual.
Have a look at the Instructions on how to set startup programs for MacOS to make Rancher Desktop run directly after starting up your OS.
In case you have a new Mac with A1 CPU, we automatically download and install the according ARM version of Docker Desktop or Rancher Desktop for macOS. However, if you use Docker and search for images you may end up with errors like:
docker: no matching manifest for linux/arm64/v8 in the manifest list entries.So with A1 CPU you may need to add --platform linux/x86_64 as option to your Docker command to find the expected container image.
Linux
Docker Desktop isn’t available for Linux, but Rancher Desktop can be used as compareable alternative as mentioned before.
To make the usage of Rancher Desktop more comfortable and reliable let your operating system run it after starting up your system. On many Linux distributions you can just go to your menu (usually by clicking the icon at your screens left bottom), type "startup" and start your systems GUI-startup manager, if popping up. At the following website you can find some examples or other options on how to set startup programs for some Linux distributions.
usage
Once installed via setup, you can run Docker from any shell of your OS directly. If you use Rancher Desktop just
make sure that Rancher Desktop runs in the background.
Run docker help to get started and use the online documentations and resources on the web to get familiar with Docker.
It is not our intention to repeat this here.
Please note that the docker commandlet is a command wrapper.
Introduction
As Docker Desktop has changed its licensing we have been looking for a license-free alternative. This document gives a rationale why we have choosen Rancher Desktop as alternative to setup and manage docker and kubernetes.
Why we chose Rancher Desktop as Docker-Desktop alternative
Our main criteria for tool comparision were:
-
The softwares licence
-
Match of toolset compared to Docker Desktop
-
Complexity of installing and setting up the toolset
-
Stability of the solution
-
Future-proofness (community activitiy, regular updates and fixes)
| Rancher Desktop | Podman-Minikube | Others | |
|---|---|---|---|
Pro |
- It comes very close to what Docker-Desktop offers, as it installs most of Docker-Desktop’s cli-tools → Almost frictionless shift |
- Works deamon less, also OCI-Containers (like Docker) |
Interesting components: |
Contra |
-does not have all features Docker Desktop has, like image security scans |
- Has most usual Docker-commands, but not all of them |
- In some cases not available for all OS |
dotnet
The dotnet commandlet allows to install, configure, and launch the dotnet command to create a devonfw API project. Call devon dotnet «args» is more or less the same as calling dotnet «args» but with some advanced features and ensuring that dotnet is properly set up for your project.
The arguments (devon dotnet «args») are explained by the followidotnet table:
| Argument(s) | Meanidotnet |
|---|---|
|
checks if the dotnet SDK is installed on the target machine. If not the user will be redirected to Microsoft’s site to download it |
|
Create a new devon4net API project. |
|
run dotnet with the given arguments ( |
eclipse
The eclipse commandlet allows to install, configure, and launch the Eclipse IDE.
To launch eclipse for your current workspace and devonfw-ide installation simply run:
devon eclipse
You may also supply additional arguments as devon eclipse «args». These are explained by the following table:
| Argument(s) | Meaning |
|---|---|
|
if provided as first arg then to command will be invoked for each workspace |
|
setup Eclipse (install or update) |
|
install an additional plugin. If only |
|
remove the specified plugin. Typically the key of a preconfigured plugin properties file should be given as |
|
launch Eclipse (default if no argument is given) |
|
same as |
|
update workspace |
|
reverse merge changes from workspace into settings |
|
reverse merge adding new properties |
|
create launch script for this IDE, your current workspace and your OS |
|
mirror the content of an update-site |
There are variables that can be used for Eclipse. These are explained by the following table:
| Variable | Meaning |
|---|---|
|
The version of the tool Eclipse to install and use. |
|
The edition of the tool Eclipse to install and use. You can choose between Java for standard edition or JEE for enterprise edition. |
* |
You can set this to a different (newer) version of Java used to launch your IDE (other than |
plugins
To be productive with Eclipse you need plugins. Of course devonfw-ide can automate this for your:
In your settings git repository create a folder eclipse/plugins (click on this link to see more examples and see which plugins come by default).
Here you can create a properties file for each plugin. This is an example tmterminal.properties:
plugin_url=http://download.eclipse.org/tm/terminal/marketplace
plugin_mirror_url=https://my-server.com/terminal-2022-09-13
plugin_id=org.eclipse.tm.terminal.feature.feature.group,org.eclipse.tm.terminal.view.feature.feature.group,org.eclipse.tm.terminal.control.feature.feature.group,org.eclipse.tm.terminal.connector.ssh.feature.feature.group,org.eclipse.tm.terminal.connector.telnet.feature.feature.group
plugin_active=true
The variables are defined as follows:
-
plugin_urldefines the URL of the Eclipse update site of the plugin -
plugin_mirror_urldefines the URL of the Eclipse mirrored update site of the plugin. See Mirroring Eclipse Update Site -
plugin_iddefines the feature group ID(s) to install. To install multiple features/plugins provide a coma-separated list of IDs. If you want to customizedevonfw-idewith new plugins you can first install them manually and then go toAbout Eclipse > Installation Detailsthen you can filter for your newly installed plugin and find the values in theIdcolumn. Copy & paste them from here to make up your own custom config. -
plugin_activeis an optional parameter. If it istrue(default) the plugin will be installed automatically during the project setup for all developers in your team. Otherwise, developers can still install the plugin manually viadevon eclipse add-plugin «plugin-name»from the config filesettings/eclipse/plugins/«plugin-name».properties. See thesettings/eclipse/pluginsfolder for possible values of «plugin-name».
In general you should try to stick with the configuration pre-defined by your project. But some plugins may be considered as personal flavor and are typically not predefined by the project config. This e.g. applies for devstyle that allows a real dark mode for eclipse and tunes the theming and layout of Eclipse in general. Such plugins should be shipped with your settings as described above with plugin_active=false allowing you to easily install it manually.
As the maintainer of the settings for your project you should avoid to ship too many plugins that may waste resources but are not used by every developer. By configuring additional plugins with plugin_active=false you can give your developers the freedom to install some additional plugins easily.
legacy plugin config
For downward compatibility we still support the deprecated legacy configuration if the folder settings/eclipse/plugins does not exist:
The project configuration typically defines the plugins that will be installed via ECLIPSE_PLUGINS variable. Otherwise defaults from this eclipse commandlet will apply.
Be aware that this comes at your own risk and sometimes plugins can conflict and break your IDE.
Here is an example how a project can configure the plugins in its devon.properties inside the settings:
ECLIPSE_PLUGINS=("AnyEditTools.feature.group" "https://raw.githubusercontent.com/iloveeclipse/plugins/latest/" "com.ess.regexutil.feature.group" "http://regex-util.sourceforge.net/update/")For the above listed plugins you can also use the short form:
ECLIPSE_PLUGINS=("anyedit" "" "regexutil" "")Of course you may also mix plugin IDs with fully qualified plugins.
mirroring update sites
A common problem with eclipse plugins is that they are provided decentralized as so-called update sites via URLs. The maintainer of that URL is in full control of the availability and the content behind that URL. If the service gets broken, obviously the plugin can not be downloaded. Even worse, if existing content gets updated, the result is not reproducible anymore.
While the plugin artifact itself is versioned, the request to install a plugin can not specify a version but always downloads the "latest" version from the update site. If at all some kind of versioning for stability is in place it happens via the URL itself so for different major versions different URLs are provided. A possible solution is to mirror the update site locally and then make it available on your own webserver. This way you always have access to the plugin version you need as a developer without being dependent on the plugin provider. Below is the process to mirror a plugin update-site.
To mirror with only one paramter, you just need the «plugin-id» of an existing plugin in ${DEVON_IDE_HOME}/settings/eclipse/plugins (e.g. checkstyle).
Open any CLI in ${DEVON_IDE_HOME} and run the following command.
devon eclipse mirror «plugin-id» [«url»]
This command will automatically mirror the content of an update site to a specific directory named by «plugin-id» together with the current date in ${DEVON_DOWNLOAD_DIR}/update-sites/ (e.g. checkstyle-2022-09-14).
Afterwards, the folder can be uploaded to your own webserver and the URL can be put manually in «plugin_mirror_url» in the «plugin-id».properties file.
This only works if a valid plugin_url is already set in the properties for the given plugin_id (see plugins).
If you want to mirror an update site independently of «plugin-id».properties, you can enter an update site URL for the optional «url» parameter (e.g. https://checkstyle.org/eclipse-cs-update-site).
dictionary
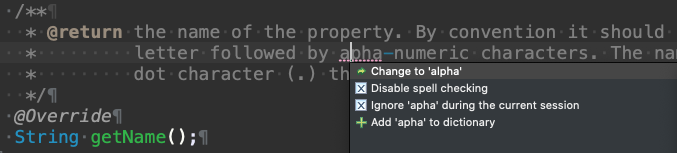
Eclipse already comes with a build-in spellchecker. This is very helpful when writing comments. The default settings of devonfw-ide ship with a project specific dictionary file and according configurations to enable spellchecking and configuring this dictionary.
When typing JavaDoc, inline comments or other texts the spellchecker will underline unknown words in red.
If your cursor is located at such a word you can hit [Ctrl][1] to get a context menu with additional options.
There you can either choose similar correct words to correct a typo or you may even add the word (maybe a new business term) to your local dictionary.
In the latter case, you should commit the changes to your settings so that it will be available to your entire team. For further details about committing changes to the settings please consult the admin usage.
non-english dictionary
In case your project has to write documentation or text in languages other than English, you might want to prefill your project dictionary for that language. Here we collect a list of such dictionaries that you can download and merge into your project dictionary:
-
German: https://sourceforge.net/projects/germandict/ (has to be converted to UTF-8 e.g. with Notepad++ via
Encoding > Convert to UTF-8)
gcloud
The gcloud commandlet allows to install and use gcloud cli.
The arguments (devon gcloud «args») are explained by the following table:
| Argument(s) | Meaning |
|---|---|
|
install gcloud cli on your machine. |
GCViewer
The gcviewer commandlet is used to install the GCViewer App if not already installed or launch the App if already installed.
GCViewer is a little tool that visualizes verbose GC (Garbage Collection) output generated by Java Virtual Machines.
To learn more about GC Loggings, please go here.
The arguments (devon gcviewer «args») are explained in the following table:
| Argument(s) | Meaning |
|---|---|
|
install the latest version of GCViewer on your machine. |
|
launch the GCViewer App. |
Please note that also devon gcviewer (without further args) will start GCViewer.
GitHub CLI
The GitHub CLI commandlet allows to install and use GitHub CLI.
The arguments (devon gh «args») are explained in the following table:
| Argument(s) | Meaning |
|---|---|
|
install GitHub CLI on your machine. |
|
call GitHub CLI with the specified arguments. Call |
GraalVM
The graalvm commandlet allows to install and use graalvm. Calling devon graalvm gu «args» is more or less the same as calling gu «args» but with the benefit that the version of graalvm preferred by your project is used (and will be installed if not yet available).
ATTENTION: Currently this feature is new and therefore experimental. It may change in incompatible ways in the next releases until we reach a stable state. We hope that all is working fine for you. However, do not expect everything to work out of the box. In case you are facing issues please give us feedback so we can improve.
The arguments (devon graalvm «args») are explained by the following table:
| Argument(s) | Meaning |
|---|---|
|
setup graalvm (install and verify), configurable via |
|
run graalvm with the given arguments ( |
Please note that the graalvm commandlet is a command wrapper.
gradle
The gradle commandlet allows to install, configure, and launch gradle. It is similar to gradle-wrapper. So calling devon gradle «args» is more or less the same as calling gradle «args» but with the benefit that the version of gradle preferred by your project is used (and will be installed if not yet available).
The arguments (devon gradle «args») are explained by the following table:
| Argument(s) | Meaning |
|---|---|
|
setup gradle (install and verify), configurable via |
|
run gradle with the given arguments ( |
Helm
The helm commandlet allows to install and use Helm.
ATTENTION: Currently this feature is new and therefore experimental. It may change in incompatible ways in the next releases until we reach a stable state. We hope that all is working fine for you. However, do not expect everything to work out of the box. In case you are facing issues (e.g. network problems with Cisco AnyConnect, etc.) please give us feedback so we can improve.
The arguments (devon helm «args») are explained by the following table:
| Argument(s) | Meaning |
|---|---|
|
install helm on your machine. |
|
call helm with the specified arguments. Call |
help
The help commandlet provides help for the CLI.
| Argument(s) | Meaning |
|---|---|
Print general help |
|
|
Print help for the commandlet |
Please note that devon help «command» will do the same as devon «command» help.
ide
The ide commandlet manages your devonfw-ide.
You need to supply additional arguments as devon ide «args». These are explained by the following table:
| Argument(s) | Meaning |
|---|---|
|
setup devonfw-ide (cloning the settings from the given URL, optionally from specific branch URL#branch) |
|
update devonfw-ide |
|
update devonfw-ide |
|
create a new devonfw-ide installation in the specified |
|
uninstall devonfw-ide (if you want remote it entirely from your system) |
setup
Run devon ide setup to initially setup your devonfw-ide. It is recommended to run the setup script in the top-level directory ($DEVON_IDE_HOME). However, in case you want to skip some system specific integration, you may also run this command directly instead. The setup only needs to be called once after a new devonfw-ide instance has been created. It will follow this process:
-
install the
devoncommand on your system (if not already installed). -
clone the settings (you may provide a git URL directly as argument or you will be prompted for it).
-
install all required software from
DEVON_IDE_TOOLSvariable (if not already installed). -
configure all these tools
-
create IDE launch scripts
-
perform OS specific system integration such as Windows Explorer integration (only done from
setupscript and not fromdevon ide setup)
update
Run devon ide update to update your devonfw-ide. This will check for updates and install them automatically.
The optional extra argument («package») behaves as follows:
-
scripts: check if a new version ofdevonfw-ide-scriptsis available. If so it will be downloaded and installed. As Windows is using file-locks, it is tricky to update a script while it is executed. Therefore, we update thescriptsfolder as an async background task and have to abort further processing at this point on windows as a workaround. -
settings: update the settings (
git pull). -
software: update the software (e.g. if versions have changed via
scriptsorsettingsupdate). -
projects: update the projects (checkout and import repositories into workspace/IDEs).
-
all: do all the above sequentially.
-
none:
settingsandsoftwareare updated by default if no extra argument is given. This is the regular usage for project developers. Only perform an update ofscriptswhen you are requested to do so by your technical lead. Bigger projects especially need to test updates before rolling them out to the entire team. If developers always updated the latest release of thescriptswhich is released globally, some project functionality would break causing problems and extra efforts in the teams.
In order to update to a specific version of scripts an explicit version can be specified after the additional to argument:
devon ide update scripts to 3.1.99The above example will update to the exact version 3.1.99 no matter if this is an upgrade or a downgrade of your current installed version.
If you just use devon ide update scripts then the latest available version will be installed. In larger teams it is recommended to communicate exact version updates to avoid that a new release can interfere and break anything. Therefore, some pilot user will test a new version for the entire team and, only after a successful test, they will communicate to the team to update to that exact version by providing the complete command as in the above example.
create
Run devon ide create to create a new devonfw-ide installation at the current directory or at the directory specified.
devon ide create /path/to/install [«SETTINGS_URL»]uninstall
We hope you love devonfw-ide. However, if you don’t and want to get rid of it entirely and completely remove all integration, you can use this command:
devon ide uninstallThis will remove devonfw-ide from all central places of your OS (user home directory such as scripts, .devon, .bashrc, as well as windows registry, etc.).
However, it will not remove your current installations (or shared software folder). So after running this uninstall, simply remove your DEVON_IDE_HOME directory of all devonfw-ide installations and potential shared software folder. You may also want to clean up your ~/Downloads directory from files downloaded by devonfw-ide. We do not automate this as deleting a directory is a very simple manual step and we do not want to take responsibility for severe data loss if your workspaces contained valuable work.
intellij
The intellij commandlet allows to install, configure, and launch IntelliJ.
To launch IntelliJ for your current workspace and devonfw-ide installation, simply run:
devon intellij
You may also supply additional arguments as devon intellij «args». These are explained by the following table:
| Argument(s) | Meaning |
|---|---|
|
if provided as first arg then to command will be invoked for each workspace |
|
setup IntelliJ (install or update) |
|
install an additional plugin |
|
launch IntelliJ (default if no argument is given) |
|
same as |
|
update workspace |
|
reverse merge changes from workspace into settings |
|
reverse merge adding new properties |
|
create launch script for this IDE, your current workspace and your OS |
There are variables that can be used for IntelliJ. These are explained by the following table:
| Variable | Meaning |
|---|---|
|
The version of the tool IntelliJ to install and use. |
|
The edition of the tool IntelliJ to install and use. The value |
* |
You can set this to a different (newer) version of Java used to launch your IDE (other than |
plugins
To be productive with IntelliJ you need plugins. Of course devonfw-ide can automate this for your:
In your settings git repository create a folder intellij/plugins (click this link to see more examples and see which plugins come by default).
Here you can create a properties file for each plugin. This is an example scala.properties:
plugin_id=org.intellij.scala
plugin_active=false
The variables are defined as following:
-
plugin_iddefines the unique ID of the plugin to install. If you want to customizedevonfw-idewith new plugins use the search on https://plugins.jetbrains.com/idea_ce to find the plugin of your choice. Select the tabVersionsand click on a version in the list. The plugin ID is displayed in the upper right corner. Copy & paste the ID from here to make up your own custom config. -
plugin_activeis an optional parameter. If it istrue(default) the plugin will be installed automatically during the project setup for all developers in your team. Otherwise developers can still install the plugin manually viadevon intellij add-plugin «plugin_id».
In general you should try to stick with the configuration pre-defined by your project. But some plugins may be considered as personal flavor and are typically not predefined by the project config. Such plugins should be shipped with your settings as described above with plugin_active=false allowing you to easily install it manually. Surely, you can easily add plugins via the UI of IntelliJ. However, be aware that some plugins may collect sensitive data or could introduce other vulnerabilities. So consider the governance of your project and talk to your technical lead before installing additional plugins that are not pre-defined in your settings.
As maintainer of the settings for your project you should avoid to ship too many plugins that may waste resources but are not used by every developer. By configuring additional plugins with plugin_active=false you can give your developers the freedom to install some additional plugins easily.
ionic
The ionic commandlet allows to install, configure, and launch ionic (ionic-cli). Calling devon ionic «args» is more or less the same as calling ionic «args» but with some advanced features and ensuring that ionic is properly set up for your project.
The arguments (devon ionic «args») are explained by the following table:
| Argument(s) | Meaning |
|---|---|
|
setup ionic (install and verify), configurable via |
|
Create a new devon4ng ionic project. |
|
run ionic with the given arguments ( |
jasypt
The jasypt commandlet allows to install jasypt and encrypt or decrypt secrets using strong encryption given a secure masterpassword. See also devon4j password encryption guide for further details.
The arguments (devon jasypt «args») are explained by the following table:
| Argument(s) | Meaning |
|---|---|
|
setup jasypt (install and verify), configurable via |
|
Encrypt a secret with a masterpassword |
|
Decrypt an encrypted secret with a masterpassword |
example
devon jasypt encrypt
Enter masterpassword: master
Enter secret to encrypt/decrypt: secret

----ENVIRONMENT-----------------

Runtime: AdoptOpenJDK OpenJDK 64-Bit Server VM 11.0.9.1+1


----ARGUMENTS-------------------

input: secret
password: master
ivGeneratorClassName: org.jasypt.iv.RandomIvGenerator
algorithm: PBEWITHHMACSHA512ANDAES_256


----OUTPUT----------------------

fQPbaDd8wq0h0qOZw/AEKp2TD4Y07Y//M5PzaLgF3qL7YnBQjiGLtW8s5XkP3Ly9

devon jasypt decrypt
Enter masterpassword: master
Enter secret to encrypt/decrypt: fQPbaDd8wq0h0qOZw/AEKp2TD4Y07Y//M5PzaLgF3qL7YnBQjiGLtW8s5XkP3Ly9

----ENVIRONMENT-----------------

Runtime: AdoptOpenJDK OpenJDK 64-Bit Server VM 11.0.9.1+1


----ARGUMENTS-------------------

input: fQPbaDd8wq0h0qOZw/AEKp2TD4Y07Y//M5PzaLgF3qL7YnBQjiGLtW8s5XkP3Ly9
password: master
ivGeneratorClassName: org.jasypt.iv.RandomIvGenerator
algorithm: PBEWITHHMACSHA512ANDAES_256


----OUTPUT----------------------

secret
java
The java commandlet allows to install and setup Java. Also it supports devon4j.
The arguments (devon java «args») are explained by the following table:
| Argument(s) | Meaning |
|---|---|
|
setup OpenJDK (install or update and verify), configurable via |
create «args» |
create a new Java project based on devon4j application template. If a single argument is provided, this is the package name and is automatically split into |
|
migrate a devon4j project to the latest version. If for some reasons the current devonfw version can not be auto-detected you may provide it manually after the 'from' argument. Also the 'single' option allows to migrate only to the next available version." |
Since 2021.12.003 an extra version of Java can be configured via EXTRA_JAVA_VERSION variable. This can be used to launch your IDE with a different (newer) version of Java but keeping the build of your project stable.
create
Examples for create a new devon4j application:
devon java create com.mycustomer.myapplicationWill create an app with package com.mycustomer.myapplication, groupId com.mycustomer, artifactId myapplication, version 1.0.0-SNAPSHOT, and h2 database.
devon java create -Dversion=0.0.1-alpha1 com.mycustomer.myapplicationWill create an app with package com.mycustomer.myapplication, groupId com.mycustomer, artifactId myapplication, version 0.0.1-alpha1, and h2 database.
devon java create com.mycustomer.myapplication com.my-customerWill create an app with package com.mycustomer.myapplication, groupId com.my-customer, artifactId myapplication, version 1.0.0-SNAPSHOT, and h2 database.
devon java create com.mycustomer.myapplication com.my-customer my-applicationWill create an app with package com.mycustomer.myapplication, groupId com.my-customer, artifactId my-application, version 1.0.0-SNAPSHOT, and h2 database.
devon java create com.mycustomer.myapplication -DartifactId=my-app -DdbType=hanaWill create an app with package com.mycustomer.myapplication, groupId com.mycustomer, artifactId my-app, version 1.0.0-SNAPSHOT, and SAP hana database.
devon java create com.mycustomer.myapplication -DdbType=oracle -Dversion=0.0.1 com.my-customer -Dbatch=batchWill create an app with package com.mycustomer.myapplication, groupId com.my-customer, artifactId myapp, version 0.0.1, oracle database, and with a batch module.
migrate
Example for migrating a devon4j application:
devon java migrateWill migrate current devon4j application to the latest version available.
jenkins
The jenkins commandlet allows to install, configure, and launch Jenkins.
| Argument(s) | Meaning |
|---|---|
|
Setup Jenkins (install and verify) |
|
Start your local Jenkins server |
|
Stop your local Jenkins server |
|
Add current project as CI job to your local Jenkins |
Kotlin
The kotlinc commandlet allows to install and setup Kotlin. The arguments (devon kotlinc «args») are explained by the following table:
| Argument(s) | Meaning |
|---|---|
|
setup Kotlin (install or update and verify), via |
|
run Kotlin with the given |
Kotlin_Native
The kotlinc-native commandlet allows to install and setup Kotlin_Native. The arguments (devon kotlinc-native «args») are explained by the following table:
| Argument(s) | Meaning |
|---|---|
|
setup Kotlin_Native (install or update and verify), via |
|
run Kotlin native with the given |
Kubernetes
The kubectl commandlet allows to install and use kubernetes.
On Windows WSL 2(Windows Subsystem for Linux) has to be installed properly as a prerequisite.
The setup on windows will then install kubernetes with K3D. K3D will create a cluster with a single node with a default name as "devonfw-cluster"
ATTENTION: Currently this feature is new and therefore experimental. It may change in incompatible ways in the next releases until we reach a stable state. We hope that all is working fine for you. However, do not expect everything to work out of the box. In case you are facing issues (e.g. network problems with Cisco AnyConnect, etc.) please give us feedback so we can improve.
The arguments (devon kubectl «args») are explained by the following table:
| Argument(s) | Meaning |
|---|---|
|
setup Kubernetes (install and verify) as per above flow. |
|
call kubectl with the specified arguments. Call |
setup
Please note that on Windows and macOS, Kubernetes support comes together with Docker Desktop that is installed via docker commandlet.
When you have installed and launched Docker Desktop, you can once enable Kubernetes in the Preferences.
On Linux however, Kubernetes is installed separately by this commandlet.
usage
Once installed via setup, you can run kubectl directly from any shell of your OS directly.
Run kubectl help to get started and use the online documentations and resources on the web to get familiar with Kubernetes.
It is not our intention to repeat this here.
Please note that the kubectl commandlet is a command wrapper.
lazydocker
The lazydocker commandlet allows to install and use lazydocker.
ATTENTION: Currently this feature is new and therefore experimental. It may change in incompatible ways in the next releases until we reach a stable state. We hope that all is working fine for you. However, do not expect everything to work out of the box.
The arguments (devon lazydocker «args») are explained by the following table:
| Argument(s) | Meaning |
|---|---|
|
install lazydocker on your machine. |
|
call lazydocker by executing the command 'devon lazydocker'. Call lazydocker --help for details or use lazydocker directly as preferred."" |
mvn
The mvn commandlet allows to install, configure, and launch maven. It is similar to maven-wrapper and mdub. So calling devon mvn «args» is more or less the same as calling mvn «args» but with the benefit that the version of maven preferred by your project is used (and will be installed if not yet available).
The arguments (devon mvn «args») are explained by the following table:
| Argument(s) | Meaning |
|---|---|
run default build, configurable via |
|
|
setup Maven (install and verify), configurable via |
|
Print the version of your current project. Will consolidate the version for multi-module projects ignoring |
|
Set the version of your current project to |
|
Check if no |
|
Check if you are running on a top-level project or fail if in a module or no maven project at all. |
release |
Start a clean deploy release build, configurable via |
|
run maven with the given arguments ( |
ng
The ng commandlet allows to install, configure, and launch ng (angular-cli). Calling devon ng «args» is more or less the same as calling ng «args» but with some advanced features and ensuring that ng is properly set up for your project.
The arguments (devon ng «args») are explained by the following table:
| Argument(s) | Meaning |
|---|---|
|
setup angular (install and verify), configurable via |
|
Create a new devon4ng project. |
|
run ng with the given arguments ( |
node
The node commandlet allows to install and setup node.js.
The arguments (devon node «args») are explained by the following table:
| Argument(s) | Meaning |
|---|---|
|
setup |
|
create a new devon4node application |
|
generate devon4node components using the schematic «s» |
|
execute a TypeORM command «c» |
|
call NodeJS with the specified arguments |
npm
The npm commandlet allows to install, configure, and launch npm. Calling devon npm «args» is more or less the same as calling npm «args» but with the benefit that the version of npm preferred by your project is used (and will be installed if not yet available).
The arguments (devon npm «args») are explained by the following table:
| Argument(s) | Meaning |
|---|---|
run default build, configurable via |
|
|
setup NPM (install and verify), configurable via |
|
print the version of your current project |
|
set the version of your current project to |
|
check if you are running on a top-level project or fail if in a module or no NPM project at all |
|
Start a clean deploy release build, configurable via |
|
run NPM with the given arguments ( |
OpenShift CLI
The oc commandlet is used to install OpenShift CLI. The instructions on how to use it can be found here.
Call devon oc «args» with the arguments described here.
ATTENTION: Currently this feature is new and therefore experimental. It may change in incompatible ways in the next releases until we reach a stable state. We hope that all is working fine for you. However, do not expect everything to work out of the box.
| Argument(s) | Meaning |
|---|---|
|
install OpenShift CLI on your machine. |
|
call oc with the specified arguments. Call |
Python
The Python Commandlet allows to install and use the Python CLI and pip.
ATTENTION: Python support for different platforms is not great unfortunately. On Linux and MacOS we have to build Python from the source-code during the installation as portable downloads are only available for windows. However, on some Macs the configure script of Python fails. This is not our fault and we can not fix this unless it gets fixed in Python itself. For details see bug issue #834.
The arguments (devon python «args») are explained by the following table:
| Argument(s) | Meaning |
|---|---|
|
install python on your machine. |
|
access additional help information. |
|
Get version of currently installed Python version. |
|
Call pip. |
|
Call pip3. (Windows only) |
|
call python with the specified arguments." |
Pip
The Pip Commandlet allows you to install and use pip (python installer of pacakges).
Usage:
-
devon pip setupto install pip -
devon pip install «package»to install a pip package where <package> is replaced with the package you want to install -
devon pip removeto remove pip -
devon pip remove «package»to remove/uninstall a given pip package
After each installation of a new package, write devon for changes to take place. Not doing so might result in command being not found by devonfw-ide.
| Argument(s) | Meaning |
|---|---|
|
install pip on your machine. |
|
call pip with the specified arguments (call 'pip --help' for details). |
|
install the specified Pip package. |
|
remove the specified Pip package. If no package is specified, pip will be removed. |
|
show the version of pip installed. |
quarkus
The quarkus commandlet allows to install and launch quarkus (quarkus-cli). Calling devon quarkus «args» is more or less the same as calling quarkus «args».
ATTENTION: Currently this feature is new and therefore experimental. It may change in incompatible ways in the next releases until we reach a stable state. We hope that all is working fine for you. However, do not expect everything to work out of the box.
The arguments (devon quarkus «args») are explained in the following table:
| Argument(s) | Meaning |
|---|---|
|
install Quarkus CLI on your machine. |
|
call Quarkus CLI with the specified arguments. Call |
release
Create a release in a standardized way including the following steps:
-
verify the current project (no local changes, etc.)
-
warn if
«version»-SNAPSHOTdependencies are used -
determine
«version»(if currently«version»-SNAPSHOT) and print out release information. -
ask user for confirmation
-
bump release to
«version»in build configuration (e.g.pom.xmlfiles) -
commit the change
-
create annotated tag for your release as
release/«version» -
invoke deployment on build-system
-
set next version as
(«version»+1)-SNAPSHOTin build configuration (e.g.pom.xmlfiles) -
commit the change
-
push your changes
| Argument(s) | Meaning |
|---|---|
|
any optional argument will directly be passed to the actual command to build the deployment |
Build-Tools
This release commandlet utilizes the build commandlet to support multiple build-tools such as maven, gradle, or npm. Each of those commandlets should respect the variable «TOOL»_RELEASE_OPTS to customize the parameters for the release build.
So e.g. if a pom.xml is detected, maven will be used. In this example the variable MVN_RELEASE_OPTS is used that defaults to clean deploy -Dchangelist= -Pdeploy.
If you provide a specific argument this will be passed additionally.
So if you invoke the command devon release -P myProfile, the above step invoke deployment on build-system would technically call this:
mvn clean deploy -Dchangelist= -Pdeploy -P myProfilePlease also note that it is very tricky to determine and modify the version of a project in a fully generic way.
Even though we try our best to support different scenarios, we can not ensure this is working for edge-cases.
Therefore, we strongly encourage to follow best practices such as ci-friendly maven.
Further, sticking to the defaults and follow the devonfw standard to name the profile for custom goals in deployment simply deploy is recommended.
rewrite
The rewrite commandlet allows the use of Openrewrite, a Maven based tool that can be used to refactor code with recipes for multiple languages and tools. Before using this tool, we recommend that you read the Getting-Started page.
Usage
The commandlet accepts the name of a recipe such as org.openrewrite.java.format.AutoFormat as the first argument.
If this recipe is built-in, the second argument can be ignored.
In case the recipe is provided by an external catalog of recipes, the second parameter must be passed.
Usually this information is set in the pom.xml of the project in plugin dependencies:
<dependencies>
  <dependency>
    <groupId>org.openrewrite.recipe</groupId>
    <artifactId>rewrite-spring</artifactId>
    <version>4.33.0</version>
  </dependency>
</dependencies>
However, you can set up the second parameter in this structure instead: groupId:artifactId:version.
In the example the second parameter would be org.openrewrite.recipe:rewrite-spring:LATEST. You can also use the exact version instead of LATEST.
The catalog of recipes can be found here:
The arguments (devon rewrite «args») are explained by the following table:
Usage of devon rewrite
| Argument(s) | Meaning |
|---|---|
«recipe» [«catalog»] |
run a «recipe». If it is not a built-in recipe then provide the catalog of this recipe in [«catalog»]" |
sonar
The sonar commandlet allows to install, configure, and launch SonarQube.
| Argument(s) | Meaning |
|---|---|
|
Setup SonarQube (install and verify) |
|
Start your local SonarQube server |
|
Stop your local SonarQube server |
|
Analyze current project with SonarQube |
Terraform
The terraform commandlet allows to install and use Terraform.
ATTENTION: Currently this feature is new and therefore experimental. It may change in incompatible ways in the next releases until we reach a stable state. We hope that all is working fine for you. However, do not expect everything to work out of the box. In case you are facing issues (e.g. network problems with Cisco AnyConnect, etc.) please give us feedback so we can improve.
The arguments (devon terraform «args») are explained by the following table:
| Argument(s) | Meaning |
|---|---|
|
install terraform on your machine. |
|
call terraform with the specified arguments. Call |
vscode
The vscode commandlet allows to install, configure, and launch Visual Studio Code.
To launch VSCode for your current workspace and devonfw-ide installation, simply run:
devon vscode
You may also supply additional arguments as devon vscode «args». These are explained by the following table:
| Argument(s) | Meaning |
|---|---|
|
if provided as first arg then to command will be invoked for each workspace |
|
setup VSCode (install or update) |
|
install an additional plugin (extension) |
|
launch VSCode (default if no argument is given) |
|
same as |
|
update workspace |
|
reverse merge changes from workspace into settings |
|
reverse merge adding new properties |
|
create launch script for this IDE, your current workspace and your OS |
plugins
To be productive with VS Code you need plugins (called extensions in VS Code).
Of course devonfw-ide can automate this for your:
In your settings git repository create a folder vscode/plugins (click this link to see more examples and see which plugins come by default).
Here you can create a properties file for each plugin.
This is an example devonfw-extension-pack.properties:
plugin_id=devonfw.devonfw-extension-pack
plugin_active=true
The variables are defined as following:
-
plugin_iddefines the unique ID of the plugin to install. If you want to customizedevonfw-idewith new plugins click onExtensionsat the bottom of the left navigation icon bar in VS code. Then use the search to find the plugin of your choice. If you click on it the plugin ID is displayed in grey beside the official title at the top of the plugin details page. Copy & paste the ID from here to make up your own custom config. -
plugin_activeis an optional parameter. If it istrue(default) the plugin will be installed automatically during the project setup for all developers in your team. Otherwise developers can still install the plugin manually viadevon vscode add-plugin «plugin-name»from the config filesettings/vscode/plugins/«plugin-name».properties. See thesettings/vscode/pluginsfolder for possible values of «plugin-name».
In general you should try to stick with the configuration pre-defined by your project.
But some plugins may be considered as personal flavor and are typically not predefined by the project config.
Such plugins should be shipped with your settings as described above with plugin_active=false allowing you to easily install it manually. Surely, you can easily add plugins via the UI of VS code.
However, be aware that some plugins may collect sensitive data or could introduce other vulnerabilities.
So consider the governance of your project and talk to your technical lead before installing additional plugins that are not pre-defined in your settings.
As maintainer of the settings for your project you should avoid to ship too many plugins that may waste resources but are not used by every developer.
By configuring additional plugins with plugin_active=false you can give your developers the freedom to install some additional plugins easily.
In addition, these plugins are recommended to the user by recommendation recommendation feature of VS Code. Be aware that the recommendations feature only works for the main workspace.
cleaning plugins on update
If you want to strictly manage the plugins for VS code in your project, you can create or edit the file settings/vscode/plugins in your settings and add this variable:
clean_plugins_on_update=trueThis will wipe all plugins when an update of VS code is performed (e.g. via devon ide update) and reinstall all configured plugins.
While this gives you more control over the governance of the plugins and allows to remove a plugin later during project lifecycle.
However, this will delete all manually installed plugins automatically without asking.
yarn
The yarn commandlet allows to install, configure, and launch npm. Calling devon yarn «args» is more or less the same as calling yarn «args» but with the benefit that the version of npm preferred by your project is used (and will be installed if not yet available).
The arguments (devon yarn «args») are explained by the following table:
| Argument(s) | Meaning |
|---|---|
run default build, configurable via |
|
|
setup yarn (install and verify), configurable via |
|
print the version of your current project |
|
set the version of your current project to |
|
check if you are running on a top-level project or fail if in a module or no NPM project at all |
|
start a clean deploy release build, configurable via |
|
run yarn with the given arguments ( |