
MacOS Tooling
Finder
If you want to open a terminal from a folder in Finder and automatically get your environment set properly for devonfw-ide you will find the perfect solution here.
So after installing (see below) the integration(s) provided here, you can easily open a terminal ready for your devonfw-ide:
-
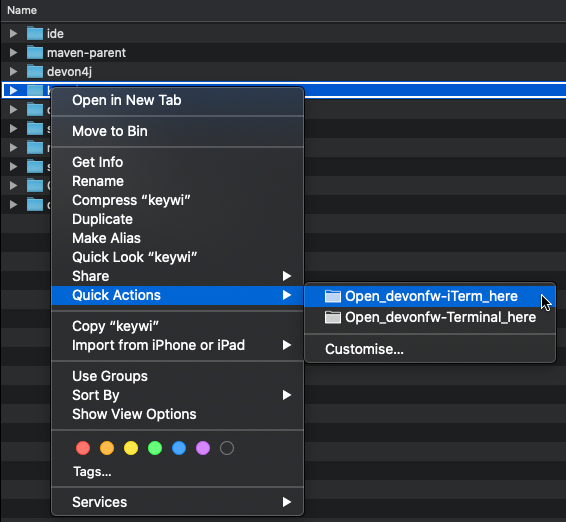
right click (
[control]+ click) on file or folder inFinder -
Expand the
Quick-Actionssub-menu -
Click on the desired action (e.g.
Open devonfw-Terminal here) -
Verify that you environment is properly initialized by invoking:
mvn -v
To get this feature for macOS Terminal.app open Finder and run the workflow system/mac/terminal/Open_devonfw-Terminal_here.workflow (in ${DEVON_IDE_HOME}). For iTerm2.app (that can be installed from App Store) do the same with system/mac/iterm/Open_devonfw-iTerm_here.workflow.
Keyboard
Keyboard support is not an integration however, some users coming from other platforms may struggle with the way macOS deals with (external non-apple) keyboards.
So to make it short: if you are happy with your keyboard and shortcuts, you can skip all the following.
Otherwise, if you think that pressing keys like Home, End, etc. should just work as expected or pressing Alt Gr should allow you to type the special characters as printed on your German keyboard then here you will find a solution to your problems!
To get all automated you can just run the script system/mac/keyboard/install-mac-keyboard-support.sh (in ${DEVON_IDE_HOME}).
If you would like to understand what is going on, you want to customize the keyboard settings to your needs, or you want a keyboard layout other than German ISO, please read on.
Keyboard Layouts
Keyboard layouts allow a find-grained mapping of each key on your keyboard to its resulting input character or behaviour.
They are macOS native features and do not need to have software running as a background service to make the keyboard mapping work (see Karabiner section below as an alternative).
They are provided as so called bundle (white lego brick icon). Like a macOS app this is a folder containing a Contents folder with a specific sub-folder structure.
In the Resources subfolder *.keylayout files are placed and define the exact mapping for the keyboard.
As an example we provide a Keyboard Layouts folder containing a bundle for a German keyboard mapping.
To install keyboard layouts simply double-click the bundle or copy it to ~/Library/Keyboard Layouts.
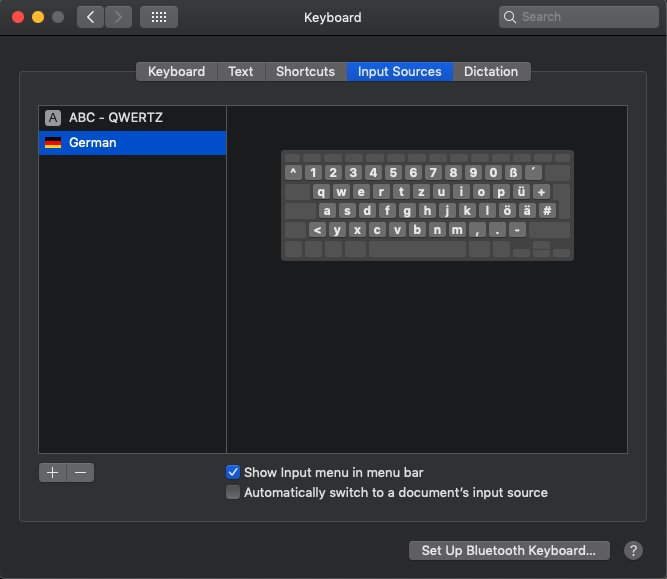
To actually use them go to System Preferences and select Keyboard.
Then, select the tab Input Sources.
With the + button you can add a keyboard layout for your daily usage with your Mac.
Please note that the keyboard layout shipped with devonfw-ide is called German-ISO and can be found in the Others section at the end of the list.
It can be used as an example or template, if you want to create your own layout.
When you have multiple mappings in place, on the top menu bar you will find a little icon next to the current time that allows you to switch between the keyboard layouts, which is very handy when you switch from your native MacBook keyboard to an external USB keyboard or vice versa. Even for a pure MacOS geek this can be helpful in case a friend coming from Windows/Linux is supposed to type something on the Mac in a pair-programming session.
In our German keyboard mapping example you can use the keys like Alt Gr, etc. to type special characters as you would expect and as printed on your keyboard.
To make Pos1, End, etc. work properly across all apps please read on to the next section(s).
In case you would like to create your own keyboard layout you can of course edit the *.keylayout files in a text editor.
However, to make this much more comfortable, you can use the graphical editor tool Ukelele.
Besides, the app itself, the Ukelele dmg file, also contains a Documentation and a Resources folder.
The latter contains many keyboard layouts that you can use as a starting point.
Key Bindings
Still, various keyboard shortcuts might not work as expected for you.
Therefore, we provide you with an advanced configuration in the folder system/mac/keyboard/KeyBindings that you can copy to your ~/Library folder:
cd system/mac/keyboard/
cp -r KeyBindings ~/Library
To make the changes work you need to log out and log in again or you can reboot.
After that, your Home (Pos1) and End buttons should work as expected including with selection via Shift and/or Command.
Also, you can use Command together with the left or right arrow key to move between words and combined it with Shift for selection.
As an example, for further customization you can press Command + < to type the unicode character «.
However, still some apps listen to keyboard events on a lower level and come with their own keyboard mappings. In these apps you might still experience unexpected behaviour. Solutions can be found in the following sub-sections.
Switch Control and Command
If you are used to windows or linux and get easily confused by the apple keyboard behaviour you might want to switch the Control and the Option key.
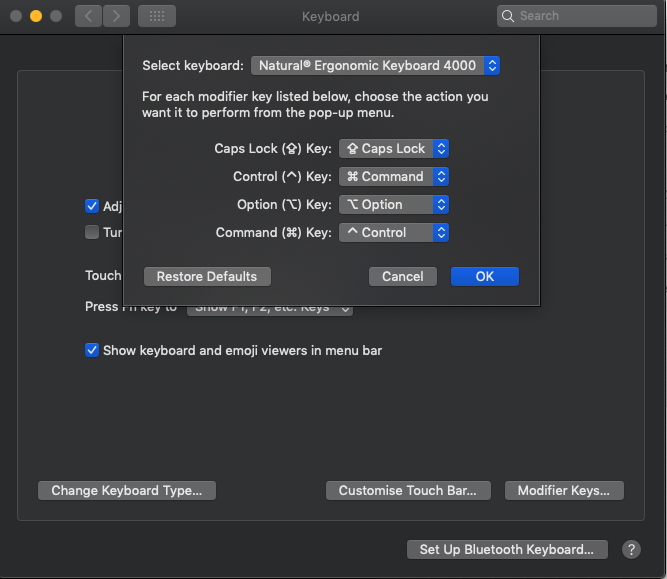
Open System Preferences and select Keyboard.
Then, in the first tab, click on the button Modifier Keys….
For every keyboard you can customize the behaviour of your modifier keys and therefore switch Control and Option as illustrated in the screenshot:
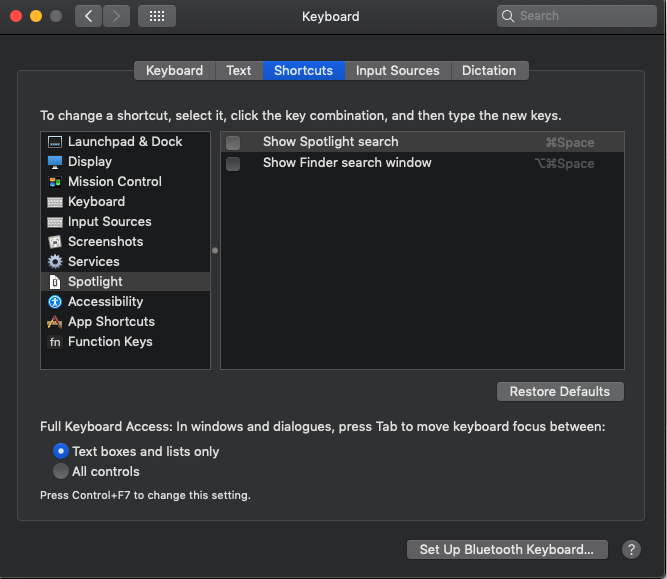
Programmers now should also disable that Control + Space is opening Spotlight Search as otherwise this shortcut can not be redefined in other apps like common IDEs.
Eclipse
In Eclipse, move and select by word as described above does not work.
Even worse, the most important shortcut does not work: Control + Space for code completion (content assist).
You can manually redefine the key bindings in Preferences under General > Keys.
However, with multiple IDE installations and workspaces this will quickly get tedious.
Therefore, you can Export and Import specific Preferences such as Keys Preferences to/from a *.epf (Eclipse PreFerences) file.
We have done all this for you so you can just import the file located in system/mac/keyboard/Eclipse/eclipse-mac-keybindings.epf into your Eclipse.
Happy coding.
Karabiner
If you want more dynamics and do not worry about an app that has to run in the background to make your keyboard work as you like (no relevant performance overhead), you can try Karabiner Elements.
This is a powerful tool to remap your keyboard shortcuts.
In the UI you can only directly create and edit Simple Modifications that are too limited for most use-cases.
However, using Complex Modifications you can do a lot of magic to customize the keyboard behaviour to your personal needs.
A key with any combination of modifiers can be mapped to any key with arbitrary modifiers.
This can also be bound to conditions based on the frontmost application or the keyboard model.
These complex modifications are configured as *.json files.
We have included a set with useful rules for external keyboards, programmer shortcuts, etc.
If you have Karabiner installed, you only need to copy the contents of the karabiner folder located in this directory to your ~/.config folder:
cd system/mac/keyboard/
cp karabiner/assets/complex_modifications/*.json ~/.config/karabiner/assets/complex_modifications/
Now, if you open the Complex Modifications in the Karabiner app, you can click on the + Add rule button and will see these mappings in the pop up.
Select the rules you want to add (e.g. add all) and you are done.
Unlike other solutions, you can quickly tweak your keyboard without the need to log out and restart apps, which gives faster trial and error turnarounds.
Further, if you want to tweak your own configs, Karabiner comes with a secondary app called Karabiner-EventViewer that shows you the names of the keys, modifiers, and apps for the events you are triggering.
This is very helpful to get the config right.