Contribute to help us improve!
Are there edge cases or problems that we didn't consider? Is there a technical pitfall that we should add? Did we miss a comma in a sentence?
If you have any input for us, we would love to hear from you and appreciate every contribution. Our goal is to learn from projects for projects such that nobody has to reinvent the wheel.
Let's collect our experiences together to make room to explore the novel!
To contribute click on Contribute to this page on the toolbar.
Dependency Injection
The dependency injection is a well-known common design pattern applied by frameworks in all languages, like Spring in Java, Angular and others. The intention of this page is not to explain how dependency injection works, but instead how it is addressed by NestJS.
NestJS resolve the dependency injection in their modules. When you define a provider in a module, it can be injected in all components of the module. By default, those providers are only available in the module where it is defined. The only way to export a module provider to other modules which import it is adding those provider to the export array. You can also reexport modules.
Inject dependencies in NestJS
In order to inject a dependency in a NestJS component, you need to declare it in the component constructor. Example:
export class CoffeeController {
  constructor(public readonly conffeeService: CoffeeService) {}
}
NestJS can resolve all dependencies that are defined in the module as provider, and also the dependencies exported by the modules imported. Example:
@Module({
  controllers: [CoffeeController],
  providers: [CoffeeService],
})
export class CoffeeModule {}
Inject dependencies in the constructor is the is the preferred choice, but, sometimes it is not possible. For example, when you are extending another class and want to keep the constructor definition. In this specific cases we can inject dependencies in the class properties. Example:
export class CoffeeController {
  @Inject(CoffeeService)
  private readonly conffeeService: CoffeeService;
}
Dependency Graph
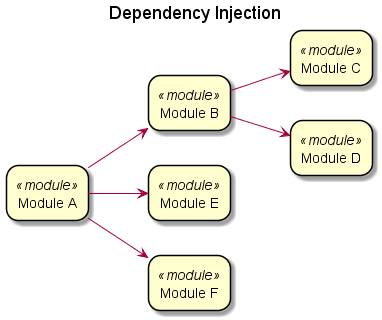
In the previous image, the Module A can inject dependencies exported by Module B, Module E and Module F. If module B reexport Module C and Module D, they are also accessible by Module A.
If there is a conflict with the injection token, it resolves the provider with less distance with the module. For example: if the modules C and F exports a UserService provider, the Module A will resolve the UserService exported by the Module F, because the distance from Module A to Module F is 1, and the distance from Module A to Module C is 2.
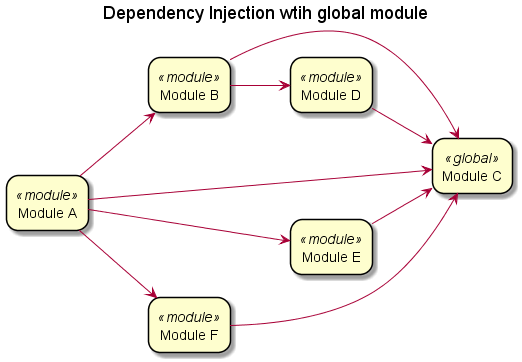
When you define a module as global, the dependency injection system is the same. The only difference is now all modules as a link to the global module. For example, if we make the Module C as global the dependency graph will be:
Custom providers
When you want to change the provider name, you can use a NestJS feature called custom providers. For example, if you want to define a provider called MockUserService with the provider token UserService you can define it like:
@Module({
  providers: [{
    provide: UserService,
    useValue: MockUserService,
  }],
})
With this, when you inject want to inject UserService as dependency, the MockUserService will be injected.
Custom provider token can be also a string:
@Module({
  providers: [{
    provide: 'USER_SERVICE',
    useValue: MockUserService,
  }],
})
but now, when you want to inject it as dependency you need to use the @Inject decorator.
constructor(@Inject('USER_SERVICE') userService: any) {}