
How to use devon4net
Introduction
As you may know, devon4net is a framework that will assist you in getting started on your.NET applications and integrating high end configurable components.
This article contains information in the form of a step-by-step guide on how to do a variety of operations.
How to: Create a new devon4net project
In this part, you will learn you how to easily create a new project using devon4net libraries and start working on it. You can create a variety of applications thanks to the different templates available. There are also multiple ways to create a new project, we will show you the most common ways.
|
Note
|
The configuration characteristics are not covered in this document. Please feel free to read the documentation for each component to discover how they work and the configuration options available. |
Command Line Interface (CLI)
This is the fastest and most efficient way. You will be installing and starting a project thanks to the template available in the NuGet Gallery using CLI. For this part you will need to have .NET 6.0 SDK installed. You can run the following command to check your version:
> dotnet --version
6.0.102
If you don’t get any response please follow the installation guide provided by Microsoft to install the latest version of .Net SDK for your OS.
Step 1 - Install the Template
Open your favourite terminal (Windows/Linux/macOS) and run the command showed below to install the latest version of the the devon4net web API template:
> dotnet new --install Devon4Net.WebAPI.Template
The following template packages will be installed:
   Devon4Net.WebApI.Template

Success: Devon4Net.WebAPI.Template::6.0.3 installed the following templates:
Template Name                    Short Name    Language  Tags
-------------------------------  ------------  --------  ------------------------------
Devon4Net API solution template  Devon4NetAPI  [C#]      devonfw/Devon4Net/Devon4NetAPI
We recommend you updating the template to the latest version. However, using the following option, you can select the version of your interest:
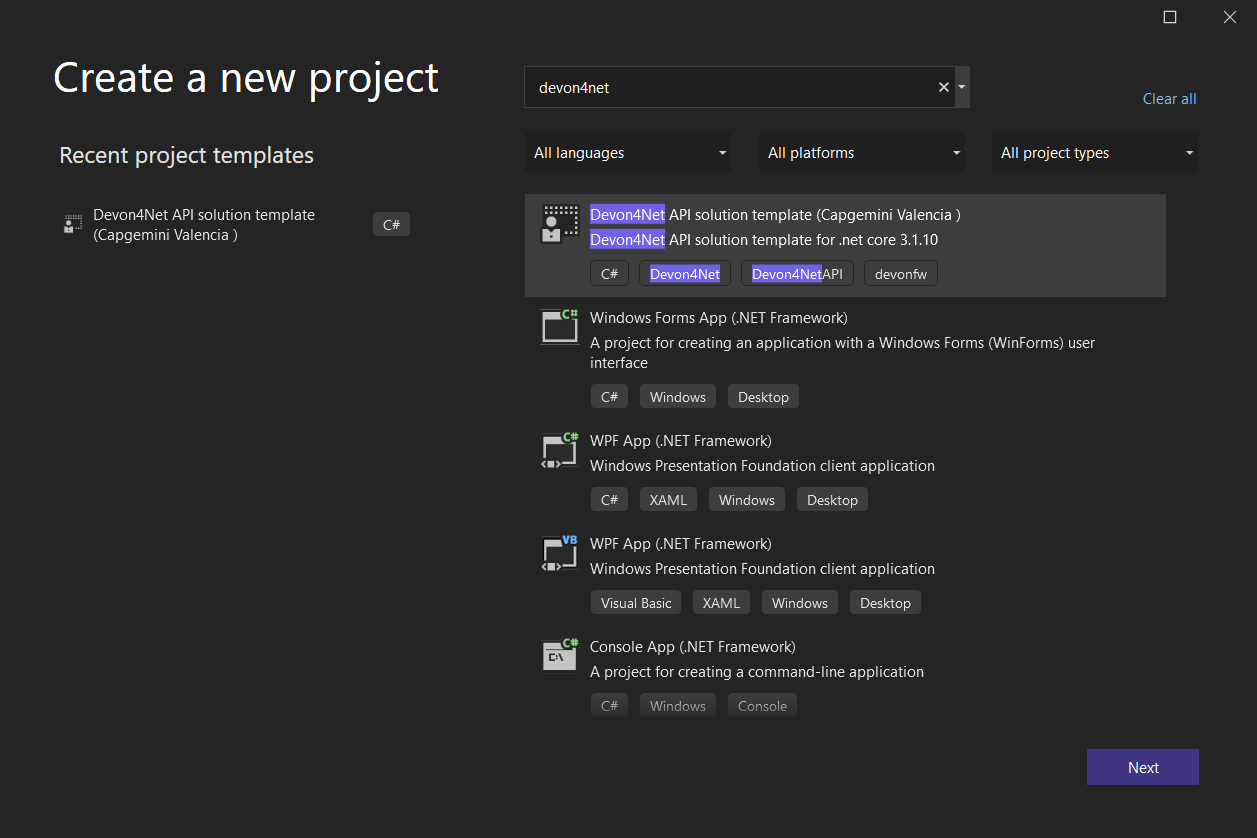
> dotnet new --install Devon4Net.WebAPI.Template::6.0.3Now you will have the template available in your Visual Studio 2022. Just type devon4net in the search bar when creating a new project!
Step 2 - Create a new project
To create a new project run the following command:
> dotnet new Devon4NetAPI
The template "Devon4Net API solution template" was created successfully.
This will create a project with the default name in the actual directory. If you want to specify the desired name and output directory you can specify the following options:
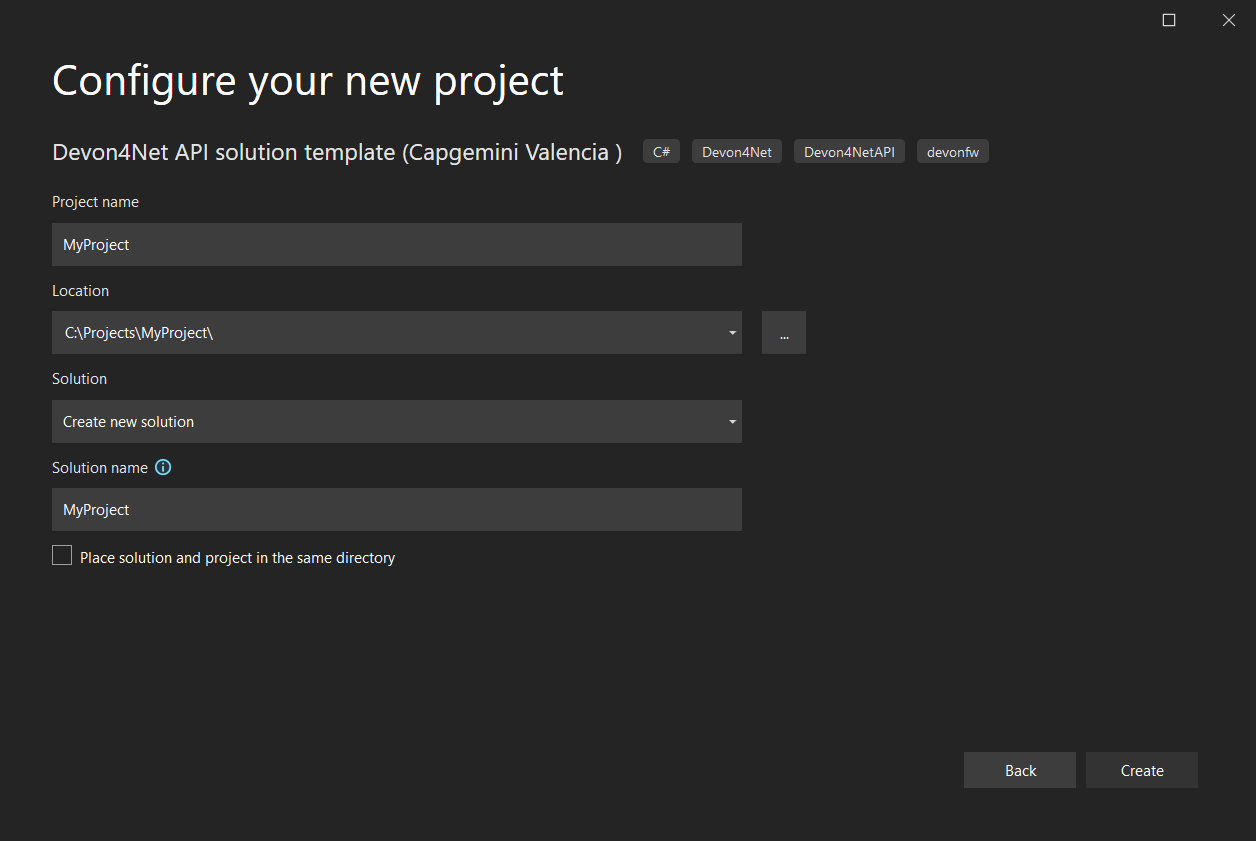
> dotnet new Devon4NetAPI --name MyProject --output C:\Projects\MyProject
The template "Devon4Net API solution template" was created successfully.
You can do it also choosing the template when creating a new project in Visual Studio 2022 as shown in figure 1, and configuring the name and output directory as shown in figure 2.
Step 3 - Run it
After running it with Kestrel you will be able to access to the swagger index.html and try the API in the following xref:devonfw-guide/devon4net.wiki_ https://localhost:8085/swagger/index.html
Create it from scratch in Visual Studio 2022
This method is a little more time consuming, but it allows for a more customized configuration and project structure. You will be using Visual Studio 2022 to create the project and add everything you need by hand.
Step 1 - Create a new project
Create a new ASP.NET Core Web API project using the template provided by Visual Studio. You can type api in the search bar and select it as shown in figure 3.

Once you go through all the initial configuration process, choosing a name, location and so on; you will find your project as shown in the next image.
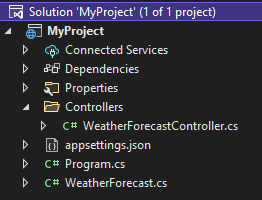
You can delete both WeatherForecastController.cs and WeatherForecast.cs as they are an example in the template but we recommend you keeping them so you can try the API when done with all the steps.
Step 2 - Add the NuGet reference
To install the NuGet package for the API Configuration we will use the Visual Studio package manager console. To open it, go to View > Other Windows > Package Manager Console as shown in the figure below.
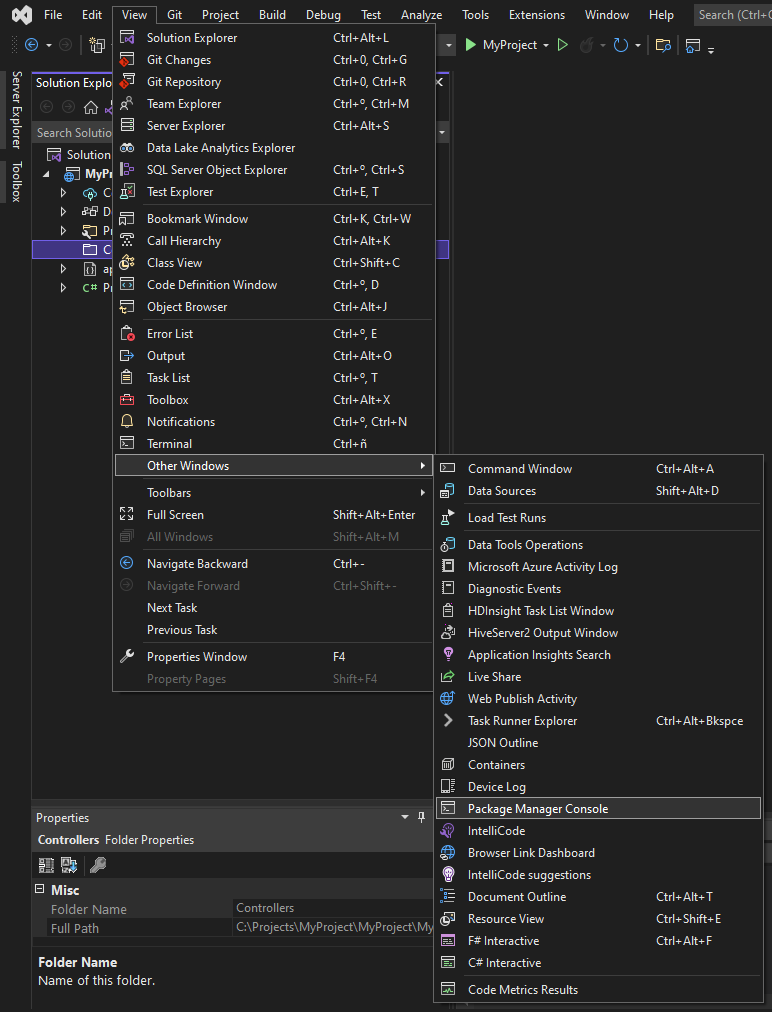
Now you can run the following command. It will take a minute to download and install all the packages:
PM> install-package Devon4Net.Infrastructure.WebAPIOnce its done, you should be able to see the dependency in the Package Dependencies of the project.
Step 3 - Set up your project
Now you will need to add some configuration in the Program.cs. The following lines will initialize the configuration for the WebHostBuilder and configure the components that were imported with the NuGet installation respectively, making use of extensions methods for the ServiceCollection and WebHostBuilder classes:
builder.WebHost.InitializeDevonFw();
builder.Services.ConfigureDevonFw(builder.Configuration);
Now you’ll need to configure the middlewares included with the following line:
app.SetupMiddleware(builder.Services);|
Note
|
Don’t forget to import the package to be able to use this methods! |
It is not necessary, but we recommend to also setup the logger so you can keep track of the trace running:
builder.Services.SetupLog(builder.Configuration);The Program.cs will end up looking like this:
using Devon4Net.Application.WebAPI.Configuration;
using Devon4Net.Application.WebAPI.Configuration.Application;
using Devon4Net.Infrastructure.Middleware.Middleware;

var builder = WebApplication.CreateBuilder(args);

builder.Services.AddControllers();

// devon4net
builder.WebHost.InitializeDevonFw();
builder.Services.SetupLog(builder.Configuration);
builder.Services.SetupDevonfw(builder.Configuration);

var app = builder.Build();
app.UseHttpsRedirection();

// devon4net
app.SetupMiddleware(builder.Services);

app.UseAuthorization();

app.MapControllers();

app.Run();
Step 4 - Configure components
The lines added on the previous step will need some configuration in the appsettings.json:
{
  "devonfw": {
    "UseDetailedErrorsKey": true,
    "UseIIS": false,
    "UseSwagger": true,
    "UseXsrf": true,
    "UseModelStateValidation": true,
    "Environment": "Development",
    "ForceUseHttpsRedirection": false,
    "Kestrel": {
      "UseHttps": true,
      "HttpProtocol": "Http1AndHttp2", //Http1, Http2, Http1AndHttp2, none
      "ApplicationPort": 8085,
      "SslProtocol": "Tls12", //Tls12, Tls13, none. For Https2 Tls12 is needed
      "ExtraSettings": {
        "KeepAliveTimeout": 120, //in seconds
        "MaxConcurrentConnections": 100,
        "MaxConcurrentUpgradedConnections": 100,
        "MaxRequestBodySize": 28.6, //In MB. The default maximum request body size is 30,000,000 bytes, which is approximately 28.6 MB
        "Http2MaxStreamsPerConnection": 100,
        "Http2InitialConnectionWindowSize": 131072, // From 65,535 and less than 2^31 (2,147,483,648)
        "Http2InitialStreamWindowSize": 98304, // From 65,535 and less than 2^31 (2,147,483,648)
        "AllowSynchronousIO": true
      }
    },
    "IIS": {
      "ForwardClientCertificate": true,
      "AutomaticAuthentication": true,
      "AuthenticationDisplayName": ""
    }
  }
}
And also in the appsettings.Development.json:
{
  "ExtraSettingsFiles": [
    "appsettingsExtra.json",
    "Directory path",
    "Specific file name"
  ],
  "KillSwitch": {
    "UseKillSwitch": false,
    "EnableRequests": false,
    "HttpStatusCode": 403
  },
  "ConnectionStrings": {
    "Default": "Todos",
    "Employee": "Employee",
    "RabbitMqBackup": "Add your database connection string here for messaging backup",
    "MediatRBackup": "Add your databascere connection string here for messaging backup"
  },
  "Certificates": {
    "ServerCertificate": {
      "Certificate": "",
      "CertificatePassword": ""
    },
    "ClientCertificate": {
      "DisableClientCertificateCheck": true,
      "RequireClientCertificate": false,
      "CheckCertificateRevocation": true,
      "ClientCertificates": {
        "Whitelist": [
          "3A87A49460E8FE0E2A198E63D408DC58435BC501"
        ]
      }
    }
  },
  "Headers": {
    "AccessControlExposeHeader": "Authorization",
    "StrictTransportSecurityHeader": "",
    "XFrameOptionsHeader": "DENY",
    "XssProtectionHeader": "1;mode=block",
    "XContentTypeOptionsHeader": "nosniff",
    "ContentSecurityPolicyHeader": "",
    "PermittedCrossDomainPoliciesHeader": "",
    "ReferrerPolicyHeader": ""
  },
  "Cors": []
}
Unable to start devon4net template on macOS or older Windows Versions
If you try to execute the devon4net template on macOS or an earlier version of Windows, such as Windows 7, you will receive the following error message:
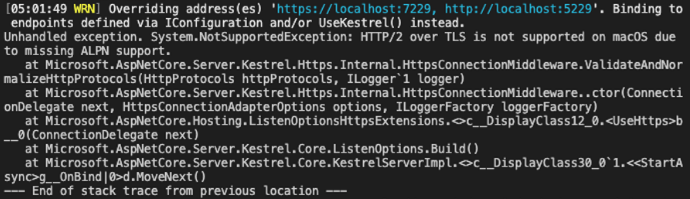
Because these operating systems lack ALPN(Application-Layer Protocol Negotiation) functionality, Kestrel does not handle HTTP/2 with TLS.
To resolve this, navigate to 'appsettings.json' and change the Kestrel configuration as seen below:
{
  "devonfw": {
    "UseDetailedErrorsKey": true,
    "UseIIS": false,
    "UseSwagger": true,
    "UseXsrf": true,
    "UseModelStateValidation": true,
    "Environment": "Development",
    "ForceUseHttpsRedirection": false,
    "Kestrel": {
      "UseHttps": true,
      "HttpProtocol": "Http1AndHttp2", //Http1, Http2, Http1AndHttp2, none
      "ApplicationPort": 8085,
      "SslProtocol": "none", //Tls12, Tls13, none. For Https2 Tls12 is needed
      "ExtraSettings": {
        "KeepAliveTimeout": 120, //in seconds
        "MaxConcurrentConnections": 100,
        "MaxConcurrentUpgradedConnections": 100,
        "MaxRequestBodySize": 28.6, //In MB. The default maximum request body size is 30,000,000 bytes, which is approximately 28.6 MB
        "Http2MaxStreamsPerConnection": 100,
        "Http2InitialConnectionWindowSize": 131072, // From 65,535 and less than 2^31 (2,147,483,648)
        "Http2InitialStreamWindowSize": 98304, // From 65,535 and less than 2^31 (2,147,483,648)
        "AllowSynchronousIO": true
      }
    },
    "IIS": {
      "ForwardClientCertificate": true,
      "AutomaticAuthentication": true,
      "AuthenticationDisplayName": ""
    }
  }
}|
Warning
|
HTTP/2 without TLS should only be used during app development. Production apps should always use transport security. |
References
Here are some interesting references to continue learning about this topic:
How to: Create and add certificates to a project
In this part, you will learn how to easily create a new certificate and properly add it to your devon4net project.
Create a certificate using OpenSSL
In order to create our own certificate for development purposes we will be using OpenSSL toolkit. To ensure correct behavior, make sure the tool is properly installed.
|
Note
|
Please refer to the OpenSSL command documentation to learn more about the commands used in this guide and how to install the toolkit. |
To run commands for OpenSSL, you will need to add OpenSSL to your environment, variables, or open a OpenSSL command prompt.
|
Note
|
The working directory (directory where all files are created and readed) is the console actual path. Use cd command to go to your desired directory.
|
Step 1 - Create a Certificate Authority (CA)
First we will need to create a Certificate Authority to sign the certificate. For that, we will run the following command which will create the certificate RootCA.pem and the corresponding private key RootCA.key.
> openssl req -x509 -nodes -new -sha256 -days 1024 -newkey rsa:2048 -keyout RootCA.key -out RootCA.pem -subj "/C=ES/ST=Valencia/L=Valencia/O=Certificates/CN=MyProjectCertificate.local"Now we will create the public key RootCA.crt for the certificate by running the following command:
> openssl x509 -outform pem -in RootCA.pem -out RootCA.crtIf you want to export the certificate you can run the command:
> openssl pkcs12 -export -out RootCA.pfx -inkey RootCA.key -in RootCA.crtStep 2 - Create a Certificate signed by the CA
To create a new certificate run the following command:
> openssl req -new -nodes -newkey rsa:2048 -keyout localhost.key -out localhost.csr -subj "/C=ES/ST=Valencia/L=Valencia/O=Certificates/CN=localhost.local"Before signing it, create a domains.ext that contains the following:
authorityKeyIdentifier=keyid,issuer
basicConstraints=CA:FALSE
keyUsage = digitalSignature, nonRepudiation, keyEncipherment, dataEncipherment
subjectAltName = @alt_names
[alt_names]
DNS.1 = localhost
DNS.2 = localhost.local
DNS.3 = 127.0.0.1
DNS.4 = fake1.local
DNS.5 = fake2.local
Once the files are created, you’ll need to sign the certificate with the CA we created earlier:
> openssl x509 -req -sha256 -days 1024 -in localhost.csr -CA RootCA.pem -CAkey RootCA.key -CAcreateserial -extfile domains.ext -out localhost.crtRun the next command to export the certificate:
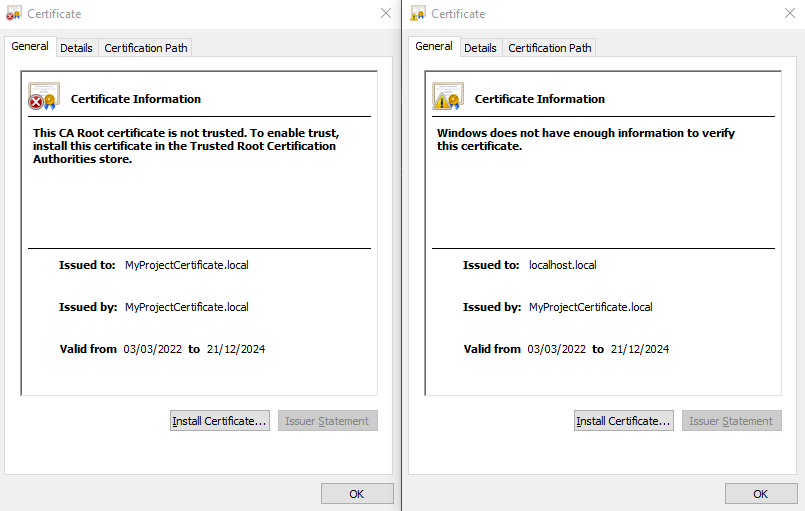
> openssl pkcs12 -export -out localhost.pfx -inkey localhost.key -in localhost.crtYou will end up having something like this:
Add certificates to a devon4net project
Once you have created a certificate or in case you already have yours, you can add it to your project thanks to devon4net tools.
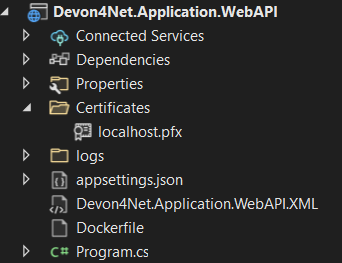
Step 1 - Add it to your project
Locate the Certificates directory in your startup project. If it doesn’t exist, please create it and drop your certificate .pfx as shown in figure 2.
Step 2 - Configure your appsettings
Now configure your certificate in appsettings.Development.json. For that, you’ll need to specify the file name and the password you chose. Look for the ServerCertificate configuration and add something like this:
"Certificates": {
    "ServerCertificate": {
        "Certificate": "localhost.pfx",
        "CertificatePassword": "12345"
    },
    "ClientCertificate": {
        "DisableClientCertificateCheck": true,
        "RequireClientCertificate": false,
        "CheckCertificateRevocation": true,
        "ClientCertificates": {
        "Whitelist": [
            "3A87A49460E8FE0E2A198E63D408DC58435BC501"
            ]
        }
    }
},
References
Here are some interesting references to continue learning about this topic:
How to: Setup JWT
As you may have learned at this point you can set up JWT component in a number of different ways according your needs. For that you’ll need to configure your appsettings.json.
|
Note
|
Please read documentation about JWT component first to learn what you need to do to use it in your project. |
Assuming that you already have the JWT component correctly installed and available in our project let’s start thinking about how we can put it to good use.
Configuration
We can configure it to work either with a secret key or a certificate.
If you choose certificate, you will need to add a certificate to your project, and specify the password and the encryptionAlgorithm used. You can learn how to do it following the tutorial included in this document.
If you specify both, the secret key will take priority.
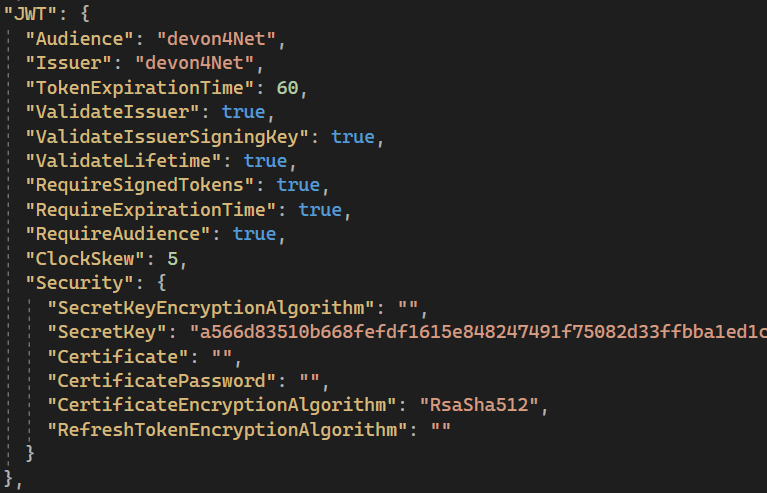
For example lets specify the next:
|
Note
|
The property SecretKey needs to be an encrypted key using the algorithm specified.
|
This would create the following configuration:
-
A token with audience and issuer equal to
devon4net. -
It will expire in 60 minutes
-
It will validate the signature and if the token is valid in time
-
It will require tokens that are signed, and have both expiration time and audience specified.
-
It will use the secret key encrypted with SHA 512
Claims
Json Web Tokens work with claims. A Claim is a piece of information about a subject. It is similar to a key-value pair, where the value will be the claim type, such as the name or the role of an authenticated user. This claims are stored inside a JSON and then encrypted forming the JWT.
In .Net we can create Claims using the Claim class avaiable in System.Security.Claims. It has many constructors but the most important is the following one, where you can create a Claim based on two strings.
var nameClaim = new Claim(ClaimType.Name, "DevonUser");
var roleClaim = new Claim(ClaimType.Role, "Administrator");
You can choose between a variety of claim types thanks to the ClaimType class. As you can see in the previous piece of code, in this case we have asserted a name and a role in two claims. This could be for a user, for example.
JwtHandler
In JWT component we have a handler that is cofigured on the installation of the package and can be injected for use in any wanted service. This is the JwtHandler. This handler will allow us to manipulate, encrypt and extract information from Json Web Tokens.
Return Type |
Method Name |
Parameters |
Description |
string |
CreateJwtToken |
List<Claim> clientClaims |
Returns the encrypted jwt given a list of claims. |
List<Claim> |
GetUserClaims |
string jwtToken |
Returns a list of claims given an encrypted token. |
string |
GetClaimValue |
List<Claim> claimList, string claim |
Returns the value of a claim given a list of claims and the type of the claim to recover formatted as a string. |
string |
GetClaimValue |
string token, string claim |
Returns the value of a claim given an encrypted token and the type of the claim to recover formatted as a string. |
SecurityKey |
GetIssuerSigningKey |
- |
Returns the issuer’s signing key. |
bool |
ValidateToken |
string jwtToken, out ClaimsPrincipal claimsPrincipal, out SecurityToken securityToken |
Returns true if the token is valid. |
string |
CreateRefreshToken |
- |
Creates a refresh token for the JWT token. |
Video
References
Here are some interesting references to continue learning about this topic:
How to: Setup security and roles in API controllers
In this part of the document, you will learn to use the different attributes over the controller methods that manage end-points. This attributes are provided by .Net core libraries and can be used to specify the behavior of Web API controllers and action methods.
Attributtes
You can use a large number of attributes, some are optional, for example to define the route of end-points [Route("/GetSomething")] and other are required, like [ApiController] to indicate that the class is an API controller.
|
Note
|
We will be explaining the security related attributes. Those that are specific to the controllers will not be mentioned. |
This attribute identifies an API controller end-point that support the HTTP OPTIONS request. The HTTP OPTIONS method is used to get information about the communication options available for a specific URL or server.
|
Note
|
Please do your research on this method if you are not familiar with it. |
AllowAnonymous allows any type of user (authorized or unauthorized) to access the information provided by the end-point. This attribute can be specified for controller class or for individual end-points. Specifying it for individual end-points will override the controller attribute. An example could be:
[HttpGet]
[AllowAnonymous]
[Route("/v1/getsomething")]
public async Task<IActionResult> GetSomething()
{
  ...
}Authorize only enables you to restrict access to requests with an authorization specified in the header. This attribute can be specified for controller class or for individual end-points. Specifying it for individual end-points will override the controller attribute. You can specify different properties to the attribute:
Property |
Type |
Description |
Example |
|
List of strings separated by comma |
List of schemes from which user info is constructed |
|
|
String |
Policy name that determines access to the resource |
|
|
List of strings separated by comma |
List of roles allowed to access |
|
For example, lets create a controller that is authorized only for users with role 'Admin' and 'Tester' provided in 'Bearer' type authentication:
[ApiController]
[Route("[controller]")]
[Authorize(AuthenticationSchemes = "Berarer", Roles = "Admin,Tester")]
public class DebugController: ControllerBase
{
  ...
}[[devonfw-guide_devon4net.wiki_howto.asciidoc_enablecors—disablecors]]] ==== [EnableCors] & [DisableCors]
|
Note
|
Please refer to the CORS component documentation to learn everything about CORS. |
You can enable a Cors policy for controller or individual end-points. Specifying it for individual end-points will override the controller attribute. You will need to specify the policy you want to enable. This policy will need to be described in the appsettings.{environment}.json.
For example, lets create a CORS policy named 'CorsPolicy' and enable it for a controller, and disable it for a method:
"Cors": //[], //Empty array allows all origins with the policy "CorsPolicy"
[
  {
    "CorsPolicy": "CorsPolicy",
    "Origins": "http://localhost:4200,https://localhost:4200,http://localhost,https://localhost;http://localhost:8085,https://localhost:8085",
    "Headers": "accept,content-type,origin,x-custom-header,authorization",
    "Methods": "GET,POST,HEAD,PUT,DELETE",
    "AllowCredentials": true
  }
],
[ApiController]
[Route("[controller]")]
[EnableCors("CorsPolicy")]
public class MyController: ControllerBase
{
...
[HttpGet]
[Route("/v1/getsomething")]
[DisableCors]
public async Task<IActionResult> GetSomething()
{
...
}
...
}References
Here are some interesting references to continue learning about this topic:
How to: Configure and use Keycloak server
What is Keycloak?
Keycloak is an open-source tool that provides identity and access management providing highly secure properties to your application. It supports multiple protocols such as OAuth and OpenID. It has full support for SSO (Single Sign-On and Single Sign-Out) and third party Social Identity Providers such as Google, Twitter, Facebook…
You can also connect it to some type of user database if you already have one for your client. This allows you to interconnect multiple applications through same users and data.
One of the most interesting features is the GUI available through and end-point that allows you to configure and manage your Keycloak settings and properties.
Long story short, Keycloak is a server that manages all your user related interactions, such as roles, groups, access tokens… so you can focus in developing your application and don’t have to reinvent the wheel.
Docker Image
For this example we will be running the Keycloak docker image and exposing it in a local port.
|
Note
|
Please make sure you have Docker installed in your machine before running the command. |
To start the Keycloak Server run the following command:
docker run -p 8080:8080 -e KEYCLOAK_ADMIN=admin -e KEYCLOAK_ADMIN_PASSWORD=admin quay.io/keycloak/keycloak:18.0.1 start-dev|
Warning
|
This whole guide is meant to be used with the Keycloak Server version 18.0.1. It may not work in the same way in future versions.
|
This will start the keycloak server in a docker image. It will be availabe in your localhost port 8080. As you can also see by the command, it will create an initial admin user with username admin and password admin. You can sign in navigating to the address localhost:8080 and using this initial credentials.
Realms
In Keycloak, a realm is the same as an environment. It enables the creation of exclusive groups of users and applications. In Keycloak, there is just one realm by default, named master. This is for managing Keycloak only, therefore don’t use it for your own programs.
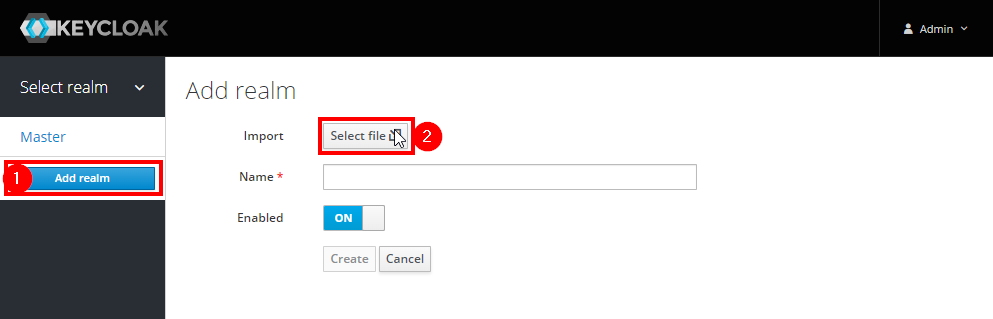
To create a realm you can hover the small arrow where it says Master in the dashboard and click on Add realm.
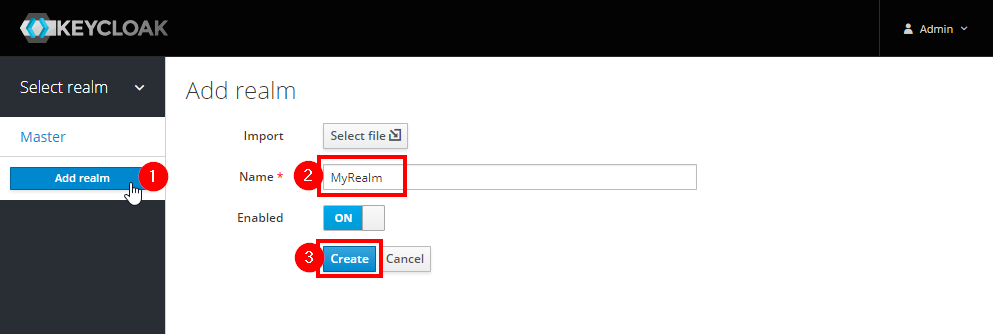
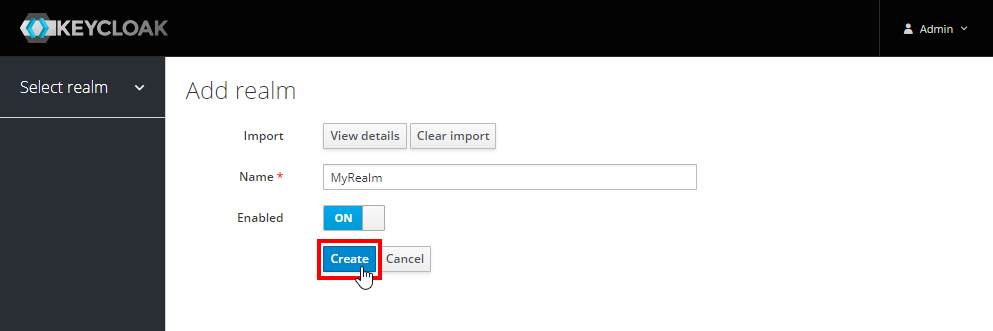
Choose a name, for this example we will name it MyRealm, and then click Create.
Now when your realm is selected, you will be able to configure it through the Realm Settings tab in the left side menu.
|
Note
|
Please visit the Keycloak documentation to learn more about how you can configure it and what options do you have. |
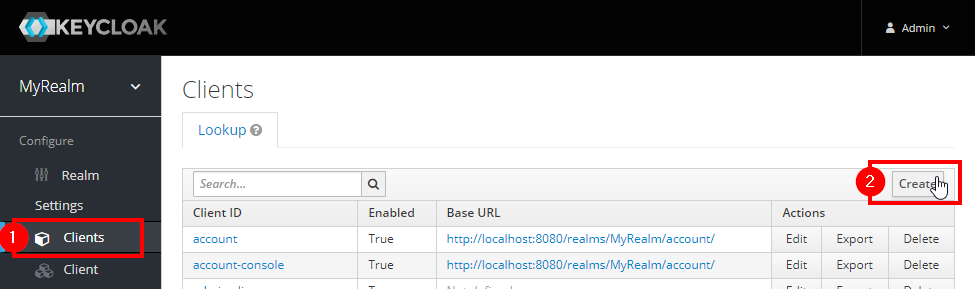
Clients
A client, in Keycloak is equivalent to an application. You can add multiple applications and all can use the same users, groups, roles…
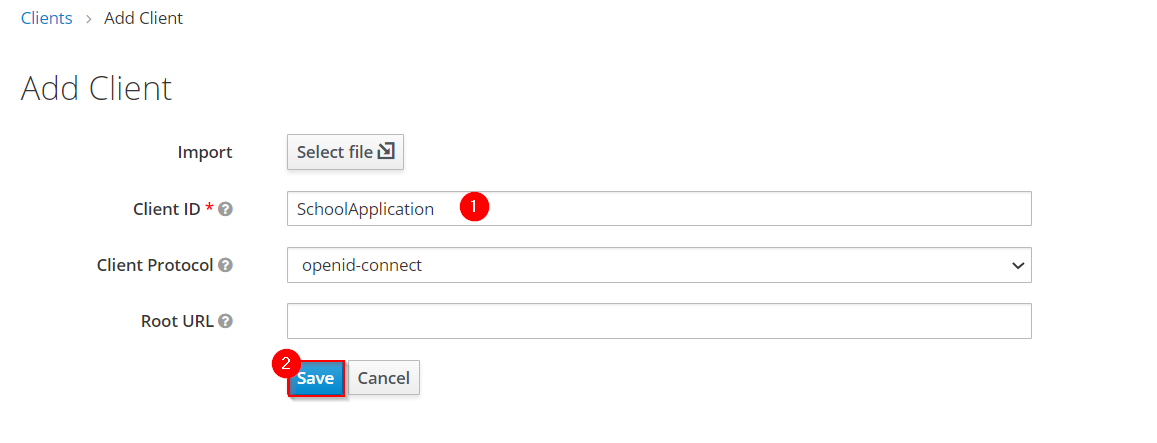
Now fill the form choosing at least a required client id. You can also select the protocol you will be using:
-
OpenID connectallows Clients to verify the identity of the End-User based on the authentication performed by an Authorization Server. -
SAMLenables web-based authentication and authorization scenarios including cross-domain single sign-on (SSO) and uses security tokens containing assertions to pass information.
Users
To create a new user follow the next steps:
-
Log into the Keycloak admin console
-
Select the Realm in which you want to create users:
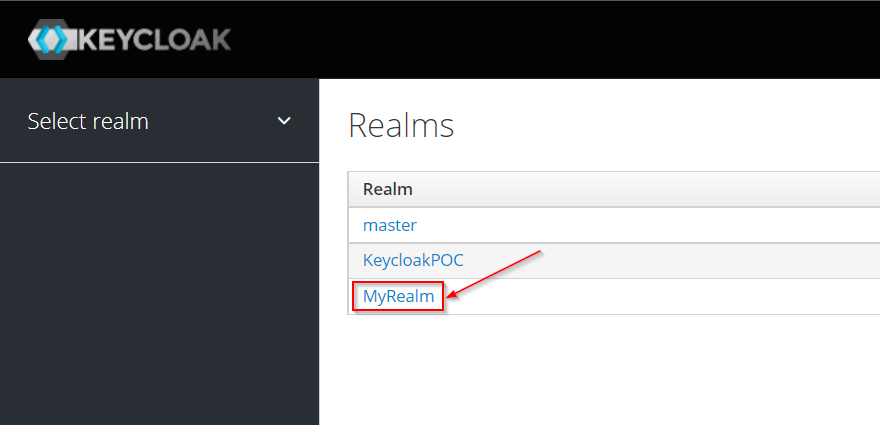 Figure 29. Keycloak administrator console
 -
Navigate to the Users section (1) in the left-side bar, then the Add user button (2):
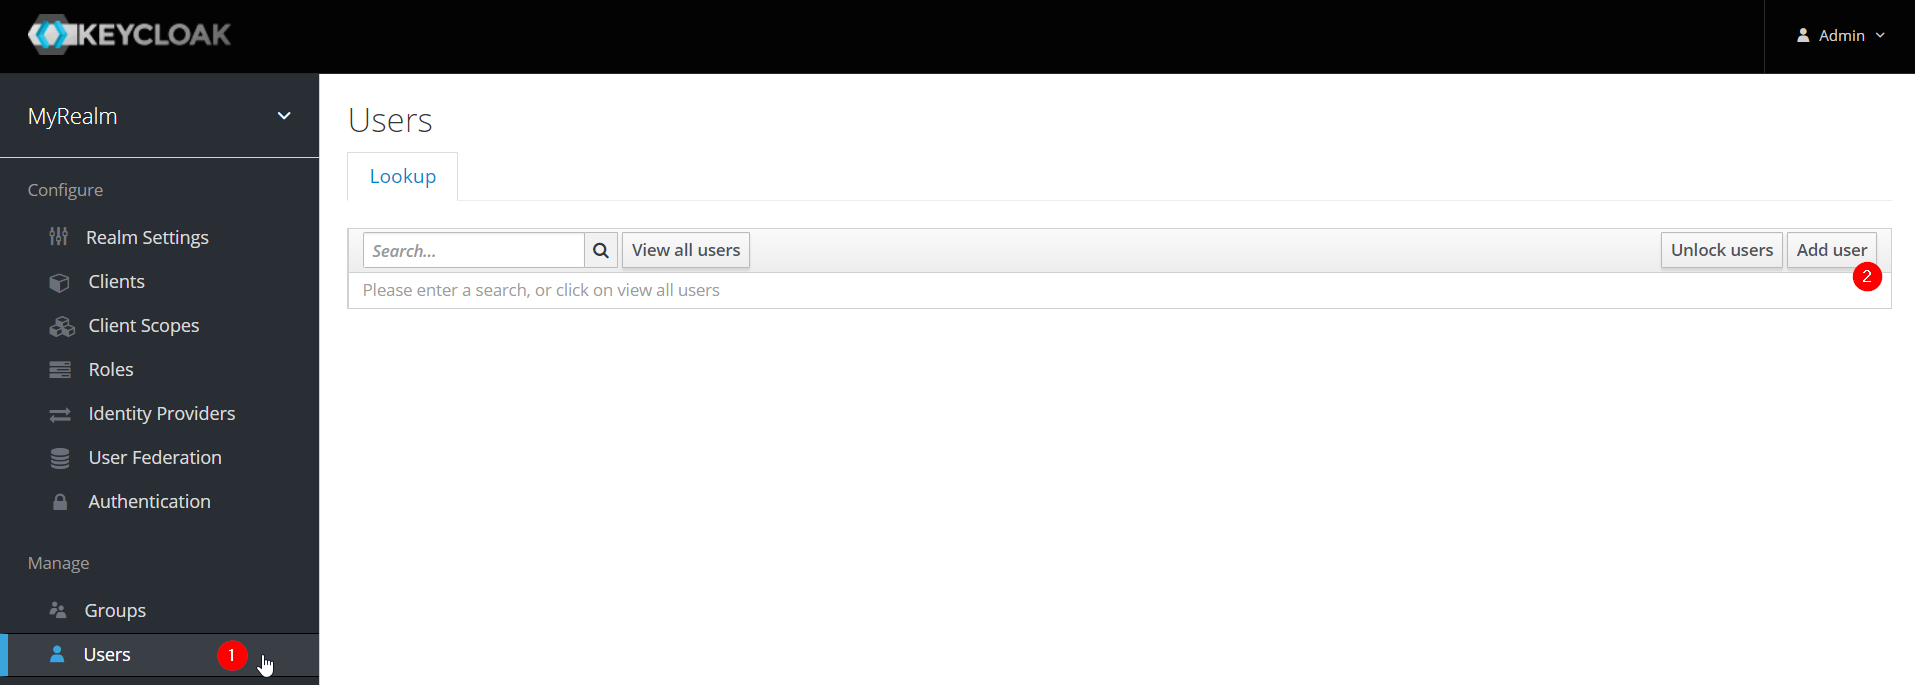 Figure 30. Add a user in Keycloak
 -
Complete the fields (1) and click the Save button (2):
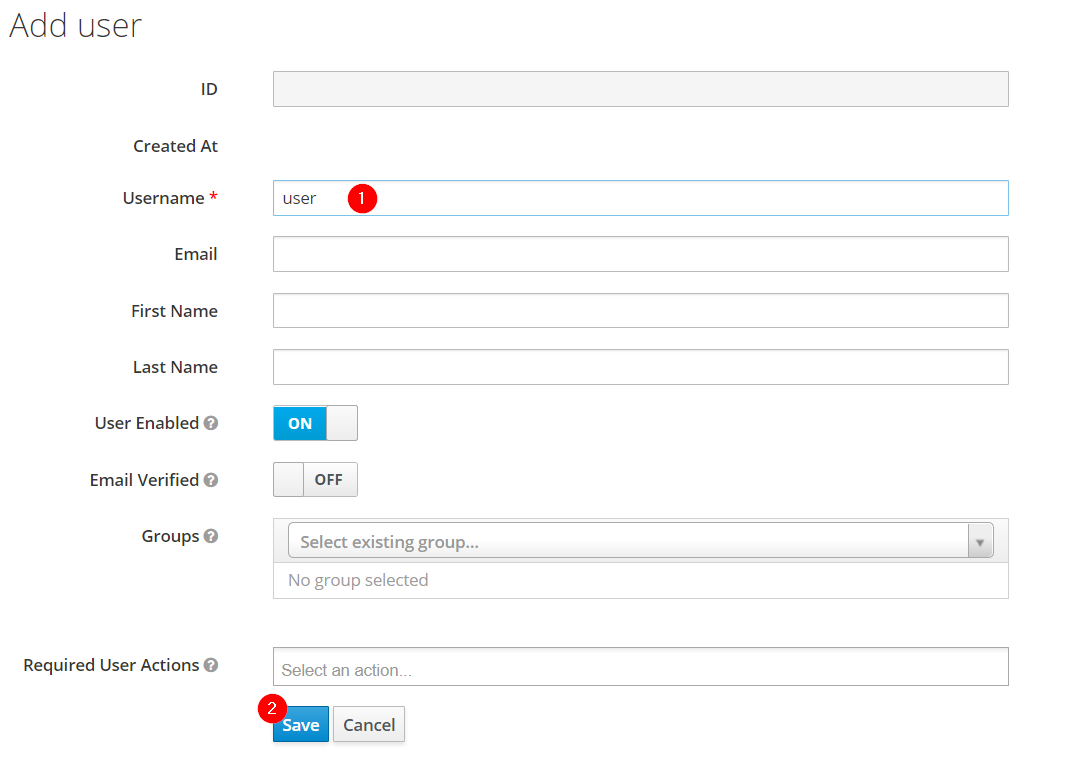 Figure 31. Add a user in Keycloak
-
The only required field is the username.
-
The required user actions field refers to some action that the user must perform upon first logging in.
-
-
Set a password for the user:
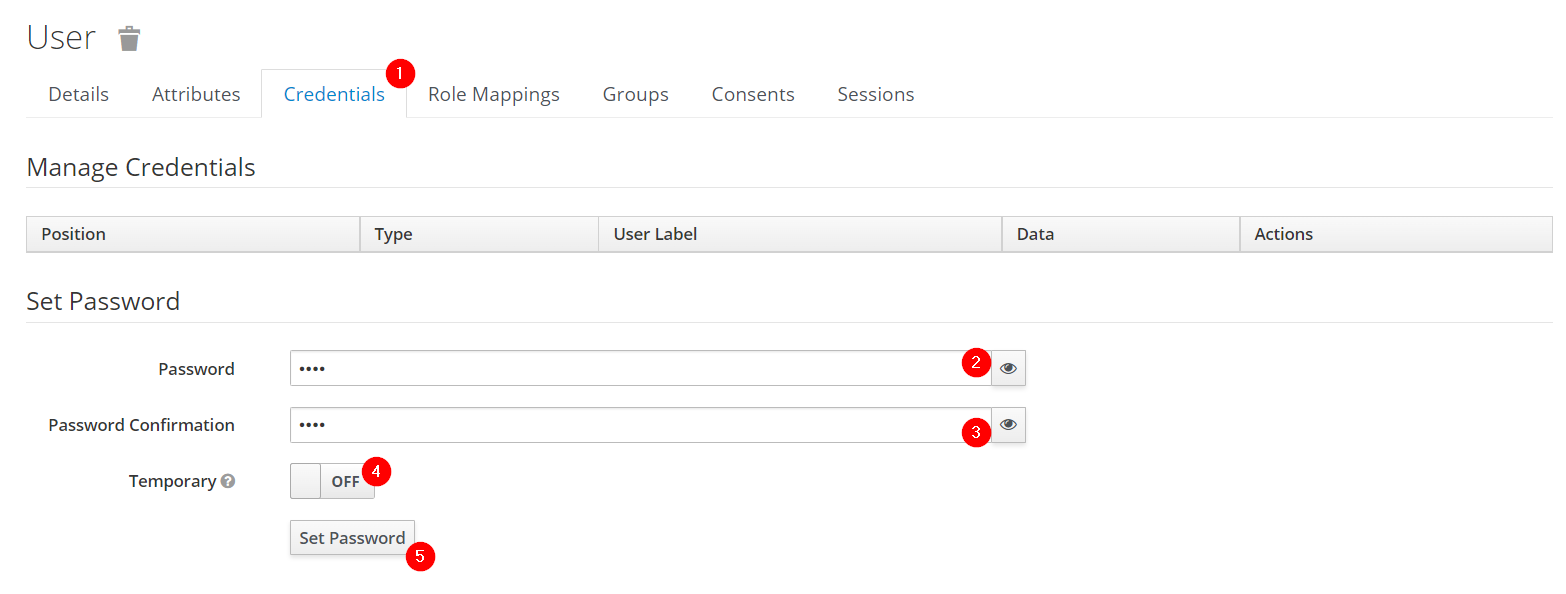 Figure 32. Set credentials to a user in Keycloak
-
Navigate to the Credentials tab (1).
-
Enter a password (2).
-
Confirm the password (3).
-
(Optional) Change the switch to on if you want the user to change their password after the first login (4).
-
Click the Set Password button to confirm the changes (5).
-
Groups
Groups in Keycloak allow you to manage a common set of attributes and role mappings for a set of users. Let’s create a new group and add some users inside:
-
Click the Groups section (1) in the left-side bar, then the New button (2):
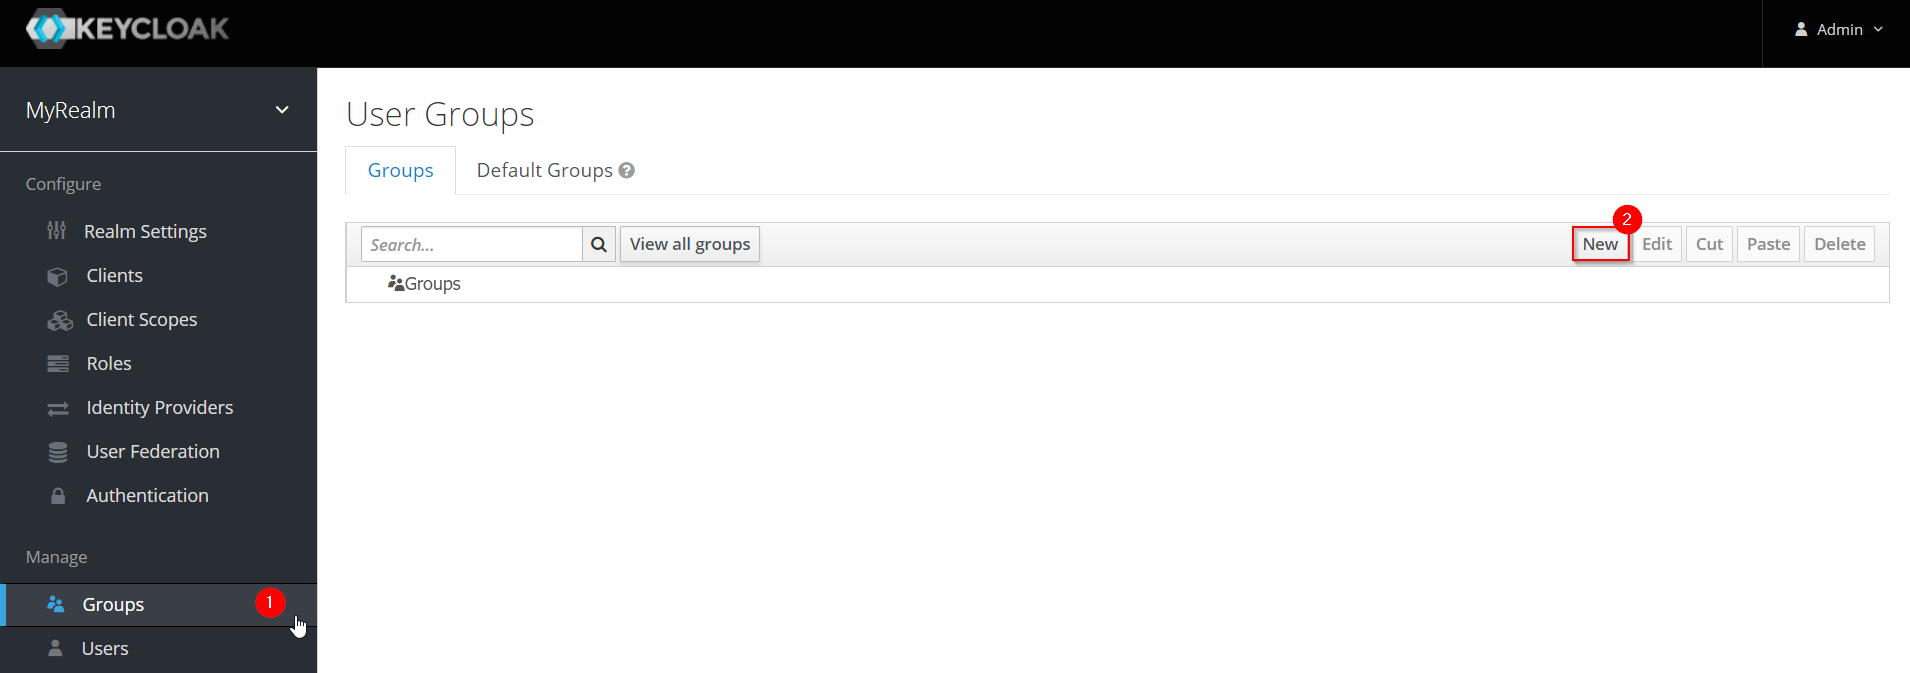 Figure 33. Create a group in Keycloak
 -
Insert the name of the group and then click the Save button:
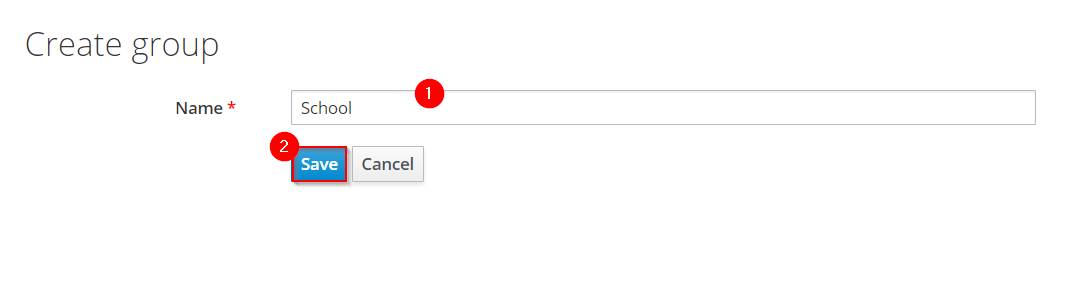 Figure 34. Create a group in Keycloak
 -
Groups are hierarchical. A group can have many subgroups, but a group can only have one parent. Subgroups inherit the attributes and role mappings from the parent. This applies to the user as well. By clicking in a group (1) and then clicking the New button (2), you can create a subgroup.
 Figure 35. Create a subgroup in Keycloak
For example, you could have something like this:
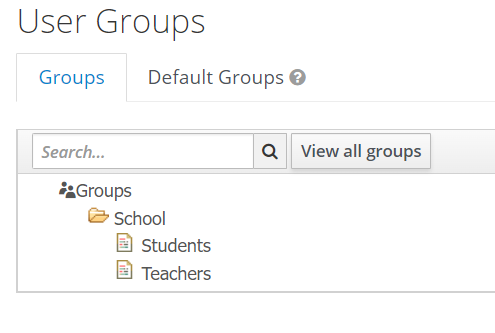 Figure 36. Create a group in Keycloak
 -
Add users to the groups:
-
Navigate to the Users section (1) in the left-side bar, then select the user you want to add to a group and click on the Edit button (2):
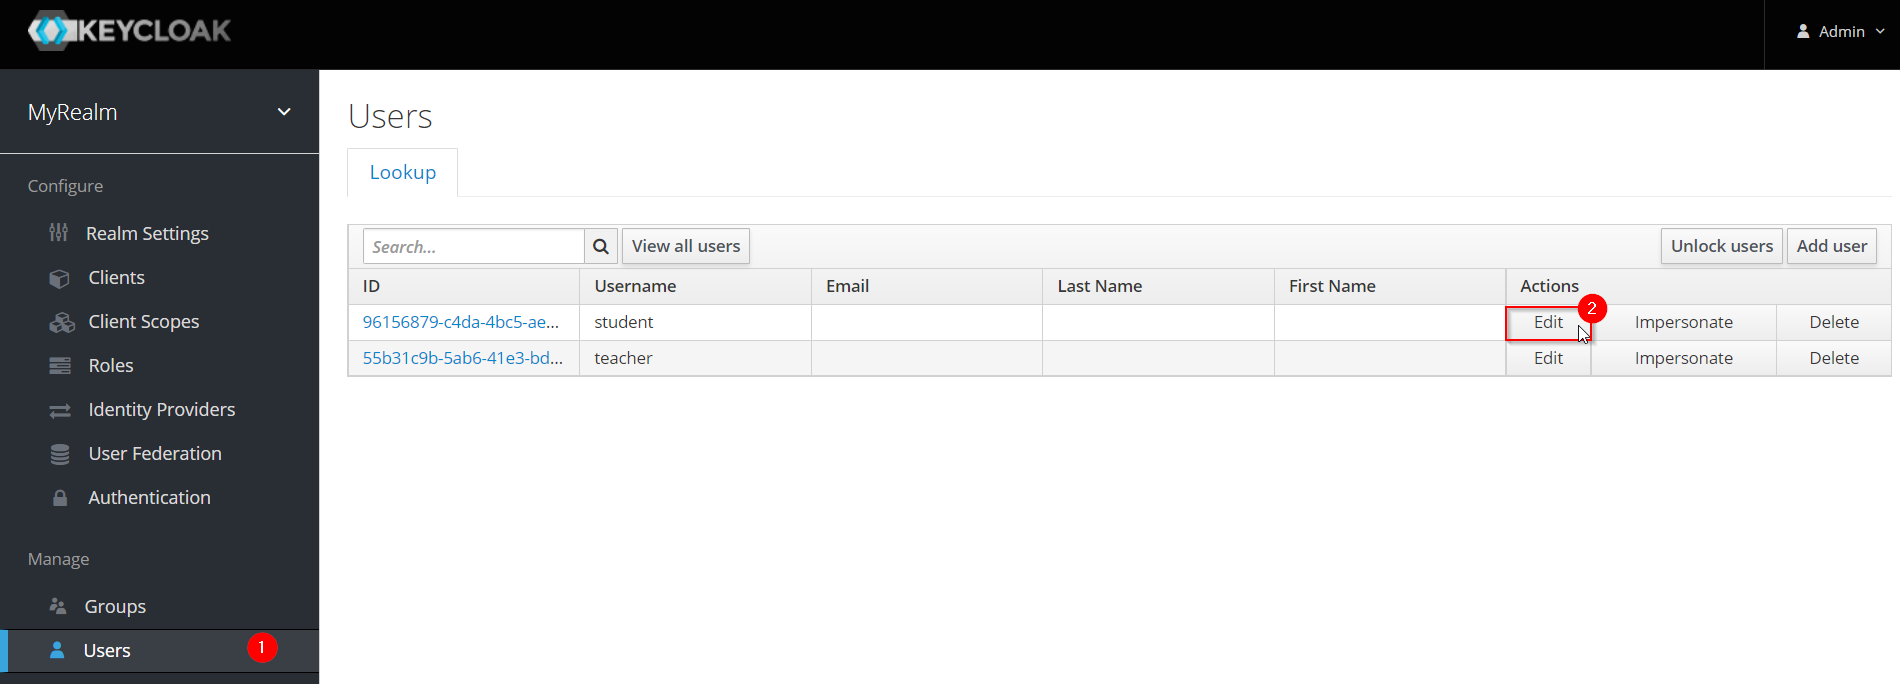 Figure 37. Add users to a group in Keycloak
 -
Click the Groups tab (1), select the group in which the user should be added (2), and then click the Join button (3):
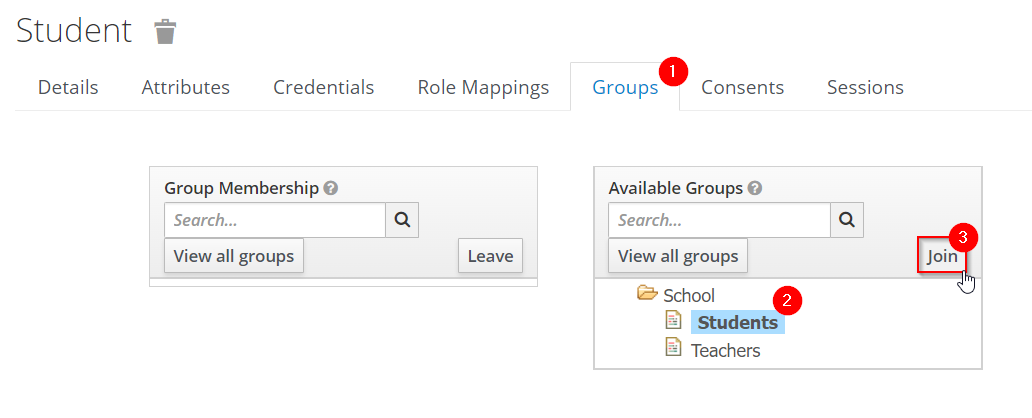 Figure 38. Add users to a group in Keycloak
 -
You will see something like this:
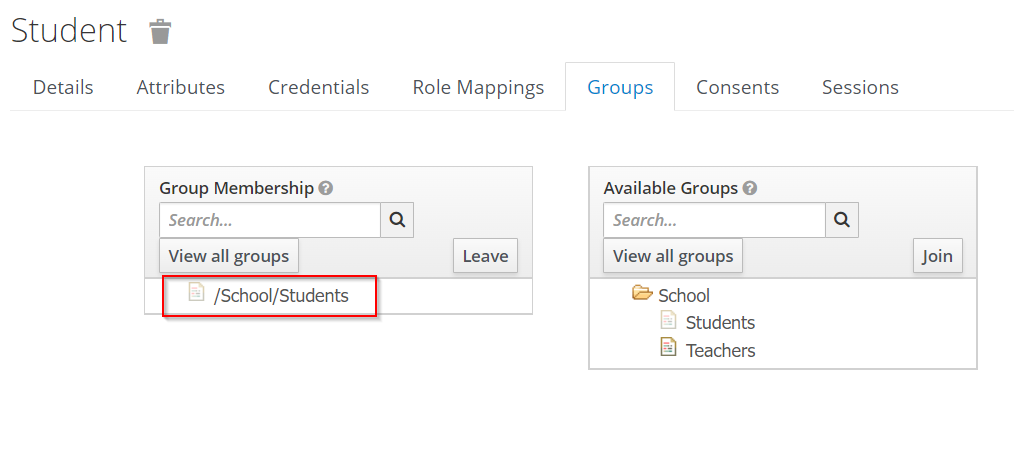 Figure 39. Add users to a group in Keycloak
-
Roles
Realm Roles
Realm-level roles are a global namespace to define your roles. To add a new Real Role you have to:
-
Navigate to the Roles section in the left-side bar (1), and click the Add Roles button (2):
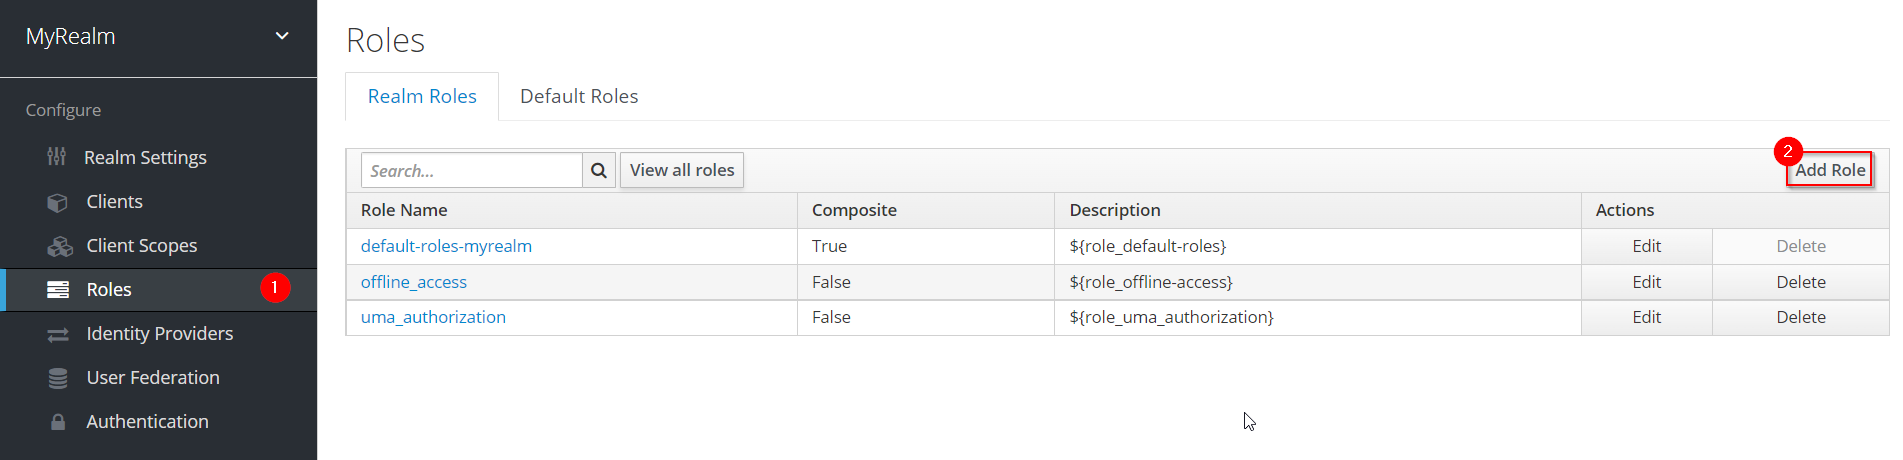 Figure 40. Create a new Realm Role in Keycloak
 -
Input a role name and click the Save button:
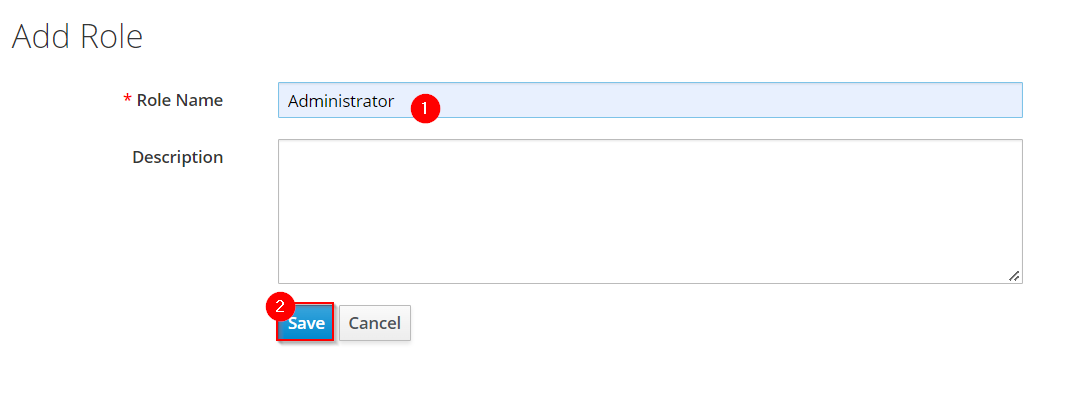 Figure 41. Create a new Realm Role in Keycloak
-
The description field is not required
-
-
Now you may add users to that role as follows:
-
Navigate to the Users section (1) and select the Edit button (2) for the user to whom you want to assign the role:
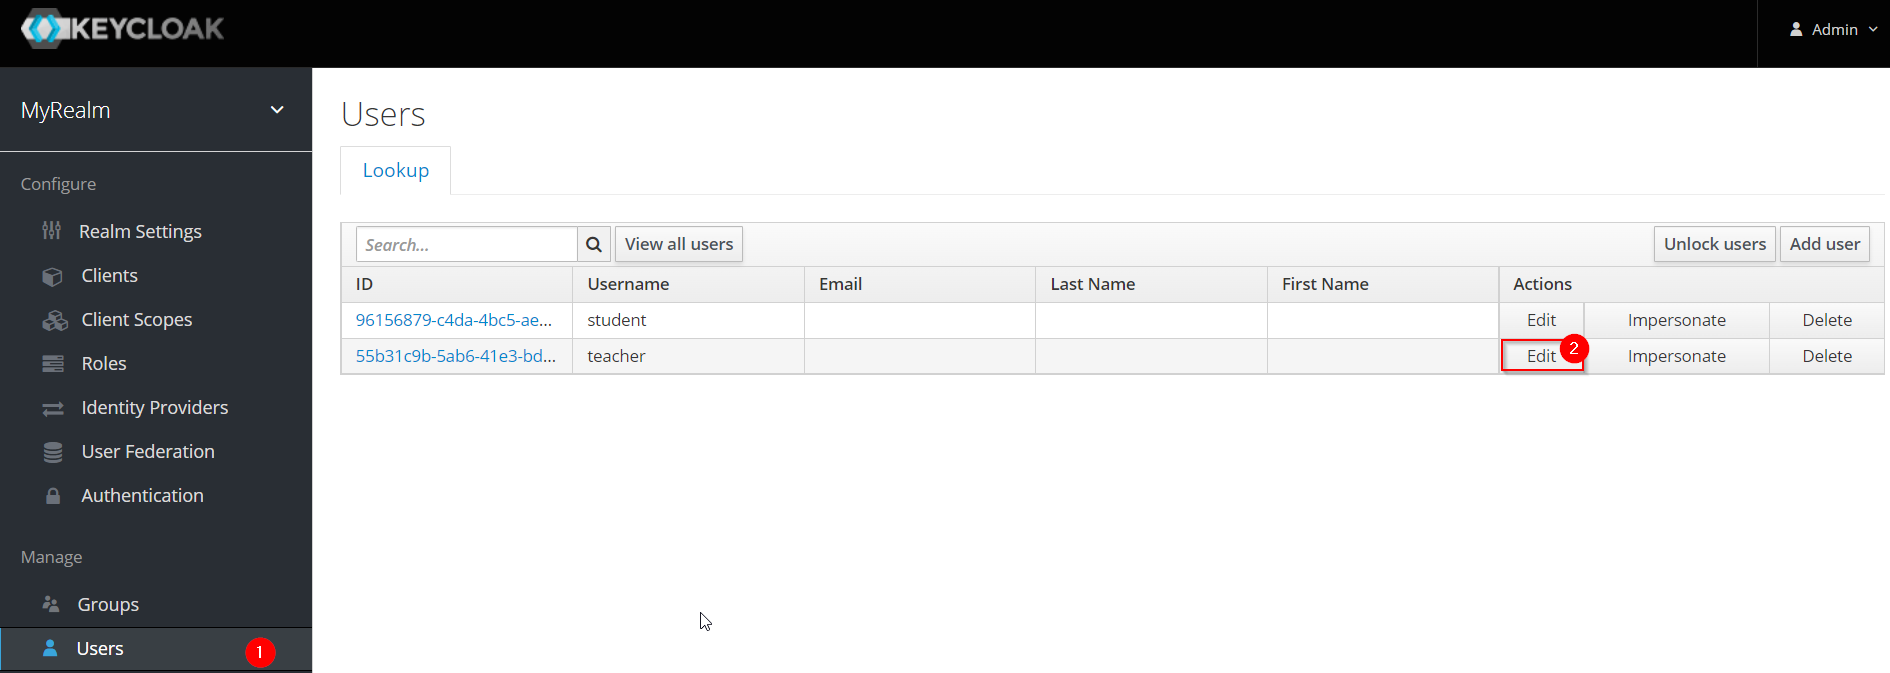 Figure 42. adding a Realm Role to a user in Keycloak
 -
Select the Role Mappings tab (1), select the Role you want to assign (2) and then click the Add selected button (3):
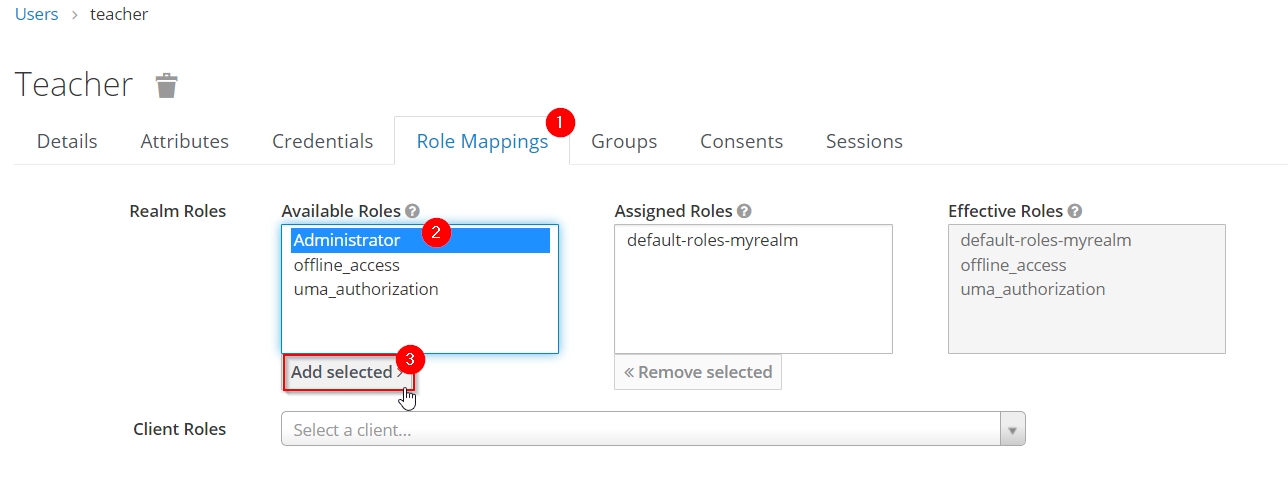 Figure 43. adding a Realm Role to a user in Keycloak
-
Client Roles
Client roles are basically a namespace dedicated to a client. Each client gets its own namespace. Client roles are managed under the Roles tab under each individual client:
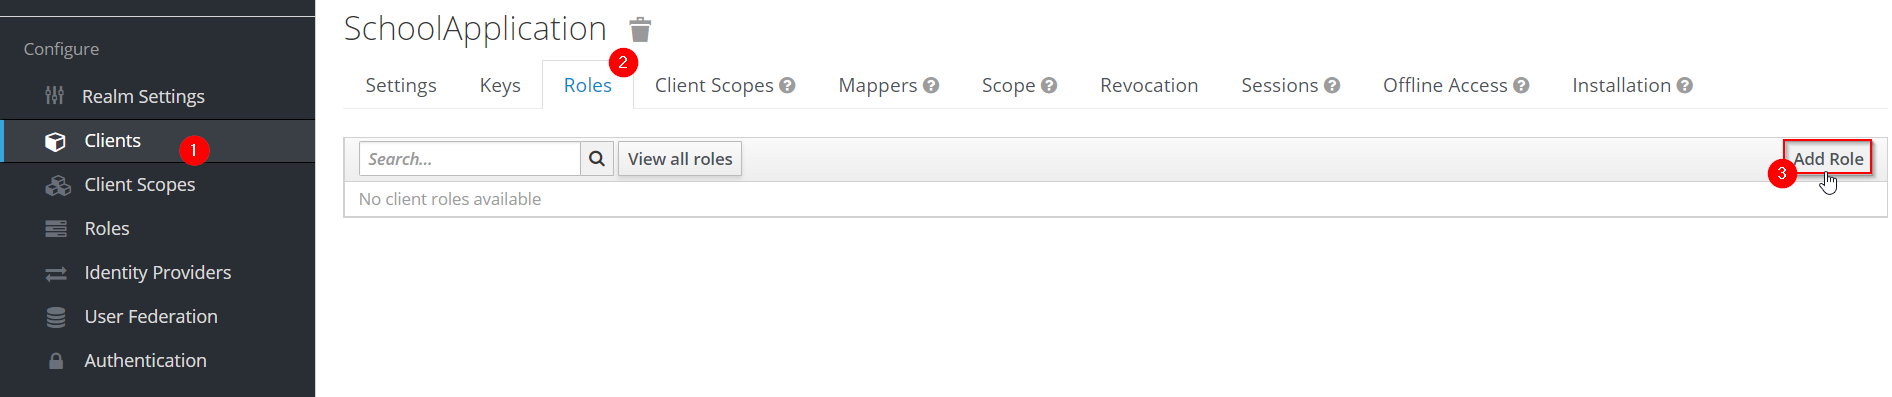
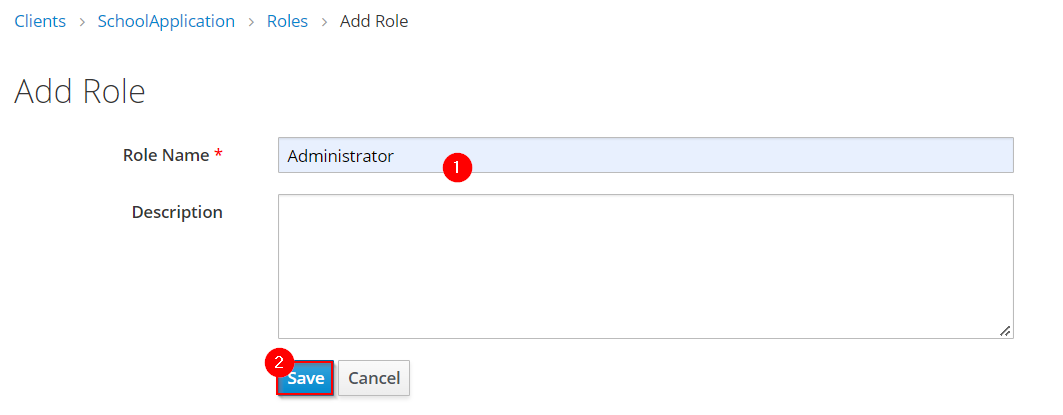
Input a role name and click the Save button:
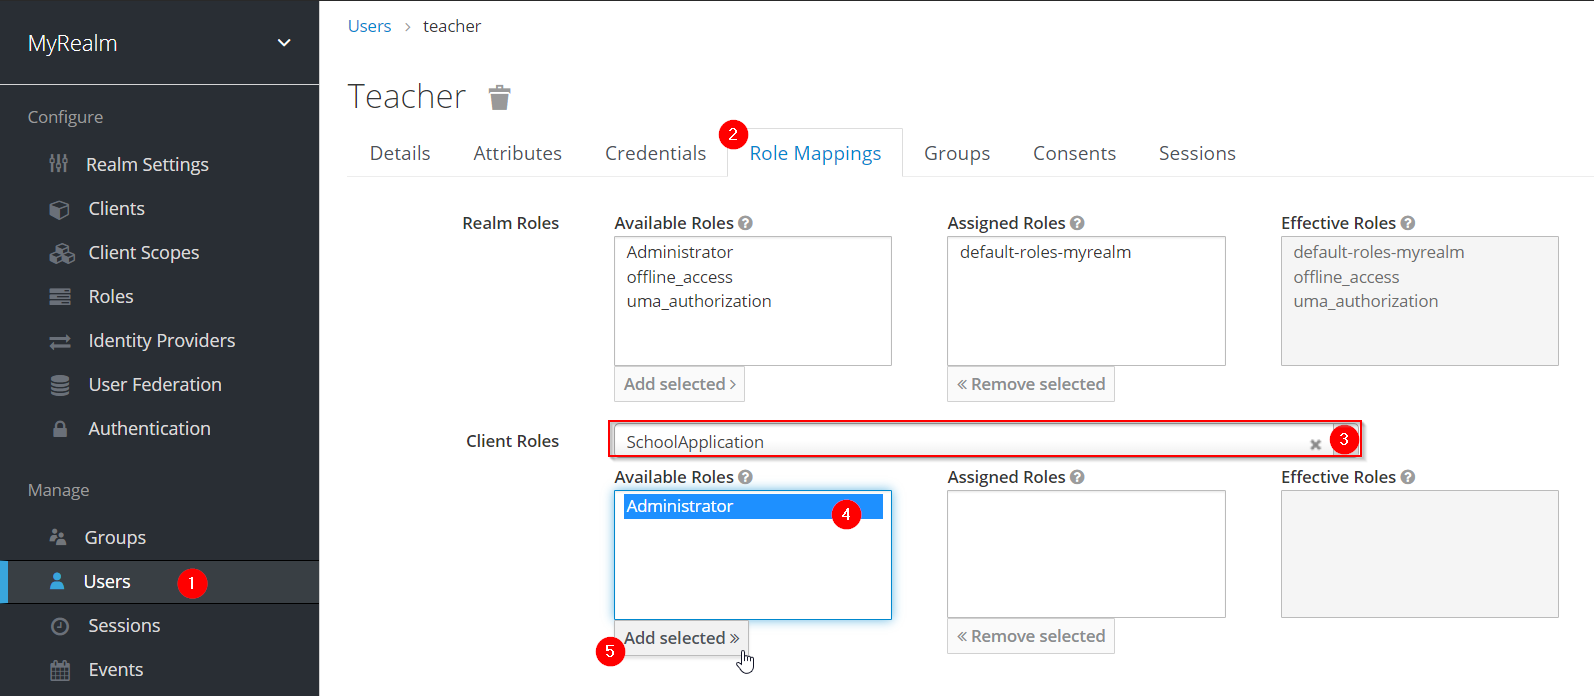
For adding the Client Role to an user:
Navigate to the Users section (1) and select the correct user to asign the role, select the Role Mappings tab (2), in the Client Roles section select the Client (3), select the desired Role to assign (4) and click the Add selected button (5)
Hardcoded audience
When your service relies on realm roles or does not rely on the token’s roles at all, a hardcoded audience can be useful. A hardcoded audience is a protocol mapper that adds the client ID of the specified service client to the token as an audience. If you want to use a different audience than the client ID, you can use any custom value, such as a URL.
The protocol mapper can be added directly to the frontend client. When the protocol mapper is directly added, the audience is always added as well.
For better control over the protocol mapper, you can create the protocol mapper on the dedicated client scope:
-
Go to the Client Scopes section in the left-side bar.
-
Enter the name for the client scope.
-
Click the Save button.
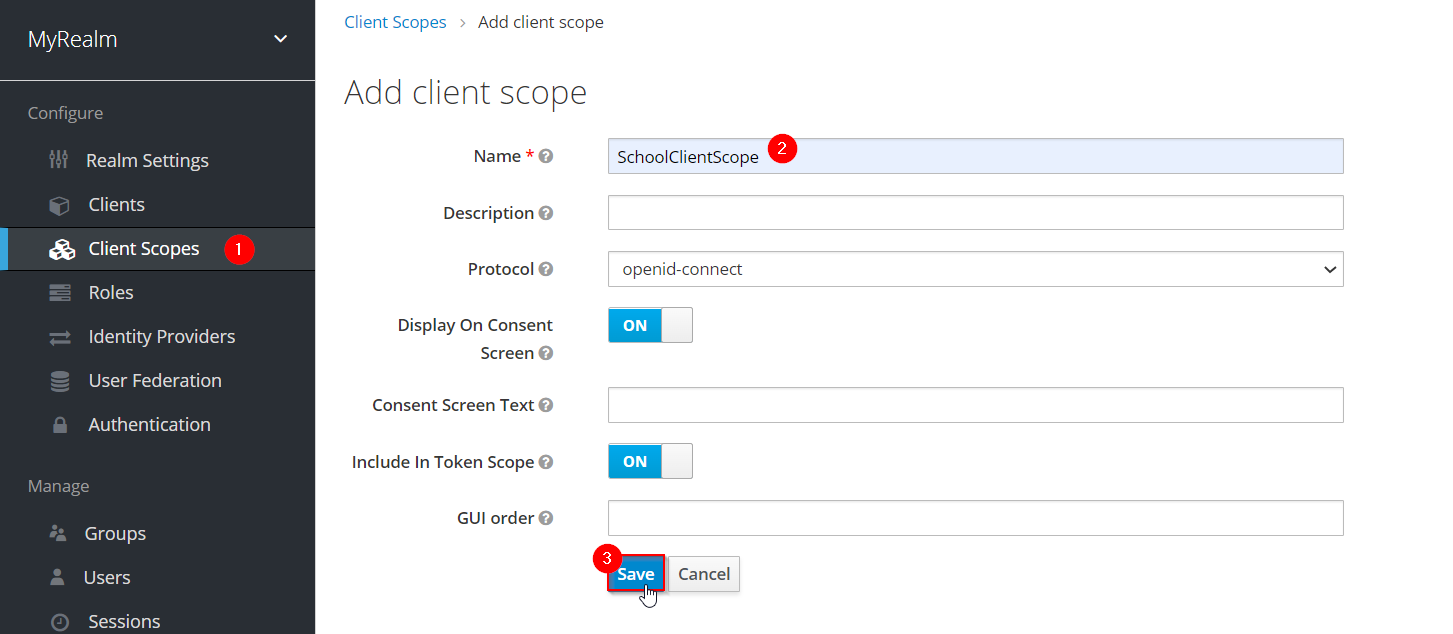 Figure 47. adding a Client Scope in Keycloak
For create the mapper itself follow the nexts steps:
-
Go to the Mappers tab.
-
Click the Create button.
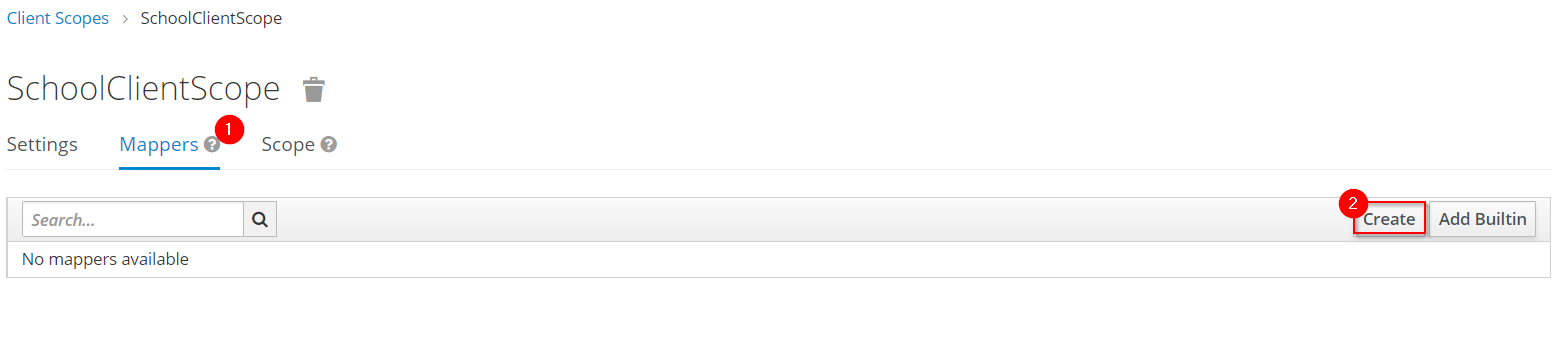 Figure 48. adding a mapper to a Client Scope in Keycloak
In the next screen configure the Mapper as follows:
-
Enter the name of the mapper.
-
In the Mapper type select
Audience -
Click the Save button.
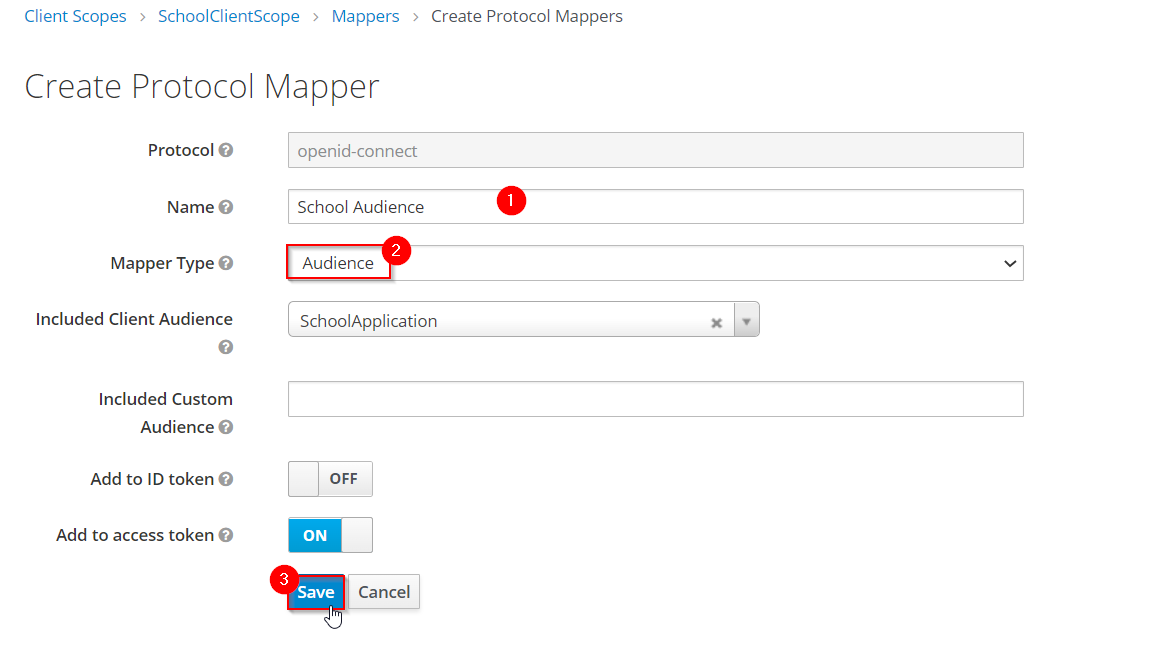 Figure 49. adding a mapper to a Client Scope in Keycloak
Keycloak Sample
This template allows you to understand the authentication and authorization process using Keycloak:
-
Authentication: Is the process of confirming that someone or something is who they claim to be. To secure access to an application or its data, most technology systems employ some form of authentication. When you need to access an online site or service, for example, you usually have to enter your username and password. Then, in the background, it compares the username and password you entered to a record in its database. If the information you provided matches, the system considers you a valid user and grants you access.
-
Authorization: Is the security process that determines a user or service’s level of access. In technology, we use authorization to give users or services permission to access some data or perform a particular action. Authentication verifies the user (Lucia) before allowing them access, and authorization determines what they can do once the system has granted them access (view sales information, for example).
In the Download section you will find a sample that you can use as a template for integrating Keycloak in your application.
|
Note
|
Please download the template so you can follow the guide successfully. |
The template shows an example of a School with two types of entities, Student and Teacher, the teachers also have the Administrator role, that allows to access to their Student list.
In the application you will be able to authenticate yourself through a username and password, and this will give you an authorization token that will allow you to use the application with a certain role.
Keycloak Setup
To setup the keycloak server we provide the realm_export.json file that is the configuration of the server that we need to use the template.
For import the Realm follow the steps below:
-
Create a new Realm (1)
-
Click in the Select file button and choose the
realm_export.jsonfile (2) -
Enter a name for your Realm and click the Create button.
The next step is to create users in your realm for that follow the next steps:
-
Navigate to the Users section (1) in the left-side bar, then the Add user button (2):
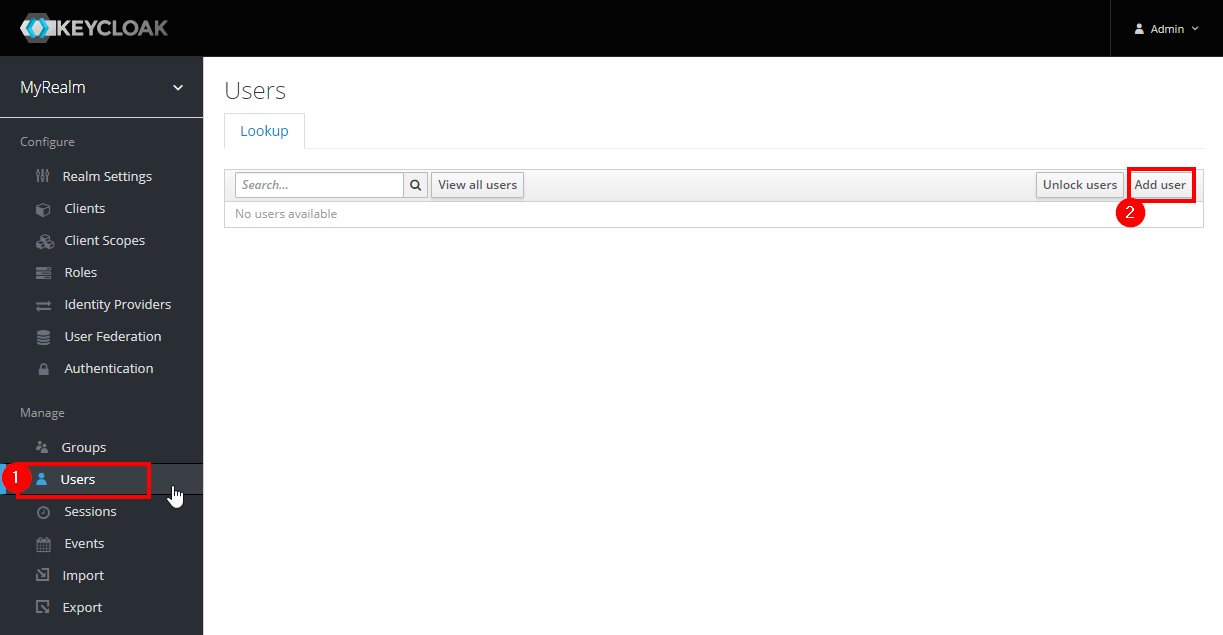 Figure 51. Add a user in Keycloak
 -
Complete the fields (1) and click the Save button (2):
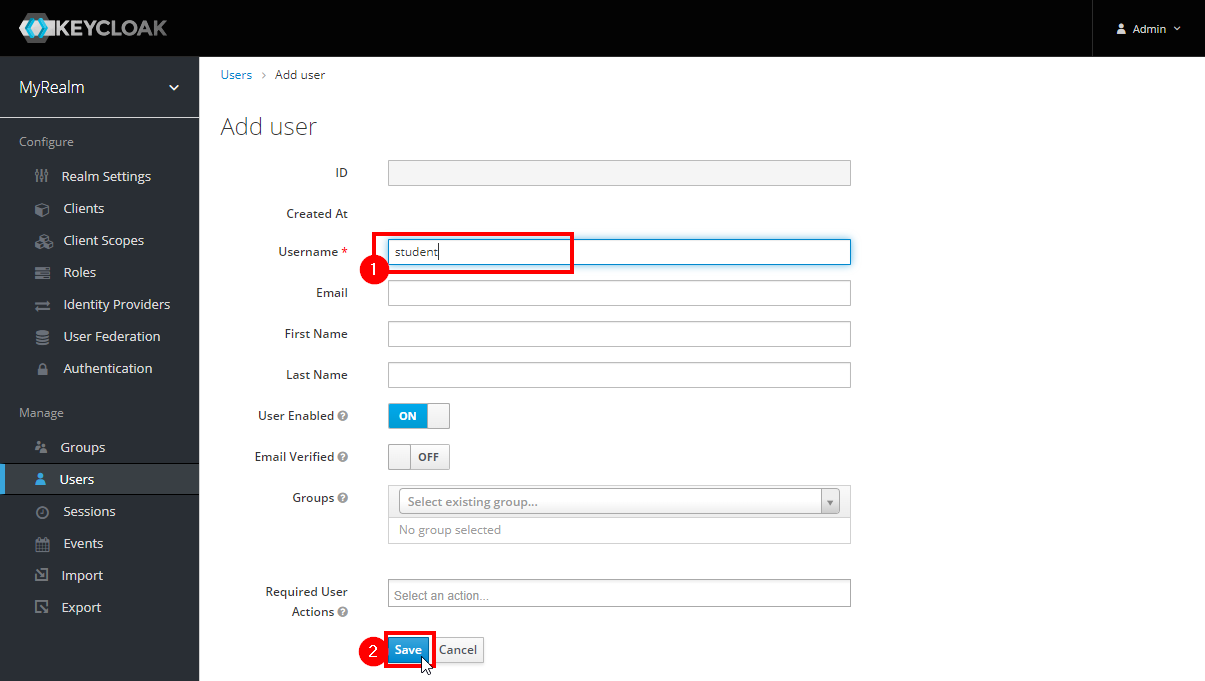 Figure 52. Add a user in Keycloak
 -
Set a password for the user:
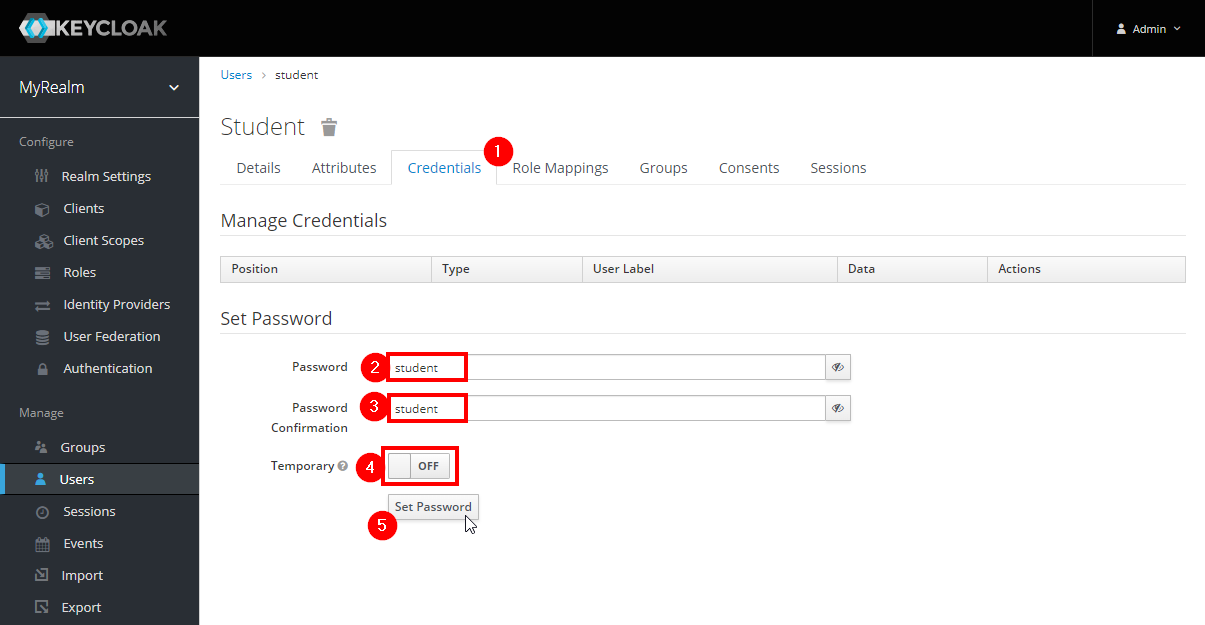 Figure 53. Set credentials to a user in Keycloak
-
Navigate to the Credentials tab (1).
-
Enter a password (2).
-
Confirm the password (3).
-
(Optional) Change the switch to on if you want the user to change their password after the first login (4).
-
Click the Set Password button to confirm the changes (5).
-
For this example, we created two user types,student and teacher:
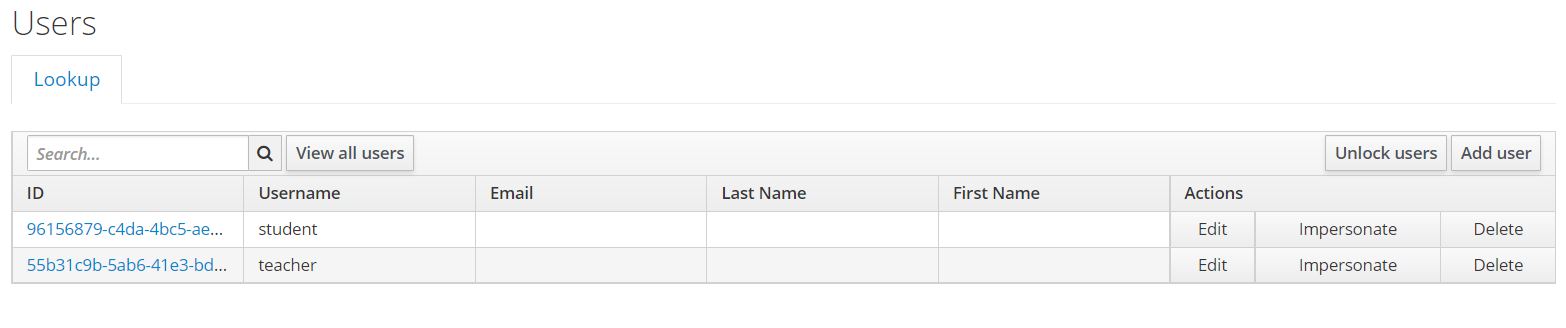
Now we are going to assign to the user teacher, the Administrator Role, for that follow the nexts steps:
Navigate to the Users section (1) and select the correct user to asign the role, select the Role Mappings tab (2), in the Client Roles section select the SchoolApplication Client (3), select the Administrator Role (4) and click the Add selected button (5)
|
Note
|
If you need more information about how to configure the Keycloak server please refer to the How to: Configure Keycloak server section.
|
Devon4net.Application.Keycloak
This is the startup project of the template. Its main purpose is to launch the api and configure it using the settings files. The following figure shows the directory tree of the application:
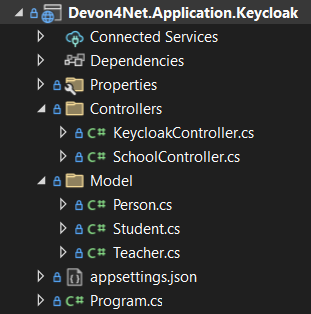
-
Controllers: This template, has two controllers: the
KeycloakControllerfor obtaining the access token and theSchoolControllerfor testing that token and the user roles. -
Model: The model objects of the application. This template is about a School so we have Persons that are also Students or Teachers. The Teachers will have the
Administratorrole aswell.
The configuration is done in the appsettings.json file. It can contain subversions following the structure appsettings.{environment}.json. For the keycloak sample, the configuration is done as follows:
{
  "Keycloak": {
    "Realm": "MyRealm",
    "Url": "http://localhost:8080/",
    "ClientId": "SchoolApplication",
    "GrantType": "password"
  }
}-
Realm: Your Keycloak realm’s name. -
Url: The direction of your Keycloak server. -
ClientId: The Id of the Client that you created in the Keykloak server administrator console. -
GrantType: The grant type used to obtain the token.
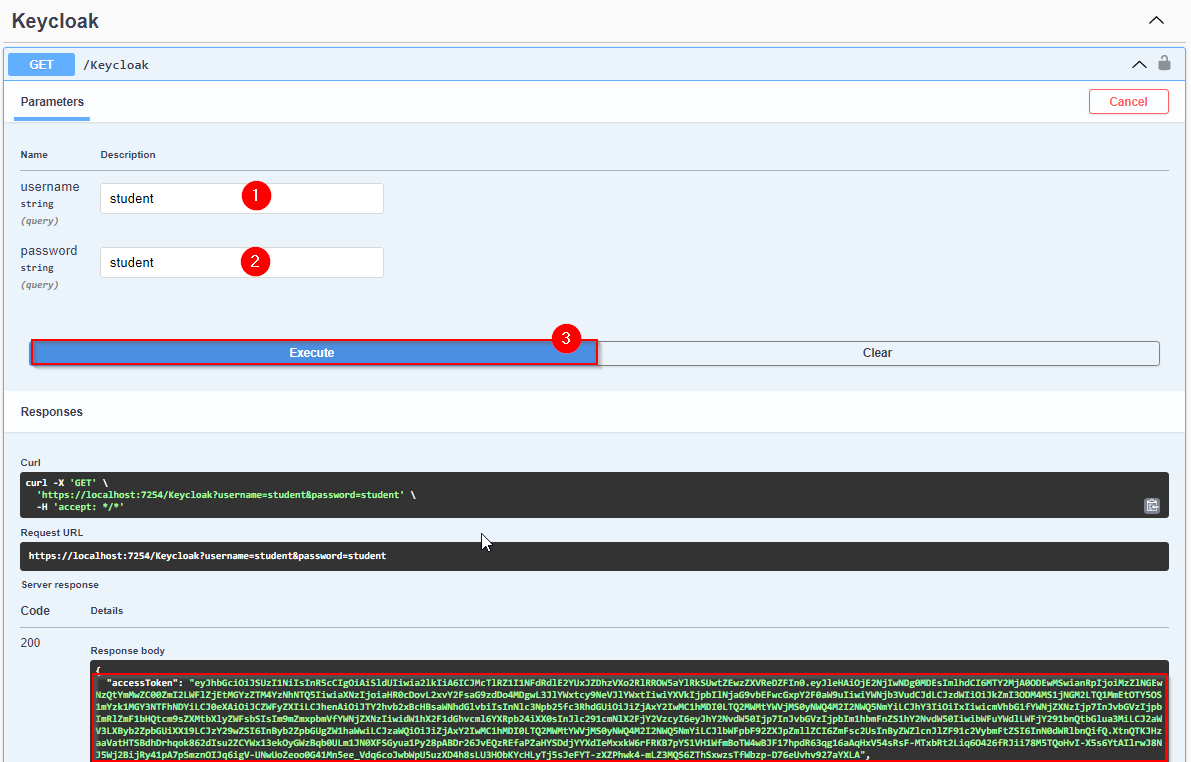
KeycloakControllerIt only has one method with the AllowAnonymous annotation, that means that this method doesn’t need authorization.
        [HttpGet]
        [AllowAnonymous]
        public async Task<ActionResult> Login(string username, string password)
        {
            return Ok(await _keycloakService.GetToken(username, password).ConfigureAwait(false));
        }
The Login method calls the Keycloak Service to retrieve the token, it has two parameters, the username and the password.
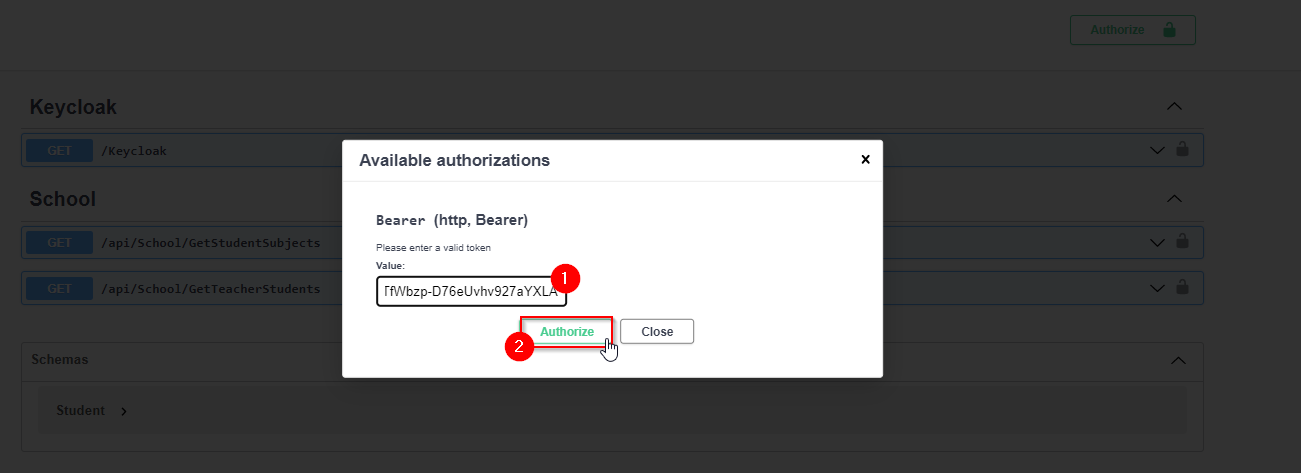
SchoolControllerOnce we have the access token we can use the methods of this controller, for that we have to authorize ourselves:
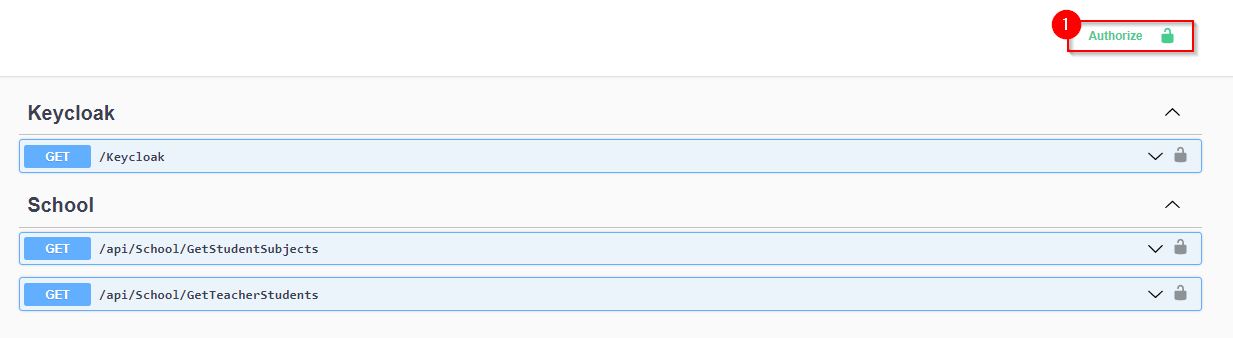
There are two methods available for this controller:
-
GetStudentSubjects(): For this method, the user should be authorized; either students or teachers can use it. -
GetTeacherStudents(): This method access is restricted to teachers only, as indicated by the following policy:[Authorize(AuthenticationSchemes = JwtBearerDefaults.AuthenticationScheme, Policy = "SchoolPolicy")]This policy specifies that only teachers with the
Administratorrole are permitted to use this method.
Devon4Net.Application.Keycloak.Implementation
This package contains all the implementation classes. You will find the following directory tree:
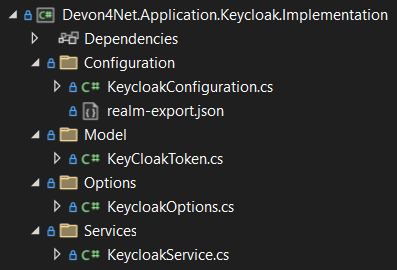
We have organized the files as if it was a Devon4Net module package:
-
Configuration: Contains all the files necesary for configuration. You can use realm-export.json to import the keycloak configuration for this specific example.
You will find in the KeycloakConfiguration class how you can add the different policies and the authorization and authentication configuration.
For example you can use the following code to add a policy that requires the claim user_roles as Administrator:
services.AddAuthorization(options => { options.AddPolicy("SchoolPolicy", policy => policy.RequireClaim("user_roles", "Administrator")); }); -
Model: Contains the model objects. In this case we only need the token, which is the response of keycloak but we could put here also the user, for example, if we were to retrieve the information from keycloak.
-
Options: This directory contains the model for all the options used to configure.
-
Services: This directory contains all the services. There is only one service, which access keycloak through the end-points available.
In this example we only need the token, so there is a method accessing the token end-point from keycloak. You can see the end-points available in keycloak in its dashboard.
Downloads
References
How to: Avoid cross-site request forgery (XSRF or CSRF) attacks
Every time you authenticate into a web app, your browser becomes trusted for an amount of time to that specific site. This way you can use the application without having to authenticate yourself each time you want to do an operation that requires authorization. This is achieved normally by providing authentication tokens that last a determinate amount of time.
Your browser includes in each request a token issued by the app at the moment of authentication, the app verifies it and then sends back the response. A cross-site request forgery is a type of attack where a malicious site can use your authentication token to issue requests through your browser.
This is done, without you even noticing and it works because browser requests automatically include all session cookies. So if the request is done from another site with all these cookies (including your authentication cookie) it wont be different from you actually doing the request.
For example, you enter the site vulnerable-bank.com and forget to log out after doing all of your operations. Now you are surfing the net and enter the site malicious-site.com this site has a hidden script that performs the following request:
POST /transaction HTTP/1.1
Host: vulnerable-bank.com
Content-Type: application/x-www-form-urlencoded
Cookie: SessionID = 1n4j0sd7uohpf13j98nh570923c48u

account={MaliciousAccount}
amount=1000
As all the session cookies are included in the request, the site will be allowed to process the transaction without you even noticing.
The most common way to prevent this vulnerability is by making use of anti forgery tokens. This token is placed in the headers and is issued with the request. The malicious-site cannot
Configuration
To configure Anti-Forgery protection in a devon4net project, you must set UseXsrf property in devonfw configuration section to true. You will find this section in appsettings.json:
{
  "devonfw": {
    "UseXsrf": true
  }
}
Setting this property to true will allow you to use IAntiforgery interface through the service provider and dependency injection in your project.
Use
In the devon4net Web API Templaate you will be able to find an example of controller using this protection. You can inject the IAntiforgery interface in the controller constructor like so:
private readonly IAntiforgery _antiForgeryToken;

public AntiForgeryTokenController(IAntiforgery antiForgeryToken)
{
    _antiForgeryToken = antiForgeryToken;
}
Now you can access its methods to manage this special token. For creating one we can use GetAndStoreTokens(HttpContext httpContext) method available on IAntiforgery, and store it in the cookies as shown below:
var token = _antiForgeryToken.GetAndStoreTokens(HttpContext);
HttpContext.Response.Cookies.Append(CustomMiddlewareHeaderTypeConst.XsrfToken, token.RequestToken);|
Note
|
Visit the documentation about this interface to find more information about IAntiforgery methods.
|
This will be done through a GET request. Now we can vaklidate this token in a controller thanks to the attribute [ValidateAntiForgeryToken]:
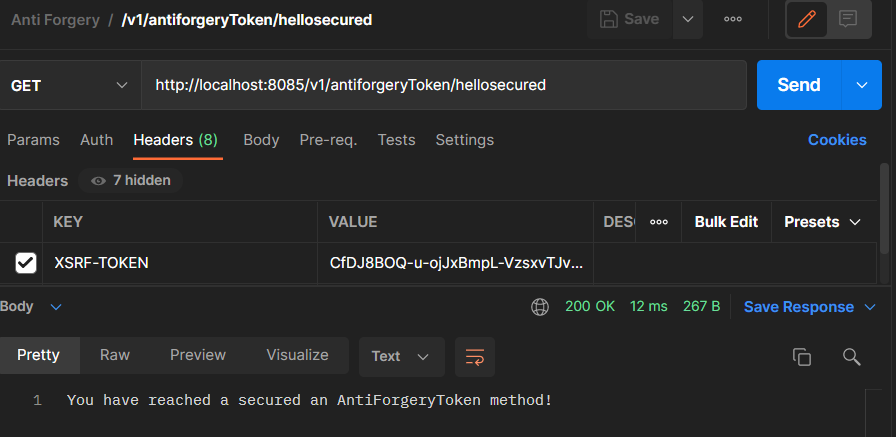
[HttpGet]
[Route("/v1/antiforgeryToken/hellosecured")]
[ValidateAntiForgeryToken]
public ActionResult HelloSecured()
{
    return Ok("You have reached a secured AntiForgeryToken method!");
}
Testing
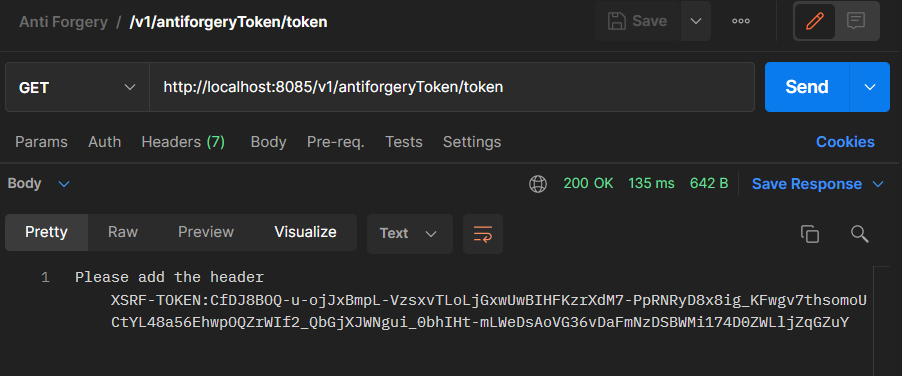
We will be using Postman to test the use of the controller, as you can see in the next figure, if we try to access the end-point protected by the antiforgery token validation we get an error:
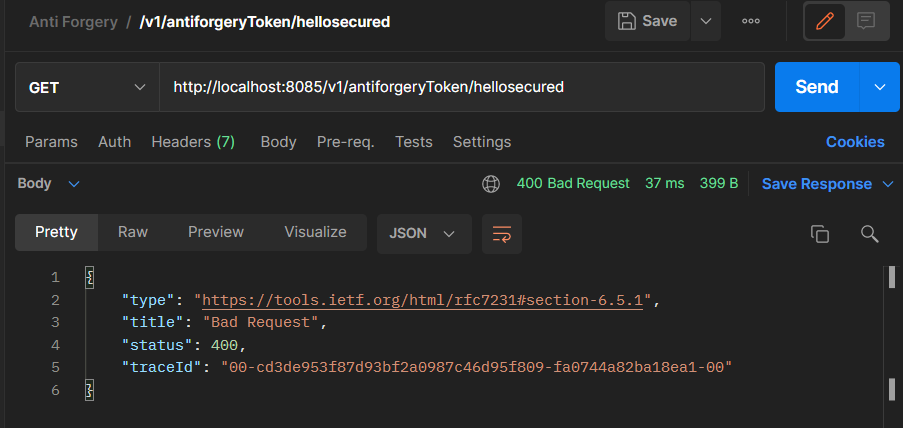
That is beacuse no valid token in XSRF-TOKEN header is specified. Lets access the end-point we created to provide an XSRF token:
Now that we have the token we can specify it in the request header as shown in the next figure:
References
Here are some interesting references to continue learning about this topic:
How to: Import a database
In this part of the document you will learn how to easily import a database to your devon4net project or any .Net project. This process is known by a variety of different names: scaffolding, database first, reverse engineering… But they all refer to the process of creating entity models and/or database context automatically based on a database schema.
Prerequisites
You can import a database in your favourite type of schema, but for this example we will be using SQL Server and Visual Studio 2022.
|
Note
|
Ensure that you have a connection ready to your database and a correct installation of Visual Studio 2022. |
For this example we used Microsoft SQL Server Management Studio to create our database and provide us with a local database connection.
NuGet packages installation
Before starting with the scaffolding you will need to install the following NuGet packages in your destination project.
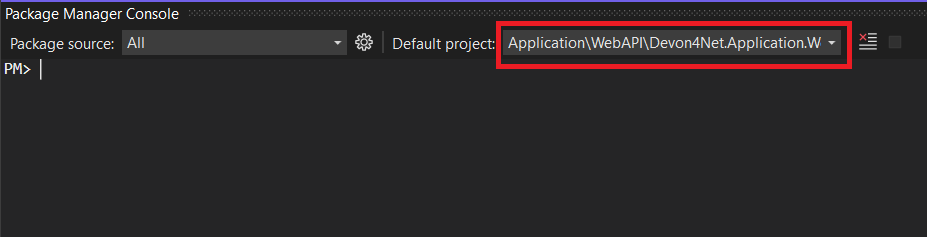
Open the Package Manager Console
To open the Package Manager Console, follow the next menu steps: View > Other Windows > Package Manager Console and then ensure that the default project in the console is set to the destination project as shown in the next figure.
|
Note
|
If the destination project is not the same as the startup project, you may need to install some of the packages in the startup project too. The package manager console will warn you of that if it is necessary. |
Install the packages
-
Microsoft.EntityFrameworkCore.Tools
install-package Microsoft.EntityFrameworkCore.Tools-
Microsoft.EntityFrameworkCore.Design
install-package Microsoft.EntityFrameworkCore.Design-
MIcrosoft.EntityFrameworkCore.SqlServer
NoteAs we mentioned we will be using a SQL Server schema, we are installing the database provider for it. Please choose your own Database Provider. install-package Microsoft.EntityFrameworkCore.SqlServer
Scaffolding command
Run the following command to execute the scaffolding operation:
scaffold-dbcontext 'Server=(localdb)\mssqllocaldb;Database=DevonDatabase;' Microsoft.EntityFrameworkCore.SqlServer -Tables School,Teacher -ContextDir Domain\Database -OutputDir Domain\Entities|
Note
|
Your connection string and database provider may be different. |
-
The first argument is the connection string.
-
The second argument is the Database Provider package for the used schema.
-
-Tables {Table list separated by comma}is the list of the tables you want to scaffold. -
-ContextDirwill specify the relative path for the context. -
-OutputDirwill specify the relative path for the models.
In our case, before doing the scaffolding we had something like this:
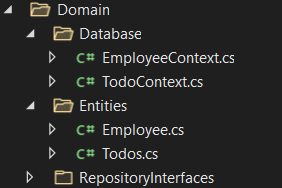
And the scaffolding produced the following directory tree:
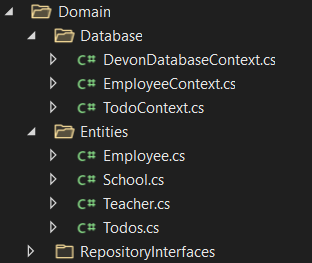
If you do not specify -Tables, -ContextDir and -OutputDir all of the tables will be scaffolded and the default directories will be the project directory.
Add the context for Dependency Injection
Now that we have our context we will need to add it either in Program.cs or SetupDatabase method in DevonConfiguration class.
As we are using Devon, we will need to go to Devon4Net.Application.WebAPI.Implementation.Configuration.DevonConfiguration and add the folowing line in SetupDatabase method:
services.SetupDatabase<DevonDatabaseContext>(configuration,"DevonDatabase", DatabaseType.SqlServer).ConfigureAwait(false);Where:
Parameter |
Description |
|
Database context you want to add |
|
Available |
|
Name of the connection string defined at |
|
Database schema available in devon (see the following list). |
List of supported databases:
-
SqlServer
-
Sqlite
-
InMemory
-
Cosmos
-
PostgreSQL
-
MySql
-
MariaDb
-
FireBird
-
Oracle
-
MSAccess
How to: Use LiteDb
In this part you will learn how to easily start using a LiteDb database in your project.
|
Note
|
Please read the documentation of this component to learn more about how to set it up and use it. |
Video
As you will find all the information in the component documentation, we prepared a video using LiteDb in a very short example:
How to: Customize Headers
HTTP headers let the client and the server provide additional information with an HTTP request or a response. As this headers provide information about either the client or the server, it can be dangerous if this information lands in the wrong hands.
As Owasp explains in great detail, proper HTTP headers can help prevent security vulnerabilities like Cross-Site Scripting, Clickjacking, Information disclosure and more.
In devon we take security very seriously, that’s why we developed a very easy form of customizing HTTP headers. You will be able to do it configuring the headers in the appsettings.{environment}.json file. A middleware will be configured with those options and will modify each HTTP response according to the specified options.
Configuration
"Headers": {
    "AccessControlExposeHeader": "Authorization",
    "StrictTransportSecurityHeader": "",
    "XFrameOptionsHeader": "DENY",
    "XssProtectionHeader": "1;mode=block",
    "XContentTypeOptionsHeader": "nosniff",
    "ContentSecurityPolicyHeader": "",
    "PermittedCrossDomainPoliciesHeader": "",
    "ReferrerPolicyHeader": ""
  },
The following table shows the options that can be configured.
|
Note
|
Please refer to the links provided to learn more about each header and what can be done with it. |
Option |
Header |
Description |
|
Indicates which headers may be exposed as part of the response by listing their names. |
|
|
Allows a website to tell browsers that it should only communicate with HTTPS instead of using HTTP. |
|
|
Can be used to indicate whether a browser should be allowed to render a page in a |
|
|
Prevents the loading of a page when it detects cross-site attacks. |
|
|
It is a flag used by the server to indicate that the MIME types advertised in the |
|
|
Allows the administrators of a website to control the resources that the User-Agent can upload to a page. |
|
|
Grants a web client ermission to handle data across domains. |
|
|
Determines which referrer data, among those sent with the |
|
Note
|
If the response header does not have a value or does not appear in the optons, it will not be added to the response headers. |
How to: Specflow
In this part of the document you will learn to use Specflow in your projects for defining, managing and automatically execute readable acceptance tests in .NET.
SpecFlow is a.NET test automation tool based on the BDD (Behavior-driven development) paradigm. Specflow tests use the Gherking language to write test cases that are then bound to your application code through bindings, allowing you to run the tests using your preferred testing framework.
Before going into detail on how to use Specflow and how you can use it to implement your tests, you will need know Gherking syntax. It is used to write tests in a form that can be readed perfectly as a sentence. For example:
Feature: Calculator
  Scenario: Sum two numbers
    Given the first number is 10
    And the second number is  5
    When the two values are added
    Then the result is 15
As you can see, thanks to Gherkin we have written a test for a calculator, which makes sure that when the values 10 and 5 are added, the result is 15. Because is a natural-language friendly language you can read the test, and understand the statement.
The following table shows the keywords used in Gherkin syntax:
Keyword |
Description |
|
Provides high level description of a software feature that wants to be tested and group related scenarios. |
|
Represents one business rule that should be implemented. |
|
List of steps that ilustrates a business rule. |
|
Each step starts with |
|
Scenario context run before the |
|
It is used to run the same |
|
Keyword used to define the variables of |
|
Strings |
|
Tags |
|
Comments |
|
Tables |
For example:
# Test for the calculator
@mytag
Feature: Calculator
  Scenario Outline: Sum two numbers
    Given the first number is <first>
    And the second number is  <second>
    When the two values are added
    Then the result is <result>

    Examples:
    | first | second | result |
    |    10 |   5    |   15   |
| 20 | 5 | 25 ||
Note
|
Please refer to the Cucumber Documentation or Specflow Documentation to learn more about the keywords used in Gherkin. |
Specflow Installation
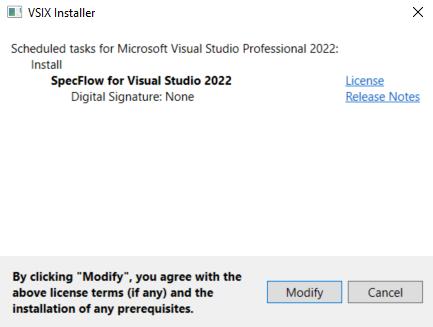
To use specflow you will need to add the Specflow extension to your Visual Studio 2022. This way you can use it in any of your projects. For that open visual studio and navigate to Extensions > Manage Extensions.
This will open the extension manager, where you will have to search for the 'SpecFlow' extension and hit download:

Hitting download will schedule the extension installation. At the time when you close VS2022, you will be able to install the extension by clicking Modify in the pop-up window shown below:
Create specflow project
To create a specflow project for testing, first we will need to have something to test. In this example we will test a Calculator class that we created inside a class library project in an empty solution like shown in the following image:
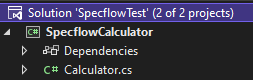
Where, the Calculator class implementation is:
public class Calculator
{
public int FirstNumber { get; set; }
public int SecondNumber { get; set; }
protected int Add()
{
return FirstNumber + SecondNumber;
}
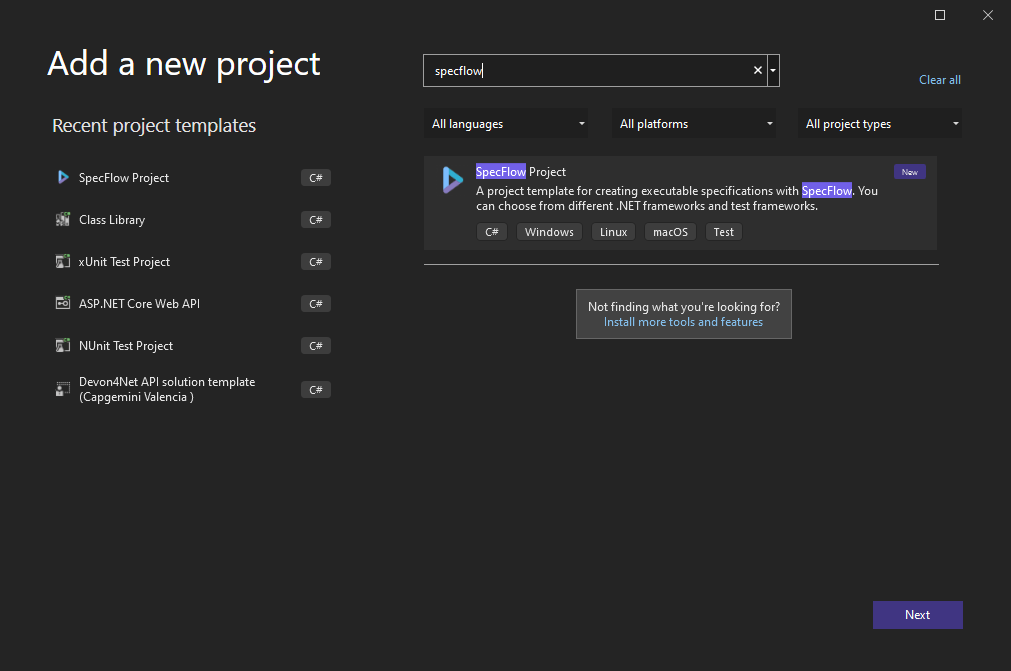
}Once we have the Calculator ready, we need to create a Specflow project. For that you can Right click on the solution > Add > New Project…. This will open a window where you can search the specflow project as shown in the next image:
When creating the project you will be able to choose the .Net version that you are using, the library for the tests and if you want to use FluentAssertions library. For this example we will use the configuration shown below:
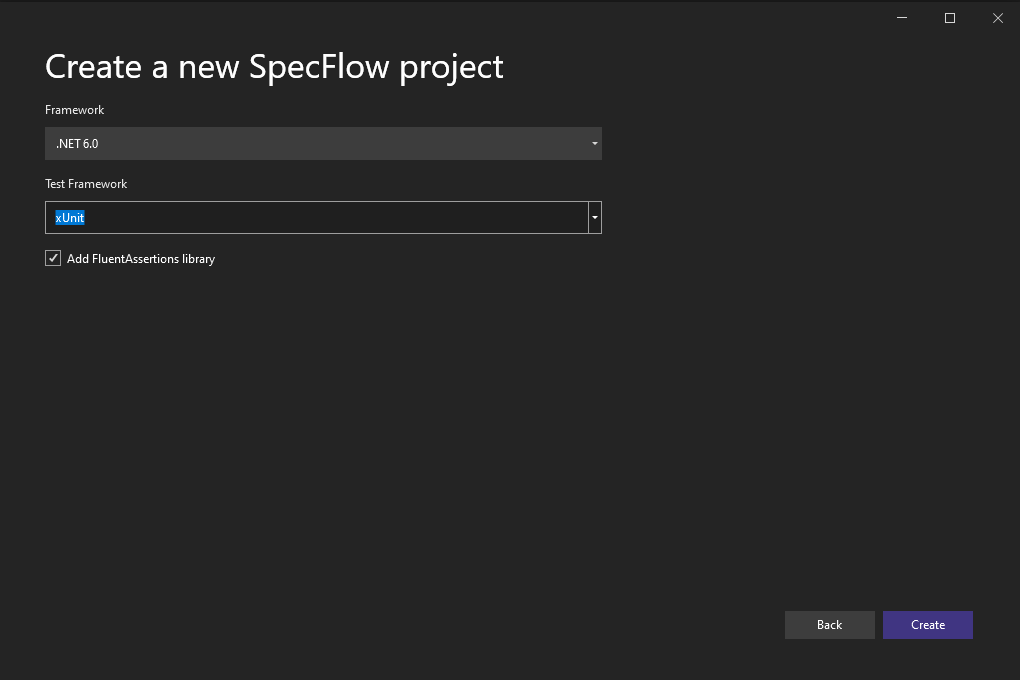
The specflow template comes with a calculator test implemented, this is their example. But we will create the files from scratch so you know how to complete your testing project.
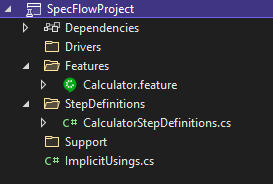
As you can see also the template comes with a folder structure defined, you can redifine it as you want but this is the recommended one.
Create specflow tests
To create a new test using specflow, you can add a new item to your project by Right click in any directory on the project > Add > New item…:
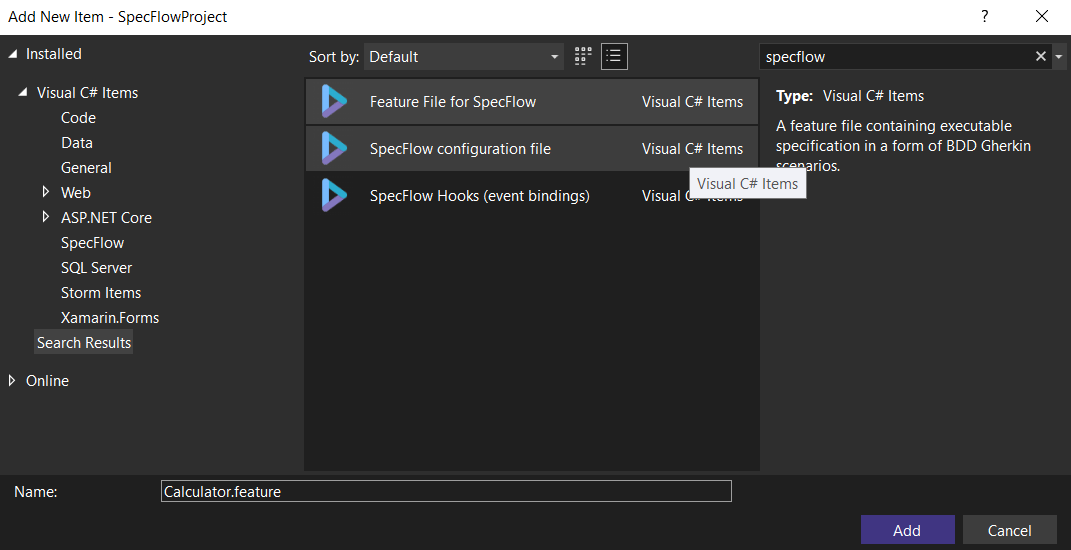
You can type specflow in the search bar to look for the items available thanks to the library and select Feature File for Specflow. You can create a test there in Gherkin syntax:
Feature: Calculator

A short summary of the feature

@mytag
Scenario: Add two numbers
	Given the first number is 50
	And my favourite number is 70
	When the two numbers are added
	Then the result should be 120
Once you have your test created you can build the project by navigating to Build > Build Solution. You will see that the test appears in a purple color, this is because it is not mapped to a definition yet. You can automatically create the definition by Right clicking inside the feature file > Define Steps.
This will open the following window:
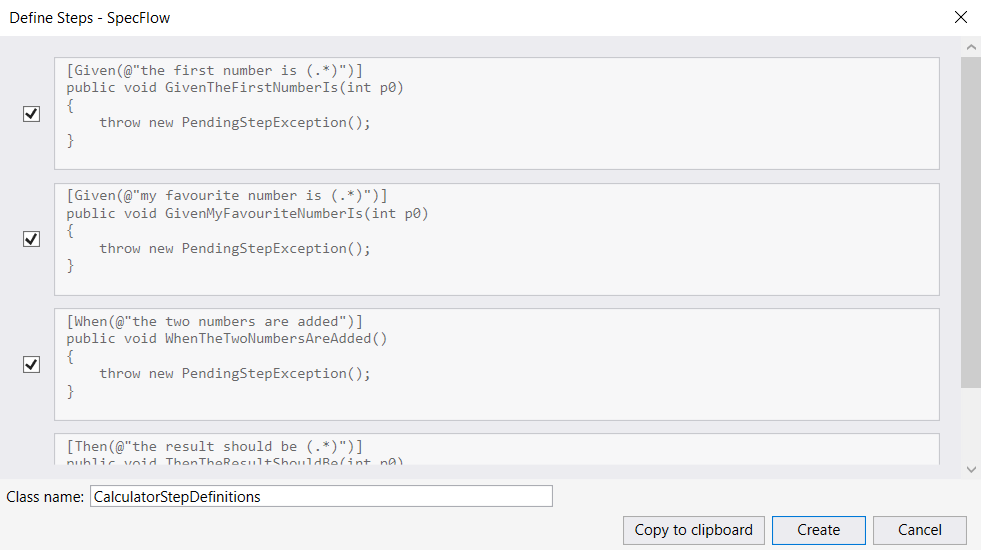
Once you press Create the test will no longer appear in purple and will be shown in a white color. This is because now they have a definition. You can also do this manually creating a class and marking it with the [Binding] attribute.
This class will need to define the test steps such as Gherkin syntax can be transformed into C# code. You can implement this class as follows to test the Calculator:
using SpecflowCalculator;

namespace SpecFlowProject.StepDefinitions
{
    [Binding]
    public class CalculatorStepDefinitions
    {
        private Calculator _calculator;
        private int _result;

        public CalculatorStepDefinitions()
        {
            _calculator = new Calculator();
        }

        [Given(@"the first number is (.*)")]
        public void GivenTheFirstNumberIs(int p0)
        {
            _calculator.FirstNumber = p0;
        }

        [Given(@"my favourite number is (.*)")]
        public void GivenMyFavouriteNumberIs(int p0)
        {
            _calculator.SecondNumber = p0;
        }

        [When(@"the two numbers are added")]
        public void WhenTheTwoNumbersAreAdded()
        {
            _result = _calculator.Add();
        }

        [Then(@"the result should be (.*)")]
        public void ThenTheResultShouldBe(int p0)
        {
            // xUnit assertions
            Assert.Equal(_result, p0);

            // FluentAssertions
            _result.Should().Be(p0);
        }
    }
}
Now build the solution again to be able to run the tests.
|
Note
|
Please revise the Specflow Documentation to learn more about feature bindings. |
Run the tests
To run the tests you can navigate to Test > Test Explorer:
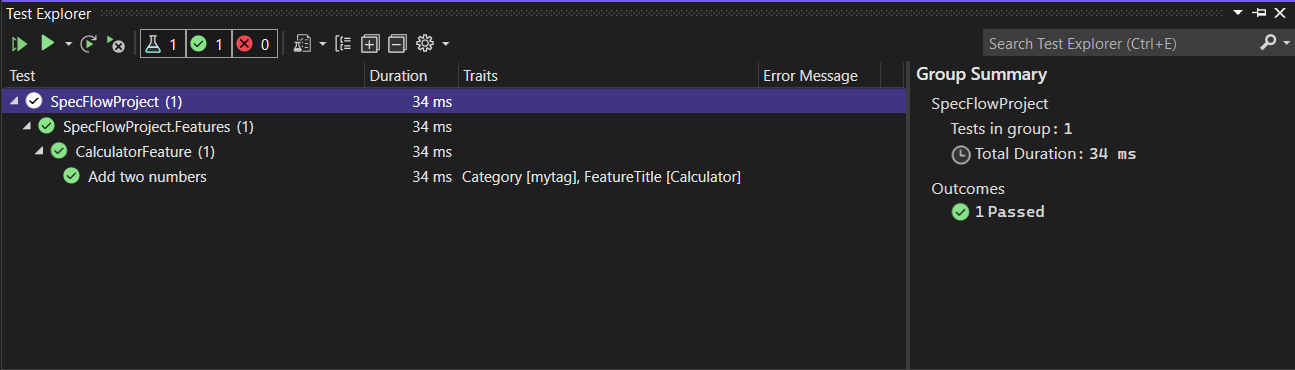
By clicking the green play button you can run the tests and see the results as shown in the image above.
Living documentation
SpecFlow Living Documentation is a set of tools that allows you to share and collaborate on Gherkin Feature Files. It gives you the option to generate and share an html interactive file. You can do this directly for Azure DevOps or using a CLI (Command Line Interface). In this guide you will learn how to do this with the CLI continuing with the Calculator example.
|
Note
|
Please refer to the Specflow+LivingDoc documentation to learn more. |
Step 1 - Install CLI
Install the tool by running the following command in your preferred terminal:
dotnet tool install --global SpecFlow.Plus.LivingDoc.CLIStep 2 - Navigate to the build output directory
Now we need to navigate to the build directory of the Specflow Project taht contains the tests. In our case we can navigate to this path by running the following command:
cd C:\Projects\devon4net\samples\SpecflowTest\SpecFlowProject\bin\Debug\net6.0|
Warning
|
Your path may be different depending on the root directory, the file structure of the solution and the .Net version you are using. |
Step 3 - Run command to generate results
To generate the file run the following command:
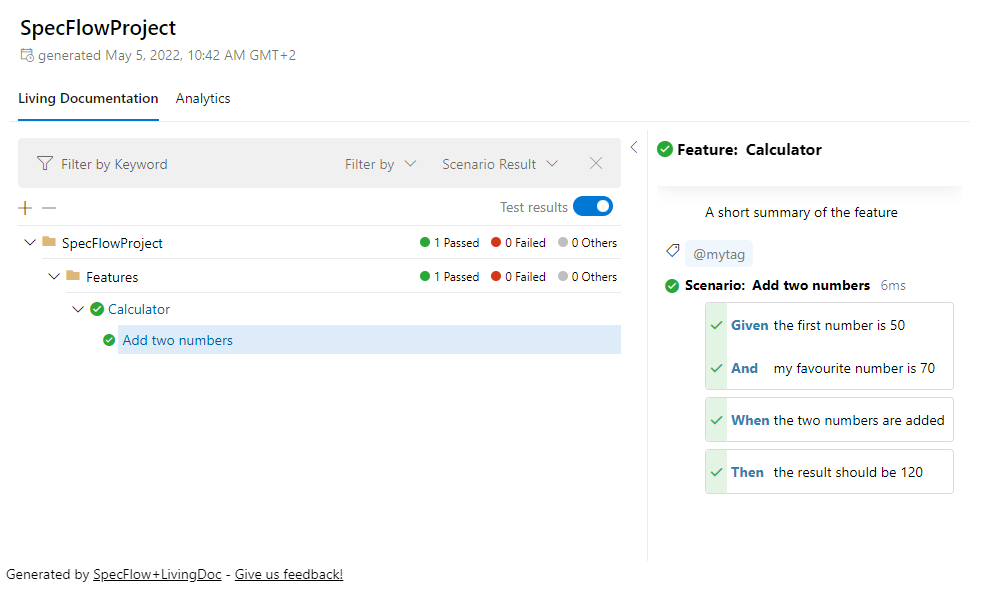
livingdoc test-assembly SpecFlowProject.dll -t TestExecution.jsonStep 4 - See html results
The file generated can be seen with your favorite browser and will look like this:
How To: Circuit breaker communication with Certificates
In this section we are going to configure two services communication for using certificates, and Circuit Breaker Pattern.
|
Note
|
Please refer to the component documentation for more information about how to configure CircuitBreaker in devon4net and other projects |
Configuration
We have to setup two services in order to implement Circuit Breaker pattern, in this scenario, we’re creating a basic application that connects two services that are similar.
ServiceA
In the appsettings.{development}.json you must use the following configuration:
"CircuitBreaker": {
    "CheckCertificate": false,
    "Endpoints": [
      {
        "Name": "ServiceB",
        "BaseAddress": "https://localhost:5055",
        "Headers": {
        },
        "WaitAndRetrySeconds": [
          0.0001,
          0.0005,
          0.001
        ],
        "DurationOfBreak": 0.0005,
        "UseCertificate": true,
        "Certificate": "localhost.pfx",
        "CertificatePassword": "localhost",
        "SslProtocol": "Tls12", //Tls, Tls11,Tls12, Tls13, none
        "CompressionSupport": true,
        "AllowAutoRedirect": true
      }
    ]
  }
As an example, we call the HttpClientHandler in the controller, however it is preferable to do it in the service class:
    [ApiController]
    [Route("[controller]")]
    public class PingController : ControllerBase
    {
        private IHttpClientHandler HttpClientHandler { get; }

        public PingController(IHttpClientHandler httpClientHandler)
        {
            HttpClientHandler = httpClientHandler;
        }

        /// <summary>
        /// Returs Ping!
        /// </summary>
        /// <returns></returns>
        [HttpGet]
        [HttpOptions]
        [Route("/v1/ping/")]
        [ProducesResponseType(typeof(string), StatusCodes.Status200OK)]
        [ProducesResponseType(StatusCodes.Status400BadRequest)]
        [ProducesResponseType(StatusCodes.Status401Unauthorized)]
        [ProducesResponseType(StatusCodes.Status403Forbidden)]
        [ProducesResponseType(StatusCodes.Status500InternalServerError)]
        public IActionResult Ping()
        {
            return Ok("Ping!");
        }

        /// <summary>
        /// Returs Ping!
        /// </summary>
        /// <returns></returns>
        [HttpGet]
        [HttpOptions]
        [Route("/v1/remoteping/")]
        [ProducesResponseType(typeof(string), StatusCodes.Status200OK)]
        [ProducesResponseType(StatusCodes.Status400BadRequest)]
        [ProducesResponseType(StatusCodes.Status401Unauthorized)]
        [ProducesResponseType(StatusCodes.Status403Forbidden)]
        [ProducesResponseType(StatusCodes.Status500InternalServerError)]
        public async Task<IActionResult> RemotePing()
        {
            var result = await HttpClientHandler.Send<string>(HttpMethod.Get, "ServiceB", "/v1/pong", null, MediaType.ApplicationJson);
            return Ok(result);
        }
    }
As shown in the code above, we inject the HttpClientHandler, and on the RemotePing() function, we use the HttpClientHandler’s Send method to communicate ServiceA with ServiceB.
The CircuitBreaker setup method must be added to Program.cs:
builder.Services.SetupCircuitBreaker(builder.Configuration);Also, remember to install the certificate and add the folder containing the certificate to the project.
ServiceB
ServiceB is implemented in the same way as ServiceA. You only have to change the name of the service and the base address in the appsettings.{environment}.json, and in the controller method you must change the service name and the endpoint:
appsettings.Development.json :
 "CircuitBreaker": {
    "CheckCertificate": false,
    "Endpoints": [
      {
        "Name": "ServicioA",
        "BaseAddress": "https://localhost:9091",
        "Headers": {
        },
        "WaitAndRetrySeconds": [
          0.0001,
          0.0005,
          0.001
        ],
        "DurationOfBreak": 0.0005,
        "UseCertificate": true,
        "Certificate": "localhost.pfx",
        "CertificatePassword": "localhost",
        "SslProtocol": "Tls12", //Tls, Tls11,Tls12, Tls13, none
        "CompressionSupport": true,
        "AllowAutoRedirect": true
      }
    ]
  }
PongController
public async Task<IActionResult> RemotePong()
  {
    var result = await HttpClientHandler.Send<string>(HttpMethod.Get, "ServicioA", "/v1/ping", null, MediaType.ApplicationJson);
    return Ok(result);
  }
Video
The preceding example is covered in detail in this video lesson:
How to: RabbitMQ
Configure the Server
There are several methods to configure the RabbitMQ server, depending on your operating system.
In this tutorial, we will show you how to run a server via Docker, for testing purposes. If you want further information on how to configure and install the RabbitMQ server in a specific operating system, please consult the official RabbitMQ documentation
First you must have docker installed on your machine. Run the following command to start the server:
docker run -it --rm --name rabbitmq -e RABBITMQ_DEFAULT_USER=admin -e RABBITMQ_DEFAULT_PASS=password -p 5672:5672 -p 15672:15672 rabbitmq:3.9-managementThis command shows several options parameters:
-
-it: To create an interactive container -
--rm: To automatically clean up the container and remove the file system when the container exits. -
--name: The name of the container -
-e: Environment variables -
-p: To expose a container’s internal port
The server will listen on port 5672, and you may access the management plugin at the following url:
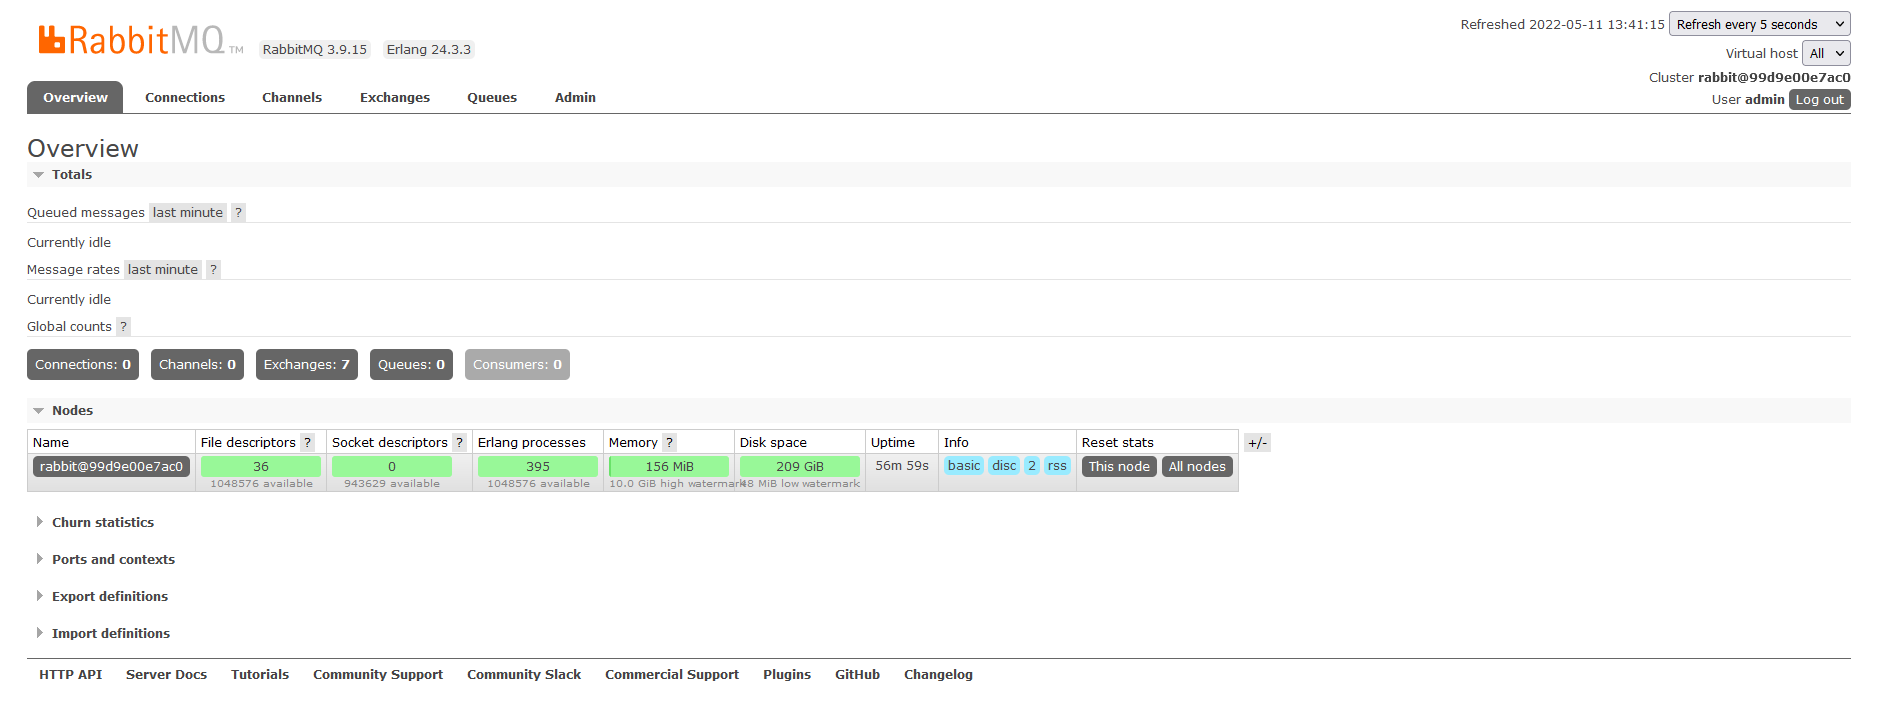
You may customize your Docker container as you like, please see the official Docker image documentation for more information.
Configure the Client
-
Install the package in your solution using the Package Manager Console:
Install-Package Devon4Net.Infrastructure.RabbitMQ -
Create a Configuration static class in order to add the
RabbitMqHandlerservices, for example:public static class Configuration { public static void SetupDependencyInjection(this IServiceCollection services, IConfiguration configuration) { var rabbitMq = serviceProvider.GetService<IOptions<RabbitMqOptions>>(); if (rabbitMq?.Value != null && rabbitMq.Value.EnableRabbitMq) { SetupRabbitHandlers(services); } } private static void SetupRabbitHandlers(IServiceCollection services) { services.AddRabbitMqHandler<TodoRabbitMqHandler>(true); } } -
Add the following lines in the
Program.csclass:builder.Services.SetupRabbitMq(builder.Configuration); builder.Services.SetupDependencyInjection(builder.Configuration); -
Configure the component in the file
appsettings.{environment}.json, for example:"RabbitMq": { "EnableRabbitMq": true, "Hosts": [ { "Host": "127.0.0.1", "Port": 5672, "Ssl": false, "SslServerName": "localhost", "SslCertPath": "localhost.pfx", "SslCertPassPhrase": "localhost", "SslPolicyErrors": "RemoteCertificateNotAvailable" //None, RemoteCertificateNotAvailable, RemoteCertificateNameMismatch, RemoteCertificateChainErrors } ], "VirtualHost": "/", "UserName": "admin", "Password": "password", "Product": "devon4net", "RequestedHeartbeat": 10, //Set to zero for no heartbeat "PrefetchCount": 50, "PublisherConfirms": false, "PersistentMessages": true, "Platform": "localhost", "Timeout": 10, "Backup": { "UseLocalBackup": true, "DatabaseName": "devon4netMessageBackup.db" } },Where:
-
EnableRabbitMq: True for enabling the RabbitMQ component -
Hosts: Host configuration, which might be a list of multiple hosts -
VirtualHost: Virtual host’s name -
UserName: User’s name -
Password: password for connecting -
RequestedHeartbeat: The heartbeat timeout setting specifies how long the peer TCP connection should be considered unreachable by RabbitMQ and client libraries. Should be set to zero for no heartbeat. -
PrefetchCount: The amount of messages transmitted by RabbitMQ before EasyNetQ sends a response. -
PublisherConfirms: True for enabling Publisher confirms that simply speaking is an AMQP extension that sends a callback when your message is successfully received by the broker. -
PersistentMessages: When set to true, RabbitMQ will retain messages to disk and survive server restarts. When set to false, performance increases might be expected. -
Platform: The value given here will be shown in the RabbitMQ management interface. -
TimeOut: Range from 0 to 65535. Format is in seconds. For infinite timeout please use 0. Throws System.TimeoutException when value exceeded. -
Backup: Configuration of Message’s BackUp. Its default database is LiteDB.
-
|
Note
|
Check the RabbitMQ Component section for examples of the component’s implementation and essential classes. |
References
How to: Kafka
In this part of the document you will learn how to use kafka component and create and use Producers and Consumers for your application. You will also learn to use the different Handlers available in the Devon4Net.Infrastructure.Kafka component and how to configure them.
Previous steps
To use Kafka you need to have an active Kafka server. There are multple ways to use a kafka server, we are using a docker image but you can choose any desired form.
|
Note
|
We recommend you to go through Kafka Documentation to learn how to get started with Apache Kafka. |
Once you have an Apache Kafka Server up and running you will need to create a project using the Devon4Net template or add Devon4Net.Infrastructure.Kafka NuGet package reference to your project.
|
Note
|
You can learn how to set up the component in your project by reading the component documentation. |
Configuration
When you have both things ready, you can start by adding the following line in your Program.cs
builder.Services.SetupKafka(builder.Configuration);Now is the time to configure all the producers and consumers you will be using in the application. You will later be relating this configuration to the Consumer and Producer Handler classes. For that you will need to complete the following configuration in appsettings.{environment}.json file with your preferred parameters.
"Kafka": {
    "EnableKafka": true,
    "Administration": [
      {
        "AdminId": "Admin1",
        "Servers": "127.0.0.1:9092"
      }
    ],
    "Producers": [
      {
        "ProducerId": "Producer1",
        "Servers": "127.0.0.1:9092",
        "ClientId": "client1",
        "Topic": "devonfw",
        "MessageMaxBytes": 1000000,
        "CompressionLevel": -1,
        "CompressionType": "None",
        "ReceiveMessageMaxBytes": 100000000,
        "EnableSslCertificateVerification": false,
        "CancellationDelayMaxMs": 100,
        "Ack": "None",
        "Debug": "",
        "BrokerAddressTtl": 1000,
        "BatchNumMessages": 1000000,
        "EnableIdempotence": false,
        "MaxInFlight": 5,
        "MessageSendMaxRetries": 5,
        "BatchSize": 100000000
      }
    ],
    "Consumers": [
      {
        "ConsumerId": "Consumer1",
        "Servers": "127.0.0.1:9092",
        "GroupId": "group1",
        "Topics": "devonfw",
        "AutoCommit": true,
        "StatisticsIntervalMs": 0,
        "SessionTimeoutMs": 10000,
        "AutoOffsetReset": "Largest",
        "EnablePartitionEof": true,
        "IsolationLevel": "ReadCommitted",
        "EnableSslCertificateVerification": false,
        "Debug": ""
      }
    ]
}|
Note
|
Please refer to the component documentation to learn more about the configuration. |
Producer
After defining the configuration in the appsettings.{environment}.json now you can create your handlers extending the ones available in the Kafka component.
For the producer you can do something as the following:
public class MessageProducerHandler : KafkaProducerHandler<string,string>
{
    public MessageProducerHandler(IServiceCollection services, IKakfkaHandler kafkaHandler, string producerId) : base(services, kafkaHandler, producerId)
    {
    }
}
You will need to add this handler to your dependencies. For that you can use the following method, and include the Id of the configuration as a parameter:
builder.Services.AddKafkaProducer<MessageProducerHandler>("Producer1");Now you can use the handler in any constructor via dependency injection:
public class KafkaController : ControllerBase
{
    private MessageProducerHandler MessageProducer { get; }

    public KafkaController(MessageProducerHandler messageProducer)
    {
        MessageProducer = messageProducer;
    }

    [HttpPost]
    [AllowAnonymous]
    [ProducesResponseType(typeof(DeliveryResult<string,string>), StatusCodes.Status200OK)]
    [ProducesResponseType(StatusCodes.Status400BadRequest)]
    [ProducesResponseType(StatusCodes.Status404NotFound)]
    [ProducesResponseType(StatusCodes.Status500InternalServerError)]
    [Route("/v1/kafka/deliver")]
    public async Task<IActionResult> DeliverMessage(string key, string value)
    {
        Devon4NetLogger.Debug("Executing DeliverMessage from controller KafkaController");
        var result = await MessageProducer.SendMessage(key, value).ConfigureAwait(false);
        return Ok(result);
    }
}
For example, in the previous piece of code, you can see how we are delivering a message to the Kafka server using a POST method in our API. This is done thanks to the SendMessage method.
Consumer
The consumer is a little different, as you can see in the following piece of code, you will need to override the HandleCommand method. This will handle the process of consuming new messages to which the consumer is subscribed.
public class MessageConsumerHandler : KafkaConsumerHandler<string, string>
{
    public MessageConsumerHandler(IServiceCollection services, IKakfkaHandler kafkaHandler, string consumerId, bool commit = false, int commitPeriod = 5) : base(services, kafkaHandler, consumerId, commit, commitPeriod)
    {
    }

    public override void HandleCommand(string key, string value)
    {
        Devon4NetLogger.Information($"Consumed message key: {key} | value: {value}");
    }
}
Similar to the producer, the Consumer also needs to be related to a configuration via the Id as follows:
builder.Services.AddKafkaConsumer<MessageConsumerHandler>("Consumer1");How to: Use Nexus
In this section we will show a practical example of how to create a raw hosted repository, to which a file will be uploaded and then retrieved and downloaded.
-
Create new Raw Hosted Repository:
To create a new repository of this type, we must first create a new instance of the
RawHostedRepositoryclass. This class will be created with its pertinent attributes. The following code snippet shows the example:var rawHostedRepository new RawHostedRepository { Name = "SampleRepository", Online = true, Storage = CreateDefaultStorage(), Raw = new Raw { ContentDisposition = "ATTACHMENT" } };Once this object is created, a call to the nexus handler will be performed, specifically the
Task CreateRepository<T>(T repositoryDto)method. The example is shown below:await _nexusHandler.CreateRepository(rawHostedRepository).ConfigureAwait(false); -
Upload new component:
To create a component similarly to the previous step, in order to upload a new repository, an instance of the type of component to be uploaded must be created, in this case it will be of type raw. The class to be created will be:
var rawComponent = new RawUploadComponent()
    {
        RepositoryName = "SampleRepository",
        Filename = {file path},
        Directory = "SampleDirectory",
        AssetPath = SampleAssetPath,
    };
Once this object is created, a call to the nexus handler will be performed, specifically the
Task UploadComponent<T>(T uploadComponent)method. The example is shown below:await _nexusHandler.UploadComponent(rawComponent); -
Retrieve metadata from component
To retrieve the component metadata, the
Task<Component> GetComponent(string repositoryName, string componentName)method of the nexus handler will be used. The example is shown below:var component = await _nexusHandler.GetComponent("SampleRepository", "SampleDirectory/SampleAssetPath"); -
Download uploaded file
To download the file, the
Task<string> DownloadAsset(string repositoryName, string assetName)method of the nexus handler will be used. The example is shown below:var downloadedFile = await _nexusHandler.DownloadAsset("SampleRepository", "SampleDirectory/SampleAssetPath");
How to: Protocol buffers
Protocol buffers are Google’s language-neutral, platform-neutral, extensible mechanism for serializing structured data. You can see it as a JSON or a XML file, but smaller, faster and with an easier syntax.
Protocol buffers are ideal for any situation in which you need to serialize data in a neutral language. Very useful when defining communications such as gRPC protocol.
In this guide you will learn how to create a protocol buffer using proto3 language.
The .proto file starts with a package declaration, which helps to prevent naming conflicts between different projects.
syntax = "proto3";

option csharp_namespace = "Devon4Net.Application.GrpcClient.Protos";

package greet;
Also for C#, you can specify the csharp_namespace option. If it wasn’t specified, the generated classes would be placed in a namespace matching the package name.
Messages
You also have message definitions, which is an aggregate containing a set of typed fields:
message Person {
  string name = 1;
  int32 id = 2;
  string email = 3;
}
The previous example defines a type Person with name, id and email. Each field needs a unique identifier, which is the number shown after the =. The data types are the standard ones including bool, int32, float, double, and string.
Let’s say that this Person can have many phone numbers, we could do something like:
message Person {
  string name = 1;
  int32 id = 2;
  string email = 3;
  repeated PhoneNumber phoneNumbers = 4;
}

message PhoneNumber {
  string number = 1;
  PhoneType type = 2;
}

enum PhoneType {
  MOBILE = 0;
  HOME = 1;
  WORK = 2;
}
As you can see, if a field is repeated, the field may be repeated any number of times, including 0. You can also define enum types if you want one of your fields to have one of a predefined list of values.
Services
If you want to use your message types with an RPC system, you may specify an RPC service interface in a.proto file, and the protocol buffer compiler will create code and stubs in your preferred language.
For example you could define the following contract:
service SearchService {
  rpc Search(SearchRequest) returns (SearchResponse);
}
In this case we will have a SearchService class with a Search method that accepts a SearchRequest and returns a SearchResponse. Both (SearchRequest and SearchResponse) need to be mapped to a message.
The following example shows the complete .proto file used in the devon gRPC templates.
syntax = "proto3";

option csharp_namespace = "Devon4Net.Application.GrpcClient.Protos";

package greet;

// The greeting service definition.
service Greeter {
  // Sends a greeting
  rpc SayHello (HelloRequest) returns (HelloReply);
}

// The request message containing the user's name.
message HelloRequest {
  string name = 1;
}

// The response message containing the greetings.
message HelloReply {
  string message = 1;
}|
Note
|
Please revise the template documentation and the component documentation to learn more about gRPC |
References
How to: AWS Lambda Function
In this part of the document you are going to learn how to develop and deploy AWS Lambda functions using devon4net.
|
Note
|
We will make use of the devon4net AWS template. So please make sure you have read its documentation to know where everything is placed. |
What is a Lambda Function?
A Lambda Function is a function or piece of code that runs in AWS without having to configure or manage a server. You can setup your code and deploy it to the AWS Lambda Service and can trigger and be triggered from other AWS Services.
It supports numerous programming languages among which is .NET.
Install the AWS template and Visual Studio AWS tools
In devon4Net you have some AWS templates available, to install them you can run the following command.
dotnet new --install Devon4Net.AWS.TemplateAfter this you will be able to create a project using the template provided by devon4net that include the components you need to start developing your first lambda function.
You will also need to install the AWS tools for Visual Studio. Run the following command to install the tools:
dotnet tool install -g Amazon.Lambda.ToolsOr check if a new version is available in case you have already installed it:
dotnet tool update -g Amazon.Lambda.ToolsCreate a project using the template
Now that everything is installed you can start by creating your project using the template, for that:
-
Open Visual Studio 2022 and select create a new project.
-
Look for the devon4net AWS Template, select it and click next.
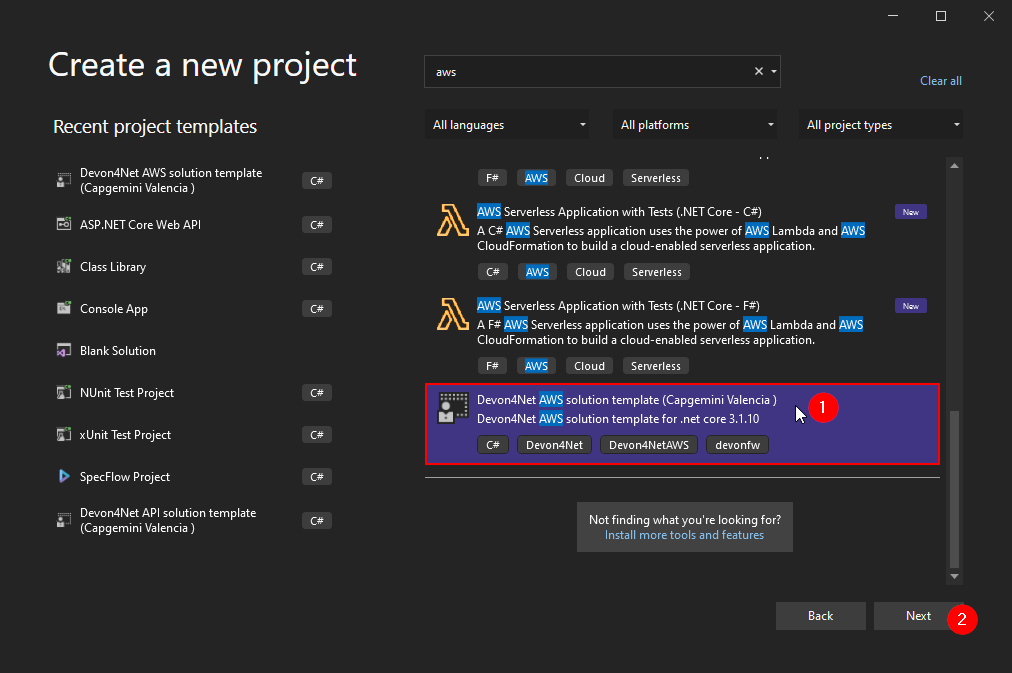 Figure 77. Create a new AWS project using devon4net
 -
Choose a name and project location and create it.
 Figure 78. Create a new AWS project using devon4net
This three steps will create the project where we will develop our function. For this tutorial, we will focus in the Lambda part of the template. That means, that we will only be using the Devon4Net.Application.Lambda project present in the template:

As you can see in the screenshot above, you already have some example functions that are already working:
-
SnsManagement: Example with Amazon Simple Notification Service (SNS) -
SqsManagement: Example with Amazon Simple Queue Service (SQS) -
StringManagement: Example processing some operations over strings
Each directory has the following subdirectories:
-
Handlers: Implementation of the functions.
-
Functions: Function definition for the services.
-
Dto: Objects used to input and output the data in the functions.
|
Note
|
If you want to learn more about what this part of the template includes you can read the Template Documentation. |
Develop your first function
We will follow the same file structure than the examples that are already in the template. For the example we will create a Calculator that will do a mathematical division of two numbers, dividend and divisor; and will produce two other numbers, quotient and remainder.
Step 1 - Create Input and output class
As the example says, we will need to input dividend and divisor, and output quotient and remainder, so lets create CalculatorInputDto and CalculatorOutput objects in CalculatorManagement/Dto.
public class CalculatorInputDto
{
    public int Dividend { get; set; }
    public int Divisor { get; set; }
}
public class CalculatorOutputDto
{
public int Quotient { get; set; }
public int Remainder { get; set; }
}Step 2 - Create Function Handler
To create the function handler you will need to implement the FunctionHandler method available thanks to ILambdaEventHandler<TInput, TOutput> interface from Devon4Net.Infrastructure.AWS.Lambda component.
|
Note
|
To learn more about it, please read the component documentation. |
This method will contain all the logic necessary that will be aplied to TInput to produce TOutput, being CalculatorInputDto and CalculatorOutputDto respectively.
To follow the structure it will be placed in CalculatorManagement/Handlers.
public class CalculatorFunctionEventHandler : ILambdaEventHandler<CalculatorInputDto, CalculatorOutputDto>
{
    public Task<CalculatorOutputDto> FunctionHandler(CalculatorInputDto calculatorInput, ILambdaContext context)
    {
        CalculatorOutputDto output = new()
        {
            Quotient = calculatorInput.Dividend/calculatorInput.Divisor,
            Remainder = calculatorInput.Dividend%calculatorInput.Divisor
        };
        return Task.FromResult(output);
    }
}
Step 3 - Add Function to Services
Now we need to create our Function class that will inherit from LambdaFunction<TInput, TOutput> also available thanks to the Devon4Net.Infrastructure.AWS.Lambda component.
And we will also need to implement the abstract method ConfigureServices as follows:
public class CalculatorFunction : LambdaFunction<CalculatorInputDto, CalculatorOutputDto>
{
    protected override void ConfigureServices(IServiceCollection services)
    {
        services
            .AddTransient<ILambdaEventHandler<CalculatorInputDto, CalculatorOutputDto>, CalculatorFunctionEventHandler>();
    }
}
It will be placed in CalculatorManagement/Functions to follow the same structure.
Step 4 - Configure it in serverless.template
After the previous three steps we will have something like this:
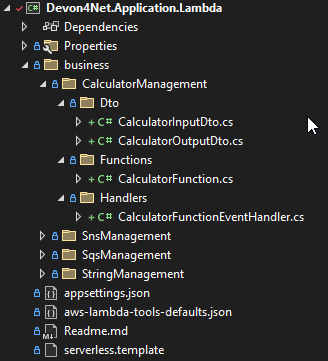
Now we need to configure it so that the function is interpreted by AWS Lambda service as a Lambda function. For that we have a template defined as serverless.template.
In that file we will find the configuration for all the functions, where we will need to add the following configuration for the CalculatorManagementFunction:
"CalculatorManagementFunction": {
  "Type": "AWS::Serverless::Function",
  "Properties": {
    "Handler": "Devon4Net.Application.Lambda::Devon4Net.Application.Lambda.business.CalculatorManagement.Functions.CalculatorFunction::FunctionHandler",
    "Runtime": "dotnetcore6.0",
    "CodeUri": "",
    "MemorySize": 512,
    "Timeout": 30,
    "Role": null,
    "Policies": [
      "AWSLambdaFullAccess",
      "AmazonSSMReadOnlyAccess",
      "AWSLambdaVPCAccessExecutionRole"
    ],
    "Environment": {
      "Variables": {}
    },
    "Events": {
      "ProxyResource": {
        "Type": "Api",
        "Properties": {
          "Path": "/{proxy+}",
          "Method": "ANY"
        }
      },
      "RootResource": {
        "Type": "Api",
        "Properties": {
          "Path": "/",
          "Method": "ANY"
        }
      }
    }
  }
}
Before trying everything, as we are not using neither AWS Secrets Manager nor AWS Parameter Store, navigate to appsettings.json and make sure the following variables are set to false:
{
  "AWS": {
    "UseSecrets": false,
    "UseParameterStore": false,
    "Credentials": {
      "Profile": "",
      "Region": "eu-west-1",
      "AccessKeyId": "",
      "SecretAccessKey": ""
    }
  }
}
Step 5 - Try it
To try that everything works fine in our local we will be using Mock Lambda Test Tool 6.0 from the AWS toolkit that we installed earlier.
For that, right click in the project (1) and select it as startup project (2). Then execute it by pressing the green button which says Mock Lambda Test Tool 6.0 (3).
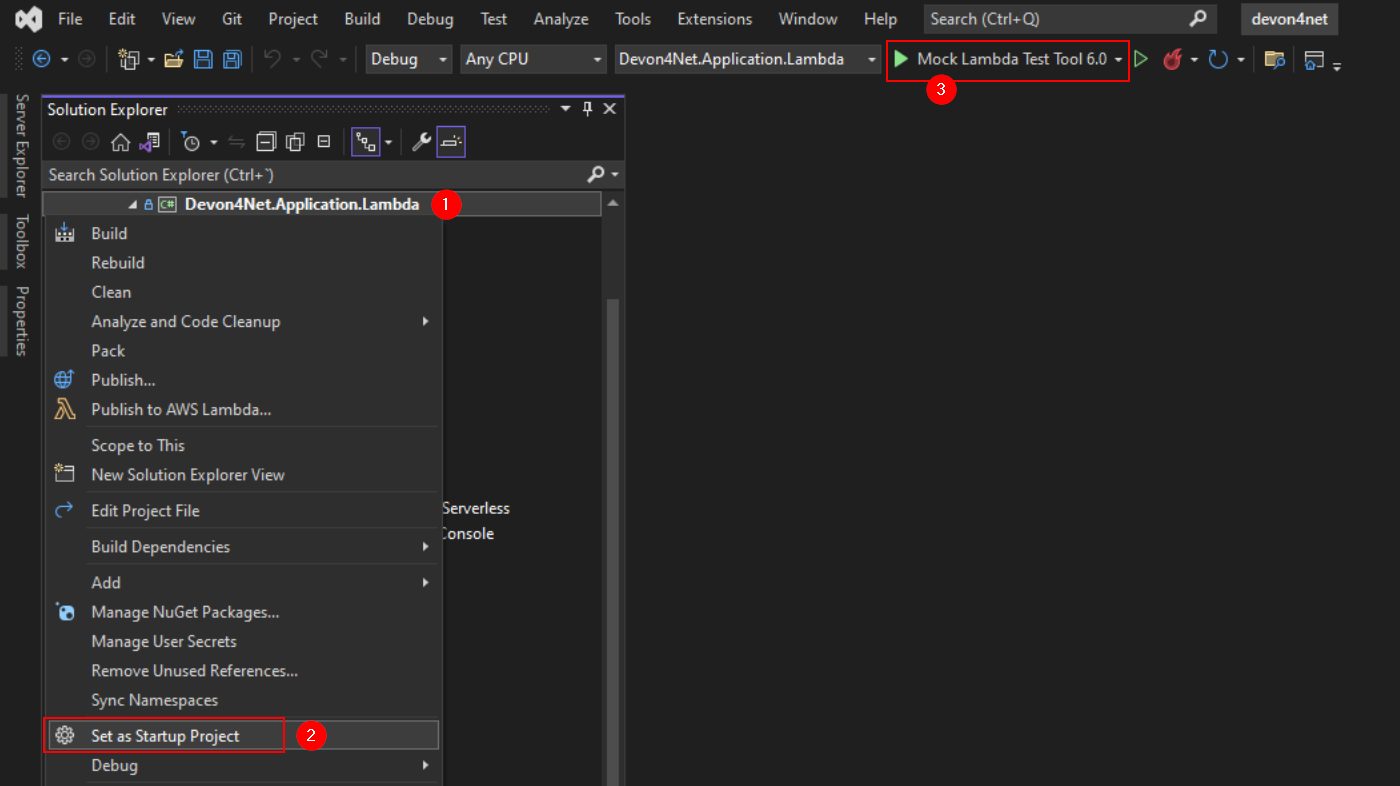
Now navigate to http://localhost:5050/ using your favorite web browser (1) and select the CalculatorFunction in the UI (2). You can put your desired numbers in the form of a JSON in the box (3), press Execute (4) and check the results (5).
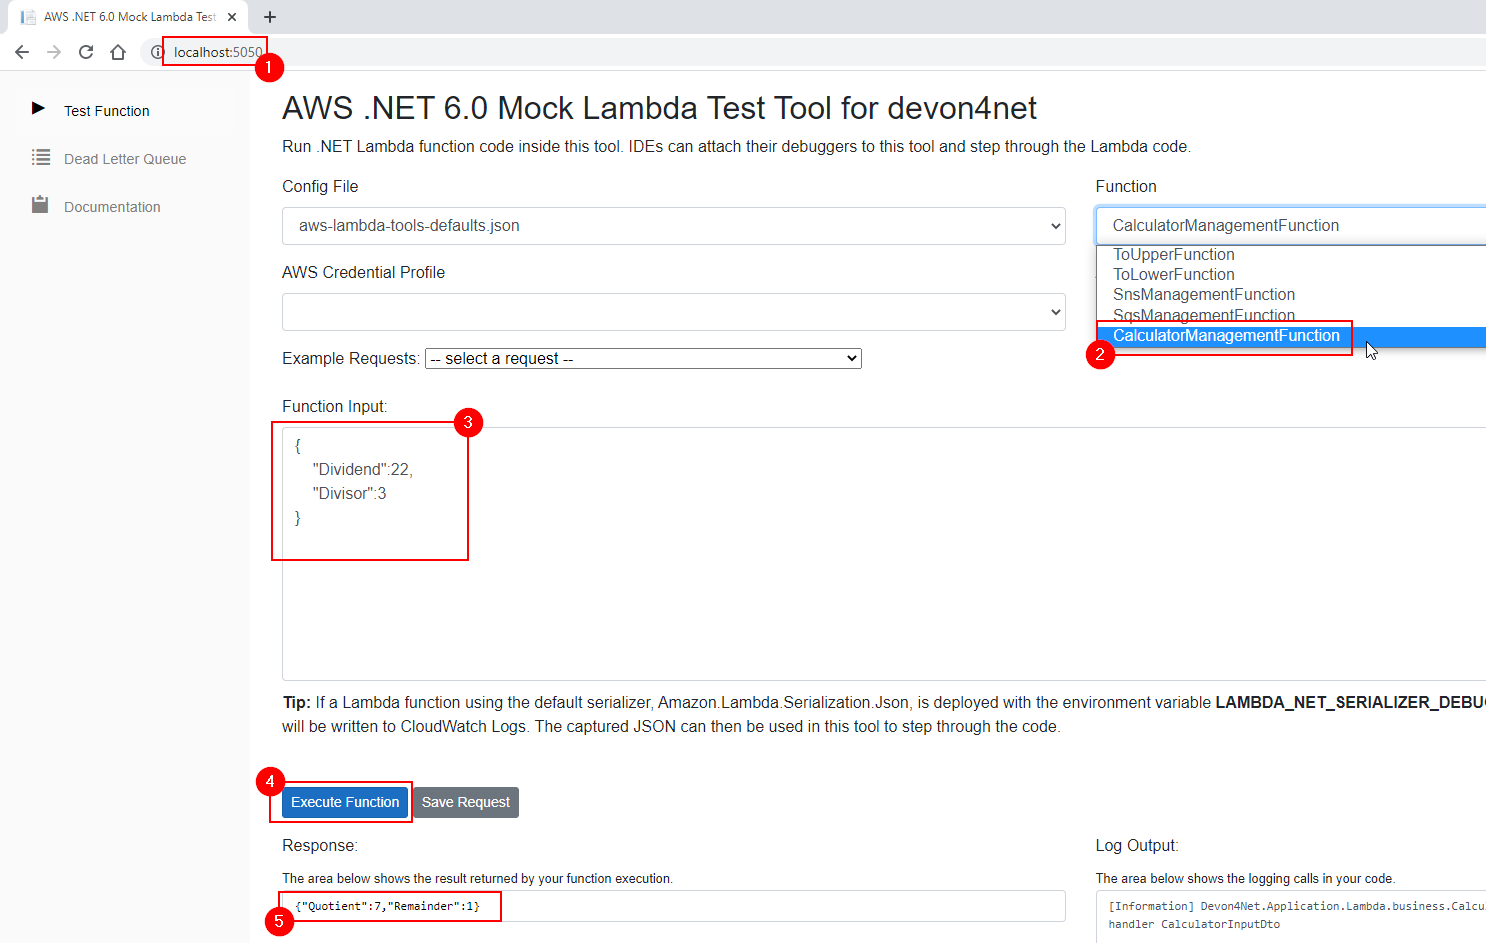
References
|
Note
|
Please check the next section if you want to learn how to deploy lambda functions. |
How to: Deploy AWS Lambda Functions
In this section, you are going to learn how to deploy AWS Lambda functions using AWS CLI, AWS console portal (web), and with the visual studio plugin.
|
Note
|
If you want to know more about developing lambda fuctions, please check the previous section. |
Install Amazon Lambda Tools
You will need to install the AWS Lambda tools. Run the following command to install the tools:
dotnet tool install -g Amazon.Lambda.ToolsOr check if a new version is available in case you have already installed it:
dotnet tool update -g Amazon.Lambda.Tools|
Warning
|
Working with AWS lambda fuctions requires an AWS account, remember that this type of operations may incur a cost. |
Deployment with AWS console portal (web)
Step 1 - Create publish file
Navigate to the application folder, run a terminal and execute the following command:
dotnet lambda packageThe file will be stored in the following path:
{Your-Project-Path}\bin\Release\{.Net-Version}\publish
Here’s an example: :

Step 2 - Create the lambda fuction in the AWS Lambda dashboard
To create the lambda fuction visit the AWS lambda Dashboard.
|
Warning
|
Remember to choose your desired region, service costs may depend on the selected region |
Then, in the upper right corner of the dashboard, click the Create function button.
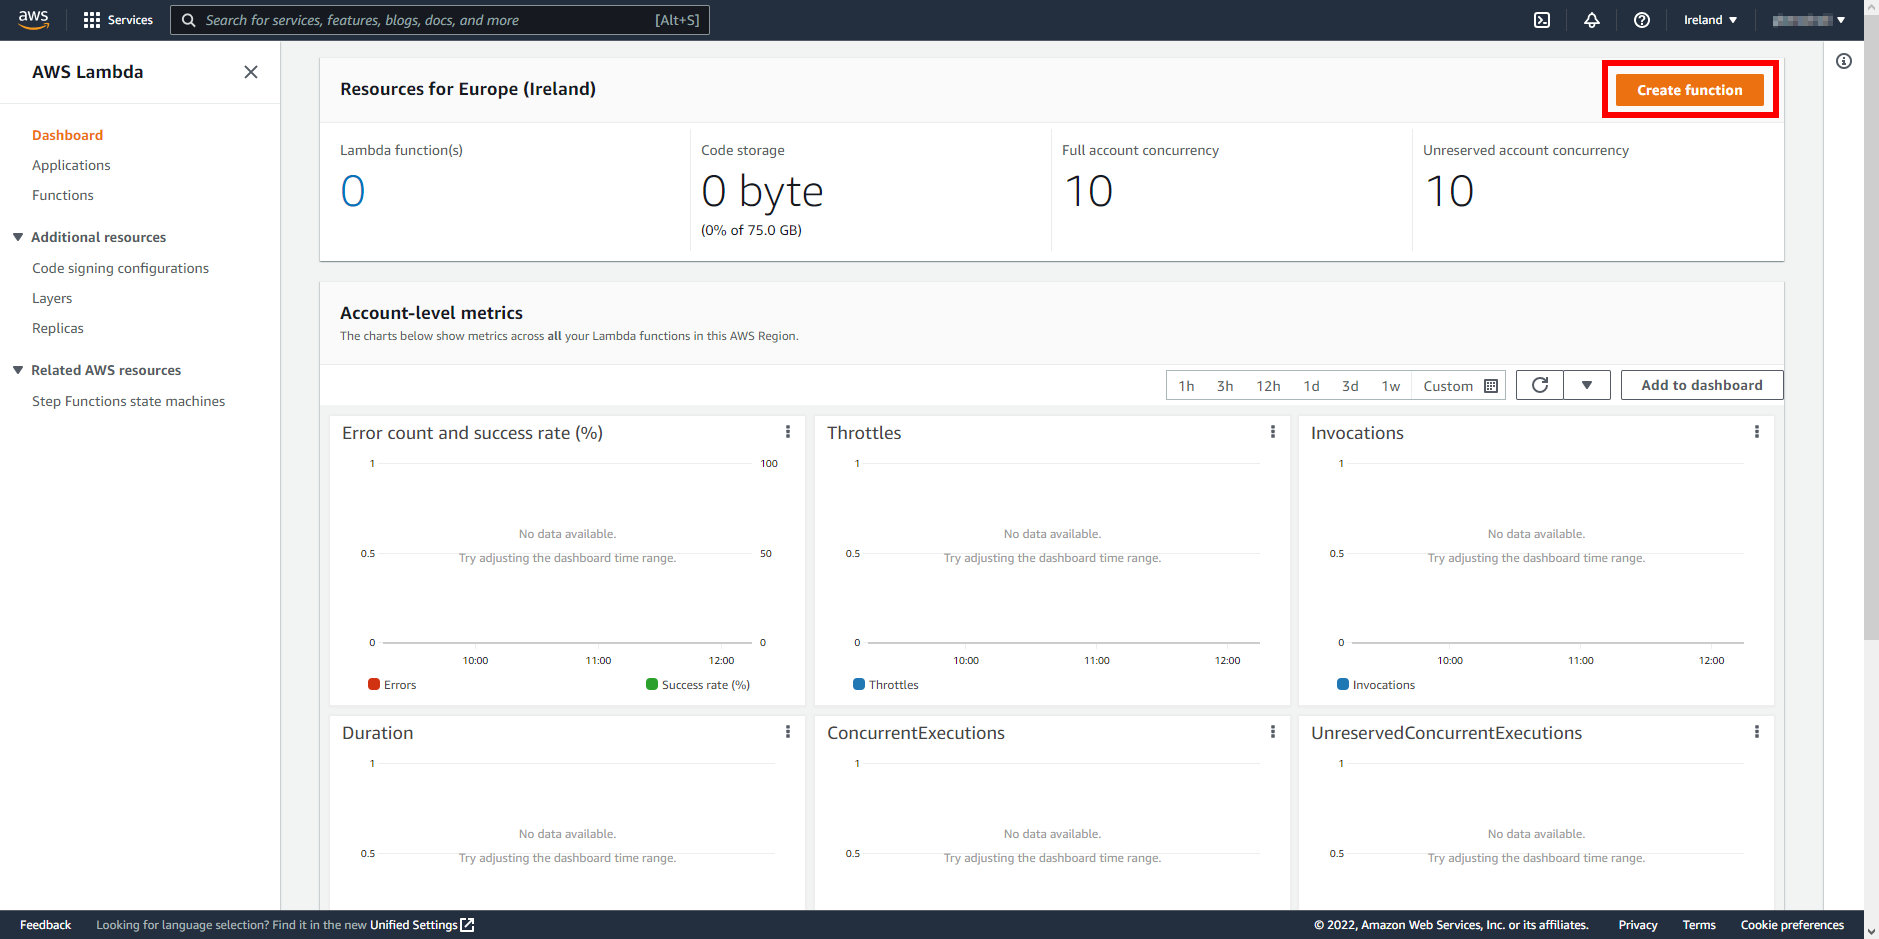
In the following page, you must provide a function name (1) and choose the appropriate runtime (2) for your project, which in our case is .Net 6. Then click in the Create function button (3).
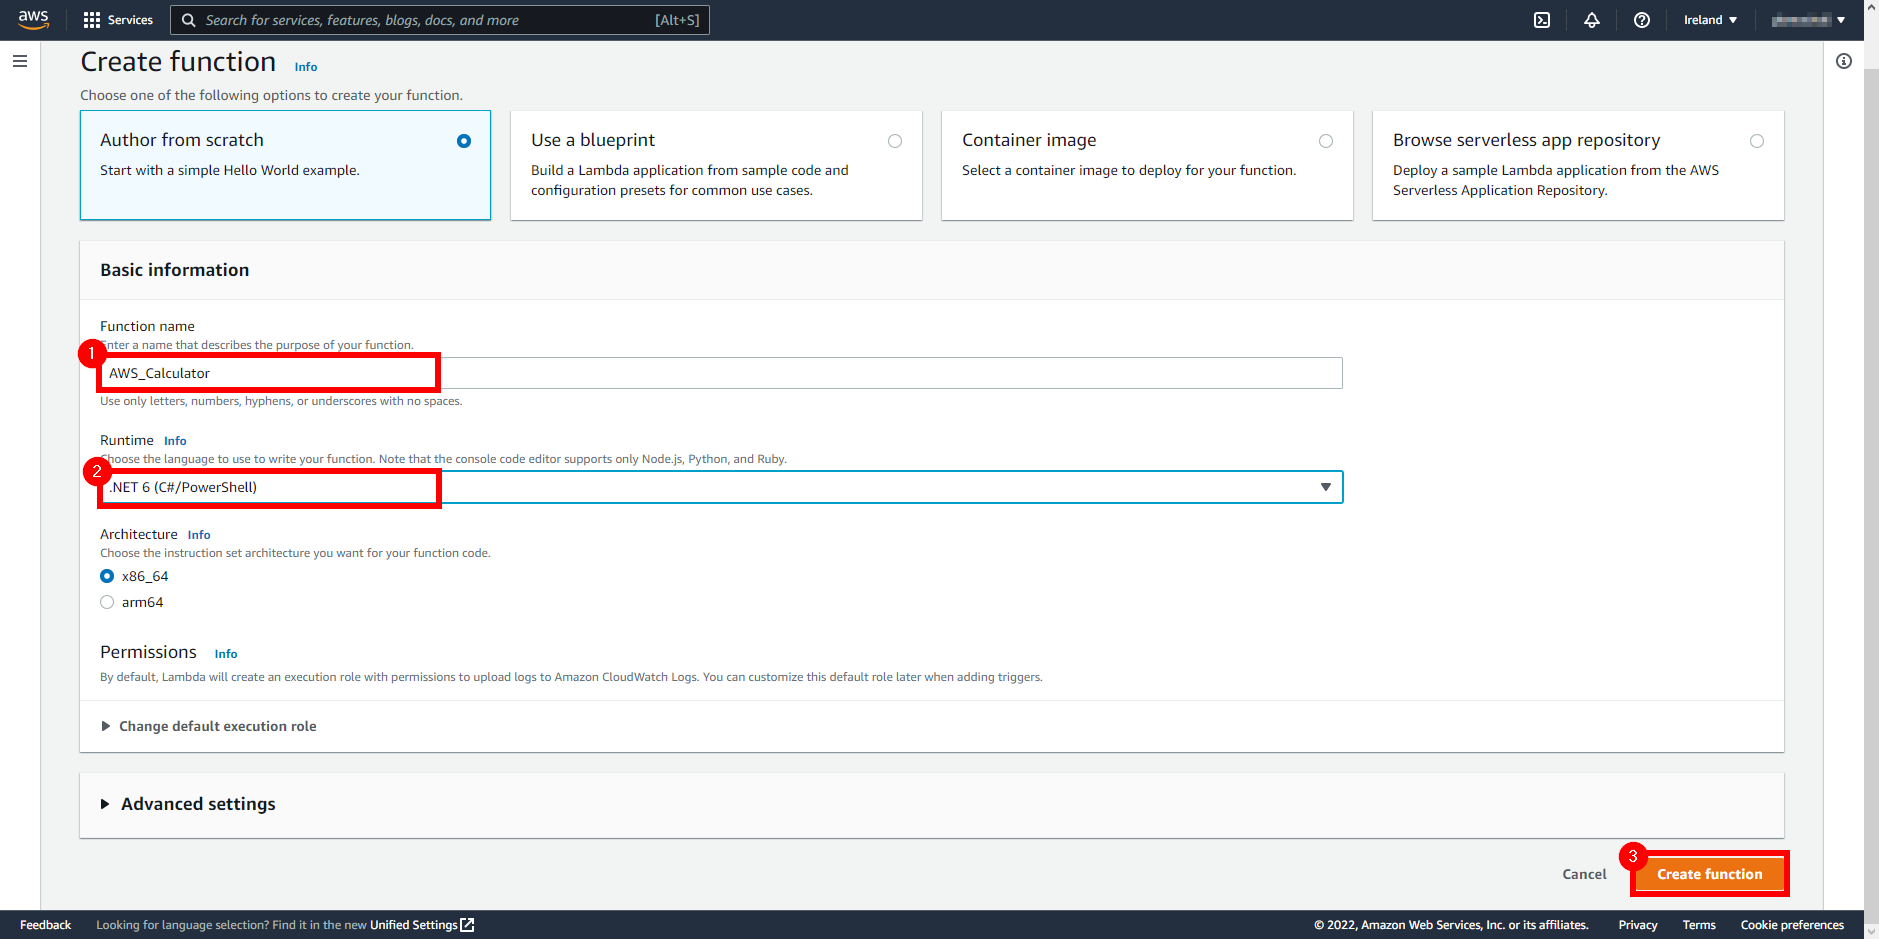
Step 3 - Upload .zip publish file
When we have finished creating our function, we must submit the .zip file that we prepared in step 1:
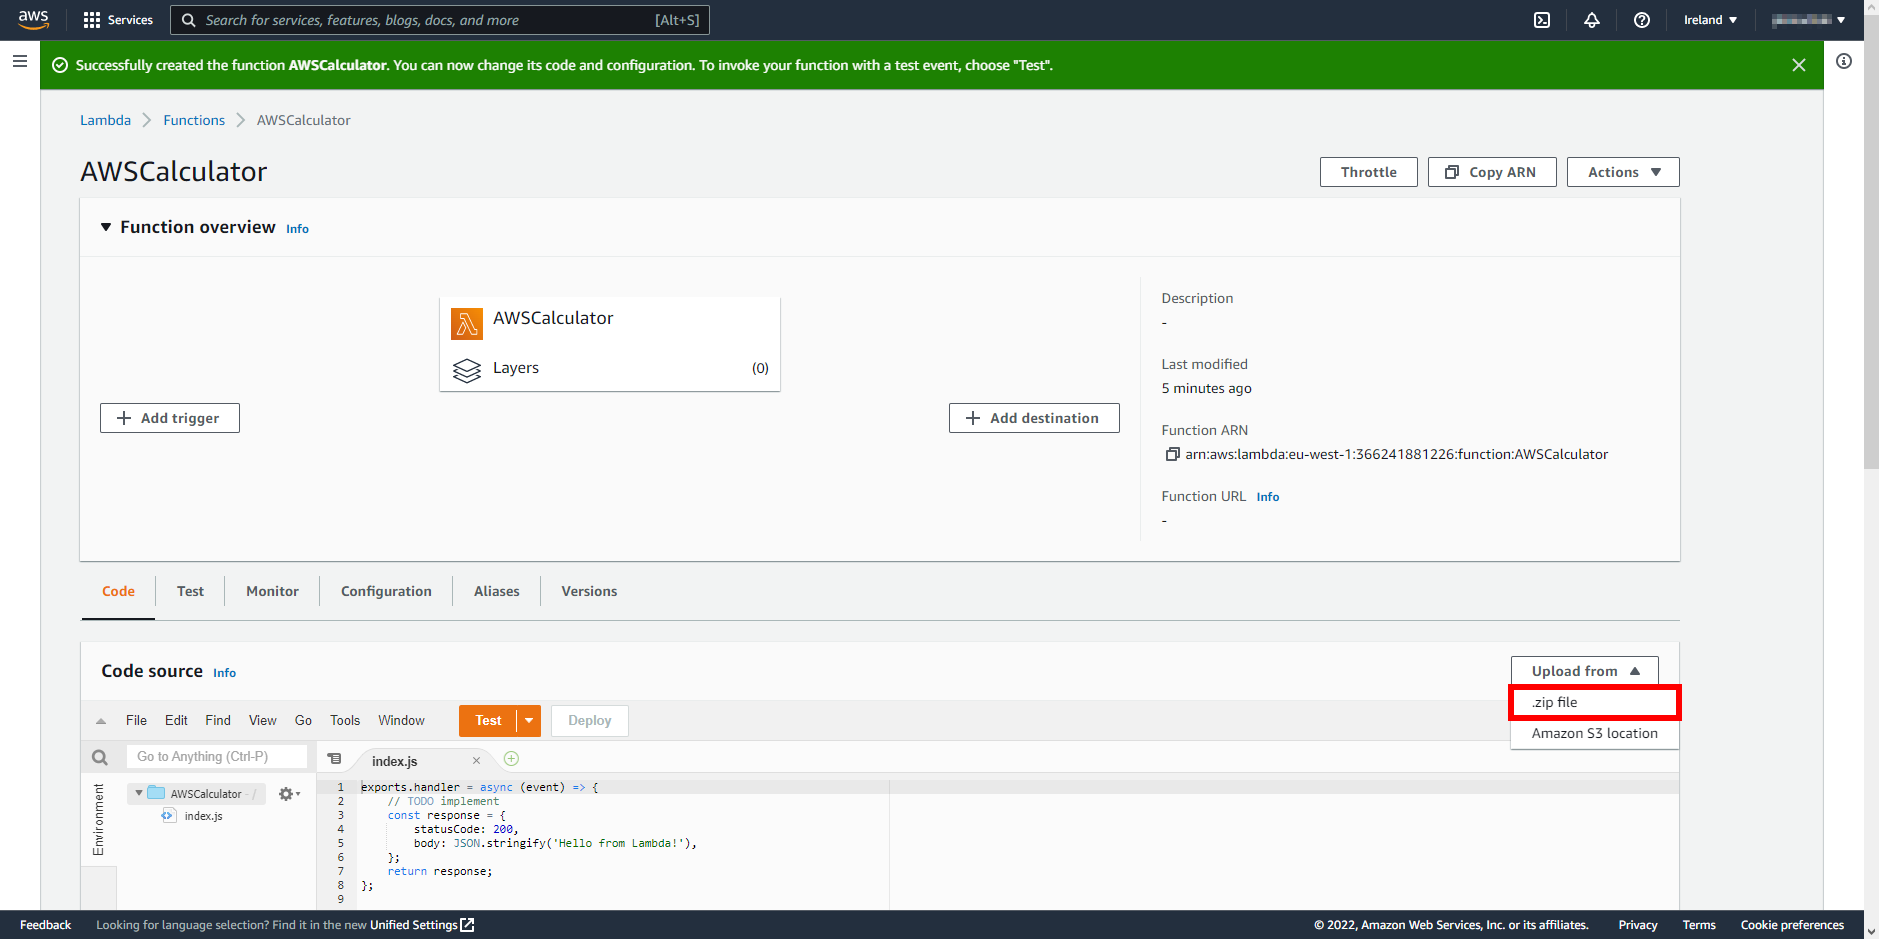
Step 4 - Add the Lambda Handler
To add the lambda handler, click the Edit button in the Runtime settings section of the code tab.
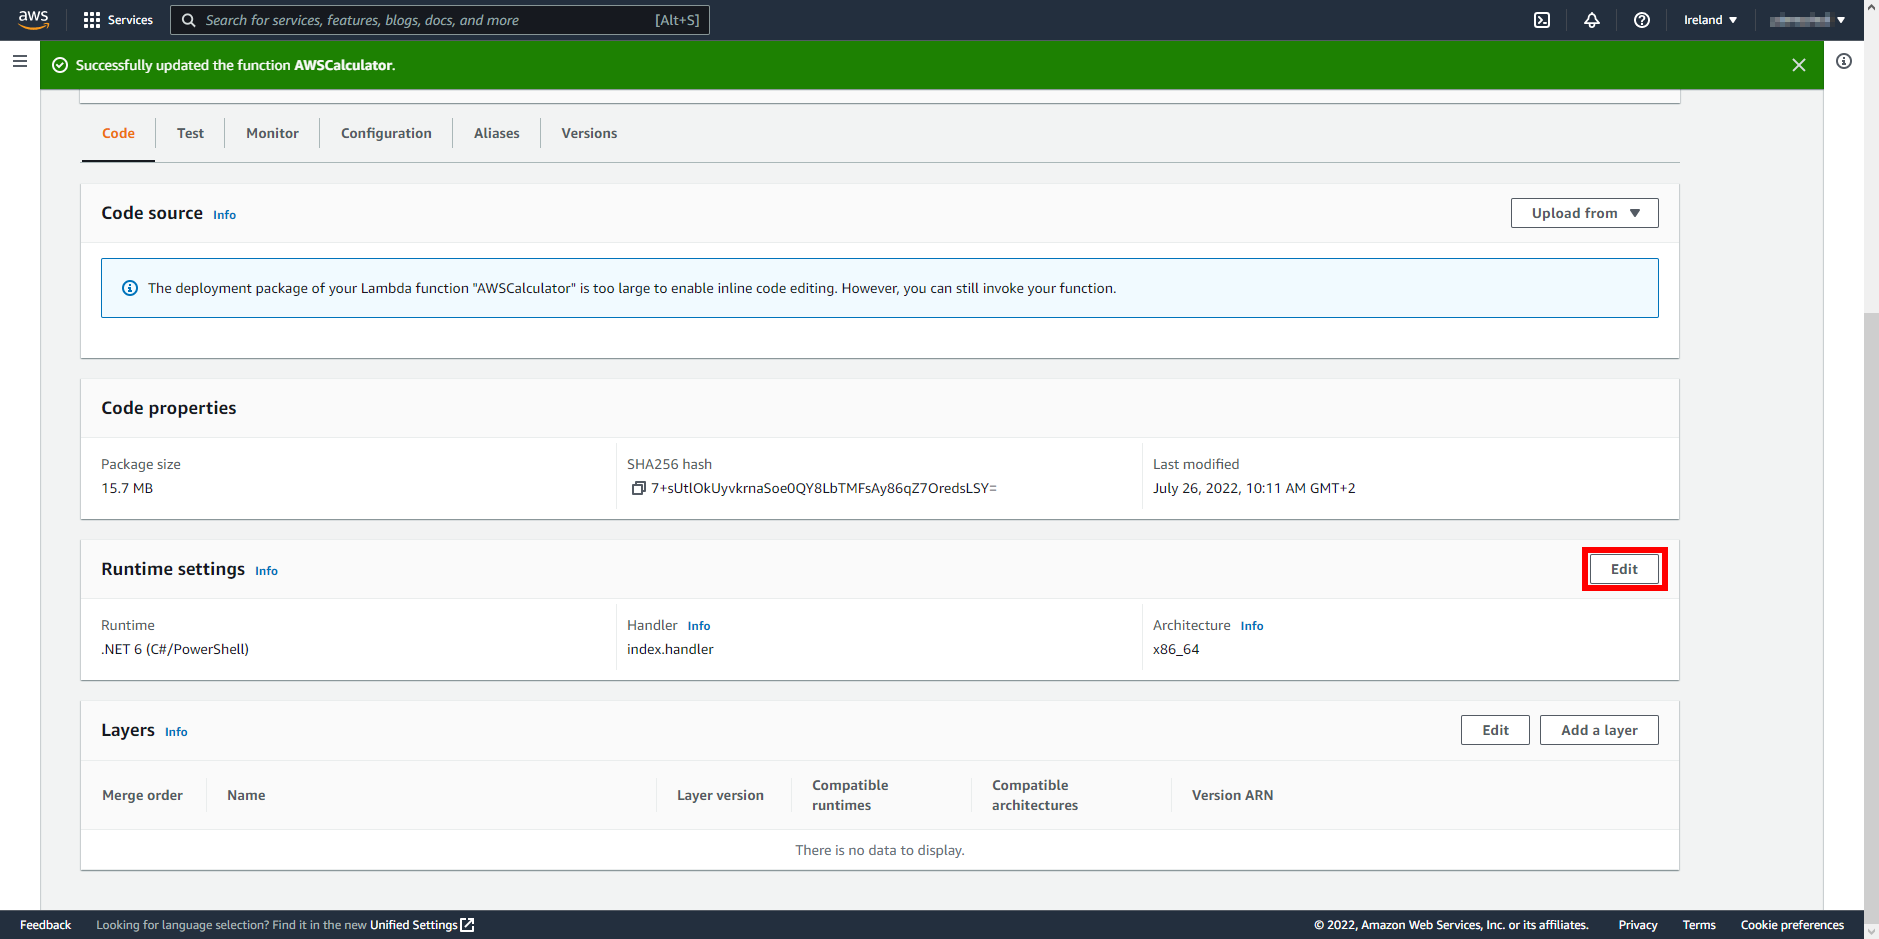
In the next page, ensure that you have selected the right runtime for your project (1), and then add the Handler (2), which must have the following structure:
Assembly::Namespace.ClassName::MethodName
In our example:
Devon4Net.Application.Lambda::Devon4Net.Application.Lambda.Functions.CalculatorFunction::FunctionHandler
|
Warning
|
The handler’s name cannot exceed 128 characters. |
Then click in the Save button(3).
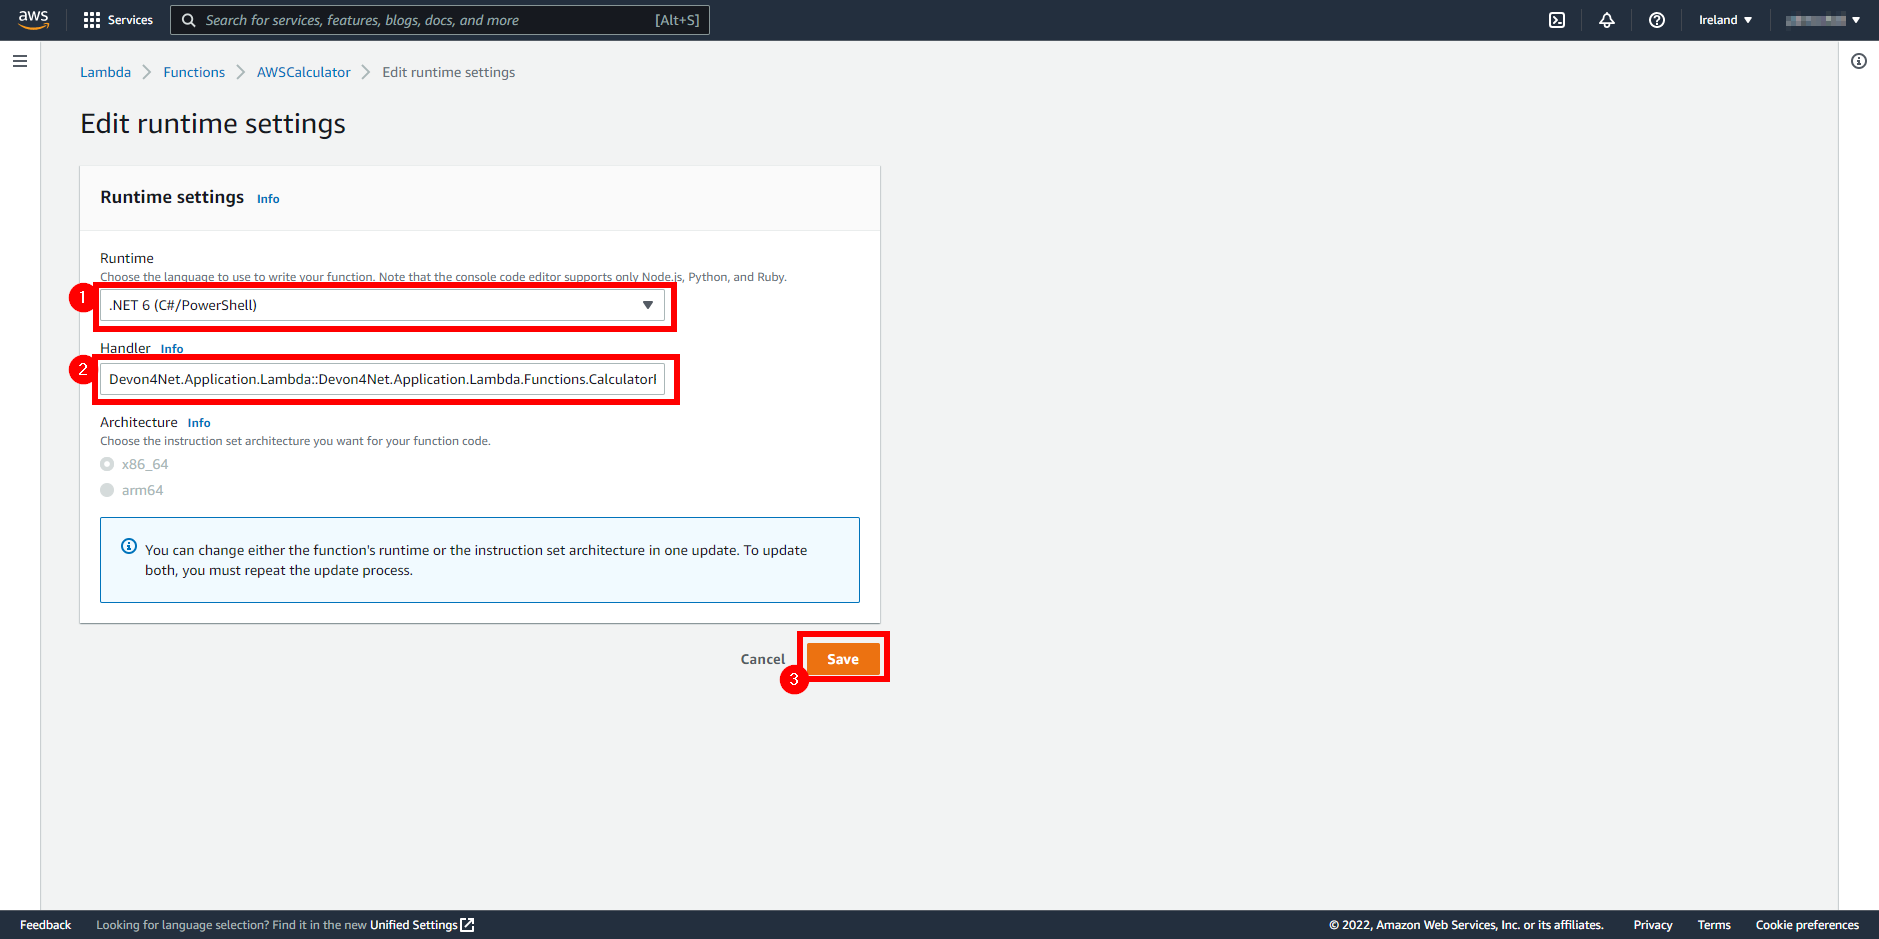
Step 5 - Test it
You may test your lambda function by selecting the test tab (1) and providing the function’s input parameters (2) in .JSON format:
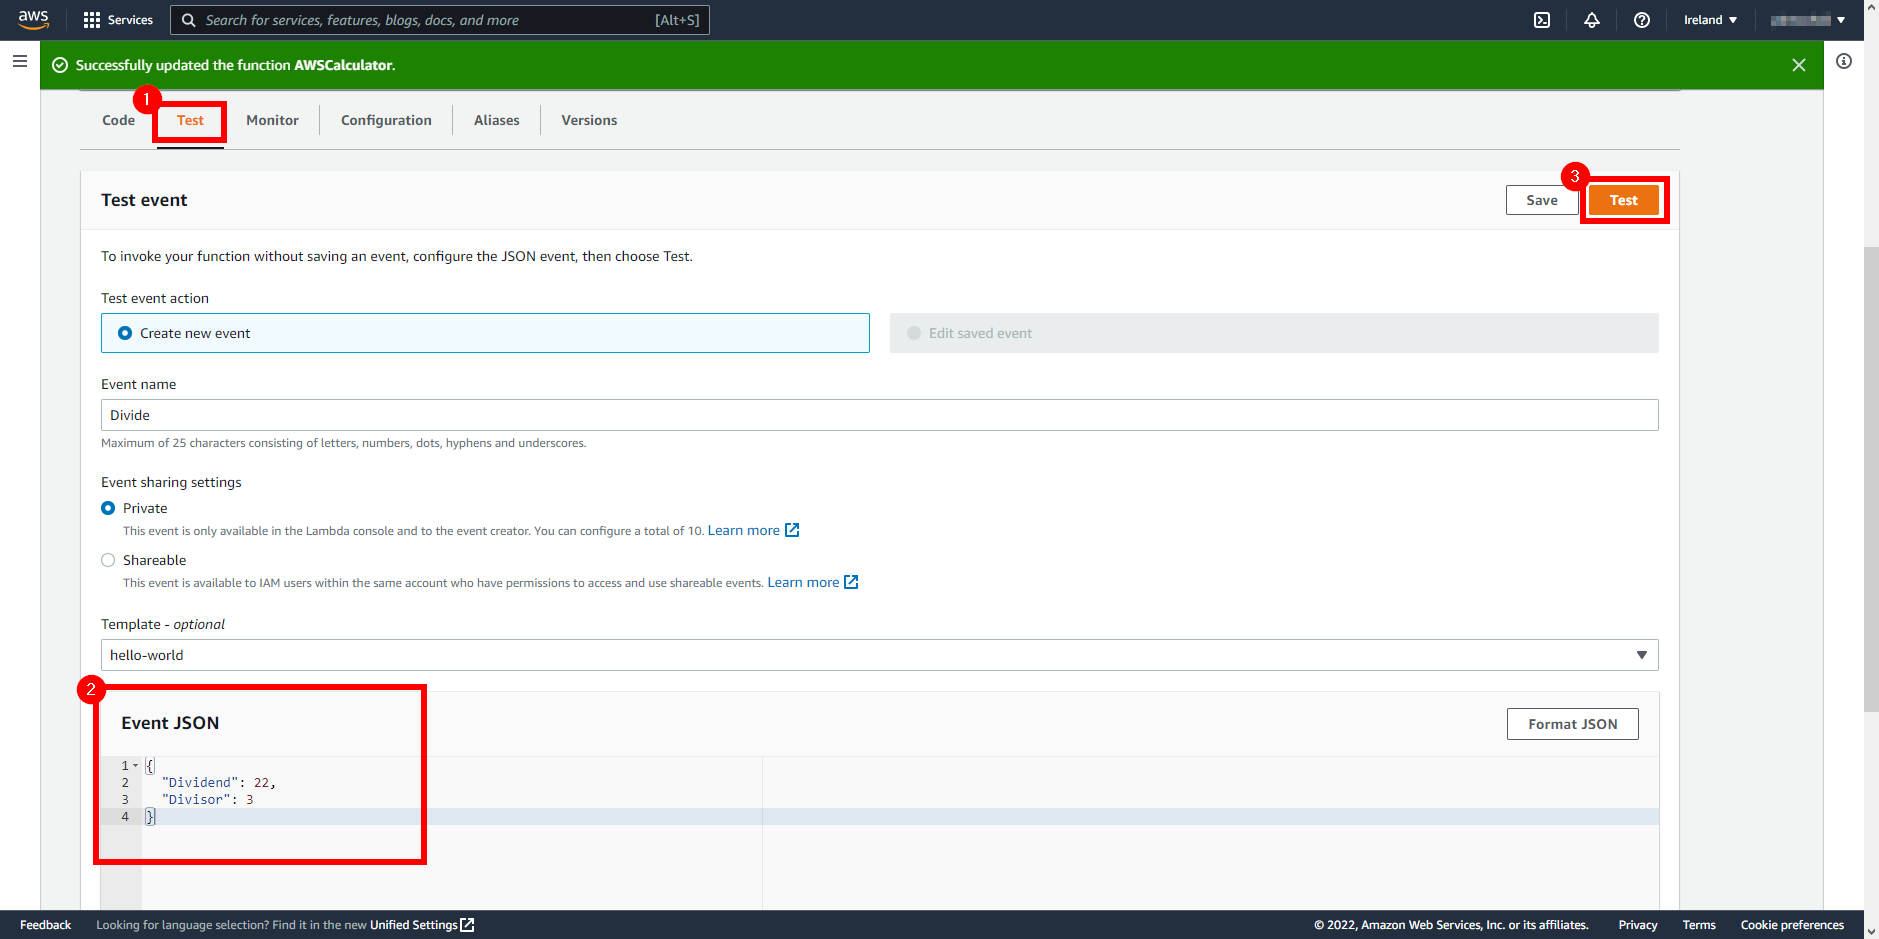
Once the information has been provided, click the Test button in the upper right corner of the page (3).
The output should look like this:

Deployment with AWS CLI
For deploying the lambda function using the Amazon Web Services CLI (Command Line Interface) first you will need to install the tool. You can check if you already have it by running the following command in your preferred terminal:
aws --versionIf you don’t see any output, please refer to the following guide for Installing or updating the latest version of the AWS CLI.
Step 1 - Configure your AWS CLI
Before using the CLI, you will need to configure it so that it can be linked to your aws account. For that, run the following command:
aws configureYou will need to input some security credentials that you will be able to find in your Security Credentials section in your AWS Dashboard.
Step 2 - Create Role with basic policy
Create the execution role that gives your function permission to access AWS resources.
In the following example, trust-policy.json is a file in the current directory. This trust policy allows Lambda to use the role’s permissions and contains the following data:
{
  "Version": "2012-10-17",
  "Statement": [
    {
      "Effect": "Allow",
      "Principal": {
        "Service": "lambda.amazonaws.com"
      },
      "Action": "sts:AssumeRole"
    }
  ]
}
To create an execution role with the AWS CLI and the previous trust policy, use the following command:
aws iam create-role --role-name lambda-ex --assume-role-policy-document file://trust-policy.jsonTo add permissions to the role, use the attach-policy-to-role command. Start by adding the AWSLambdaBasicExecutionRole managed policy, which adds permissions to write logs to CloudWatch Logs.
aws iam attach-role-policy --role-name lambda-ex --policy-arn arn:aws:iam::aws:policy/service-role/AWSLambdaBasicExecutionRoleStep 3 - Create publish file
Navigate to the application folder, run a terminal and execute the following command:
dotnet lambda packageThe file will be stored in the following path:
{Your-Project-Path}\bin\Release\{.Net-Version}\publish
Here’s an example: :
Step 4 - Deploy the function
Open a terminal in the path of your lambda .zip file (result of the previous step). For the next command you will need the following data:
-
{function-name}: The name you want for the function. e.g
AWSCalculator -
{zip-name}: The name of the zip that contains the publish files. e.g
Devon4Net.Application.Lambda.zip -
{handler}: The handler route of the lambda function folowing the form Assembly::Namespace.ClassName::MethodName. e.g
Devon4Net.Application.Lambda::Devon4Net.Application.Lambda.Functions.CalculatorFunction::FunctionHandler -
{runtime}: The runtime environment for your function to run on. e.g
dotnet6 -
{account-id}: The account id from your AWS Dashboard.
To deploy the function run the following command replacing the previous parameters with your data.
|
Warning
|
The handler’s name cannot exceed 128 characters. |
aws lambda create-function --function-name {function-name} --zip-file fileb://{zip-name} --handler {handler} --runtime {runtime} --role arn:aws:iam::{account-id}:role/lambda-exFor our example, the command will look like this:
aws lambda create-function --function-name AWSCalculator --zip-file fileb://Devon4Net.Application.Lambda.zip --handler Devon4Net.Application.Lambda::Devon4Net.Application.Lambda.Functions.CalculatorFunction::FunctionHandler --runtime dotnet6 --role arn:aws:iam::123456789012:role/lambda-exYou will see a JSON output with the result of the deployment if everything worked properly. You can also check if the deployment was done correctly by listing your lambda functions:
aws lambda list-functions --max-items 10Step 5 - Test the function
To test the function you can run the invoke command that will receive an input.json file containing the input data for the lambda function, and will output the result in output.json. The input file will look something like this:
{
  "Dividend": 22,
  "Divisor": 3
}
For our example calculator, run following the command in the same directory than the input.json:
aws lambda invoke --function-name AWSCalculator --cli-binary-format raw-in-base64-out --payload file://input.json output.jsonIf everything has gone according to plan, your output.json file will look like this:
{
    "Quotient":7,
    "Remainder":1
}
Deployment with AWS Toolkit for Visual Studio
For deploying the lambda function using the AWS Toolkit for Visual Studio first you will need to install the plugin.
For installing it, please refer to the following documentation Install the AWS Toolkit for Visual Studio.
Step 1 - Set up your AWS Account in Visual Studio
The first thing that you have to do, is configure your AWS Credentials. For that you must navigate to:
View > AWS Explorer
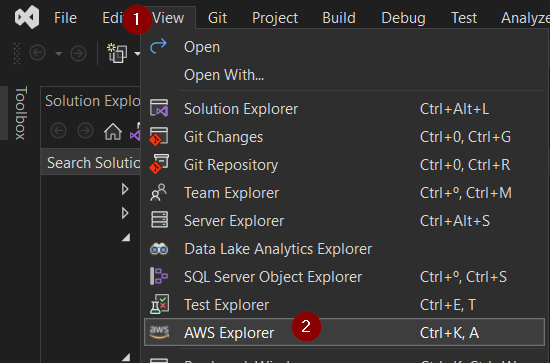
Add a new profile for AWS credentials as showing on the image below:
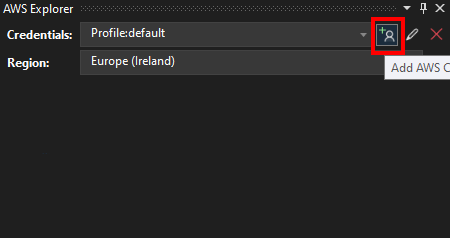
Set the credentials needed:
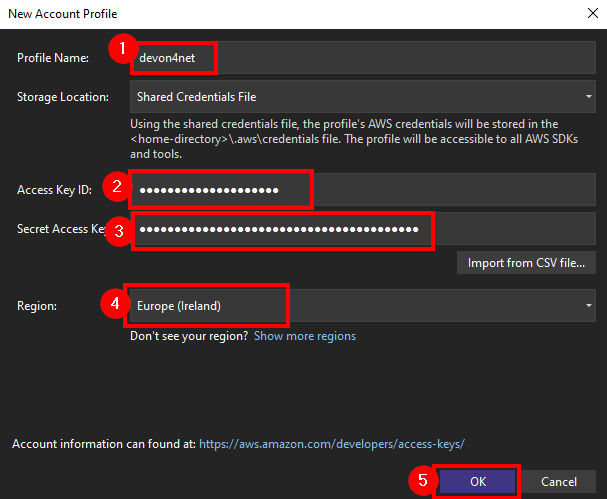
You may find the Access Key ID (2) and the Secret Access Key (3) at AWS Dashboard.
Step 2 - Create publish file
Navigate to the application folder, run a terminal and execute the following command:
dotnet lambda packageThe file will be stored in the following path:
{Your-Project-Path}\bin\Release\{.Net-Version}\publish
Here’s an example: :
Step 3 - Create a new function
Return to the AWS Explorer, right click in AWS Lambda (1) and select the Create New Function option (2)
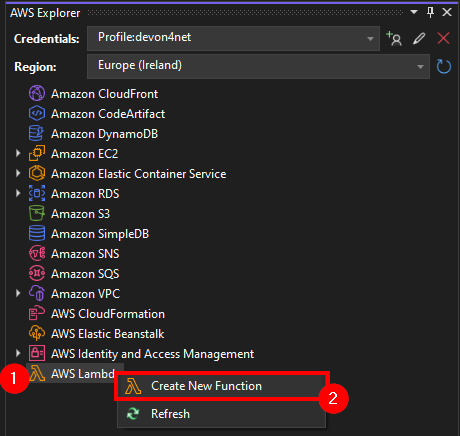
In the next screen you must provide the details about the function that you want to upload

-
Source Code: Refers to the .zip file that you created in the previous step
-
Function Name: The name that you want for your function
-
Handler’s name: This parameter must follow the next structure:
Assembly::Namespace.ClassName::MethodName
|
Warning
|
The handler’s name cannot exceed 128 characters. |
Once the information has been provided, click the Next button.
Step 4 - Create Role with basic policy
In the next step, we’ll set up a Role. Choose an existing role or create one if you don’t have one already.
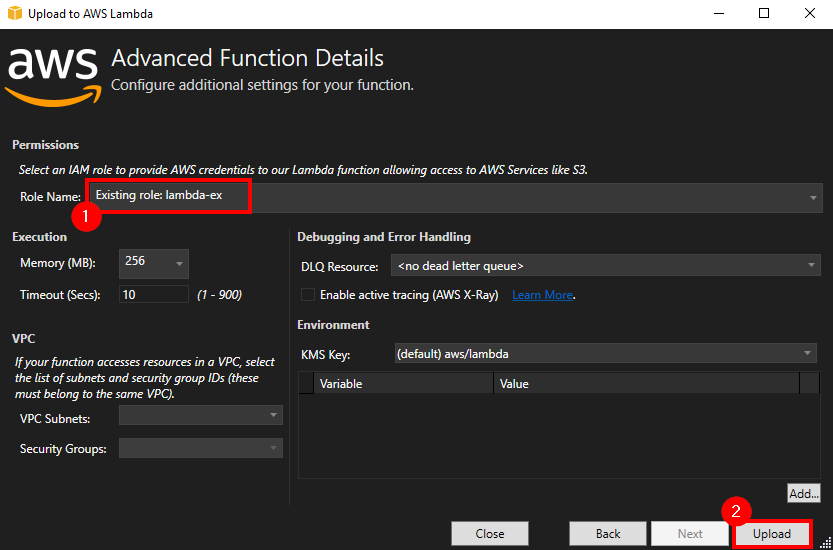
Then click the Upload button.
Step 5 - Test the function
Now you can test your lambda function providing the function’s input parameters (1) in JSON format:
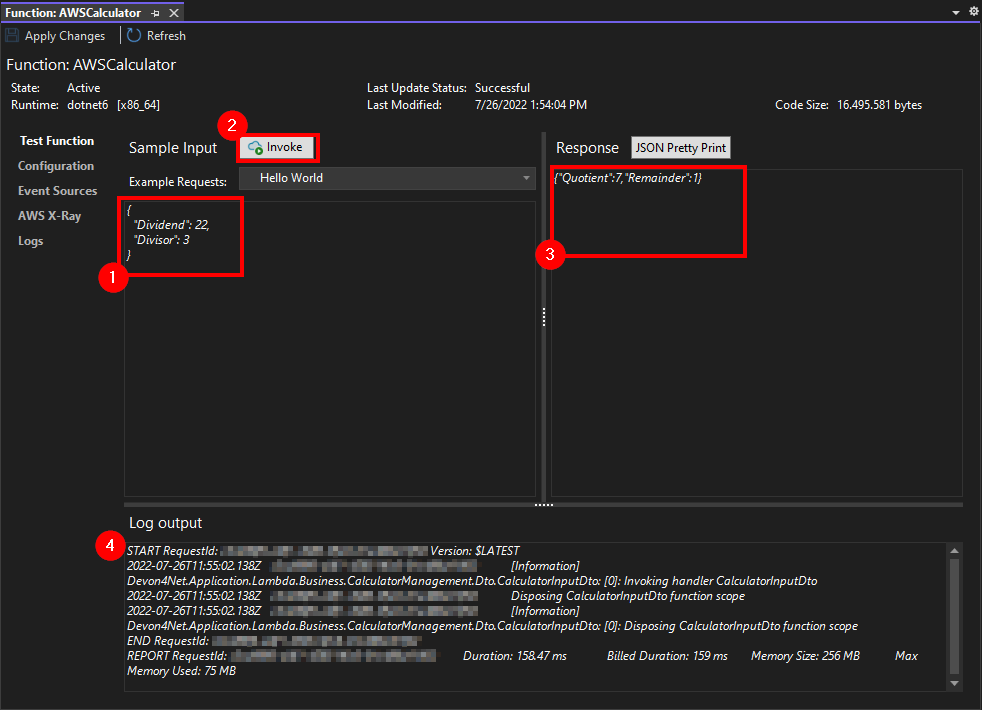
Once the information has been provided, click the Invoke button (2) to run the function.
You can see the Response (3) and the Log output (4)
How to: AWS Serverless
In this section, you will learn how to launch a AWS WebAPI serverless using devon4net.
|
Note
|
We will make use of the devon4net AWS template. So please make sure you have read its documentation to know where everything is placed. |
What is a serverless architecture?
A serverless architecture is a way to build and run applications and services without having to manage infrastructure. Your application still runs on servers, but all the server management is done by AWS.
Install the AWS template and Visual Studio AWS tools
In devon4Net you have some AWS templates available, to install them you can run the following command.
dotnet new --install Devon4Net.AWS.TemplateFollowing that, you will be able to build a project using the devon4net template that includes the components you need to begin building your first AWS serverless WebAPI.
Create a project using the template
Now that everything is in place, you may begin by creating your project using the template:
-
Open Visual Studio 2022 and select create a new project.
-
Look for the devon4net AWS Template, select it and click next.
Figure 99. Create a new AWS project using devon4net -
Choose a name and project location and create it.
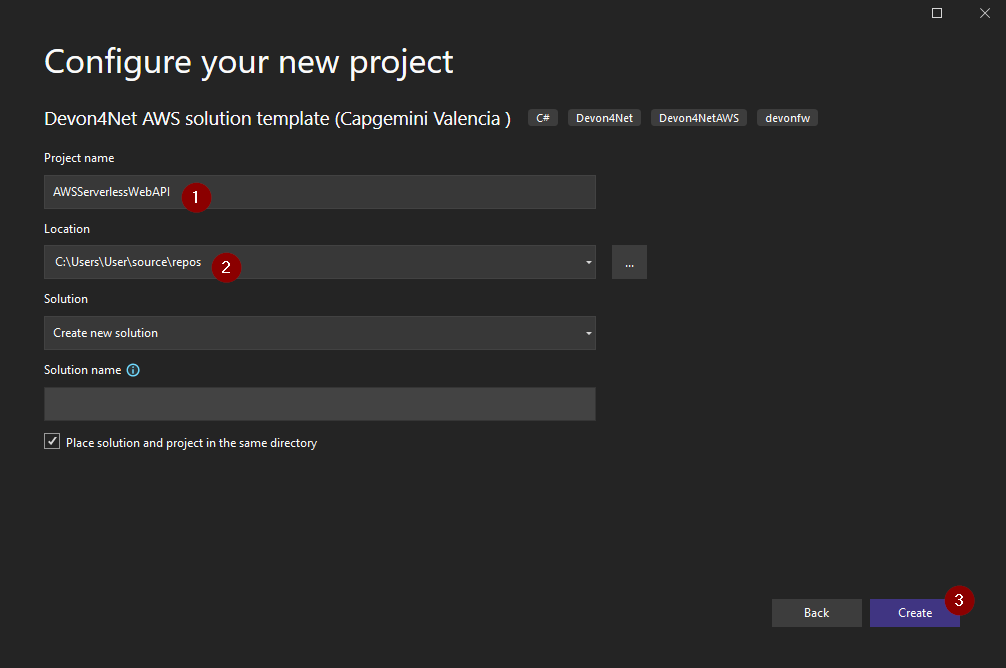 Figure 100. Create a new AWS project using devon4net
These three procedures will result in the creation of the project in which we will develop our serverless WebAPI. For that, we will just use the project 'Devon4Net.Application.WebAPI.AwsServerless' from the template:
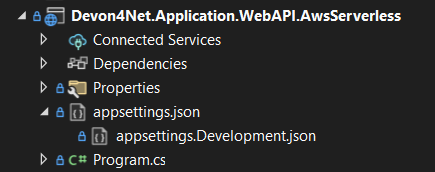
[[devonfw-guide_devon4net.wiki_howto.asciidoc_step-1---configure-it-in-appsettings.{environment}.json]]
==== Step 1 - Configure it in appsettings.{environment}.json
{
    "AWS": {
    "EnableAws": true,
    "UseSecrets": true,
    "UseParameterStore": true,
    "Credentials": {
      "Profile": "default",
      "Region": "eu-west-1",
      "AccessKeyId": "",
      "SecretAccessKey": ""
    },
    "Cognito": {
      "IdentityPools": [
        {
          "IdentityPoolId": "",
          "IdentityPoolName": "",
          "ClientId": ""
        }
      ]
    },
    "SqSQueueList": [
      {
        "QueueName": "", // Mandatory. Put the name of the queue here
        "Url": "", //optional. If it is not present, it will be requested to AWS
        "UseFifo": false,
        "MaximumMessageSize": 256,
        "NumberOfThreads": 2,
        "DelaySeconds": 0,
        "ReceiveMessageWaitTimeSeconds": 0,
        "MaxNumberOfMessagesToRetrievePerCall": 1,
        "RedrivePolicy": {
          "MaxReceiveCount": 1,
          "RedrivePolicy": {
            "MaxReceiveCount": 1,
            "DeadLetterQueueUrl": ""
          }
        }
      }
    ]
  }
}|
Note
|
If you want to learn more about these parameters you can check the template or the component documentation. |
Step 2 - Set up as startup project
-
Right click in the
Devon4Net.Application.WebAPI.AwsServerless. -
Select the "Set as Startup Project" option.
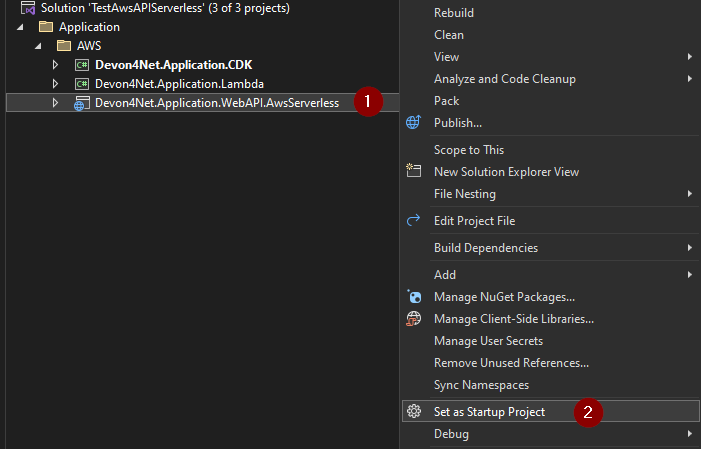
Step 3 - Run it
Run the project and now you can start to develop your serverless WebAPI.
How to: AWS DynamoDB
In this guide, you will learn how to configure and use the Amazon DynamoDB database service using devon4net.
What is Amazon DynamoDB?
Amazon DynamoDB is a fully managed NoSQL database service that provides fast and predictable performance with seamless scalability. In DynamoDB, tables, items, and attributes are the core components that you work with. A table is a collection of items, and each item is a collection of attributes. DynamoDB employs primary keys to uniquely identify each item in a table, as well as secondary indexes to provide query flexibility. DynamoDB supports two different types of primary keys:
-
Partition key
-
Partition key and Sort key
|
Warning
|
Sort keys and Secondary indexes are not yet available in devon4net; however, we are working on introducing such features in future updates. |
In devon4net you may work with two types of repositories:
-
Table Repository, which is intended for Complex objects, works with tables and serialization.
-
Entity Repository, which is designed for Model objects with annotations.
Installing the nuget
You need to install the AWSSDK.DynamoDBV2 nuget, for that you can run the following command in the Package Manager Console:
Install-Package AWSSDK.DynamoDBv2Working with Table Repository
Step 1 - Create the object
Create the object you want to use to interact with the database; in this example, we built a user object:
public class User
    {
        public string Key { get; set; }
        public string Name { get; set; }
        public string Surname {get; set;}
    }
Step 2 - Register the DynamoDbTableRepository service
The code below registers the IDynamoDbTableRepository service with the concrete type DynamoDbTableRepository. The AddTransient method registers the service with a transient lifetime. These services are created each time they’re requested from the service container:
protected override void ConfigureServices(IServiceCollection services)
  {
    services.AddTransient<IDynamoDbTableRepository, DynamoDbTableRepository>();
  }
Step 3 - Inject the Table Repository
private IDynamoDbTableRepository DynamoDbTableRepository { get; set; }
        public RepositoryService(IDynamoDbTableRepository dynamoDbTableRepository)
        {
            DynamoDbTableRepository = dynamoDbTableRepository;
        }
Step 4 - Create a table
In this scenario, we want to create a table called users. The code below first checks if the table users already exists, and if it doesn’t, then uses the CreateTable method from the DynamoDbTableRepository to create it:
public async void CreateTable()
        {
            if (!await DynamoDbTableRepository.TableExists("users").ConfigureAwait(false))
            {
                await DynamoDbTableRepository.CreateTable("users",
                    new List<KeySchemaElement> { new KeySchemaElement { AttributeName = DynamoDbGeneralObjectStorageAttributes.AttributeKey, KeyType = KeyType.HASH } },
                    new List<AttributeDefinition> { new AttributeDefinition { AttributeName = DynamoDbGeneralObjectStorageAttributes.AttributeKey, AttributeType = ScalarAttributeType.S } }).ConfigureAwait(false);
            }

        }
Step 5 - Insert values into the table
Now let’s insert data into the table using the repository’s Put method. We must specify the table name, partition key, and object to insert.
public async Task<User> InsertUser()
        {
            var user = new User {
                Key = "User-01",
                Name = "Josh",
                Surname = "Martin"
            };

            await DynamoDbTableRepository.Put("users", user.Key, user).ConfigureAwait(false);
            var criteria = new DynamoSearchCriteria();
            criteria.AddQueryCriteria(DynamoDbGeneralObjectStorageAttributes.AttributeKey, user.Key, QueryOperator.Equal); // For query method
            var result = await DynamoDbTableRepository.Get<User>("users", criteria.GetCriteriaScanFilterForSearchCriteria()).ConfigureAwait(false);
            return result.FirstOrDefault();
        }
As you can see in the code above, we can obtain the result using DynamoSearchCriteria() We will describe query and scan methods later in this guide.
Working with Entity Repository
Step 1 - Create the Entity
Create the entity you want to use to interact with the database; in this example, we built a Users entity:
[DynamoDBTable("users")]
public class UsersTable
    {
        [DynamoDBHashKey]
        [DynamoDBProperty("key")]
        public string Key { get; set; }

        [DynamoDBProperty("name")]
        public string Name { get; set; }

        [DynamoDBProperty("surname")]
        public string Surname {get; set;}

        [DynamoDBIgnore]
        public int Age {get; set;}
    }
In this example, we use some annotations:
-
[DynamoDBTable("tableName")]: The name of the table that will be created for this entity. -
[DynamoDBHashKey]: Is used to set a property as Partition Key. -
[DynamoDBProperty("propertyName")]: The name of the property that will be shown in the database. -
[DynamoDBIgnore]: For avoiding this property when saving or loading data.
Step 2 - Register the DynamoDbEntityRepository service
The code below registers the IDynamoDbEntityRepository service with the concrete type DynamoDbEntityRepository. The AddTransient method registers the service with a transient lifetime. These services are created each time they’re requested from the service container:
protected override void ConfigureServices(IServiceCollection services)
  {
    services.AddTransient<IDynamoDbEntityRepository<UsersTable>, DynamoDbEntityRepository<UsersTable>>();
  }
Step 3 - Inject the Entity Repository
private IDynamoDbEntityRepository<UsersTable> DynamoDbEntityRepository { get; set; }
        public DynamoDbFunctionEventHandler(IDynamoDbEntityRepository<UsersTable> dynamoDbEntityRepository)
        {
            DynamoDbEntityRepository = dynamoDbEntityRepository;
        }
Step 4 - Create a table
In this example, we want to create a table called users. The code below first checks if the table users already exists, and if it doesn’t, then uses the CreateTable method from the DynamoDbEntityRepository to create it:
public async void CreateTable()
        {
            if (!await DynamoDbEntityRepository.TableExists("users").ConfigureAwait(false))
            {
                await DynamoDbEntityRepository.CreateTable("users",
                    new List<KeySchemaElement> { new KeySchemaElement { AttributeName = DynamoDbGeneralObjectStorageAttributes.AttributeKey, KeyType = KeyType.HASH } },
                    new List<AttributeDefinition> { new AttributeDefinition { AttributeName = DynamoDbGeneralObjectStorageAttributes.AttributeKey, AttributeType = ScalarAttributeType.S } }).ConfigureAwait(false);
            }

        }
Step 5 - Insert values into the table
Now let’s insert data into the table using the repository’s Create method. In this case, we simply need to specify the entity itself as a parameter.
public async Task<User> InsertUser()
        {
            await DynamoDbEntityRepository.Create(new UsersTable { Key = "User-01", Name = "Josh", Surname = "Martin"}).ConfigureAwait(false);

            return await DynamoDbEntityRepository.GetById("User-01").ConfigureAwait(false);
        }
We also use the the repository’s GetById method to obtain the added user.
Searching methods
Devon4net includes the DynamoSearchCriteria class, which makes it easier to use the DynamoDB SDK searching methods.
In DynamoDB SDK, there are two possible operations:
-
Scan: Searches the whole table for elements that fit the criteria. Is slower than Query operations.
-
Query: Performs a direct lookup to a selected partition based on primary or secondary partition/hash key.
In devon4net you must create a new instance of DynamoSearchCriteria class, for accessing those methods:
var criteria = new DynamoSearchCriteria();

            criteria.AddSearchCriteria(DynamoDbGeneralObjectStorageAttributes.AttributeKey, user.Name, ScanOperator.Equal);// For scan method

            criteria.AddQueryCriteria(DynamoDbGeneralObjectStorageAttributes.AttributeKey, user.Key, QueryOperator.Equal);// For query method
The AddSearchCriteria and AddQueryCriteria methods have fairly similar syntax, as shown in the code above.
|
Note
|
For more information about query and scan methods please visit the DynamoDB component documentation |
How to: Use AWS CDK
What is AWS CDK?
AWS Cloud Development Kit (CDK) is an open-source software development framework to define your cloud application resources using familiar programming languages. This framework allows you to define all your AWS infrastructure as readable code. This process is known as Infrastructure as Code (IaC) and consists in provisioning and managing infrastructure for your software solutions through code, instead of doing so manually.
This means that you can easily modify, distribute and reproduce configurations. In addition, by including infrastructure as code:
-
facilitates the integration of infrastructure into version control systems for tracking changes and audit modifications.
-
enables the introduction of significant automation for infrastructure management. All of these factors contribute to the SDLC’s IaC being fully integrated into CI/CD pipelines.
-
Eliminates the unnecessary manual management.
Why CDK support in devon4net?
In a real project, we will use AWS services such as DynamoDB databases, S3 buckets, multiple lambdas, and so on. Similarly, we will be working in a variety of work environments.
Devon4Net, with the help of the CDK, allows us to treat these services as code (IaC), which allows us to take all of this service structure and replicate it in another environment that interests us, saving development time and treating this copy of your AWS services as a backup.
In Devon4Net, we can use a standarized json file to configure the AWS CDK service, this json will be translated into readable code for the CDK framework.
How to use
Installing the NuGet
You need to install the Devon4net.Infrastructure.AWS.CDK NuGet, for that you can run the following command in the Package Manager Console:
Install-Package Devon4net.Infrastructure.AWS.CDKConfigure your ProvisionStack
In the Startup class of your application, follow the nexts steps:
-
Load your
appsettings.{environment}.jsonconfiguration file. As an example, consider the Options Pattern:private static List<CdkOptions> LoadConfigurationFiles() { var file = FileOperationsHelper.GetFilesFromPath("appsettings.json")?.FirstOrDefault(); if (file == null) throw new ArgumentException("No appsettings.json was provided"); var configuration = new ConfigurationBuilder().AddJsonFile(file, true, true).Build(); var environmentFileName = Configuration.GetSection("Environment").Value; var environmentFile = FileOperationsHelper.GetFilesFromPath($"appsettings.{environmentFileName}.json")?.FirstOrDefault(); configuration = new ConfigurationBuilder().AddConfiguration(configuration).AddJsonFile(environmentFile, true, true).Build(); return Configuration.GetSection("CdkOptions").Get<List<CdkOptions>>(); } -
Once your setup has been charged, you may create an instance of the
ProvisionStackclass and then call theProcess()method:var cdkOptions = LoadConfigurationFiles(); foreach (var stack in cdkOptions) { if (string.IsNullOrWhiteSpace(AwsAccount)) { AwsAccount = stack.ProvisionStack.AwsAccount; } if (string.IsNullOrWhiteSpace(AwsRegion)) { AwsRegion = stack.ProvisionStack.AwsRegion; } var defaultPsrovisionStack = new ProvisionStack(AwsAccount, AwsRegion, stack); defaultPsrovisionStack.Process(); }The
Process()method is responsible for building the infrastructure that you specified in your configuration file.
|
Note
|
For more information about the configuration of the component itself, please, visit the component documentation. |