
How to
Enterprise Architect client generation
We are going to show you how to generate source code from an Enterprise Architect diagram using CobiGen.
Prerequisites
If CobiGen_Templates is not already imported into your workspace, follow the next steps:
-
Click on the Eclipse’s menu File > Import > Existing Projects into Workspace and browse to select the
workspaces/main/CobiGen_Templatesdirectory. -
Click Finish and you should have the CobiGen_Templates as a new project in Eclipse’s workspace.
Also verify that you have the latest templates of CobiGen. Your templates folder must contain the crud_java_ea_uml folder.
If you do not see it, please follow the next steps:
-
Download the accumulative patch.
-
Open the zip file and extract its content inside the root folder of your Devonfw distribution Devon-dist_2.4.0/
After following those steps correctly, you should have the latest version of the templates ready to use.
Generation
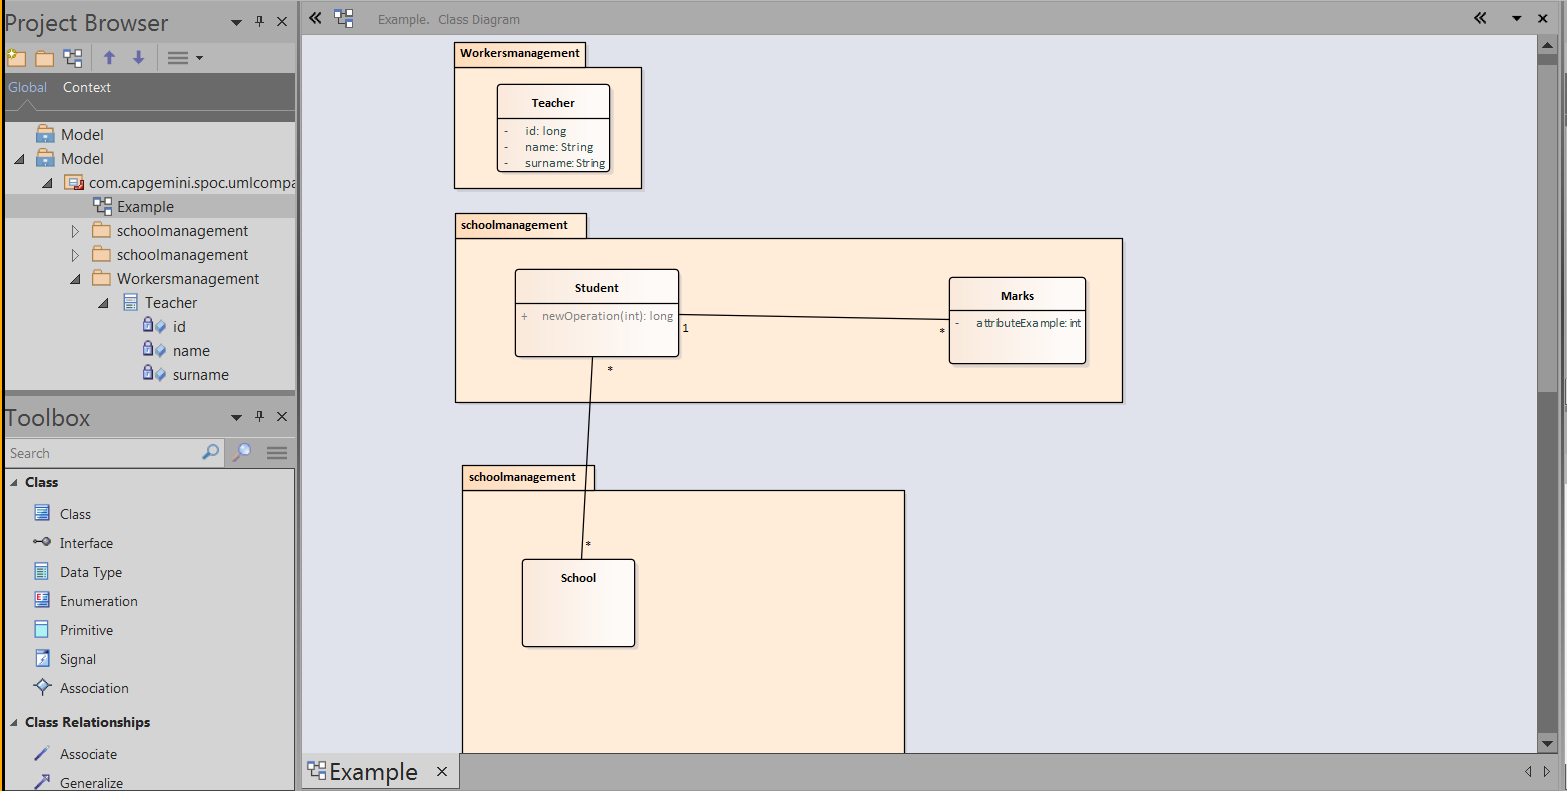
In this tutorial, we are going to generate the entity infrastructure using as input a class diagram, modelled with Enterprise Architect (EA). First, create a class diagram, an example is shown on figure below:
When you are finished, you will have to export that UML diagram into an XMI version 2.1 file. This is the file format that CobiGen understands. See below a figure showing this process:
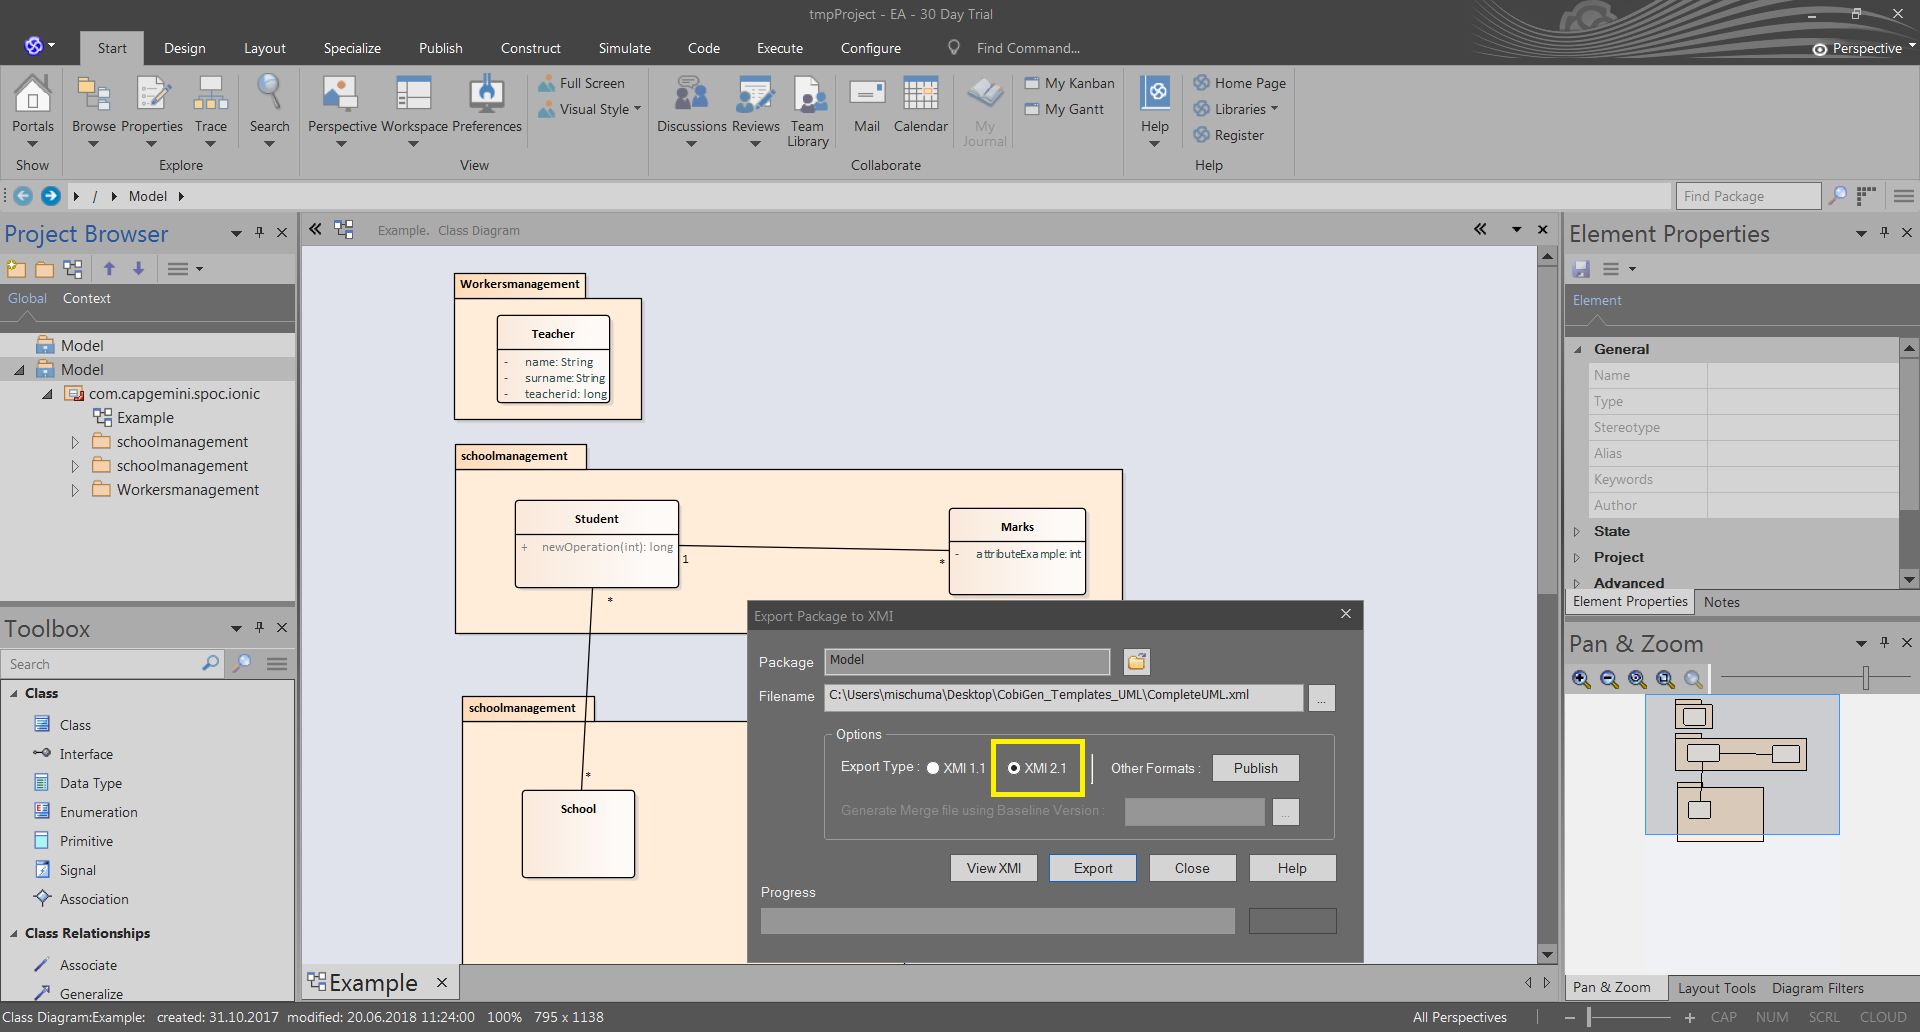
To open that window, see this tutorial.
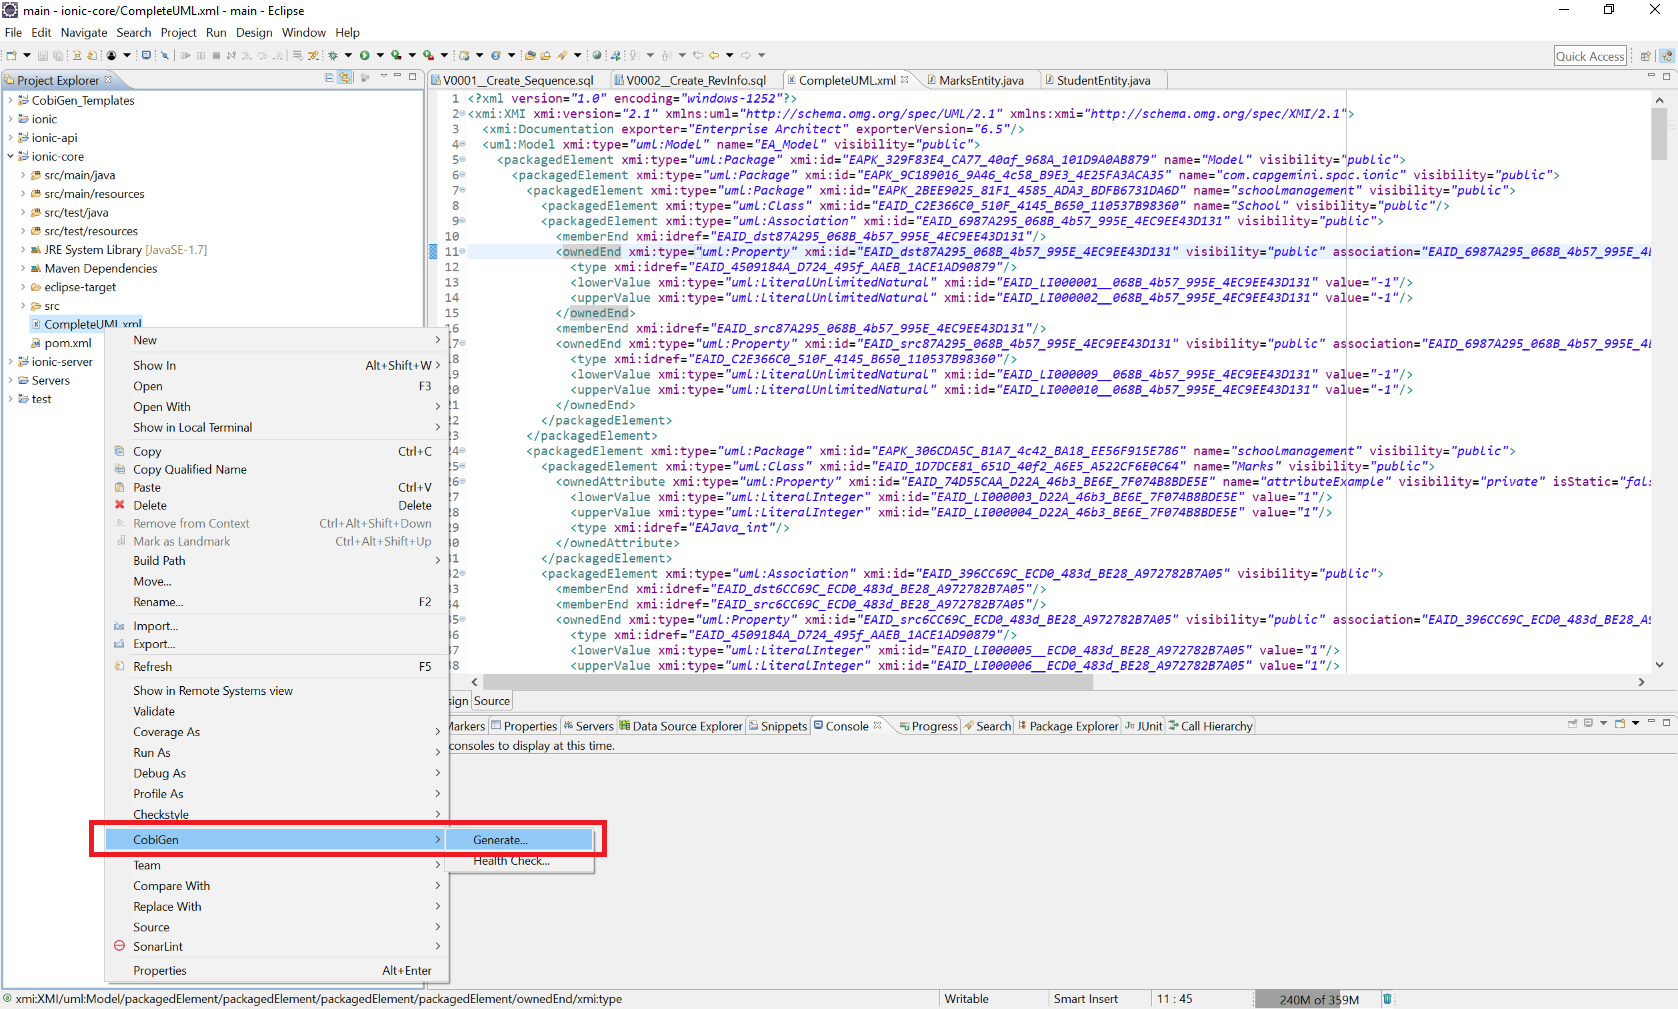
After having that exported file, change its extension from xmi to xml. Then create an devon4j project and import the exported file into the core of your devon4j project.
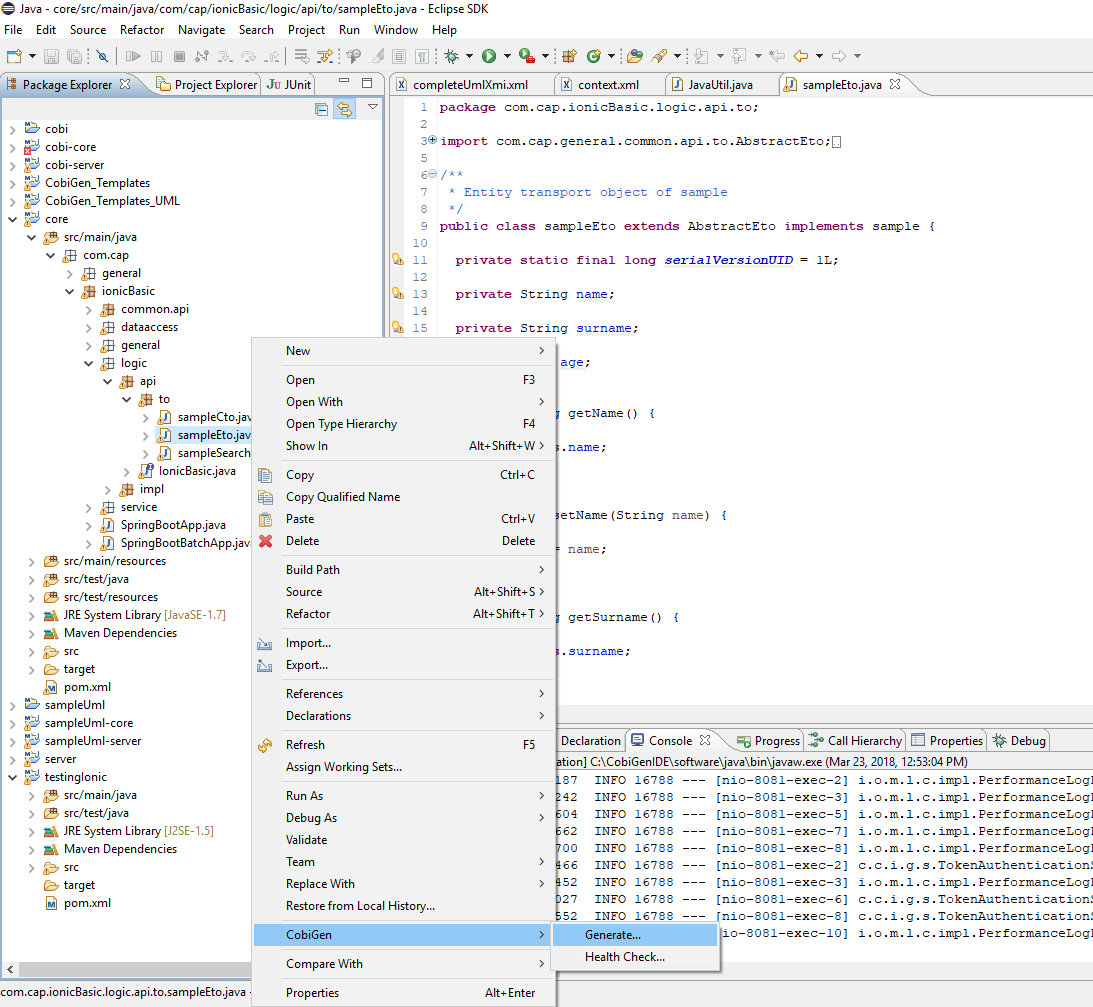
Now we are going to start the generation, right-click your exported file and select CobiGen > Generate, finally select the entity infrastructure increment:
After following all these steps, your generated files should be inside src\main\java folder. If you want an XMI example, you will find it here.
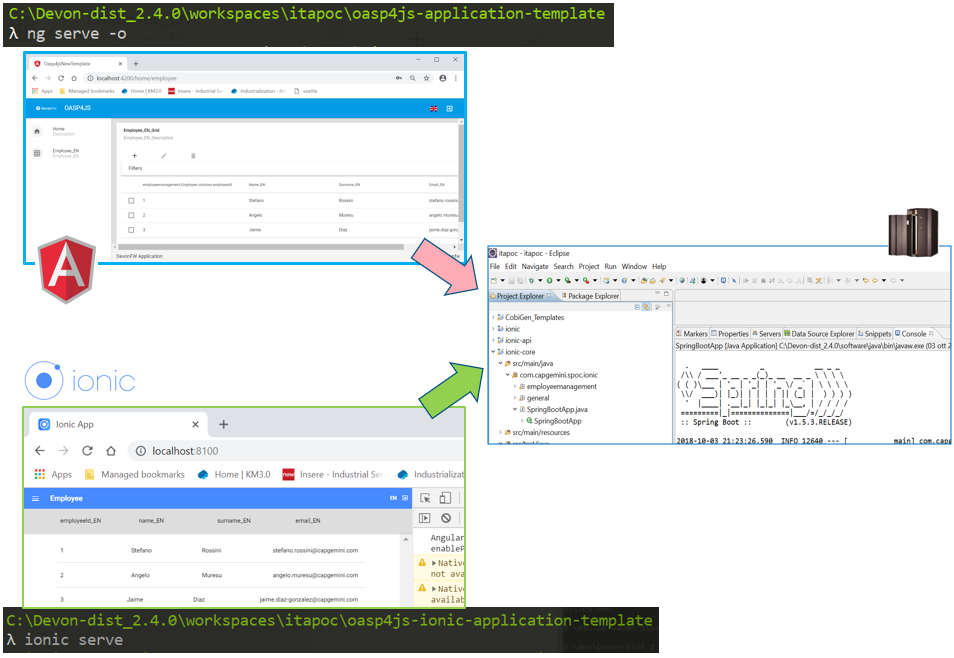
Angular Client Generation
The generation can create a full Angular client (Angular 13, as of March 2022) using the devon4ng-application-template package located at workspaces/examples folder of the distribution. For more details about this package, please refer here.
Take into account that the TypeScript merging for CobiGen needs Node 6 or higher to be installed at your machine.
| This is a short introduction to the Angular generation. For a deeper tutorial including the generation of the backend, we strongly recommend you to follow this document. |
Requisites
Install yarn globally:
npm install -g yarnAngular workspace
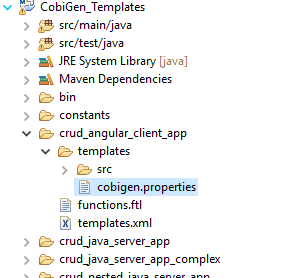
The output location of the generation can be defined editing the cobigen.properties file located at crud_angular_client_app/templates folder of the CobiGen_Templates project.
By default, the output path would be the devon4ng-application-template folder at the root of the devon4j project parent folder:
root/
 |- devon4ng-application-template/
 |- devon4j-project-parent/
   |- core/
   |- server/
However, this path can be changed, for example to the src/main/client folder of the devon4j project:
relocate: ./src/main/client/${cwd}
root/
 |- devon4j-project-parent/
   |- core/
      |- src
        |- main
          |- client
   |- server/
Once the output path is chosen, copy the files of the devon4ng-application-template repository into this output path.
Install Node dependencies
Open a terminal in the just copied devon4ng-application-template folder and run the command:
yarnThis will start the installation of all node packages needed by the project into the node_modules folder.
Generating
Choose an ETO object as an input file for CobiGen, right click on it and select CobiGen → Generate from the context menu. CobiGen will then display a wizard showing you the resources to be generated which are related to your input file:
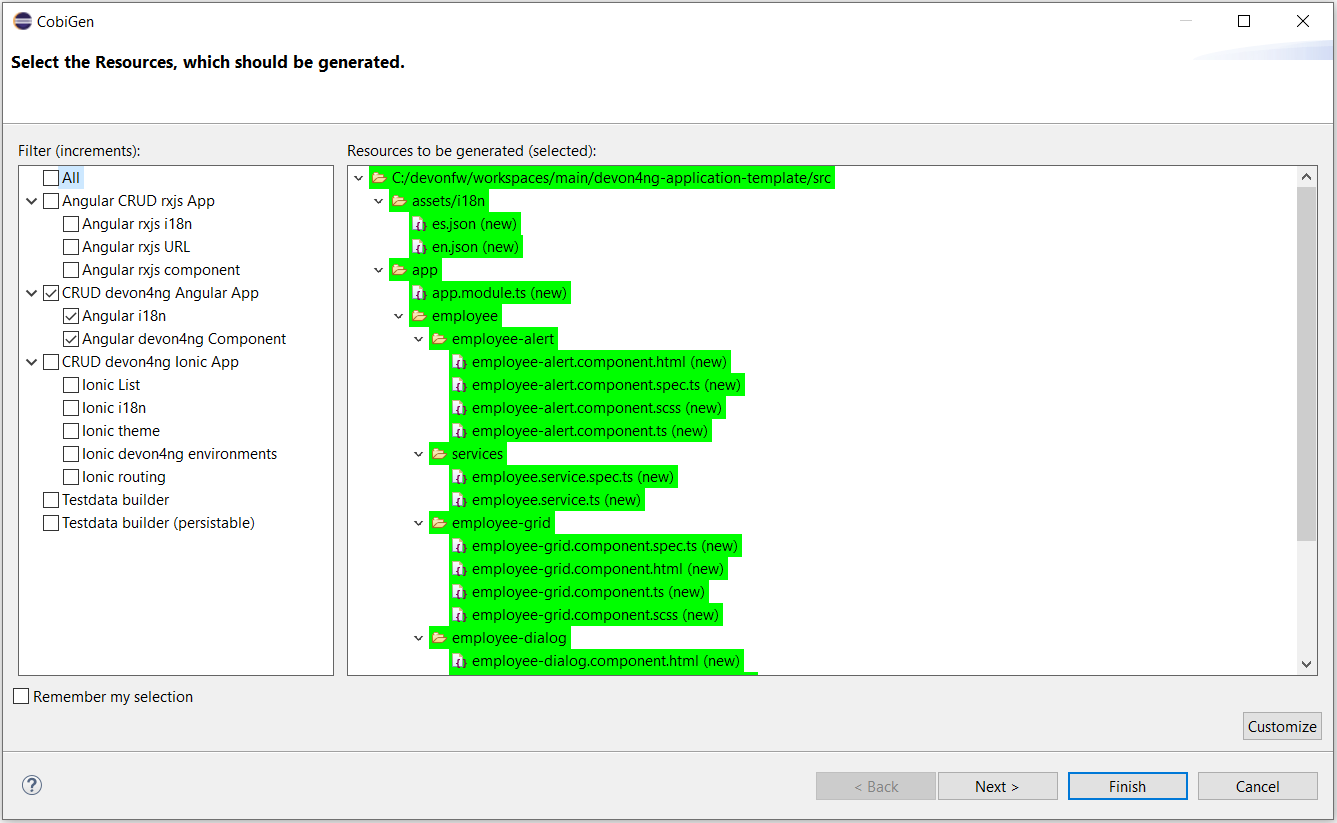
Check all the increments relative to Angular:
|
The Angular devon4j URL increment is only needed for the first generations however, checking it again on next generation will not cause any problem. |
As we have done on other generations, we click Next to choose which fields to include at the generation or simply clicking Finish will start the generation.

Routing
Due to the nature of the TypeScript merger, currently it is not possible to merge the array of path objects of the routings at app-routing.module.ts file properly, so the modification should be done by hand on this file. However, the import related to the new component generated is added.
This would be the generated app-routing.module.ts file:
import { NgModule } from '@angular/core';
import { RouterModule, Routes } from '@angular/router';
import { AuthGuard } from './core/security/auth-guard.service';
import { NavBarComponent } from './layout/nav-bar/nav-bar.component';

const routes: Routes = [
  {
    path: '',
    redirectTo: '/login',
    pathMatch: 'full',
  },
  {
    path: 'login',
    loadChildren: () =>
      import('./auth/auth.module').then(m => m.AuthDataModule),
  },
  {
    path: 'home',
    component: NavBarComponent,
    canActivateChild: [AuthGuard],
    children: [
      {
        path: 'initial',
        loadChildren: () =>
          import('./home/initial-page/initial-page.module').then(
            m => m.InitialPageModule,
          ),
      },
      {
        path: 'sampleData',
        loadChildren: () =>
          import('./sampledata/sampledata.module').then(
            m => m.SampleDataModule,
          ),
      },
    ],
  },
  {
    path: '**',
    redirectTo: '/login',
  },
];
@NgModule({
  imports: [RouterModule.forRoot(routes, { relativeLinkResolution: 'legacy' })],
  exports: [RouterModule],
})
export class AppRoutingModule {}
Adding the following to the children object of home will add a new side menu entry to the component generated:
{
    path: 'employee',
    loadChildren: () =>
        import('./employee/employee.module').then(
            m => m.EmployeeModule,
        )
}
import { NgModule } from '@angular/core';
import { RouterModule, Routes } from '@angular/router';
import { AuthGuard } from './core/security/auth-guard.service';
import { NavBarComponent } from './layout/nav-bar/nav-bar.component';
const routes: Routes = [{
path: '',
redirectTo: '/login',
pathMatch: 'full'
},
{
path: 'login',
loadChildren: () =>
import('./auth/auth.module').then(m => m.AuthDataModule)
},
{
path: 'home',
component: NavBarComponent,
canActivateChild: [
AuthGuard
],
children: [{
path: 'initial',
loadChildren: () =>
import('./home/initial-page/initial-page.module').then(
m => m.InitialPageModule,
)
},
{
path: 'sampleData',
loadChildren: () =>
import('./sampledata/sampledata.module').then(
m => m.SampleDataModule,
)
},
{
path: 'employee',
loadChildren: () =>
import('./employee/employee.module').then(
m => m.EmployeeModule,
)
}
]
},
{
path: '**',
redirectTo: '/login'
}
];
@NgModule({
imports: [
RouterModule.forRoot(routes)
],
exports: [
RouterModule
]
})
export class AppRoutingModule {
}
JWT Authentication
If you are using a backend server with JWT authentication, you need to specify this type of authentication to be used by your Angular application (default when generating from the devon4ng template).
export const environment = {
  ...,
  security: 'jwt',
};
An alternative would be to set security: 'csrf'. For more details, see the devon4j CSRF guide.
Running
First of all, run your devon4j java server by right clicking on the SpringBootApp.java file and choose Run As → Java Application from the context menu. This will start to run the SpringBoot server. Once you see the statement: Started SpringBoot in XX seconds, the backend is running.

Once the the server is running, open a devonfw console at the output directory defined previously and run:
ng serve --openThis will run the Angular application at:
http://localhost:4200
Once finished, the browser will open automatically at the previously stated localhost URL showing the Angular application. You can use the credentials set at the devon4j java server to login.
Ionic client generation
We are going to show you how to generate a CRUD Ionic application from an ETO using CobiGen.
| This is a short introduction to the Ionic generation. For a deeper tutorial including the generation of the backend, we strongly recommend you to follow this document. |
Prerequisites
Before starting, make sure you have the following things already installed on your machine:
If CobiGen_Templates are not already downloaded, follow the next steps:
-
Right click on any file in your Eclipse workspace. Select CobiGen → Update Templates… from the context menu and now you are able to start the generation.
-
If you want to adapt the templates, select CobiGen → Adapt Templates… from the menu and you should have the CobiGen_Templates as a new project in your Eclipse’s workspace.
After following those steps correctly, you should have the latest version of the templates ready to use.
Generation
We are going to generate the CRUD functions into a sample application. First, clone or download the devon4ng Ionic template in your workspace.
After that, please create a devon4j project and then start implementing the ETO: you can find an example here.
As you can see, TableEto contains 3 attributes: 2 of them are Long and the third one TableState is an enum that you will find
here.
The Ionic generation works fine for any Java primitive attribute (string, float, char, boolean…) and enums. However, if you want to use your own objects, you should
override the toString() method, as explained here.
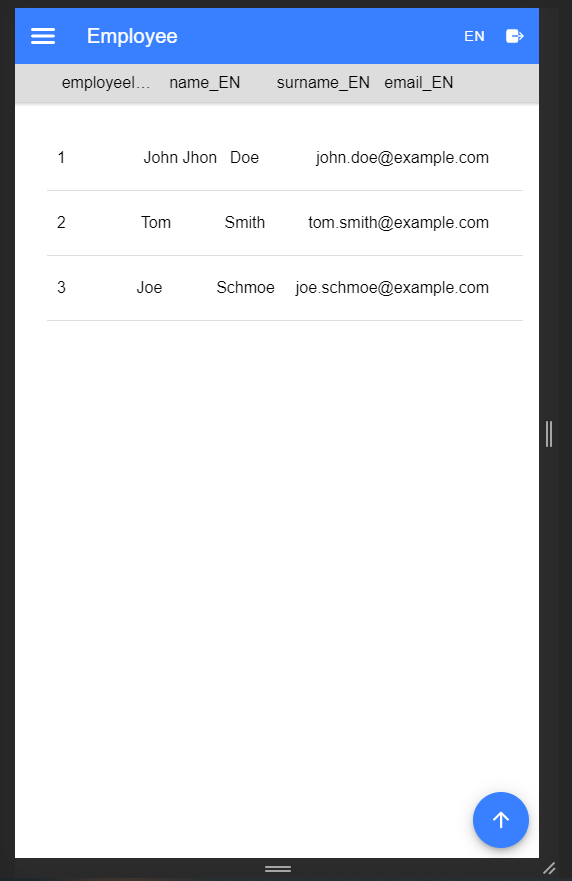
The attributes explained above will be used for generating a page that shows a list. Each item of that list will show the values of those attributes.
For generating the files:
-
Right click your ETO file and click on CobiGen > Generate as shown on the figure below.
-
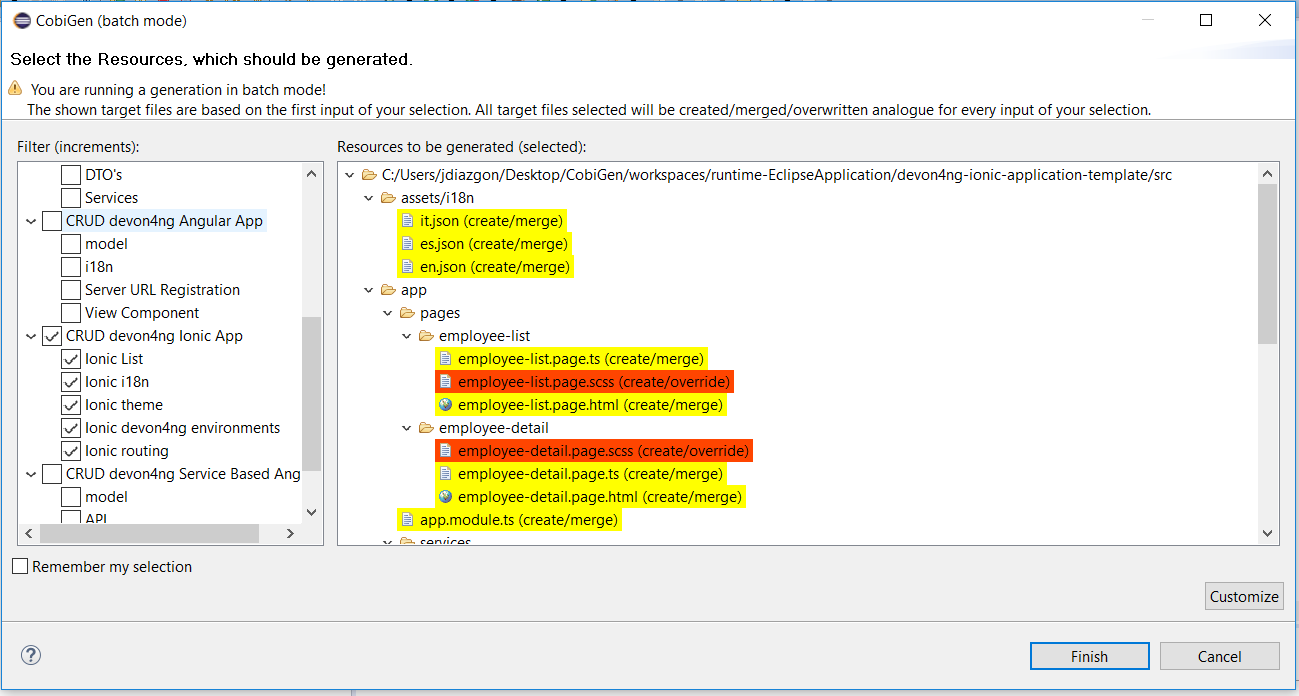
Select the Ionic increments for generating as shown below. Increments group a set of templates for generating different projects.
-
Ionic Listused for generating the page containing the list. -
Ionic devon4ng environmentsis for stating the server path. -
Ionic i18nused for generating the different language translations for the `translationService` (currently English and Spanish). -
Ionic routingadds an app-routing.module.ts file to allow navigation similar to the one available in Angular. -
Ionic themegenerates thevariables.scssfile which contains variables to style the application.
-
By default, the generated files will be placed inside "devon4ng-ionic-application-template", next to the root of your project’s folder.
See the image below to know where they are generated. For changing the generation path and the name of the application go to CobiGen_Templates/crud_ionic_client_app/cobigen.properties.
|

Now that we have generated the files, lets start testing them:
-
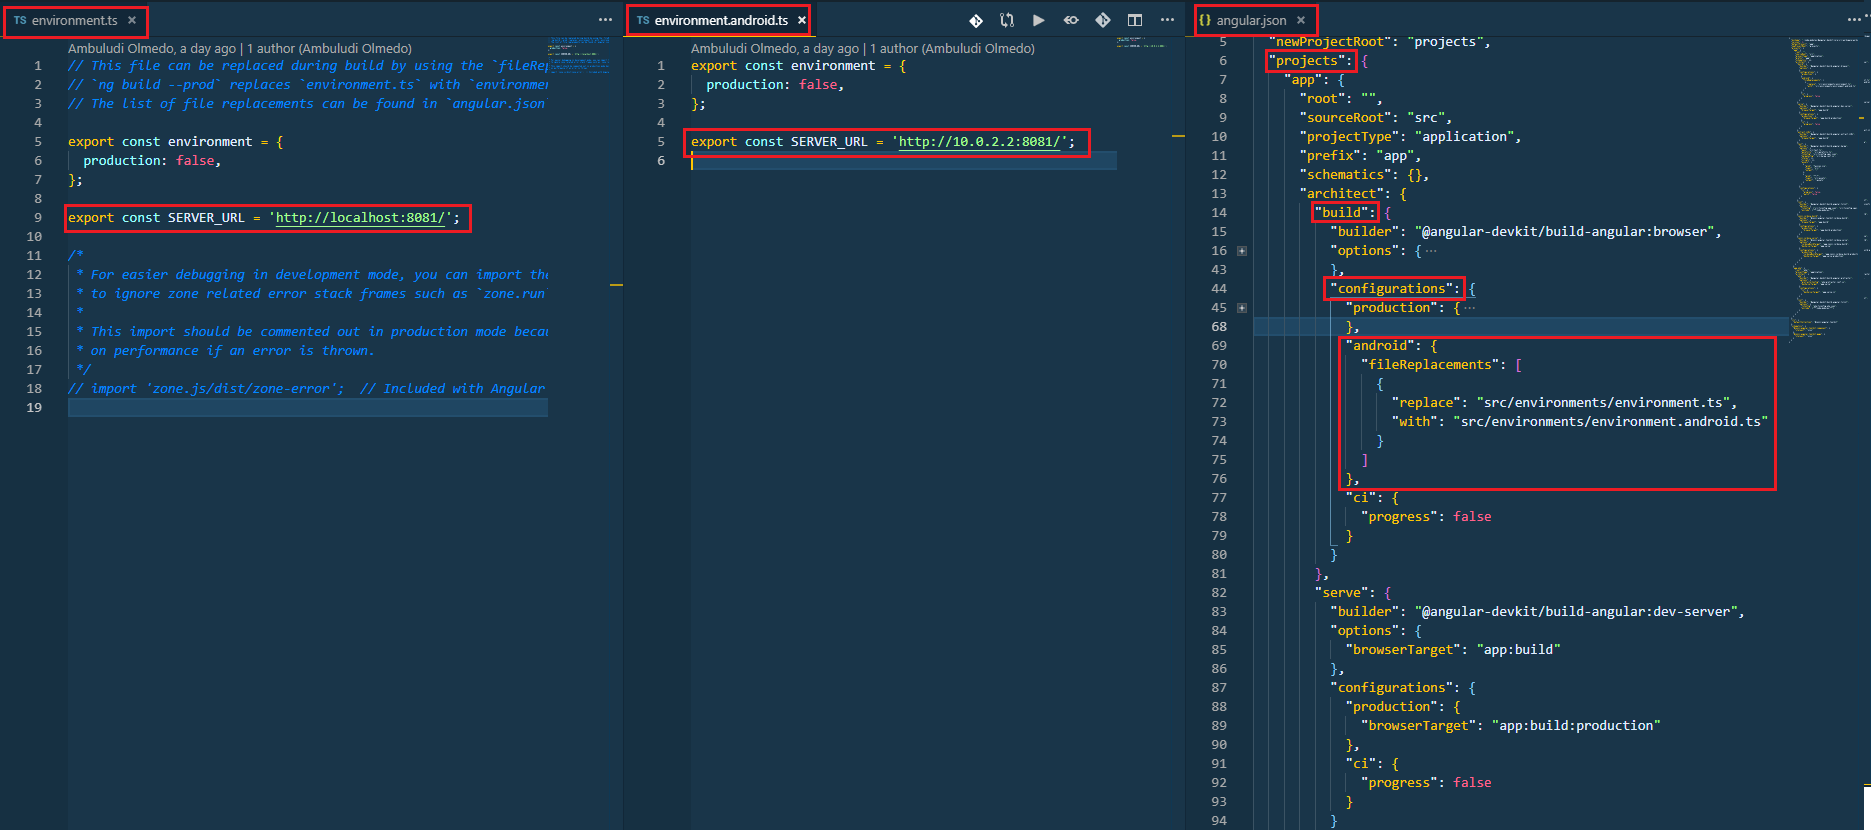
First change the SERVER_URL of your application. For doing that, modify
src/environments/environments.ts, also modifysrc/environments/environments.android.ts(android) andsrc/environments/environments.prod.ts(production) if you want to test in different environments. -
Check that there are no duplicated imports. Sometimes there are duplicated imports in
src/app/app.module.ts. This happens because the merger of CobiGen prefers to duplicate rather than to delete. -
Run
npm installto install all the required dependencies. -
Run
`ionic serveon your console.
After following all these steps your application should start. However, remember that you will need your server to be running for access to the list page.
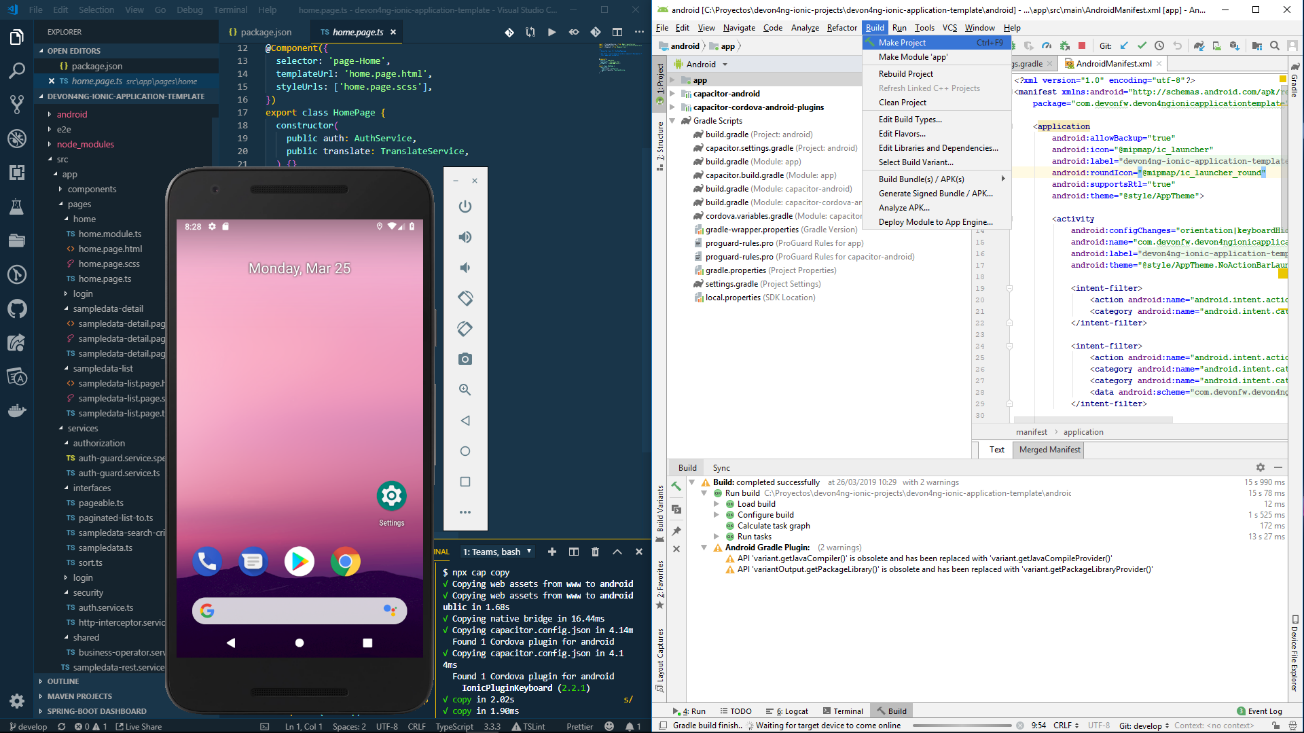
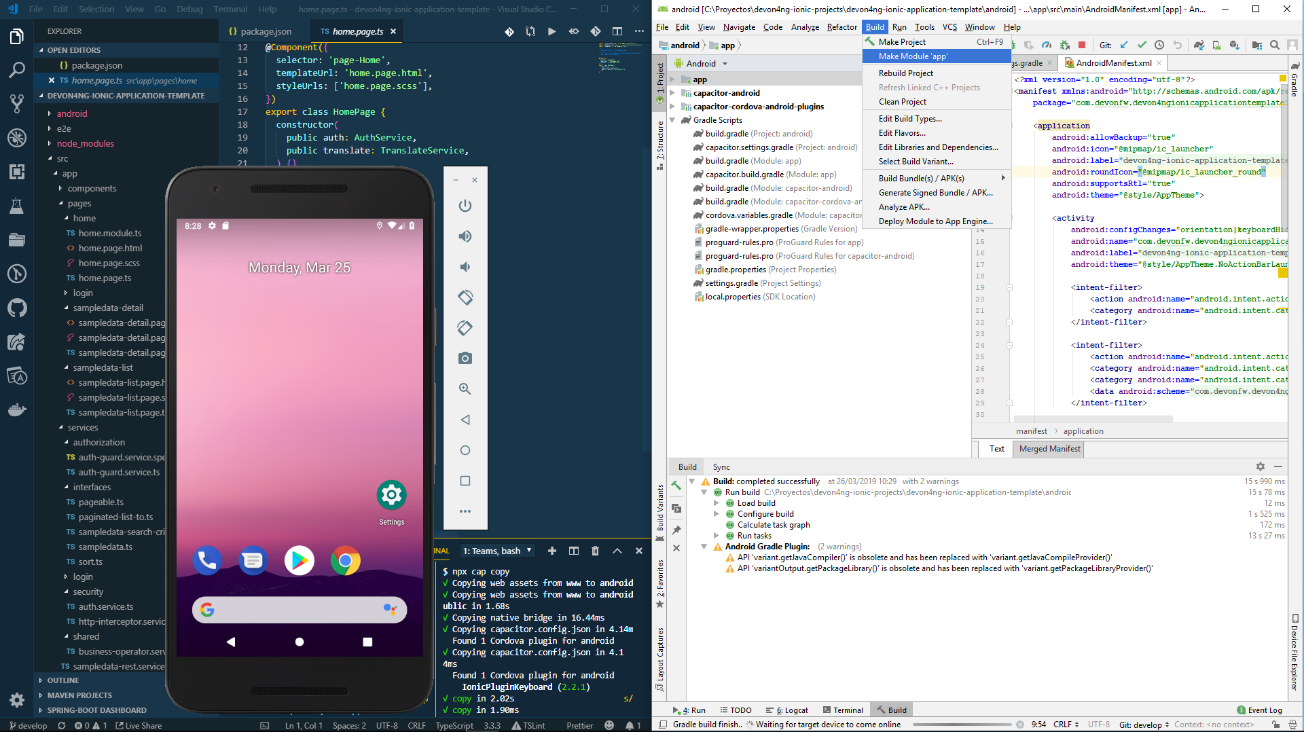
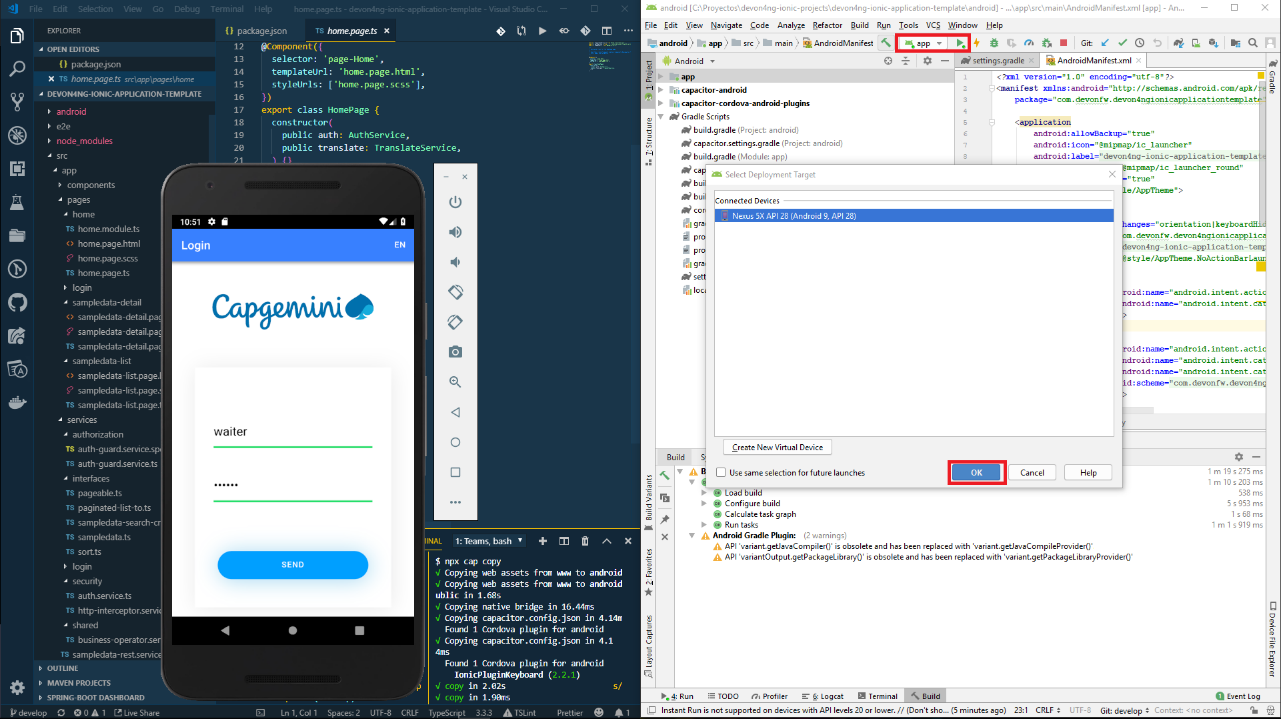
Running it on Android
To run the application in an android emulated device, it is necessary to have Android Studio and Android SDK. After its installation, the following commands have to be run on your console:
-
npx cap init "name-for-the-app (between quotes)" "id-for-the-app (between quotes)" -
ionic build --configuration=android. To use this command, you must add an android build configuration at angular.json
    "build": {
      ...
      "configurations": {
        ...
        "android": {
          "fileReplacements": [
            {
              "replace": "src/environments/environment.ts",
              "with": "src/environments/environment.android.ts"
            }
          ]
        },
      }
    }
-
npx cap add android -
npx cap copy -
npx cap open android
The last steps are done in Android studio: make the project, make the app, build and APK and run in a device.


Implementing a new Plug-in
New plug-ins can implement an input reader, a merger, a matcher, a trigger interpreter, and/or a template engine as explained here.
|
It is discouraged to have |
Plugin Activator
Each plug-in has to have an plug-in activator class implementing the interface GeneratorPluginActivator from the core-api. This class will be used to load the plug-in using the PluginRegistry as explained here. This class implements two methods:
-
bindMerger()→ returns a mapping of merge strategies and its implementation to be registered. -
bindTriggerInterpreter()→ returns the trigger interpreters to be provided by this plug-in.
Both methods create and register instances of mergers and trigger interpreters to be provided by the new plug-in.
Adding Trigger Interpreter
The trigger interpreter has to implement the TriggerInterpreter interface from the core. The trigger interpreter defines the type for the new plugin and creates new InputReader and new Matcher objects.
Adding Input Reader
The input reader is responsible of read the input object and parse it into FreeMarker models. The input reader must be implemented for the type of the input file. If there is any existent plugin that has the same file type as input, there will be no need to add a new input reader to the new plug-in.
Input Reader Interface
The interface needed to add a new input reader is defined at the core. Each new sub plug-in must implements this interface if is needed an input reader for it.
The interface implements the basic methods that an input reader must have,
but if additional methods are required, the developer must add a new interface
that extends the original interface `InputReader.java` from the core-api
and implement that on the sub plug-in.
The methods to be implemented by the input reader of the new sub plugin are:
| Method | Return Type | Description |
|---|---|---|
|
|
This function will be called if matching triggers or matching templates should be retrieved for a given input object. |
|
Map<String, Object> |
This function should create the FreeMarker object model from the given input. |
|
|
States whether the given input object combines multiple input objects to be used for generation. |
|
List<Object> |
Will return the set of combined input objects if the given input combines multiple input objects. |
|
Map<String, Object> |
This method returns available template methods from the plugins as Map. If the plugin which corresponds to the input does not provide any template methods an empty Map will be returned. |
|
List<Object> |
Will return the set of combined input objects if the given input combines multiple input objects. |
Model Constants
The Input reader will create a model for FreeMarker. A FreeMarker model must
have variables to use them at the .ftl template file. Refer to Java Model to see the FreeMarker model example for java input files.
Registering the Input Reader
The input reader is an object that can be retrieved using the correspondent get
method of the trigger interpreter object. The trigger interpreter object is
loaded at the eclipse plug-in using the load plug-in method explained
here.
That way, when the core needs the input reader, only needs to call that getInputReader method.
Adding Matcher
The matcher implements the MatcherInterpreter interface from the core-api.
Should be implemented for providing a new input matcher. Input matcher are
defined as part of a trigger and provide the ability to restrict specific
inputs to a set of templates.
This restriction is implemented with a MatcherType enum.
E.g JavaPlugin
private enum MatcherType {
    /** Full Qualified Name Matching */
    FQN,
    /** Package Name Matching */
    PACKAGE,
    /** Expression interpretation */
    EXPRESSION
}
Furthermore, matchers may provide several variable assignments, which might be dependent on any information of the matched input and thus should be resolvable by the defined matcher.
E.g JavaPlugin
private enum VariableType {
    /** Constant variable assignment */
    CONSTANT,
    /** Regular expression group assignment */
    REGEX
}
Adding Merger
The merger is responsible to perform merge action between new output with the
existent data at the file if it already exists. Must implement the Merger
interface from the core-api.
The implementation of the Merge interface must override the following methods:
| Method | Return Type | Description |
|---|---|---|
|
String |
Returns the type, this merger should handle. |
|
String |
Merges the patch into the base file. |
Is important to know that any exception caused by the merger must throw a MergeException from the core-api to the eclipse-plugin handle it.
Changes since Eclipse / Maven 3.x
Since version 3.x the Eclipse and Maven plugins of CobiGen utilize the Java ServiceLoader mechanic to find and register plugins at runtime. To enable a new plugin to be discovered by this mechanic the following steps are needed:
-
create the file
META-INF/services/com.devonfw.cobigen.api.extension.GeneratorPluginActivatorcontaining just the full qualified name of the class implementing theGeneratorPluginActivatorinterface, if the plugin provides aMergerand/or aTriggerInterpreter -
create the file
META-INF/services/com.devonfw.cobigen.api.extension.TextTemplateEnginecontaining just the full qualified name of the class implementing theTextTemplateEngineinterface, if provided by the plugin -
include
META-INFinto the target bundle (i.e. the folderMETA-INFhas to be present in the target jar file)
-
to properly include the plugin into the current system and use existing infrastructure, you need to add the plugin as a module in
/cobigen/pom.xml(in case of aMerger/TriggerInterpreterproviding plugin) and declare that as the plugin’s parent in it’s ownpom.xmlvia
<parent>
    <groupId>com.devonfw</groupId>
    <artifactId>cobigen-parent</artifactId>
    <version>dev-SNAPSHOT</version>
</parent>
or /cobigen/cobigen-templateengines/pom.xml (in case of a Merger/TriggerInterpreter providing plugin) and declare that as the plugin’s parent in it’s own pom.xml via
<parent>
    <groupId>com.devonfw</groupId>
    <artifactId>cobigen-tempeng-parent</artifactId>
    <version>dev-SNAPSHOT</version>
</parent>
If the plugin provides both just use the /cobigen/pom.xml.
-
The dependencies of the plugin are included in the bundle
-
To make the plugin available to the Eclipse plugin it must be included into the current
compositeContent.xmlandcompositeArtifacts.xmlfiles. Both files are located inhttps://github.com/devonfw/cobigen/tree/gh-pages/updatesite/{test|stable}. To do so, add an<child>entry to the<children>tag in both files and adapt thesizeattribute to match the new number of references. Thelocationattribute of the new<child>tag needs to be the artifact id of the pluginspom.xml.
Deployment
If you want to create a test release of eclipse you need to run the command
sh deploy.shon the cloned CobiGen repository while making sure, that your current version of CobiGen cloned is a snapshot version. This will automatically be detected by the deploy script.
Introduction to CobiGen external plug-ins
Since September of 2019, a major change on CobiGen has taken place. CobiGen is written in Java code and previously, it was very hard for developers to create new plug-ins in other languages.
Creating a new plug-in means:
-
Being able to parse a file in that language.
-
Create a human readable model that can be used to generate templates (by retrieving properties from the model).
-
Enable merging files, so that user’s code does not get removed.
For the Java plug-in it was relatively easy. As you are inside the Java world, you can use multiple utilities or libraries in order to get the AST or to merge Java code. With this new feature, we wanted that behaviour to be possible for any programming language.
General intuition
Below you will find a very high level description of how CobiGen worked in previous versions:
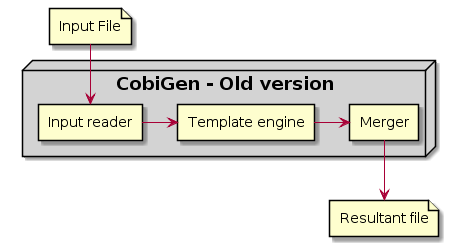
Basically, when a new input file was sent to CobiGen, it called the input reader to create a model of it (see here an example of a model). That model was sent to the template engine.
Afterwards, the template engine generated a new file which had to be merged with the original one. All this code was implemented in Java.
On the new version, we have implemented a handler (ExternalProcessHandler) which connects through TCP/IP connection to a server (normally on localhost:5000). This server can be implemented in any language (.NET, NodeJS, Python…) it just needs to implement a REST API defined here. The most important services are the input reading and merging:
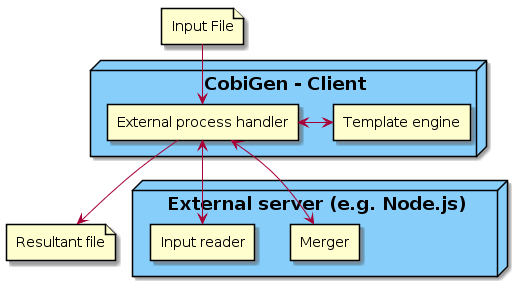
CobiGen acts as a client that sends requests to the server in order to read the input file and create a model. The model is returned to the template engine so that it generates a new file. Finally, it is sent back to get merged with the original file.
How to create new external plug-in
The creation of a new plug-in consists mainly in three steps:
-
Creation of the server (external process).
-
Creation of a CobiGen plug-in.
-
Creation of templates.
Server (external process)
The server can be programmed in any language that is able to implement REST services endpoints. The API that needs to implement is defined with this contract. You can paste the content to https://editor.swagger.io/ for a better look.
We have already created a NestJS server that implements the API defined above. You can find the code here which you can use as an example.
As you can see, the endpoints have the following naming convention: processmanagement/todoplugin/nameOfService where you will have to change todo to your plug-in name (e.g. rustplugin, pyplugin, goplugin…)
When implementing service getInputModel which returns a model from the input file there are only two restrictions:
-
A
pathkey must be added. Its value can be the full path of the input file or just the file name. It is needed because in CobiGen there is a batch mode, in which you can have multiple input objects inside the same input file. You do not need to worry about batch mode for now. -
On the root of your model, for each found key that is an object (defined with brackets
[{}]), CobiGen will try to use it as an input object. For example, this could be a valid model:{ "path": "example/path/employee.entity.ts" "classes": [ { "identifier": "Employee", "modifiers": [ "export" ], "decorators": [ { "identifier": { "name": "Entity", "module": "typeorm" }, "isCallExpression": true } ], "properties": [ { "identifier": "id", ... ... ... }] "interfaces": [{ ... }] }
For this model, CobiGen would use as input objects all the classes and interfaces defined. On the templates we would be able to do model.classes[0].identifier to get the class name. These input objects depend on the language, therefore you can use any key.
In order to test the server, you will have to deploy it on your local machine (localhost), default port is 5000. If that port is already in use, you can deploy it on higher port values (5001, 5002…). Nevertheless, we explain later the testing process as you need to complete the next step before.
| Your server must accept one argument when running it. The argument will be the port number (as an integer). This will be used for CobiGen in order to handle blocked ports when deploying your server. Check this code to see how we implemented that argument on our NestJS server. |
CobiGen plug-in
You will have to create a new CobiGen plug-in that connects to the server. But do not worry, you will not have to implement anything new. We have a CobiGen plug-in template available, the only changes needed are renaming files and setting some properties on the pom.xml. Please follow these steps:
-
Get the CobiGen plug-in template from here. It is a template repository (new GitHub feature), so you can click on "Use this template" as shown below:

-
Name your repo as
cobigen-name-pluginwherenamecan be python, rust, go… In our case we will create anestplug-in. It will create a repo with only one commit which contains all the needed files. -
Clone your just created repo and import folder
cobigen-todopluginas a Maven project on any Java IDE, though we recommend you devonfw ;)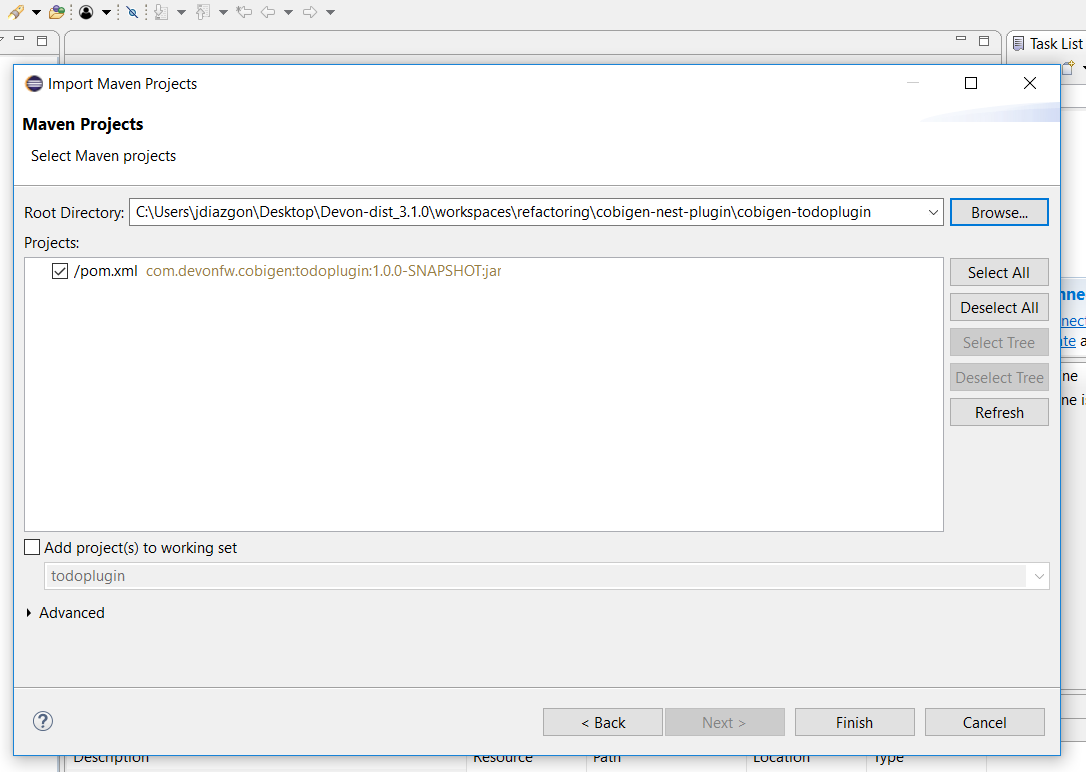
-
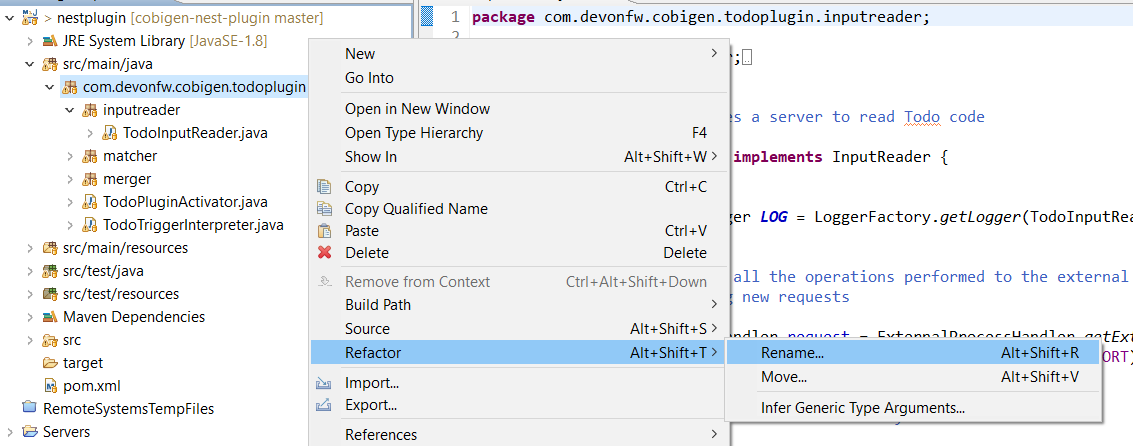
Rename all the
todopluginfolders, files and class names tonameplugin. In our casenestplugin. In Eclipse you can easily rename by right clicking and then refactor → rename:
| We recommend you to select all the checkboxes |

-
Remember to change in
src/main/javaandsrc/test/javaall the package, files and class names to use your plug-in name. The final result would be: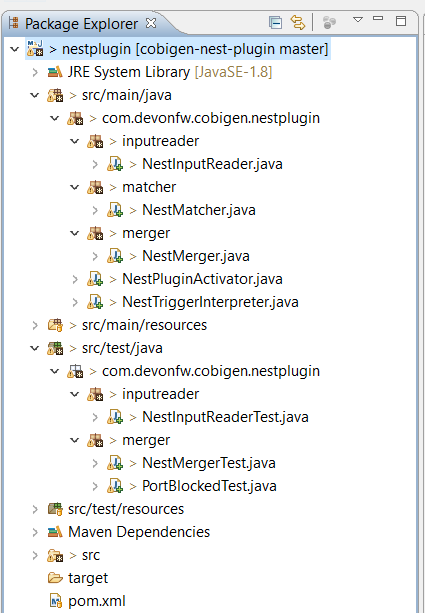
-
Now we just need to change some strings, this is needed for CobiGen to register all the different plugins (they need unique names). In class
TodoPluginActivator(in our caseNestPluginActivator), change all thetodoto your plug-in name. See below the 3 strings that need to be changed:
-
Finally, we will change some properties from the
pom.xmlof the project. These properties define the server (external process) that is going to be used:-
Inside
pom.xml, pressCtrl + Fto perform a find and replace operation. Replace alltodowith your plugin name: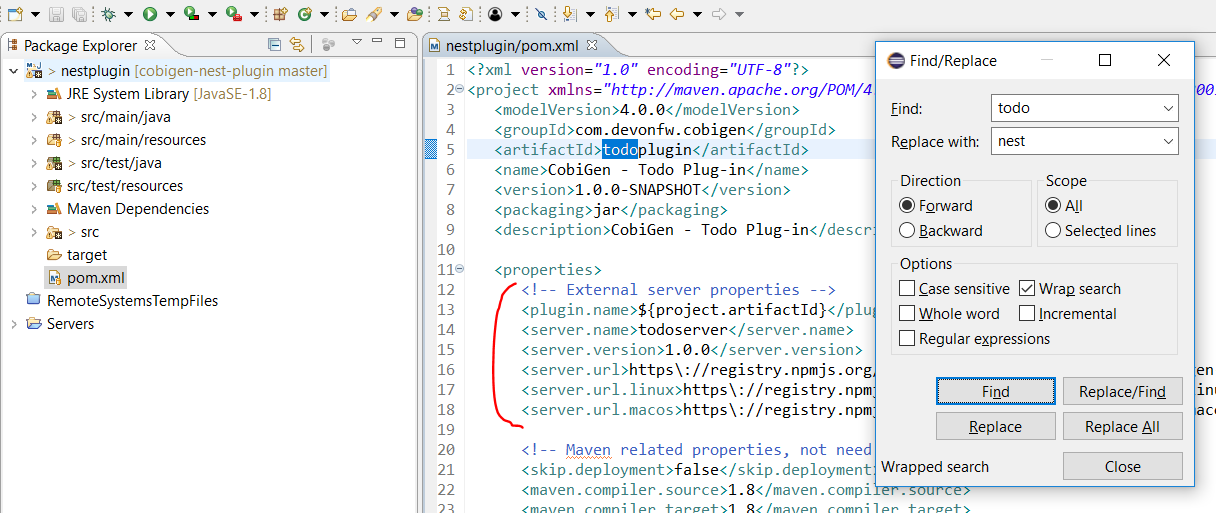
-
We are going to explain the server properties:
-
artifactId: This is the name of your plug-in, that will be used for a future release on Maven Central. -
plugin.name: does not need to be changed as it uses the property from theartifactId. When connecting to the server, it will send a request tolocalhost:5000/{plugin.name}plugin/isConnectionReady, that is why it is important to use an unique name for the plug-in. -
server.name: This defines how the server executable (.exe) file will be named. This .exe file contains all the needed resources for deploying the server. You can use any name you want. -
server.version: You will specify here the server version that needs to be used. The .exe file will be named as{server.name}-{server.version}.exe. -
server.url: This will define from where to download the server. We really recommend you using NPM which is a package manager we know it works well. We explain here how to release the server on NPM. This will download the .exe file for Windows. -
server.url.linux: Same as before, but this should download the .exe file for Linux systems. If you do not want to implement a Linux version of the plug-in, just use the same URL from Windows or MacOS. -
server.url.macos: Same as before, but this should download the .exe file for MacOS systems. If you do not want to implement a MacOS version of the plug-in, just use the same URL from Linux or Windows.
-
-
Testing phase
Now that you have finished with the implementation of the server and the creation of a new CobiGen plug-in, we are going to explain how you can test that everything works fine:
-
Deploy the server on port 5000.
-
Run
mvn clean teston the CobiGen-plugin or run the JUnit tests directly on Eclipse.-
If the server and the plug-in are working properly, some tests will pass and other will fail (we need to tweak them).
-
If every test fails, something is wrong in your code.
-
-
In order to fix the failing tests, go to
src/test/java. The failing tests make use of sample input files that we added in sake of example: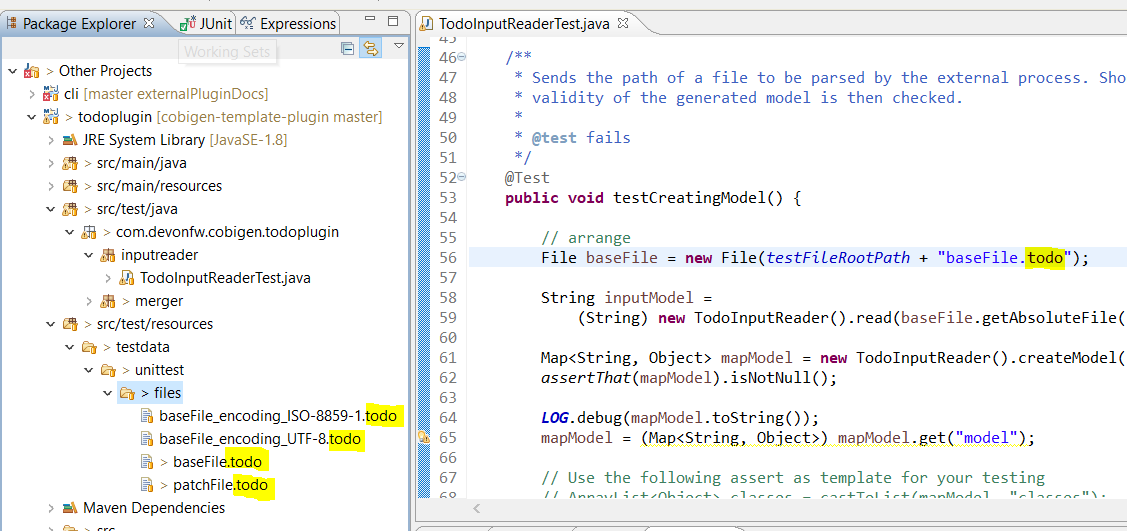
Replace those files (on src/test/resources/testadata/unittest/files/…) with the correct input files for your server.
Releasing
Now that you have already tested that everything works fine, we are going to explain how to release the server and the plug-in.
Release the server
We are going to use NPM to store the executable of our server. Even though NPM is a package manager for JavaScript, it can be used for our purpose.
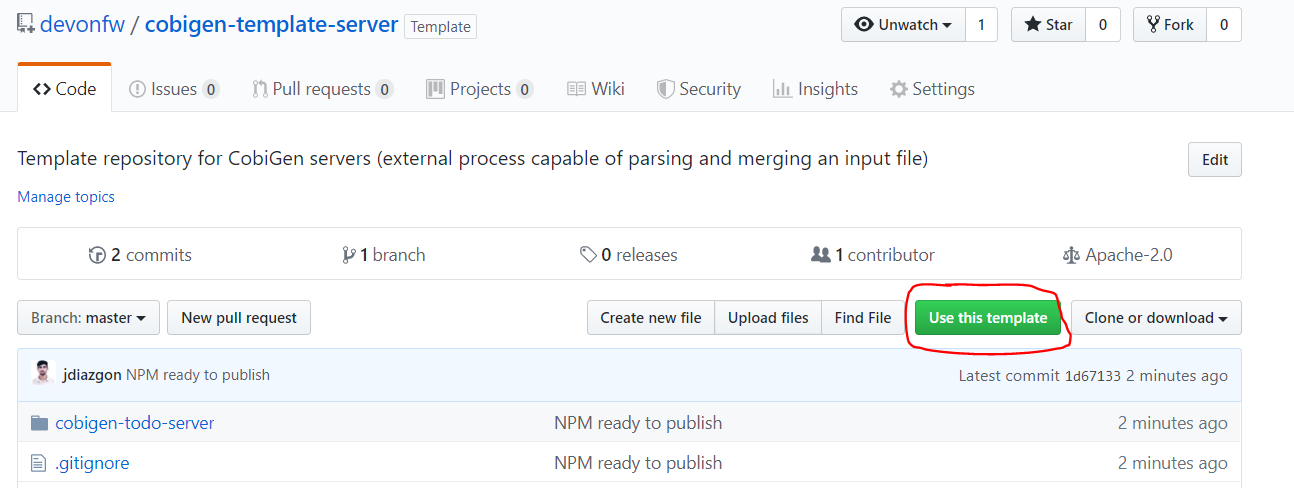
-
Get the CobiGen server template from here. It is a template repository (new GitHub feature), so you can click on "Use this template" as shown below:
-
Name your repo as
cobigen-name-serverwherenamecan be python, rust, go… In our case we will create anestplug-in. It will create a repo with only one commit which contains all the needed files. -
Clone your just created repo and go to folder
cobigen-todo-server. It will just contain two files:ExternalProcessContract.ymlis the OpenAPI definition which you can modify with your own server definition (this step is optional), andpackage.jsonis a file needed for NPM in order to define where to publish this package:{ "name": "@devonfw/cobigen-todo-server", "version": "1.0.0", "description": "Todo server to implement the input reader and merger for CobiGen", "author": "CobiGen Team", "license": "Apache" }
Those are the default properties. This would push a new package cobigen-todo-server on the devonfw organization, with version 1.0.0. We have no restrictions here, you can use any organization, though we always recommend devonfw.
Remember to change all the todo to your server name.
|
-
Add your executable file into the
cobigen-todo-serverfolder, just like below. As we said previously, this .exe is the server ready to be deployed.cobigen-template-server/ |- cobigen-todo-server/ |- ExternalProcessContract.yml |- package.json |- todoserver-1.0.0.exe
-
Finally, we have to publish to NPM. If you have never done it, you can follow this tutorial. Basically you need to login into NPM and run:
cd cobigen-todo-server/
npm publish --access=public
To release Linux and MacOS versions of your plug-in, just add the suffix into the package name (e.g. @devonfw/cobigen-todo-server-linux)
|
That’s it! You have published the first version of your server. Now you just need to modify the properties defined on the pom of your CobiGen plug-in. Please see next section for more information.
Releasing CobiGen plug-in
-
Change the pom.xml to define all the properties. You can see below a final example for
nest:... <groupId>com.devonfw.cobigen</groupId> <artifactId>nestplugin</artifactId> <name>CobiGen - Nest Plug-in</name> <version>1.0.0</version> <packaging>jar</packaging> <description>CobiGen - nest Plug-in</description> <properties> <!-- External server properties --> <plugin.name>parent</plugin.name> <server.name>nestserver</server.name> <server.version>1.0.0</server.version> <server.url>https\://registry.npmjs.org/@devonfw/cobigen-nest-server/-/cobigen-nest-server-${server.version}.tgz</server.url> <server.url.linux>https\://registry.npmjs.org/@devonfw/cobigen-nest-server-linux/-/cobigen-nest-server-linux-${server.version}.tgz</server.url.linux> <server.url.macos>https\://registry.npmjs.org/@devonfw/cobigen-nest-server-macos/-/cobigen-nest-server-macos-${server.version}.tgz</server.url.macos> ... -
Deploy to Maven Central.
Templates creation
After following above steps, we now have a CobiGen plug-in that connects to a server (external process) which reads your input files, returns a model and is able to merge files.
However, we need a key component for our plug-in to be useful. We need to define templates:
-
Fork our CobiGen main repository, from here and clone it into your PC. Stay in the
masterbranch and import into your IDEcobigen-templates\templates-devon4j. Set the Java version of the project to 1.8 if needed. -
Create a new folder on
src/main/templates, this will contain all your templates. You can use any name, but please use underscores as separators. In our case, we created a foldercrud_typescript_angular_client_appto generate an Angular client from a TypeORM entity (NodeJS entity).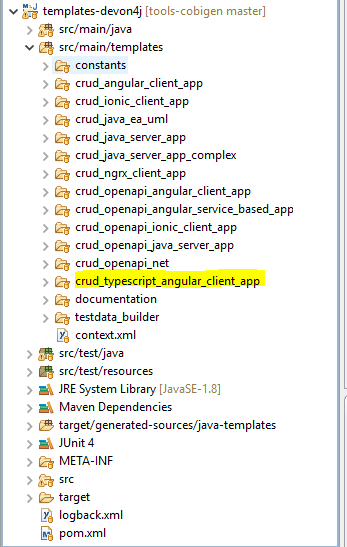
-
Inside your folder, create a
templatesfolder. As you can see below, the folder structure of the generated files starts here (the sources). Also we need a configuration filetemplates.xmlthat should be on the same level astemplates/folder. For now, copy and paste atemplates.xmlfile from any of the templates folder.
-
Start creating your own templates. Our default templates language is FreeMarker, but you can also use Velocity. Add the extension to the file (
.ftl) and start developing templates! You can find useful documentation here. -
After creating all the templates, you need to modify
context.xmlwhich is located on the root ofsrc/main/templates. There you need to define a trigger, which is used for CobiGen to know when to trigger a plug-in. I recommend you to copy and paste the following trigger:<trigger id="crud_typescript_angular_client_app" type="nest" templateFolder="crud_typescript_angular_client_app"> <matcher type="fqn" value="([^\.]+).entity.ts"> <variableAssignment type="regex" key="entityName" value="1"/> <variableAssignment type="regex" key="component" value="1"/> <variableAssignment type="constant" key="domain" value="demo"/> </matcher> </trigger> -
Change
templateFolderto your templates folder name.idyou can use any, but it is recommendable to use the same as the template folder name.typeis theTRIGGER_TYPEwe defined above on theNestPluginActivatorclass. Onmatcherjust change thevalue:([^\.]+).entity.tsmeans that we will only accept input files that containanyString.entity.ts. This improves usability, so that users only generate using the correct input files. You will find more info aboutvariableAssignmenthere. -
Finally, is time to configure
templates.xml. It is needed for organizing templates into increments, please take a look into this documentation.
Testing templates
-
When you have finished your templates you will like to test them. On the templates-devon4j
pom.xmlremove the SNAPSHOT from the version (in our case the version will be 3.1.8). Runmvn clean install -DskipTestson the project. We skip tests because you need special permissions to download artifacts from our Nexus. Remember the version that has just been installed: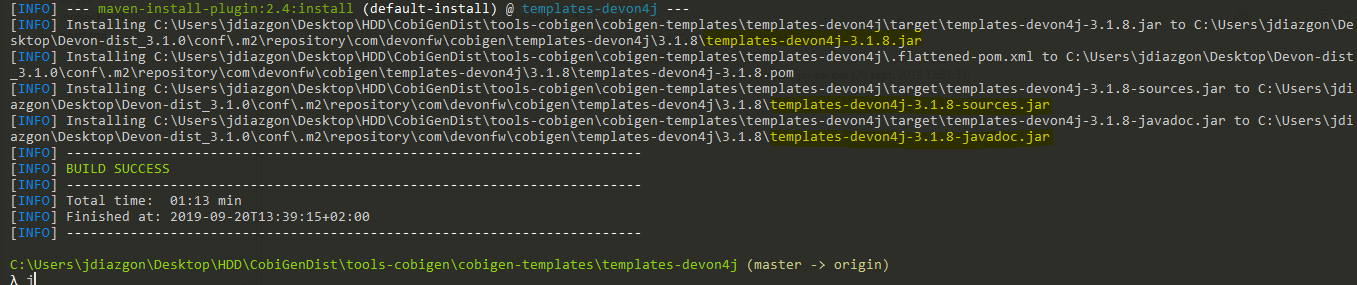
| We always recommend using the devonfw console, which already contains a working Maven version. |
-
Now we have your last version of the templates ready to be used. We need to use that latest version in CobiGen. We will use the CobiGen CLI that you will find in your cloned repo, at
cobigen-cli/cli. Import the project into your IDE. -
Inside the project, go to
src/main/resources/pom.xml. This pom.xml is used on runtime in order to install all the CobiGen plug-ins and templates. Add there your latest templates version and the previously created plug-in: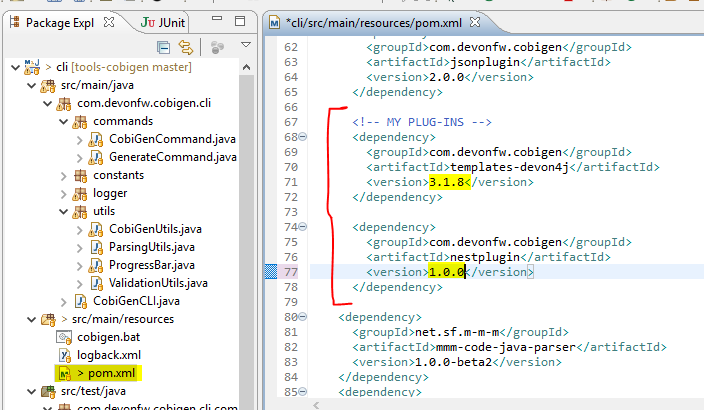
-
Afterwards, run
mvn clean install -DskipTestsand CobiGen will get your plug-ins. Now you have three options to test templates:-
Using Eclipse run as:
-
Inside Eclipse, you can run the CobiGen-CLI as a Java application. Right click class
CobiGenCLI.java→ run as → run configurations… and create a new Java application as shown below: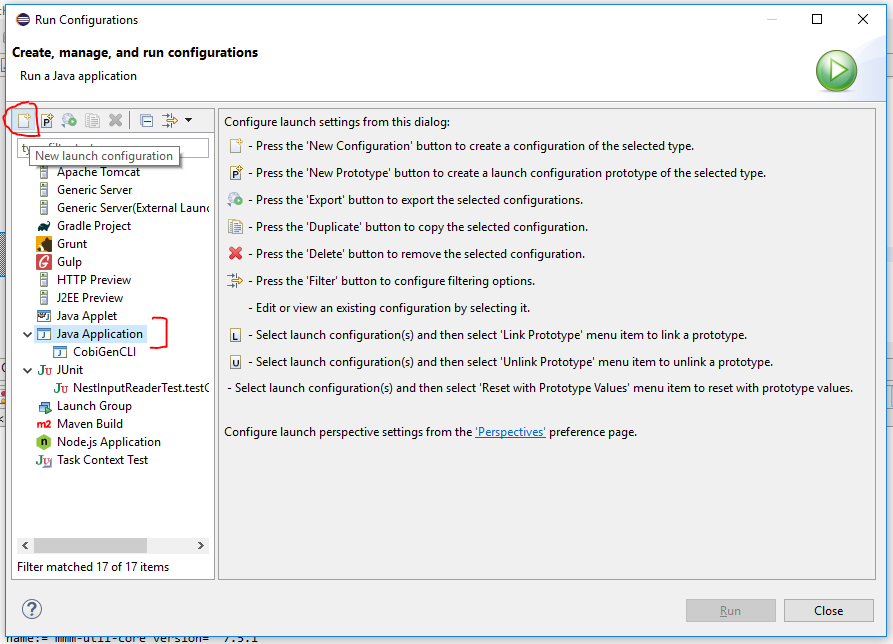
-
That will create a
CobiGenCLIconfiguration where we can set arguments to the CLI. Let’s first begin with showing the CLI version, which should print a list of all plug-ins, including ours.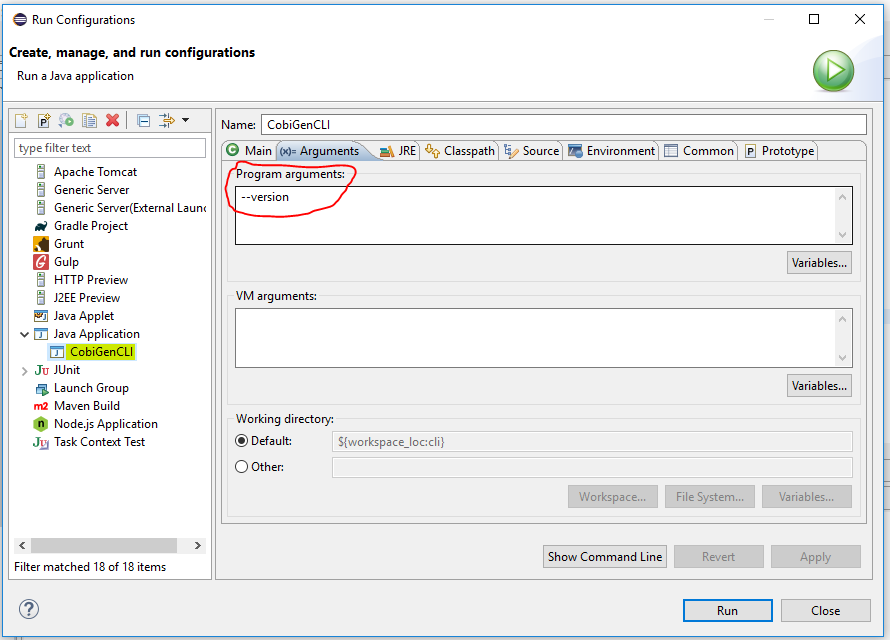
... name:= propertyplugin version = 2.0.0 name:= jsonplugin version = 2.0.0 name:= templates-devon4j version = 3.1.8 name:= nestplugin version = 1.0.0 ... -
If that worked, now you can send any arguments to the CLI in order to generate with your templates. Please follow this guide that explains all the CLI commands.
-
-
Modify the already present JUnit tests on the CLI project: They test the generation of templates from multiple plug-ins, you can add your own tests and input files.
-
Use the CLI jar to execute commands:
-
The
mvn clean install -DskipTestscommand will have created acli.jarinside your target folder (cobigen-cli/cli/target). Open the jar with any unzipper and extract to the current locationclass-loader-agent.jar,cobigen.batandcg.bat: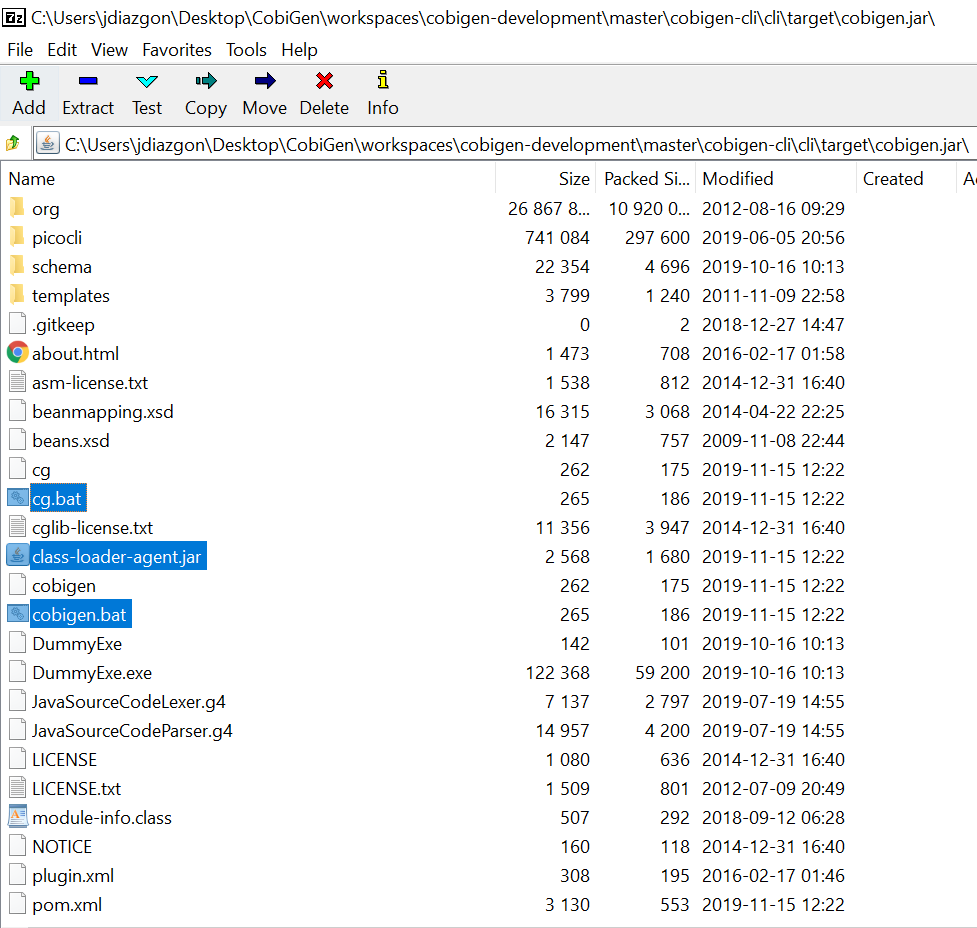
-
Now you can run any CobiGen CLI commands using a console. This guide explains all the CLI commands.
-
-
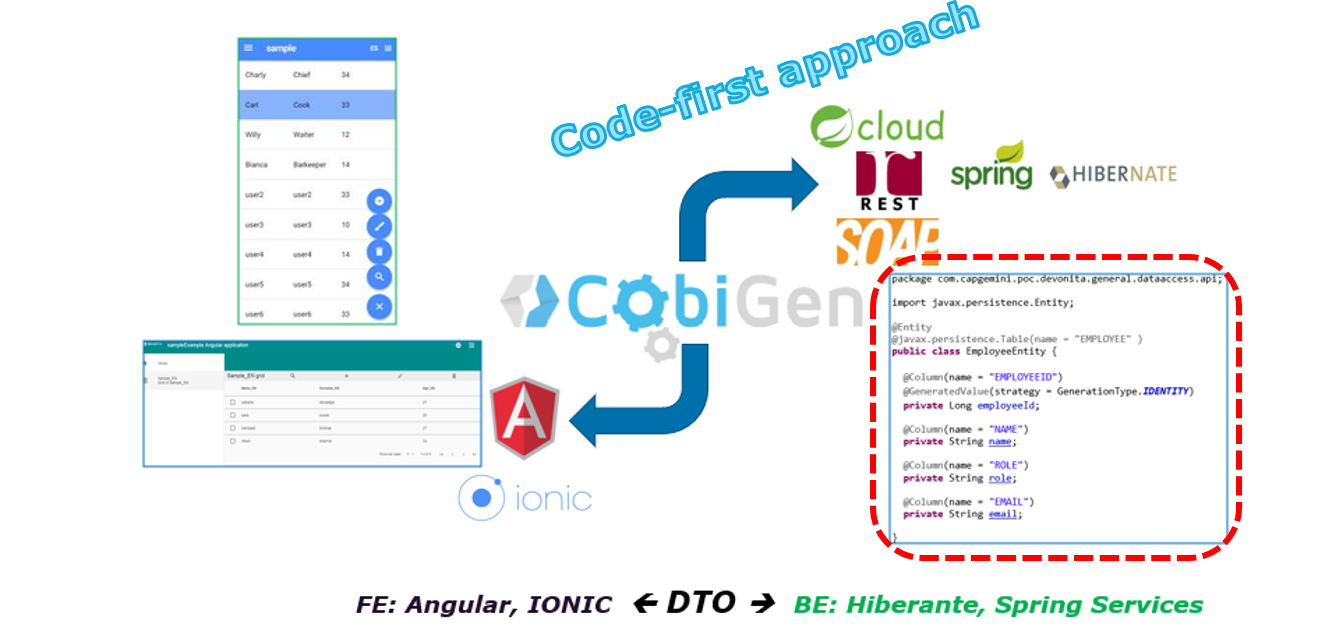
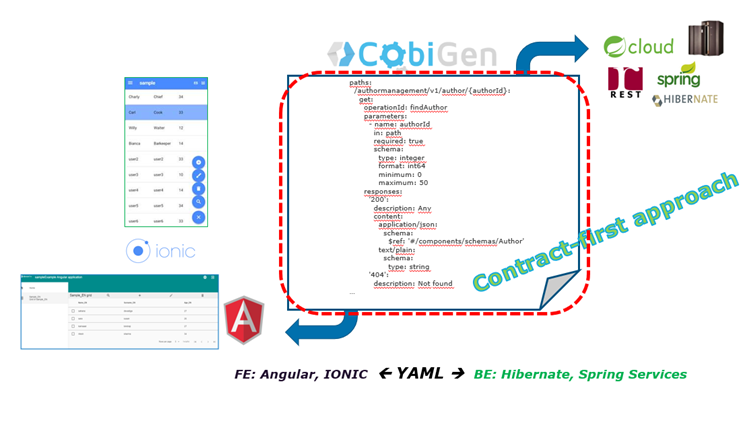
In this guide we will explain how to generate a new WebAPI project from an OpenAPI 3.0.0 specification. This means that we are going to use a “contract first” strategy. This is going to be possible due to these type of files that contain all the information about entities, operations, etc…
In order to make it work we are using CobiGen, a powerful tool for generating source code. CobiGen allows users to generate all the structure and code of the components, helping to save a lot of time otherwise wasted on repetitive tasks.
First, we will install the devonfw-IDE. It is a tool that will setup your IDE within minutes. Please follow the install guide here.
We are going to use the template of devon4net as a base to generate all the code, so what we have to do now is to download said template using the following steps.
First of all you have to set up all the environment for .NET, you can do this using the following tutorial. Next we are going to create a new folder where we want to have the WebAPI project, lastly we are going to open the terminal there.
Type the following:
`dotnet new -i Devon4Net.WebAPI.Template`
and then:
`dotnet new Devon4NetAPI`
In order to let CobiGen generate all the files, we first have to make some modifications to our OpenAPI file.
It is obligatory to put the “x-rootpackage” tag to indicate where CobiGen will place the generated files as well as the "x-component" tags for each component, keep in mind that due to CobiGen’s limitations each component must have its own entity.
You can read more information about how to configure your OpenAPI file and a working example here.
CobiGen allow us to generate the files in two different ways. One of them is using Eclipse which it can be done by using the its graphical interface. The other way to generate the code is using the CobiGen CLI tool.
In order to generate the files using Eclipse we need to follow some simple steps.
First we are going to import our basic devon4net WebAPI Project into Eclipse. to do so open Eclipse with the “eclipse-main.bat” file that can be found in the devon distribution root folder. Once we are inside of Eclipse we go to File > Open projects from file system… and, under "Directory", search for your project.

Next we copy our OpenAPI file into the root folder of the project.
And then we right click on OpenAPI file and then select CobiGen > Generate… It will display a window like this:
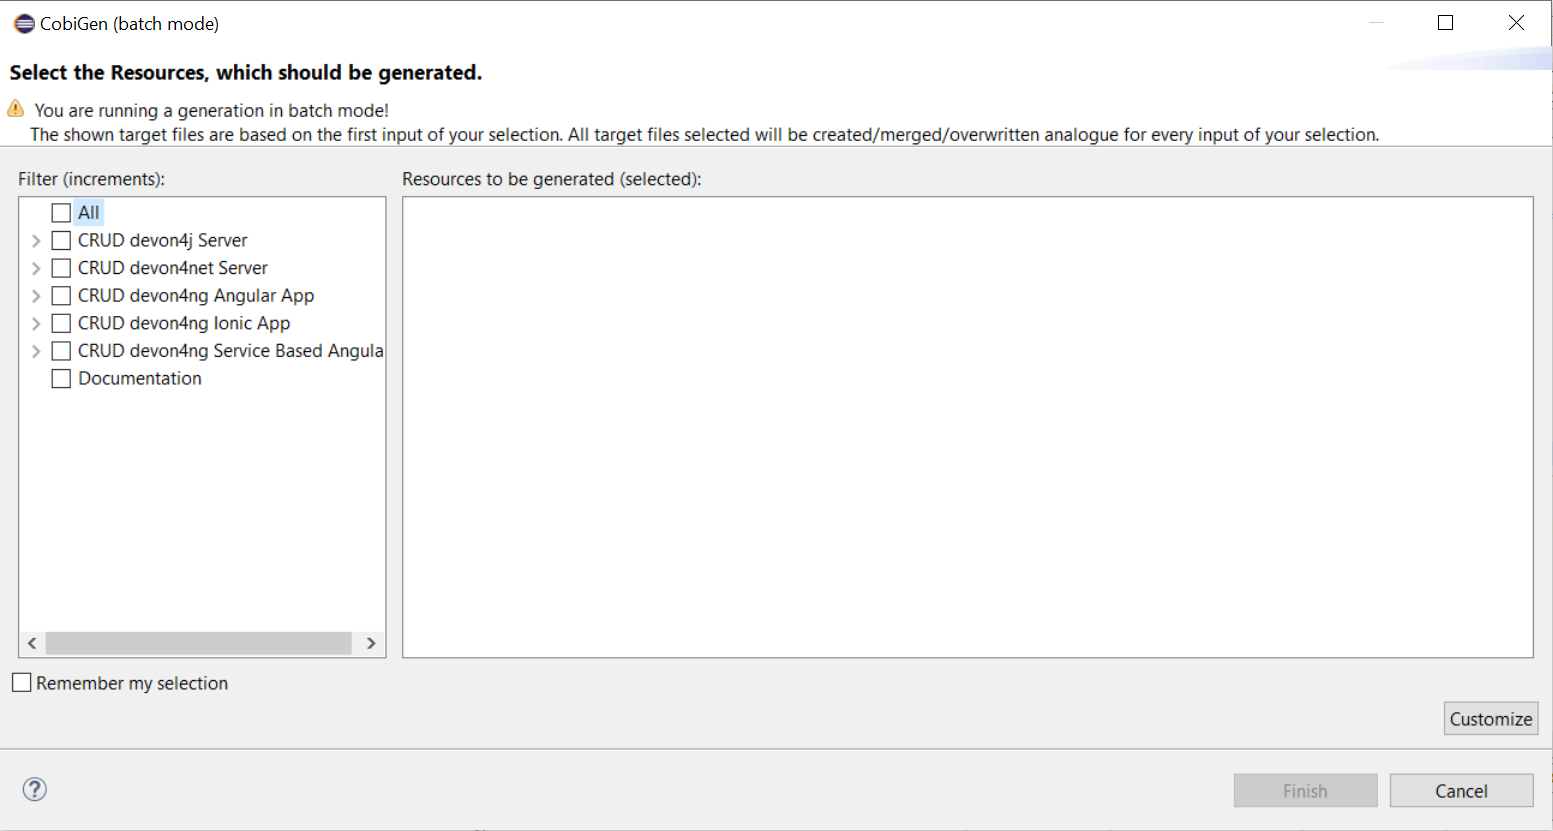
To select all .NET features choose CRUD devon4net Server otherwise you can select only those that interest you.

Ones you select all the files that you want to generate, click on the “Finish” button to generate all the source code.
In order to generate the files using the CobiGen CLI it is needed to do the following steps:
-
Go to devonfw distribution folder
-
Run console.bat, this will open a console.
-
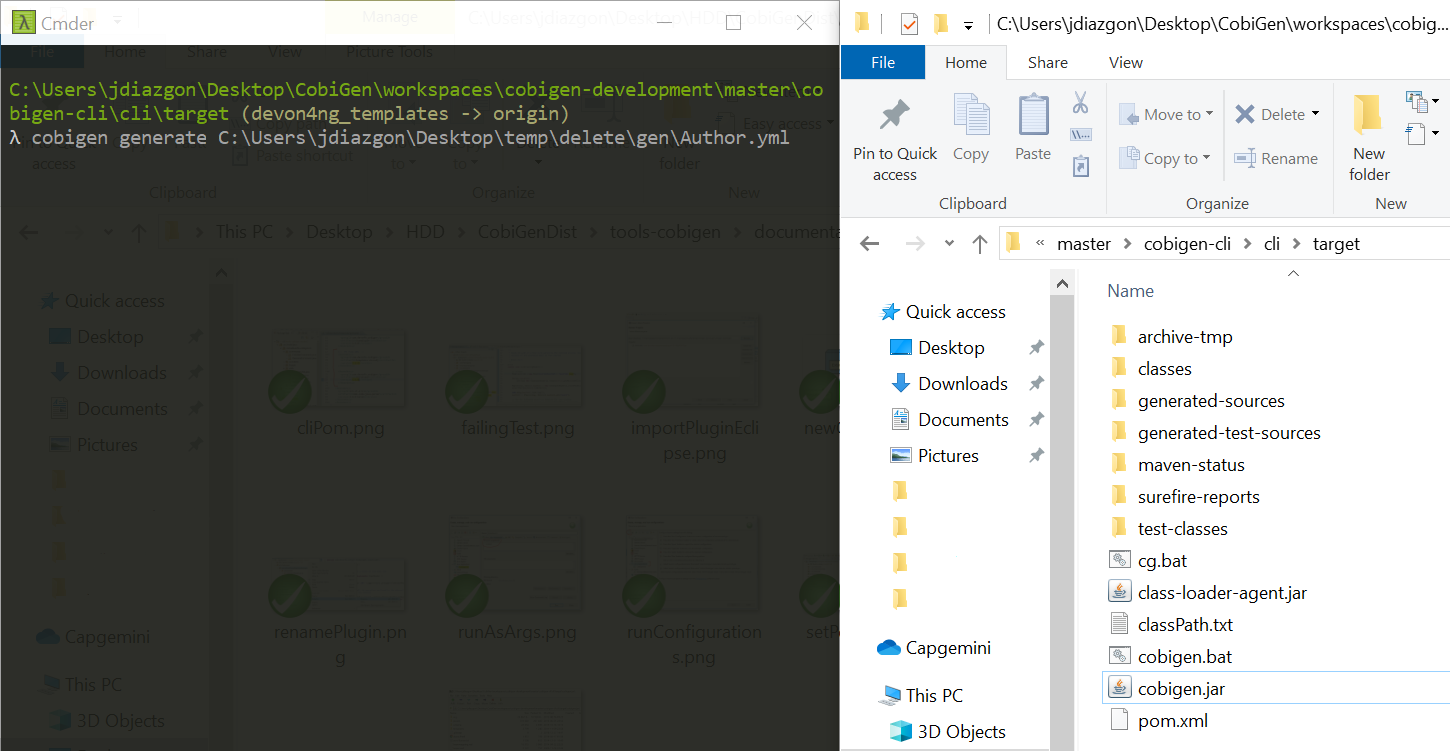
Go to the folder you downloaded the devon4net template and your yml file.
-
Run the command:
`cobigen generate {yourOpenAPIFile}.yml` -
A list of increments will be printed so that you can start the generation. It has to be selected CRUD devon4net Server increment.
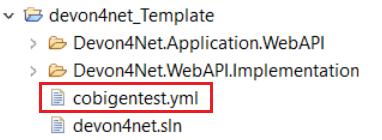
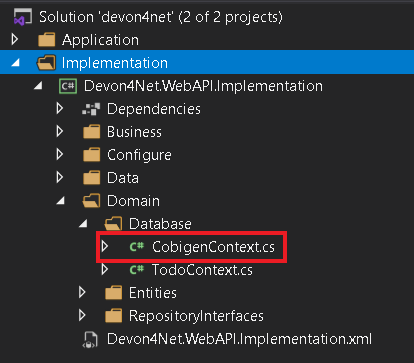
CobiGen is generating an empty context that has to be filled with manually in order to be able to work with the database. The context can be found in [Project_Name]/Devon4Net.WebAPI.Implementation/Domain/Database/CobigenContext.cs.
After the configuration of the database, open a terminal in path: [Project_Name]/Devon4Net.Application.WebAPI and then type:
`dotnet run`
This will deploy our application in our localhost with the port 8082, so when you click here (https://localhost:8082/swagger) you can see, in swagger, all the services and the data model.
How to update CobiGen
In order to update CobiGen from our devonfw distribution, we have two options:
-
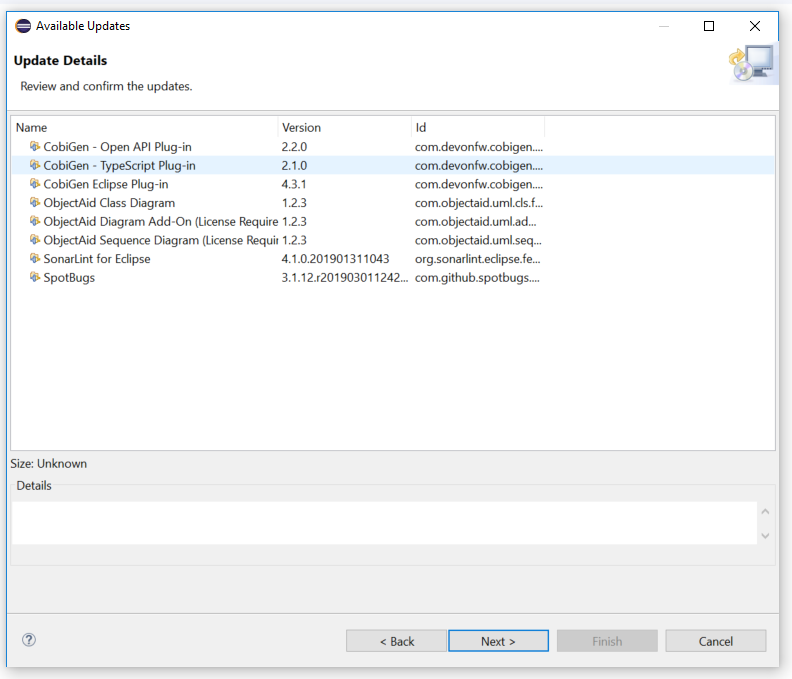
Open Eclipse, click on Help → Check for updates

-
Select all the CobiGen plugins listed and click on Next.
If this option is not working properly, then you can try the second option:
-
Open Eclipse, click on Help → About Eclipse IDE:

-
Click on Installation details:
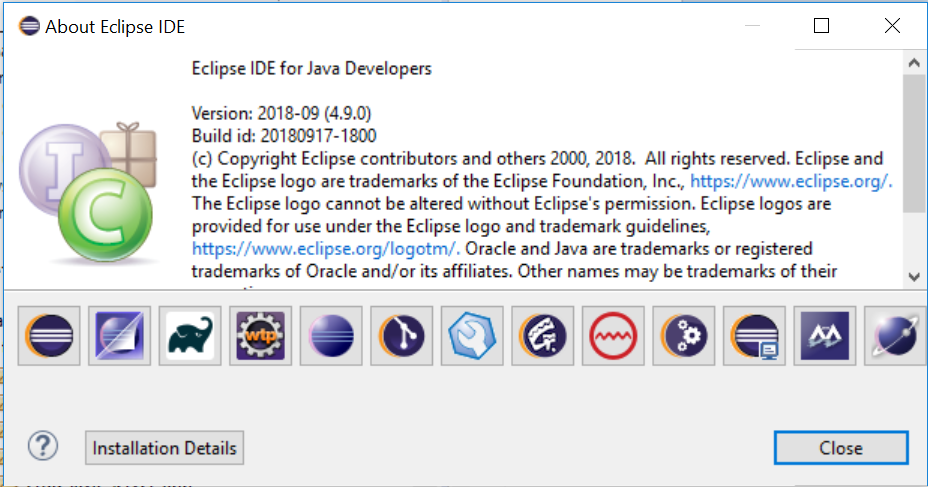
-
Select all the CobiGen plugins and click on Update:
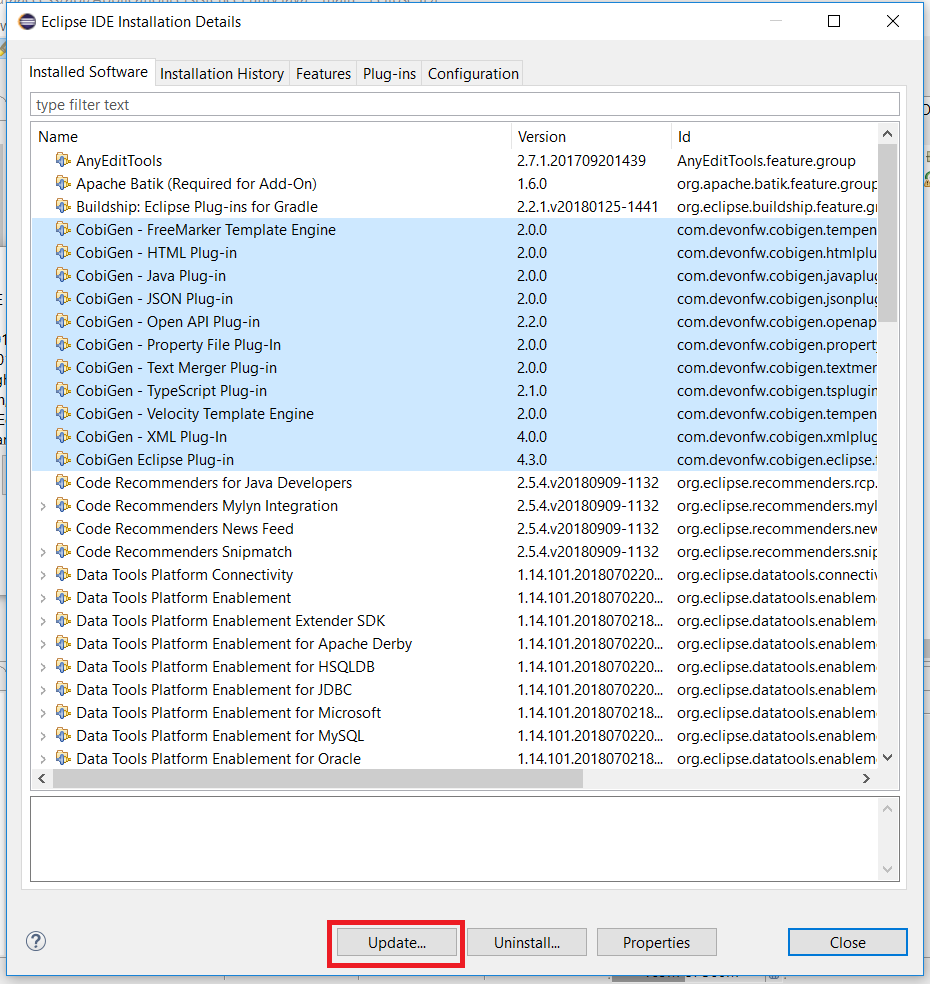
After the update process finishes, remember to restart Eclipse.
Updating templates:
To update your CobiGen templates to the latest version, you just need to do one step:
-
Right click any file on your package explorer, click on CobiGen → Update templates, then click on download:

Now you will have the latest templates ready!
Unresolved directive in cobigen.wiki/master-cobigen.asciidoc - include::howto-Cobigen-CLI-generation.asciidoc[leveloffset=3]
End to End POC Code generation using Entity class
This article helps to create a sample application using CobiGen.
Prerequisites
Download and install devonfw IDE by this tutorial.
Steps to create a Sample Project using CobiGen
The HOW_TO is divided in 2 parts:
-
BE-Backend generator (DB+DAO+ services) -
FE-Frontend generator (Web App Angular + Ionic App)
So, ready to go! We’re going to start with the BE part.
Backend
1.Under your path installation of devonfw, you can find the eclipse-main.bat script. To run it, execute installation_path\eclipse-main.bat.This will open eclipse.
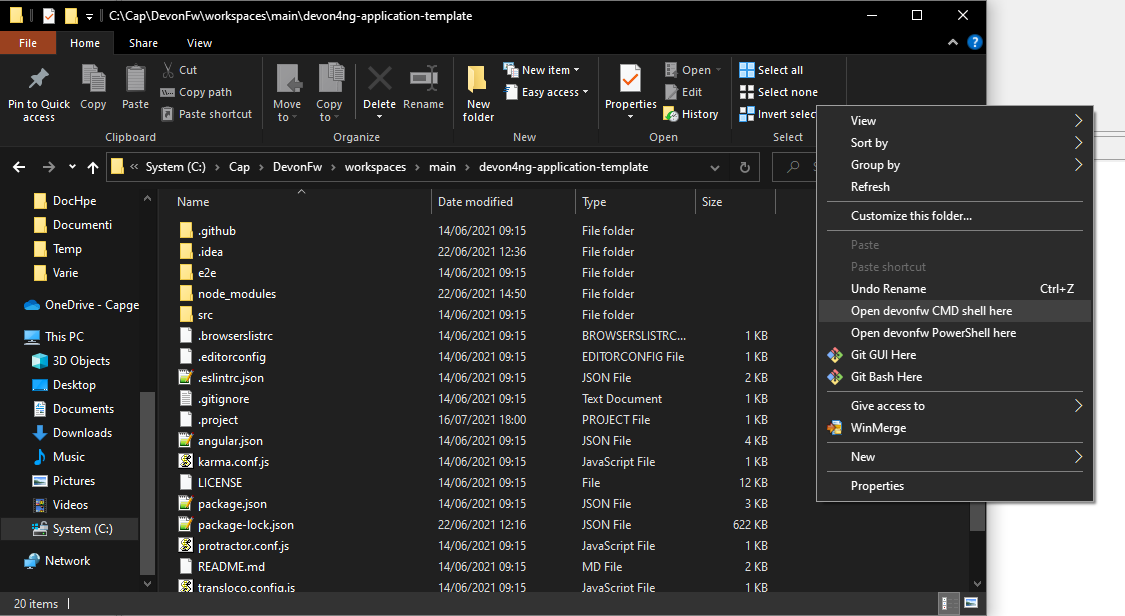
2.Create a project: Navigate in the folder containing the devonfw installation and then to workspaces/main. Right-click and choose "Open devonfw CMD shell here". Next, launch this command in the shell:
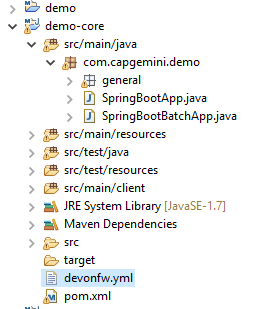
devon java create com.example.domain.myapp3.In eclipse, import the project as a maven project as specified in the image below:
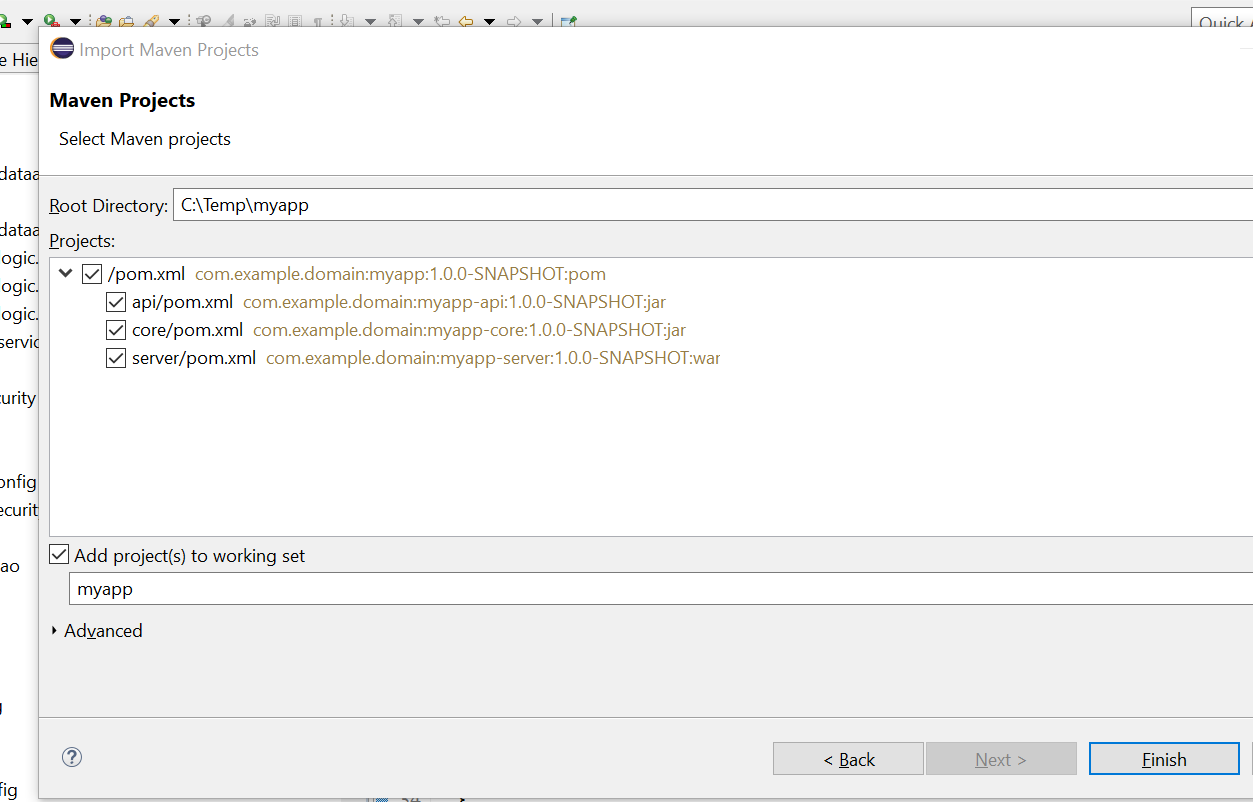
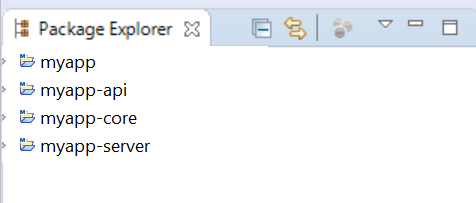
4.Click FINISH. Now you should have the following 4 projects:
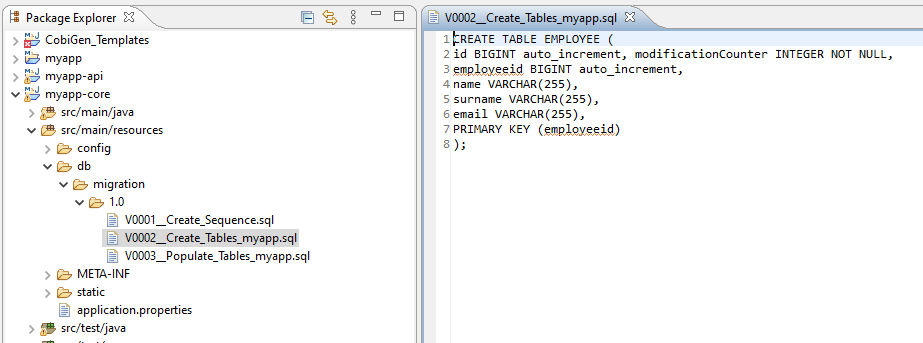
5.Create a new SQL file V0002__CreateTables_myapp.sql inside `myapp-core` , under the folder path `/myapp-core/src/main/resources/db/migration/1.0` and insert the following script:
CREATE TABLE EMPLOYEE (
id BIGINT auto_increment, modificationCounter INTEGER NOT NULL,
employeeid BIGINT auto_increment,
name VARCHAR(255),
surname VARCHAR(255),
email VARCHAR(255),
PRIMARY KEY (employeeid)
);
WARNING 1: In this folder there is only one file (0001). You have to add the other files in progressive number order (i.e. 0002)!
WARNING 2: There are 2 underscores in the name!
6.Create another SQL file analogously named V0003__PopulateTables-myapp.sql in the same folder and add following script about the INSERT to populate the table created before. Please note the warnings from the previous step here, as well.
INSERT INTO EMPLOYEE (id, modificationCounter, employeeid, name, surname,email) VALUES (1, 1, 1, 'John', 'Doe', 'john.doe@example.com');
INSERT INTO EMPLOYEE (id, modificationCounter, employeeid, name, surname,email) VALUES (2, 2, 2, 'Tom', 'Smith', 'tom.smith@example.com');
INSERT INTO EMPLOYEE (id, modificationCounter, employeeid, name, surname,email) VALUES (3, 3, 3, 'Joe', 'Schmoe', 'joe.schmoe@example.com');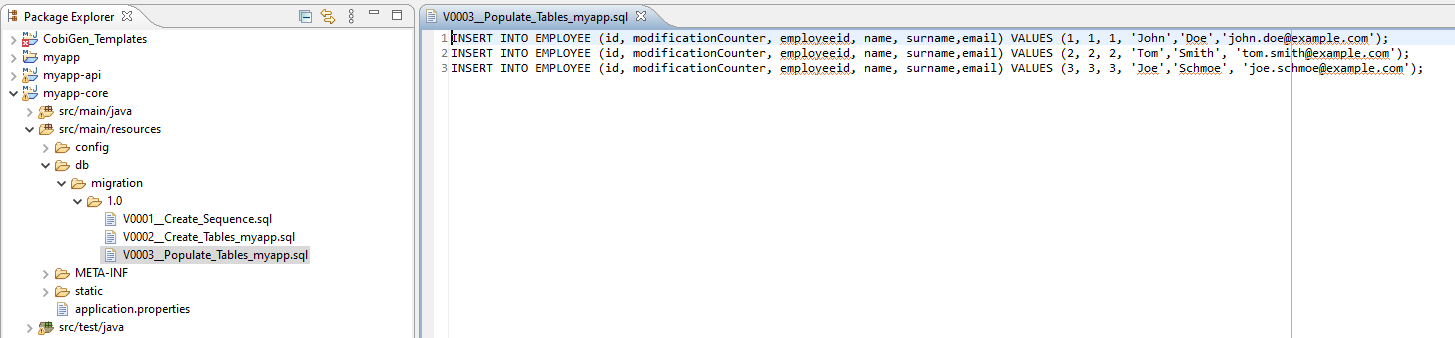
7.We will now create the Entity Class for the code generation. For this, create a package named com.example.domain.myapp.employeemanagement.dataaccess.api in the folder `myapp-core/src/main/java`.
WARNING: It’s important to follow this naming convention to ensure CobiGen is working properly.
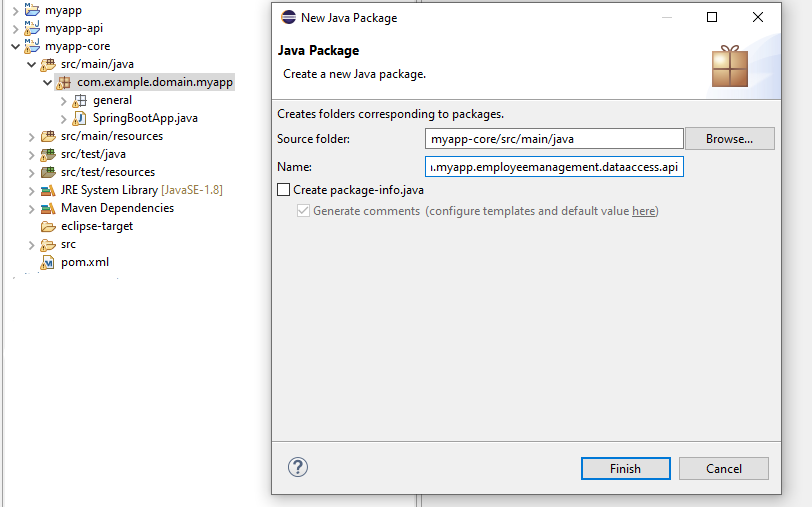
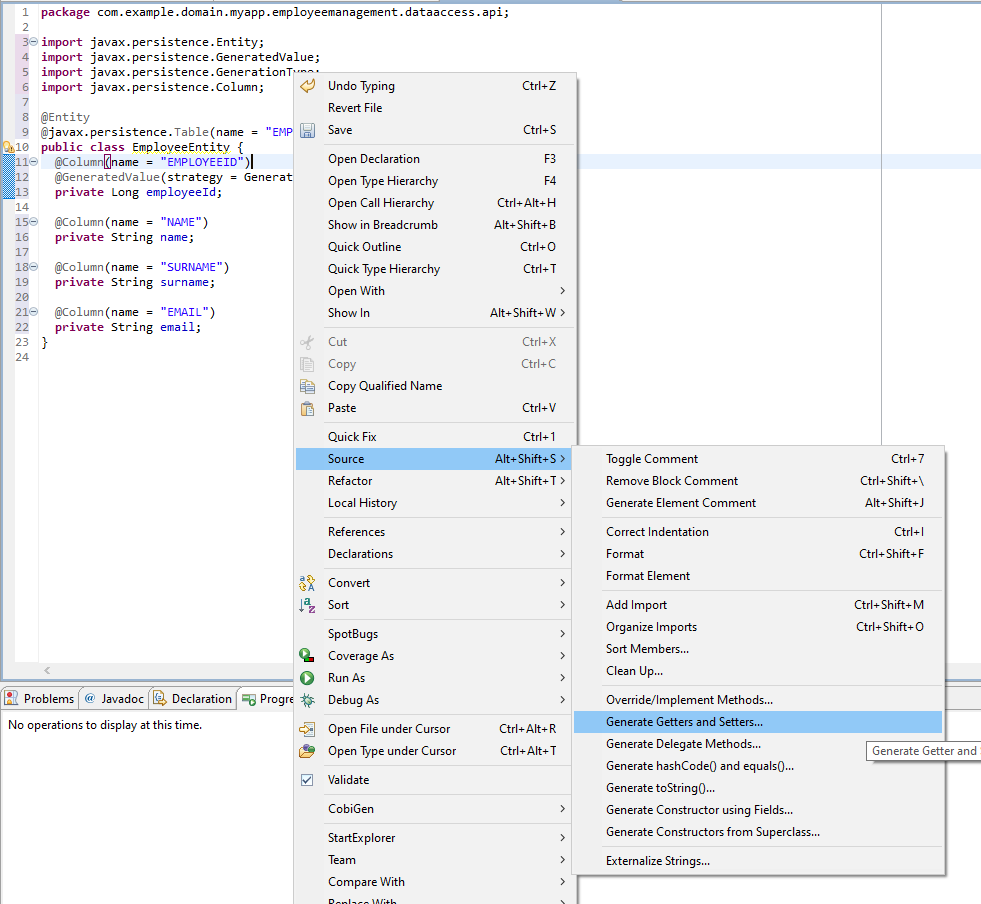
Now create a new class named EmployeeEntity in this package and paste the code below to turn it into a JPA Entity.
package com.example.domain.myapp.employeemanagement.dataaccess.api;

import javax.persistence.Entity;
import javax.persistence.GeneratedValue;
import javax.persistence.GenerationType;
import javax.persistence.Column;
@Entity
@javax.persistence.Table(name = "EMPLOYEE")
public class EmployeeEntity {
  @Column(name = "EMPLOYEEID")
  @GeneratedValue(strategy = GenerationType.IDENTITY)
  private Long employeeId;
  @Column(name = "NAME")
  private String name;
  @Column(name = "SURNAME")
  private String surname;
  @Column(name = "EMAIL")
  private String email;
}
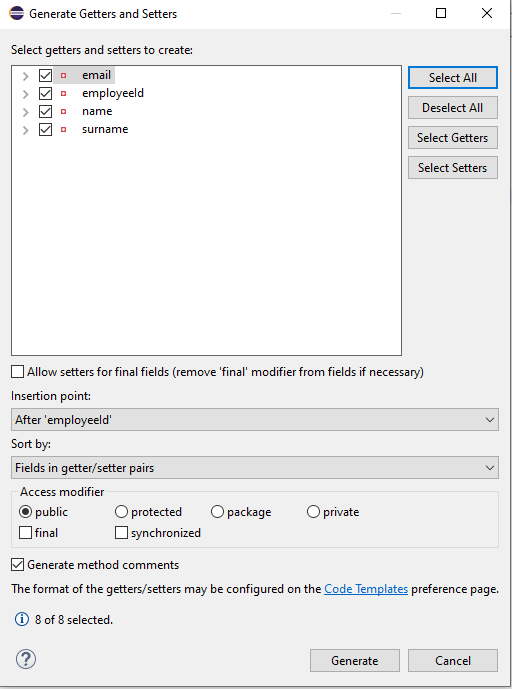
8.Generate getters and setters for all attributes, as you can see in the image below:
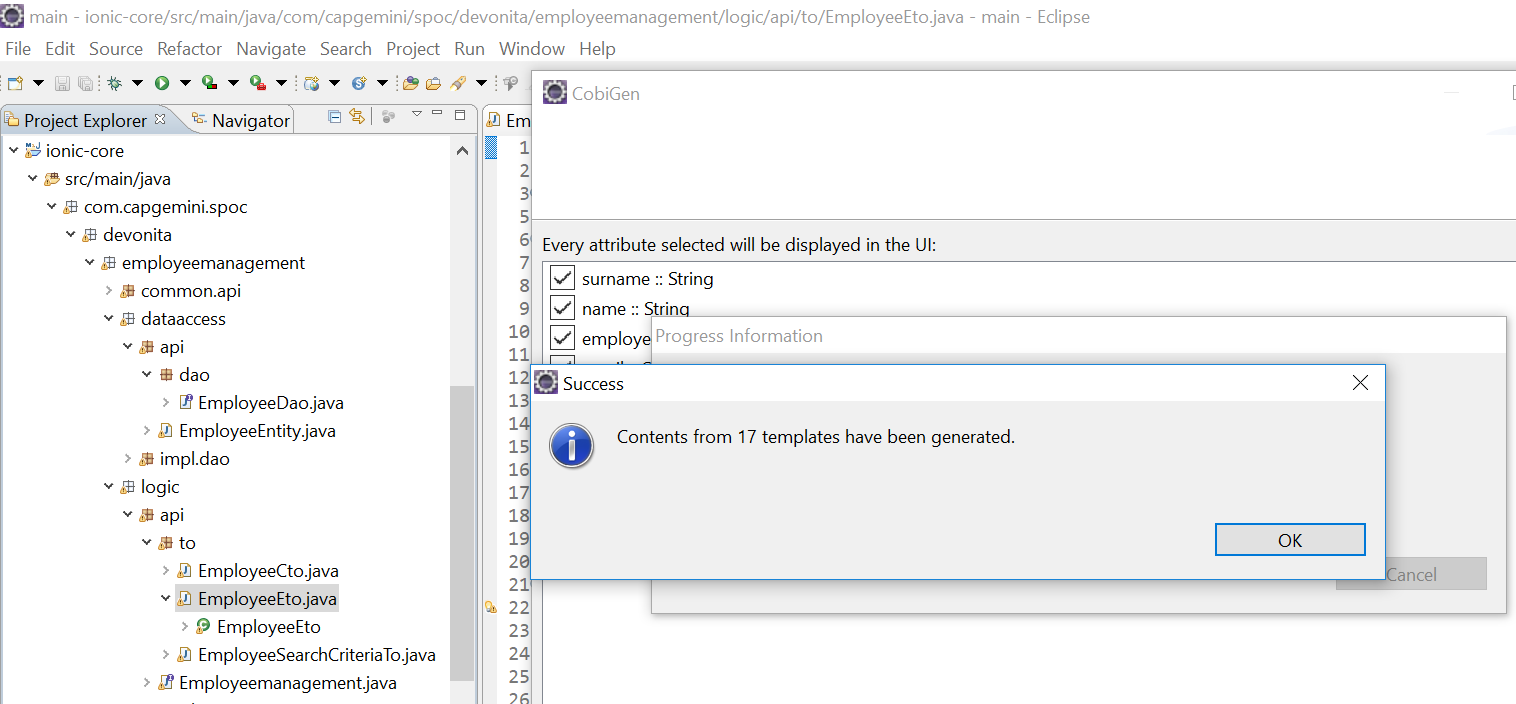
9.Now we can use CobiGen to generate code! First, right-click in the package explorer on EmployeeEntity.java → CobiGen and select Update Template. Next, right-click on EmployeeEntity.java → CobiGen → Generate and tick the boxes as can be seen in the picture:
10.Click on Finish to complete the process. The entire BE layer structure including CRUD operation methods was auto generated.
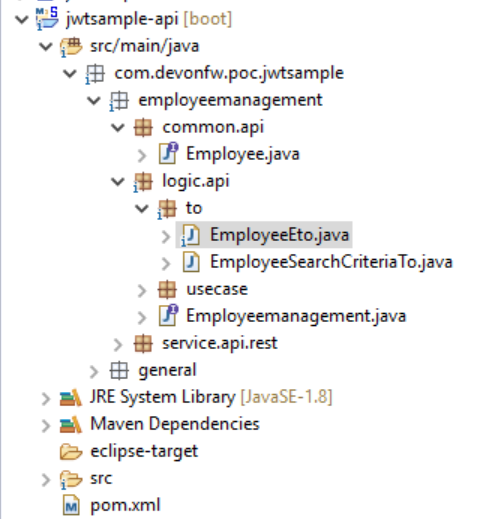
Some classes are generated in the API part (`myapp-api`), e.g. interfaces, as shown below:
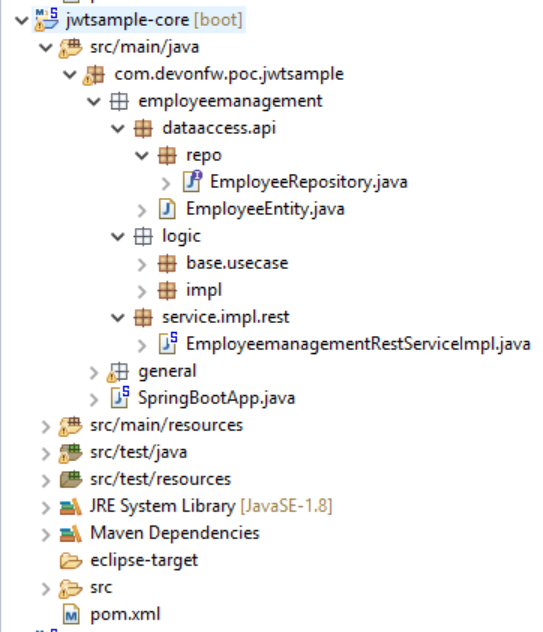
Other classes are generated in the core part (`myapp-core`), like implementations, as shown below:
11.The last step is to add the cross-domain process, as we are developing the JavaScript client and the server application separately. For this, we need to prepare the server side to accept requests from other domains, covering the following points:
-
Accept request from other domains.
-
Accept devonfw used headers like
X-CSRF-TOKENorcorrelationId. -
Be prepared to receive secured request (cookies).
Add these two kind of dependencies in the pom.xml of the `myapp-core` folder, at the end of the list of dependencies:
    <dependency>
      <groupId>com.devonfw.java.starters</groupId>
      <artifactId>devon4j-starter-security-cors</artifactId>
    </dependency>
    <dependency>
      <groupId>com.devonfw.java.starters</groupId>
      <artifactId>devon4j-starter-security-csrf</artifactId>
    </dependency>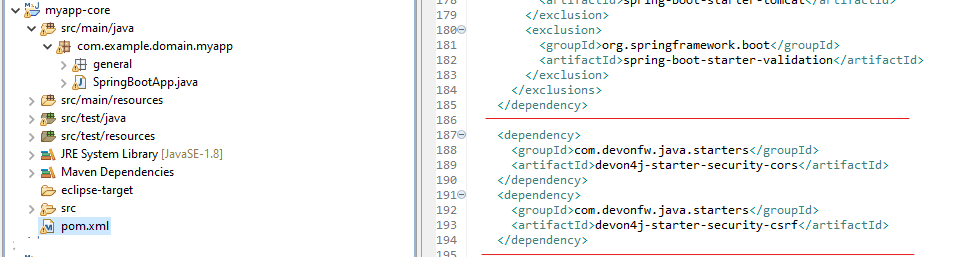
12.Add these properties in your application.properties file, in the myapp-core folder in the resources/config:
security.cors.spring.allowCredentials=true
security.cors.spring.allowedOriginPatterns=*
security.cors.spring.allowedHeaders=*
security.cors.spring.allowedMethods=OPTIONS,HEAD,GET,PUT,POST,DELETE,PATCH
security.cors.pathPattern=/**
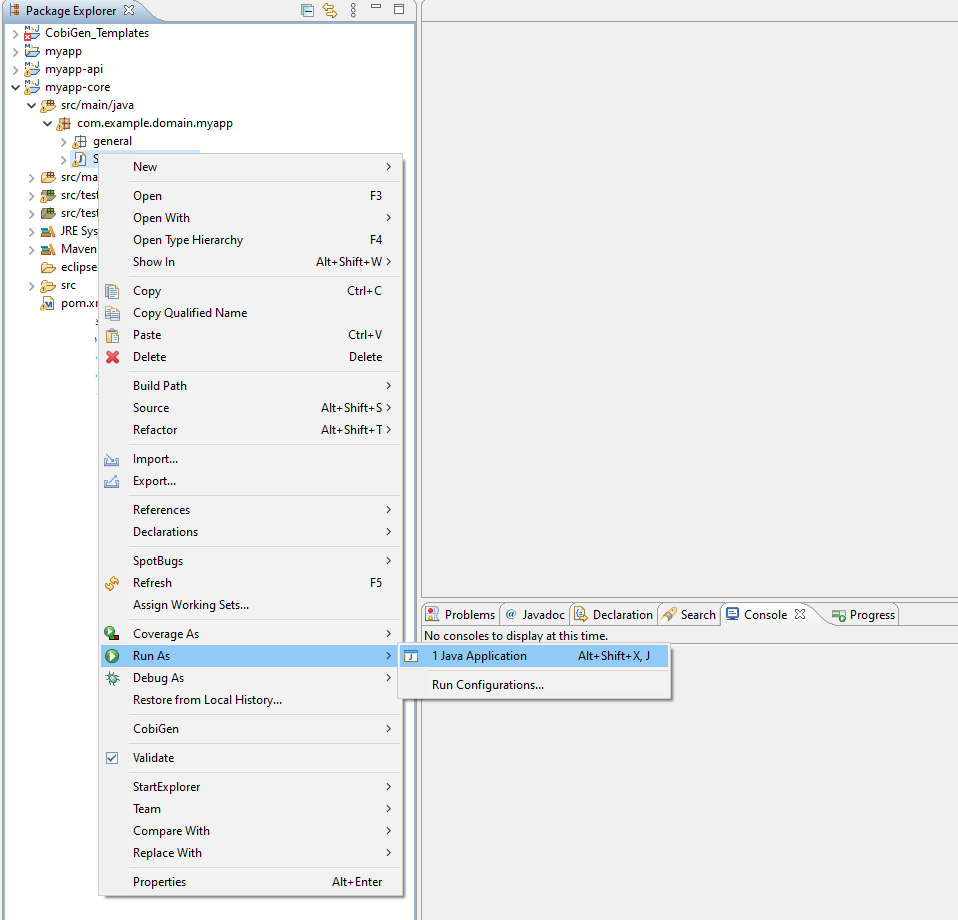
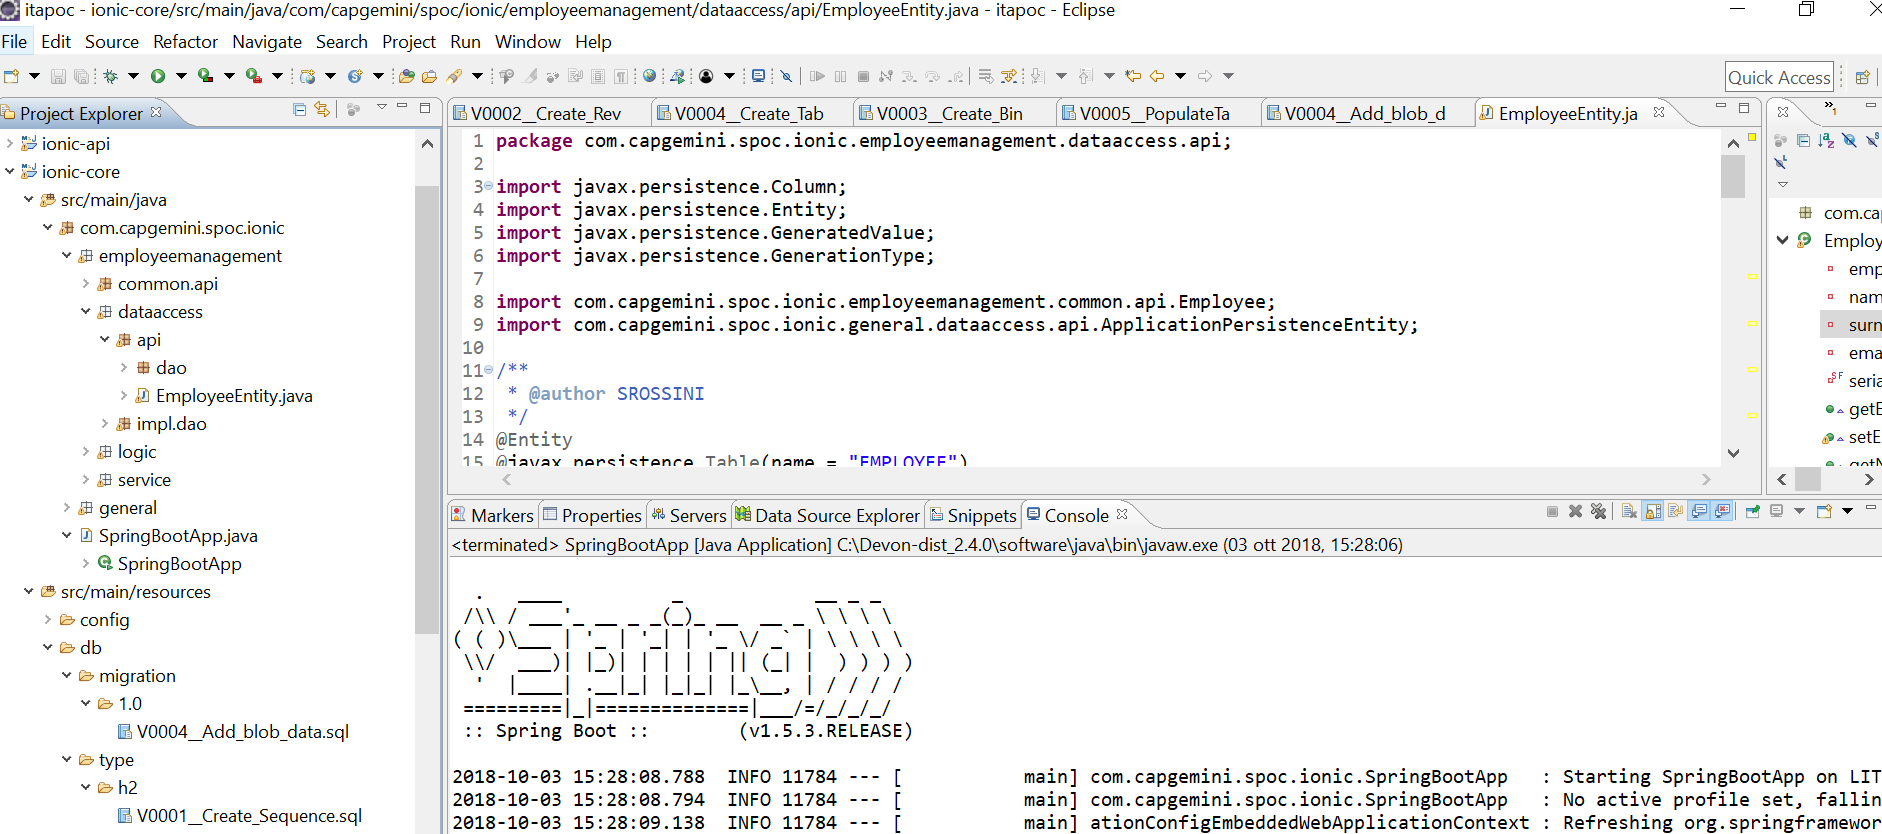
13.To check if the BE layer has been generated properly, start the server by right-clicking on `SpringBootApp.java` → run as → Java Application. If it looks like the image below, the BE part is done!
Optional step:
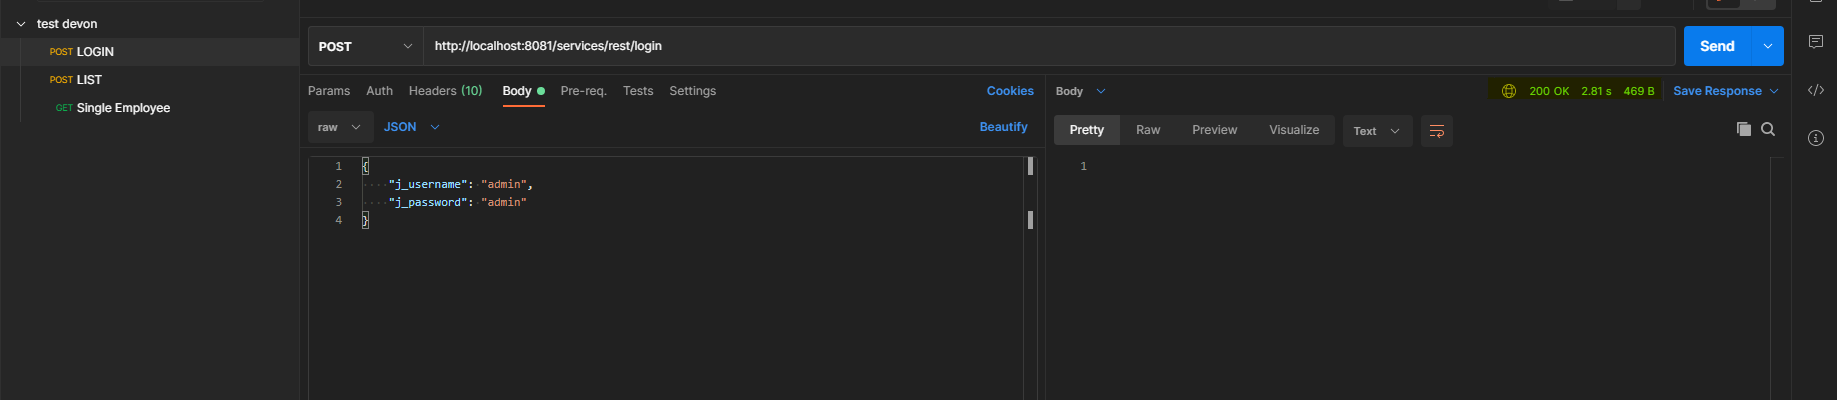
14.To test if the Backend works properly, we perform a REST service test! For this, we use Postman. You can download it here.
First send a POST request for the body with the URL [source, URL].
http://localhost:8081/services/rest/employeemanagement/v1/employee/1
Under Body, insert the JSON containing
{
  "j_username":"admin",
  "j_password":"admin"
}
Click on send. "Status:200 OK" means it worked.
Next, we create a new request, this time GET type with the URL
http://localhost:8081/services/rest/employeemanagement/v1/employee/1Click on send. If you get "Status:200 OK" again and see employee "John Doe" as you can see in the image below, the Backend works fine!

Frontend
Let’s start with the Frontend! We want to create an Angular Web App:
1.To generate angular structure, download or clone devon4ng-application-template from
https://github.com/devonfw/devon4ng-application-template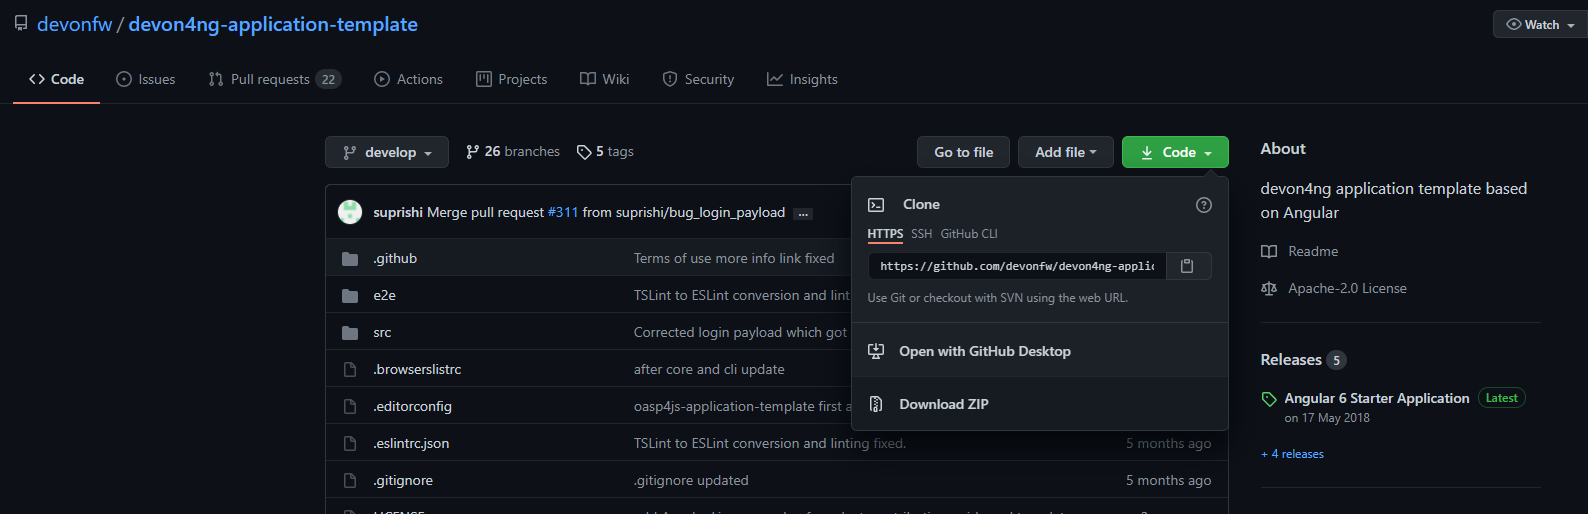
IMPORTANT if you download the zip of the source code, the name of the app MUST BE devon4ng-application-template. Extract it into your devonfw folder, under workspaces/main.
2.After downloading the APP, open the application in Eclipse. For this, right click on the left part of Eclipse and click "Import"
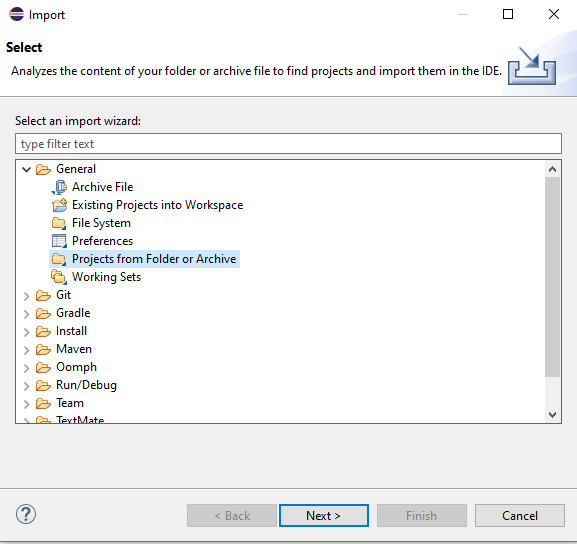
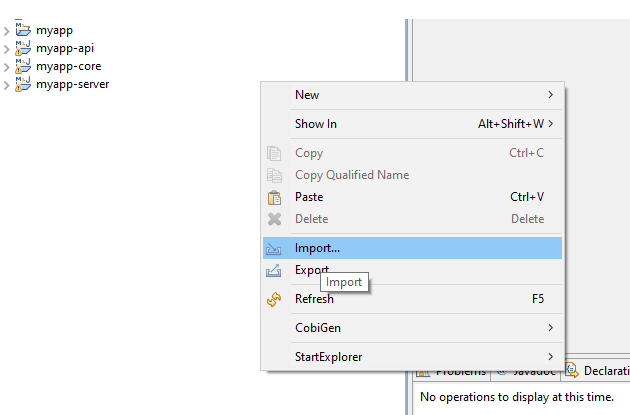 Then choose "Projects from Folder or Archive":
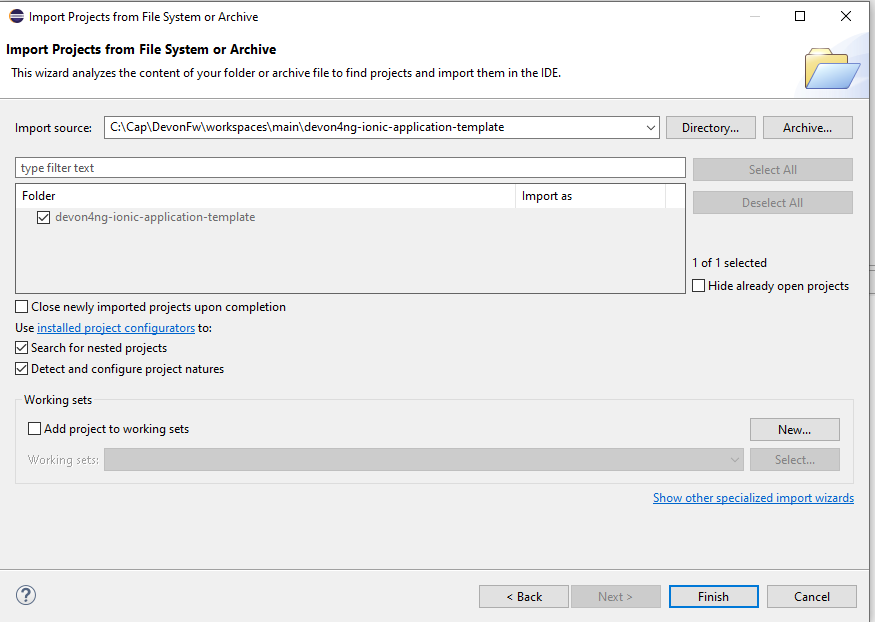
 Select the folder containing the Angular
 FE Application, under workspaces/main.Click on Finish after all dependencies have been loaded.
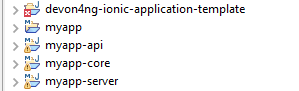
 Now, you should have a structure like this:
3.Right click on EmployeeEto.java file in the package com.example.domain.myapp.employeemanagement.logic.api.to, in the BE part (`myapp-api module`). Choose Cobigen → Generate and select the options as seen in the screenshot and click on Finish:

4.The entire ANGULAR structure has been auto generated and the generated code was merged into already existing code.
The app-routing.module.ts file (in src/app) should correspond to the code below, so copy the code and replace the existing content in your file with this:
import { NgModule } from '@angular/core';
import { RouterModule, Routes } from '@angular/router';
import { AuthGuard } from './core/security/auth-guard.service';
import { NavBarComponent } from './layout/nav-bar/nav-bar.component';
const routes: Routes = [{
        path: '',
        redirectTo: '/login',
        pathMatch: 'full'
    },
    {
        path: 'login',
        loadChildren: () =>
            import('./auth/auth.module').then(m => m.AuthDataModule)
    },
    {
        path: 'home',
        component: NavBarComponent,
        canActivateChild: [
            AuthGuard
        ],
        children: [{
                path: 'initial',
                loadChildren: () =>
                    import('./home/initial-page/initial-page.module').then(
                        m => m.InitialPageModule,
                    )
            },
            {
                path: 'employee',
                loadChildren: () =>
                    import('./employee/employee.module').then(
                        m => m.EmployeeModule,
                    )
            }
        ]
    },
    {
       path: '**',
       redirectTo: '/login'
    },
];
@NgModule({
    imports: [
        RouterModule.forRoot(routes)
    ],
    exports: [
        RouterModule
    ]
})
export class AppRoutingModule {
}
5.To make the Employee Grid in you FE application visible, you have to replace the code in nav-bar.component.html with the code below:
<div class="home-container-outer">
  <div class="home-container-inner">
    <mat-toolbar class="app-header-container" color="primary">
      <app-header (toggle)="onToggle($event)" [sideNavOpened]="sideNavOpened"></app-header>
    </mat-toolbar>
    <div class="sidenav-container-outer">
      <div class="sidenav-container-inner">
        <mat-sidenav-container>
          <mat-sidenav [disableClose]="false" [mode]="isMobile ? 'over' : 'side'" [opened]="!isMobile || sideNavOpened"
                       #sidenav>
            <mat-nav-list>
              <!-- Sidenav links -->
              <a id="home" mat-list-item [routerLink]="['./initial']" (click)="close()">
                <mat-icon matListAvatar>
                  home
                </mat-icon>
                <h3 matLine>{{ 'home' | transloco }}</h3>
                <p matLine class="desc">{{ 'description' | transloco }}</p></a>
              <a id="employee" mat-list-item [routerLink]="['./employee']" (click)="close()">
                <mat-icon matListAvatar>
                  grid_on
                </mat-icon>
                <h3 matLine> {{ 'employeemanagement.Employee.navData' | transloco }} </h3>
                <p matLine class="desc"> {{ 'employeemanagement.Employee.navDataSub' | transloco }} </p></a>
            </mat-nav-list>
          </mat-sidenav>
          <mat-sidenav-content>
            <div class="content-container-outer">
              <div class="content-container-inner">
                <router-outlet></router-outlet>
              </div>
              <mat-toolbar class="public-footer">
                <span>devonfw Application</span>
                <span>devonfw</span>
              </mat-toolbar>
            </div>
          </mat-sidenav-content>
        </mat-sidenav-container>
      </div>
    </div>
  </div>
</div>
6.Open the devon CMD shell and execute devon npm install in workspaces/main/devon4ng-application-template, which will download all the required libraries.
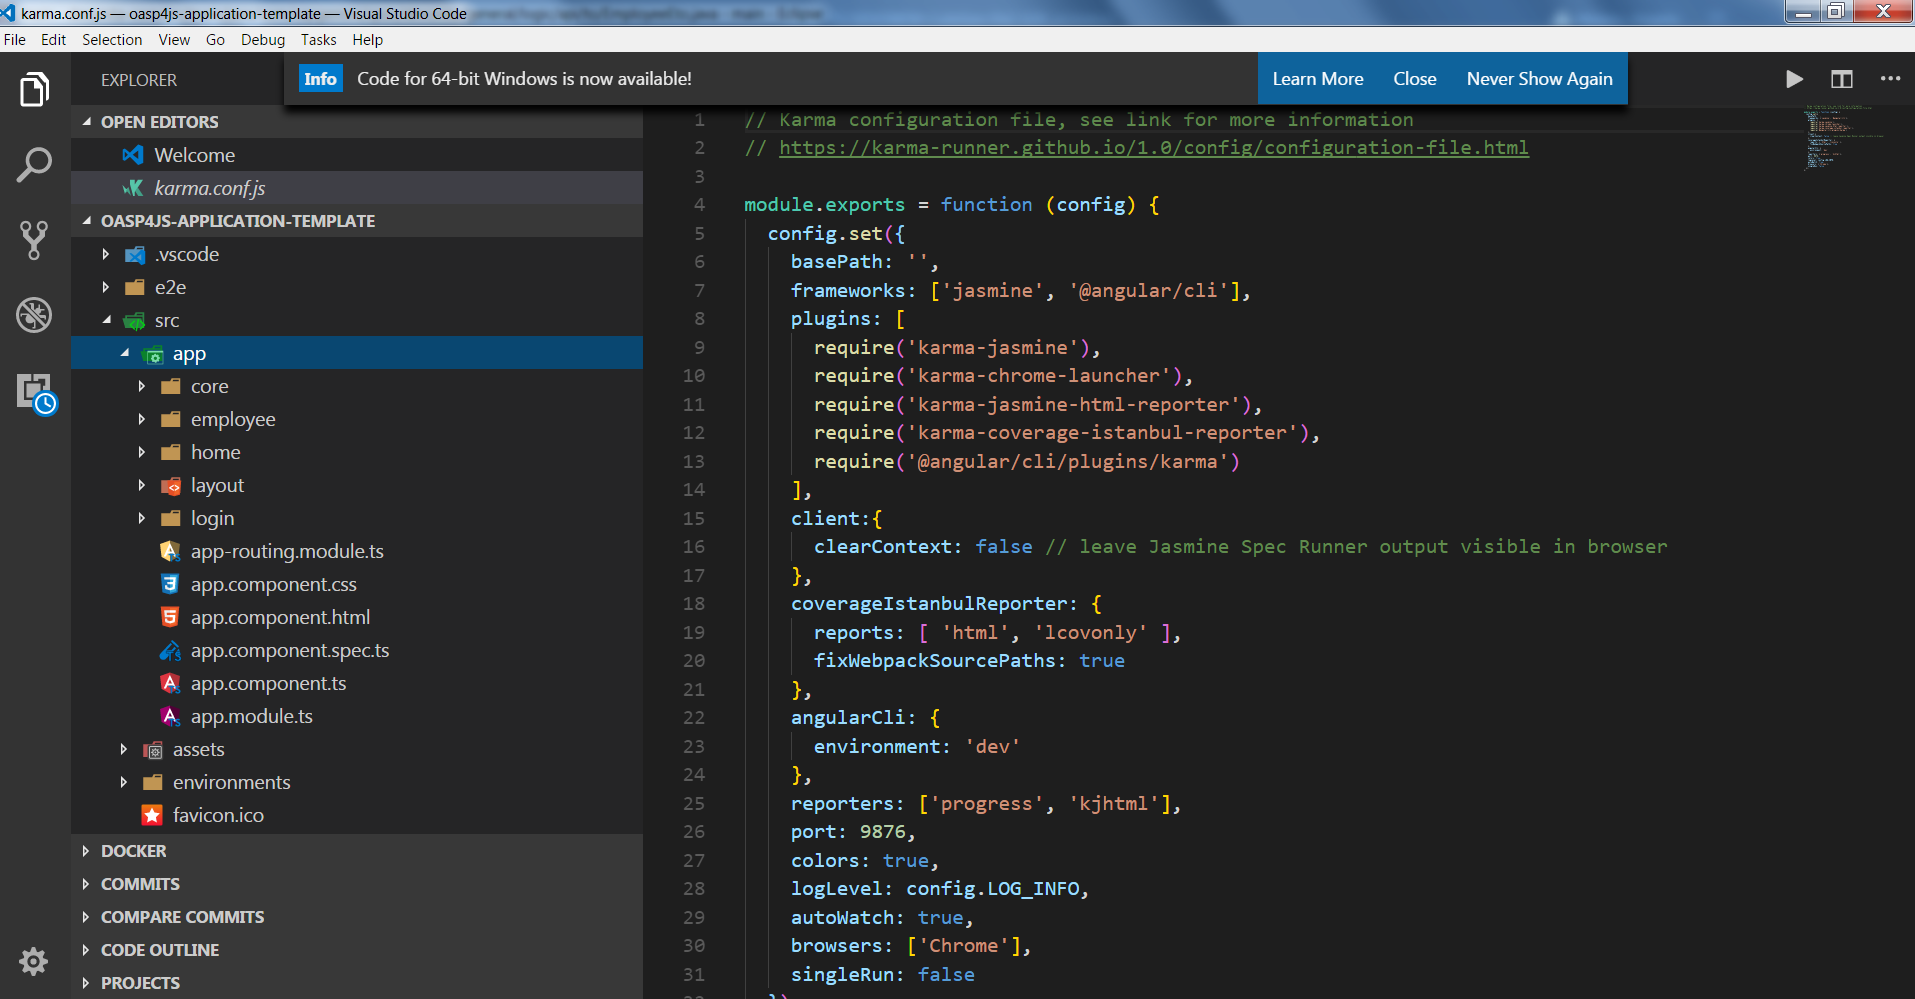
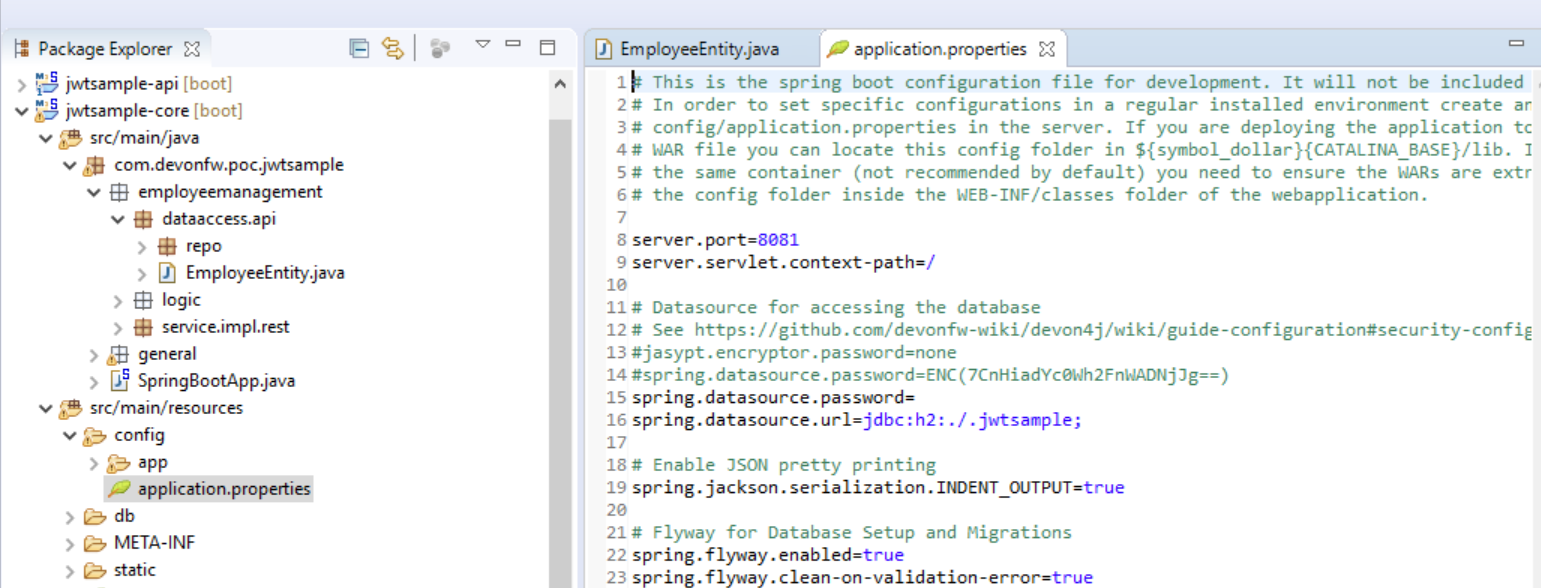
7.Check in the file environment.ts (in src/app/environments) if the server path is correct.
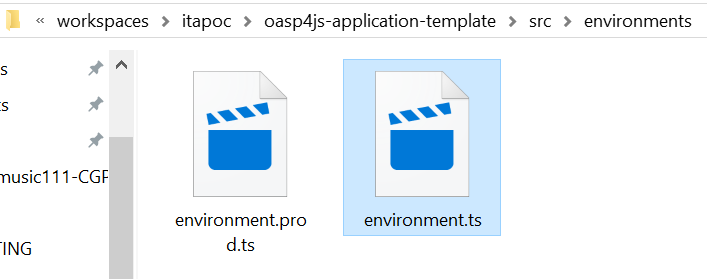
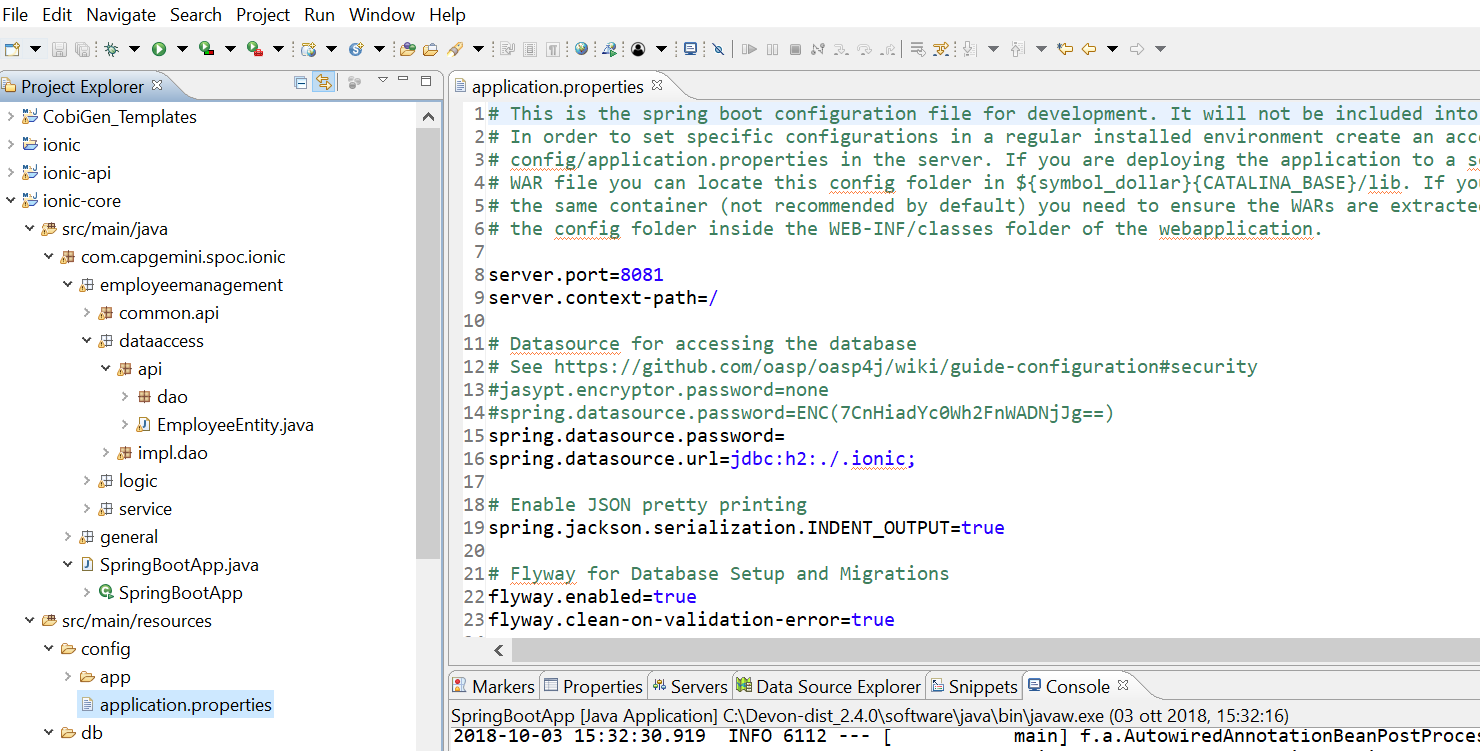
The values PATH, TCP port etc. in application.properties should match the image below. Set the security field to CSRF , if it is not configured this way already
export const environment = {
production: false,
restPathRoot: 'http://localhost:8081/',
restServiceRoot: 'http://localhost:8081/services/rest/',
security: 'csrf'
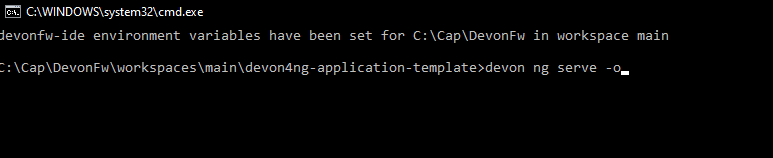
};8.For the last steps, the BE server should be running. Then run devon ng and then devon ng serve -o to start the Angular Application, in a CMD shell in your application folder (workspaces/main/devon4ng-application-template).
9.If the command execution is successful, the screen shown below will appear and you would be automatically redirected to the URL:
http://localhost:4200/login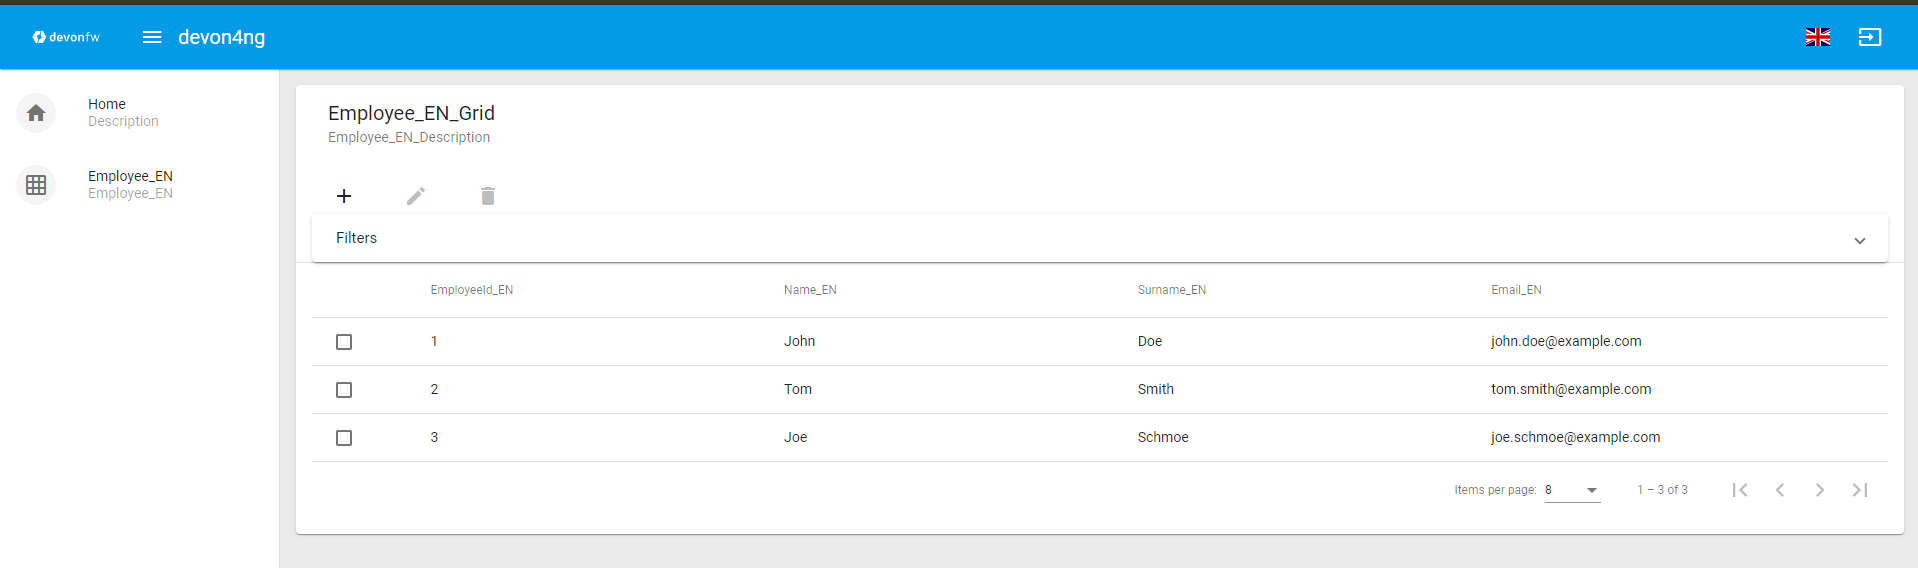
To log into the web application, you can use the credentials admin for user and for password.
Now the ANGULAR WebApp is done!
End to End POC Code generation using OpenAPI
This article helps to create a sample application using CobiGen.
Prerequisites
Download and install devonfw IDE here,
Steps to create a Sample Project using CobiGen
The HOW_TO is divided in 2 parts:
-
BE-Backend generator (DB+DAO+ services) – CONTRACT FIRST APPROACH -
FE-Frontend generator (Web App Angular + Ionic App) – CONTRACT FIRST APPROACH
So, ready to go! We’re going to start from the BE part …
Backend
Under your path installation of devonfw, you can find the eclipse-main.bat script and you can run it:
run installation_path\eclipse-main.bat
It will open eclipse
Create a project using a command from the command prompt.
To made it, it’s necessary to open a CMD and open the folder where it’s installed devonfw and launch this command under the path workspaces/main.
To facilitate this step, you can go from your "File Explorer" under workspaces/main folder and with the right button of the mouse, choose "Open devonfw CMD shell here"
|
Then launch this command from CMD:
devon java create com.example.domain.myappImport the project to eclipse as maven project
Click FINISH
Now We have the following 4 projects.
BEFORE to start to create an Entity class, remember to create the tables, for this POC it’s used an H2 Database!
Create a new SQL file (i.e: V0002__CreateTables_myapp.sql) inside `myapp-core` , under the folder path `/myapp-core/src/main/resources/db/migration/1.0` and insert the following script:
CREATE TABLE EMPLOYEE (
id BIGINT auto_increment, modificationCounter INTEGER NOT NULL,
employeeid BIGINT auto_increment,
name VARCHAR(255),
surname VARCHAR(255),
email VARCHAR(255),
PRIMARY KEY (employeeid)
);
WARNING 1: please note that there in that folder is present only one file, 0001, and you have to add the other files in progressive number order (i.e. 0002)!
WARNING 2: please note that there are 2 underscore in the name!
Now create another SQL file (i.e: V0003__PopulateTables-myapp.sql) and add following script about the INSERT in order to populate the table created before.
The script must be inserted at the same path used before: `/myapp-core/src/main/resources/db/migration/1.0`
WARNING 1: please note that there in that folder is present only one file, 0001, and you have to add the other files in progressive number order (i.e. 0003)!
WARNING 2: please note that there are 2 underscore in the name!
INSERT INTO EMPLOYEE (id, modificationCounter, employeeid, name, surname,email) VALUES (1, 1, 1, 'John','Doe','john.doe@example.com');
INSERT INTO EMPLOYEE (id, modificationCounter, employeeid, name, surname,email) VALUES (2, 2, 2, 'Tom','Smith', 'tom.smith@example.com');
INSERT INTO EMPLOYEE (id, modificationCounter, employeeid, name, surname,email) VALUES (3, 3, 3, 'Joe','Schmoe', 'joe.schmoe@example.com');
Let’s create the yml file for the code generation
Now create a new file devonfw.yml in the root of your core folder. This will be our OpenAPI contract, like shown below. Then, copy the contents of this file into your OpenAPI. It defines some REST service endpoints and a `EmployeeEntity` with its properties defined.
Important 1: Please pay attention to the content of the devonfw.yml file.
The section x-rootpackage it must be filled with the same package used when you have created the java application.
So i.e. if you have created the BE Java Application with:
devon java create com.example.domain.myappYou have to populate the devonfw.yml in this way:
x-rootpackage: com.example.domain.myapp
Important 2: if you want to know how to write an OpenAPI contract compatible with CobiGen, please read this tutorial.
Use CobiGen to generate code. Right click devonfw.yml. CobiGen → Generate
If it will ask you to download the templates, click on update:
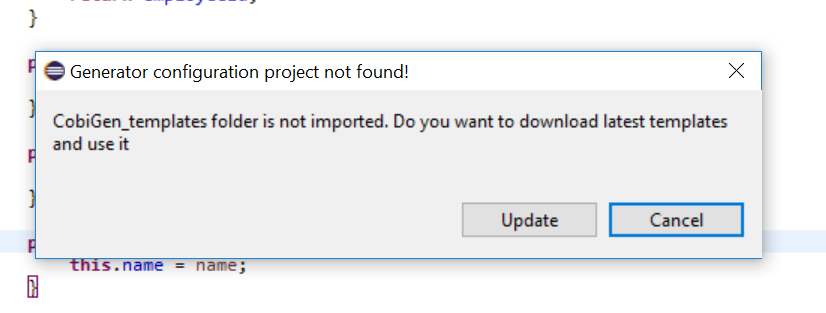
It will automatically download the latest version of CobiGen_Templates.
Attention: If you want to adapt the CobiGen_Templates, (normally this is not necessary), you will find at the end of this document (in a separate chapter) a tutorial on how to import them and adapt them!
Click on all the option selected as below:
Click on finish. Below Screen would be seen. Click on continue
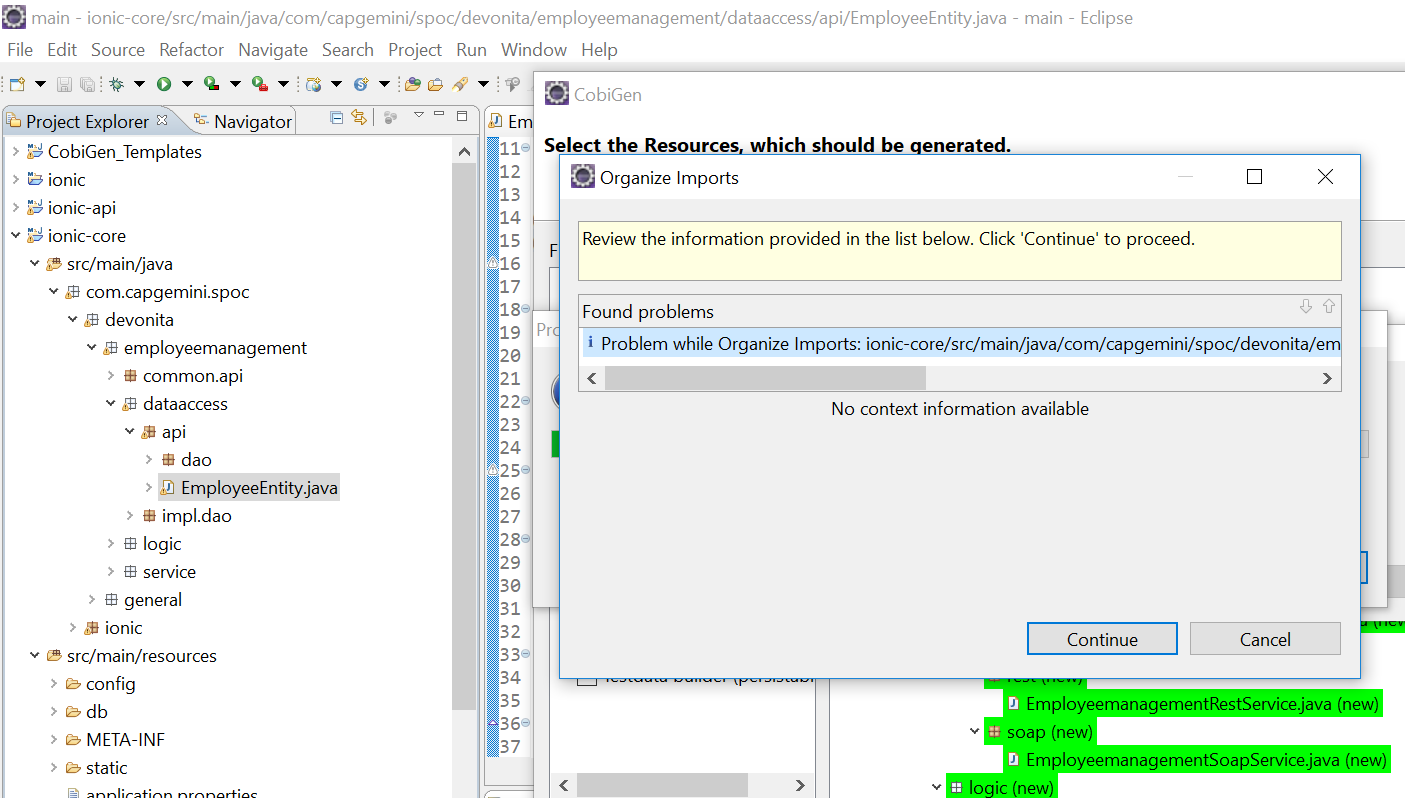
The entire BE layer structure having CRUD operation methods will be auto generated.
Some classes will be generated on the API part (`myapp-api`), normally it will be interfaces, as shown below:
Some other classes will be generated on the core part (`myapp-core`), normally it will be implementations as shown below:
The last step is to add the Cross Domain process, because when you are developing JavaScript client and server application separately, you have to deal with cross domain issues.
So, we need to prepare server side to accept request from other domains. We need to cover the following points:
-
Accept request from other domains.
-
Accept devonfw used headers like
X-CSRF-TOKENorcorrelationId. -
Be prepared to receive secured request (cookies).
To do this it’s necessary to add two kind of dependencies in the pom.xml of the `myapp-core` folder, at the end of the list of dependencies:
    <dependency>
      <groupId>com.devonfw.java.starters</groupId>
      <artifactId>devon4j-starter-security-cors</artifactId>
    </dependency>
    <dependency>
      <groupId>com.devonfw.java.starters</groupId>
      <artifactId>devon4j-starter-security-csrf</artifactId>
    </dependency>
Next step is to add some properties under your application.properties file, in the myapp-core folder in the resources/config:
security.cors.spring.allowCredentials=true
security.cors.spring.allowedOriginPatterns=*
security.cors.spring.allowedHeaders=*
security.cors.spring.allowedMethods=OPTIONS,HEAD,GET,PUT,POST,DELETE,PATCH
security.cors.pathPattern=/**
BEFORE to generate the FE, please start the Tomcat server to check that BE Layer has been generated properly.
To start a server you just have to right click on `SpringBootApp.java` → run as → Java Application
BE DONE
Last but not least: We make a quick REST services test !
See in the application.properties the TCP Port and the PATH
Now compose the Rest service URL:
service class <path>/<service method path>
-
<server> refers to server with port no. (i.e:
localhost:8081) -
<app> is in the application.properties (empty in our case, see above)
-
<rest service class path> refers to
EmployeemanagementRestService: (i.e:/employeemanagement/v1) -
<service method path>/employee/{id} (i.e: for
getEmployeemethod)
URL of getEmployee for this example is:
For all employees (POST)
http://localhost:8081/services/rest/employeemanagement/v1/employee/searchFor the specific employee (GET)
http://localhost:8081/services/rest/employeemanagement/v1/employee/1Now download Postman to test the rest services.
Once done, you have to create a POST Request for the LOGIN and insert in the body the JSON containing the username and password admin
WARNING: please note that the body of the request must be JSON type!
Once done with success (Status: 200 OK) - you can see the status of the response in the top right corner of Postman - we can create a NEW GET Request in order to get one employee.
To do this you have to create a new request in Postman, GET type, and insert the URL specified before:
http://localhost:8081/services/rest/employeemanagement/v1/employee/1Then click on "SEND" button…
Now you have to check that response has got Status: 200 OK and to see the below Employee
Now that We have successfully tested the BE is time to go to create the FE !
Frontend
Let’s start now with angular Web and then Ionic app.
To generate angular structure, download or clone devon4ng-application-template from
https://github.com/devonfw/devon4ng-application-template
IMPORTANT when you download the zip of the source code of your FE application, the name of the app MUST BE devon4ng-application-template and you can extract it in your devonfw folder, under workspaces/main
Once downloaded the APP, you can open the application with your favorite IDE (IntelliJ, Visual Studio Code, …)
Instead, if you want to open this project with Eclipse, you have to follow these steps:
-
Right click on the left part of Eclipse, and click on "Import":
-
Click on "Projects from Folder or Archive"
-
Select your folder where you have saved the Angular
FEApplication, underworkspaces/main. Wait that all the dependencies are charged and then click on "Finish" -
At the end, you will have a structure like this:
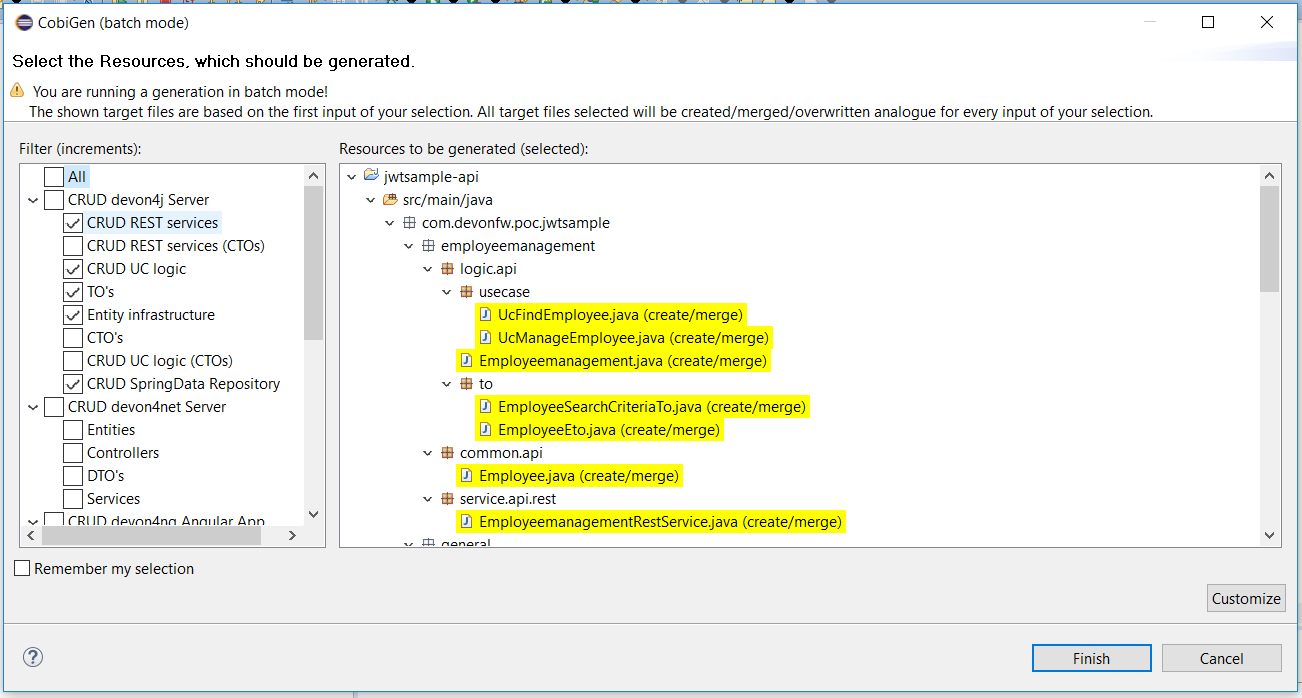
Once done, right click on the devonfw.yml (present in the `myapp-core` module) in order to use CobiGen. Click on the selected options as seen in the screenshot:
Click on Finish
The entire ANGULAR structure has been auto generated. The generated code will be merged to the existing.
IMPORTANT now you have to check in the app-routing.module.ts file, if the content corresponding to the code below:
import { NgModule } from '@angular/core';
import { RouterModule, Routes } from '@angular/router';
import { AuthGuard } from './core/security/auth-guard.service';
import { NavBarComponent } from './layout/nav-bar/nav-bar.component';
const routes: Routes = [{
        path: '',
        redirectTo: '/login',
        pathMatch: 'full'
    },
    {
        path: 'login',
        loadChildren: () =>
            import('./auth/auth.module').then(m => m.AuthDataModule)
    },
    {
        path: 'home',
        component: NavBarComponent,
        canActivateChild: [
            AuthGuard
        ],
        children: [{
                path: 'initial',
                loadChildren: () =>
                    import('./home/initial-page/initial-page.module').then(
                        m => m.InitialPageModule,
                    )
            },
            {
                path: 'employee',
                loadChildren: () =>
                    import('./employee/employee.module').then(
                        m => m.EmployeeModule,
                    )
            }
        ]
    },
    {
       path: '**',
       redirectTo: '/login'
    },
];
@NgModule({
    imports: [
        RouterModule.forRoot(routes)
    ],
    exports: [
        RouterModule
    ]
})
export class AppRoutingModule {
}
After that, if you want to make visible the Employee Grid in you FE application, you have to modify the nav-bar.component.html, to add the Employee grid in the section:
<div class="home-container-outer">
  <div class="home-container-inner">
    <mat-toolbar class="app-header-container" color="primary">
      <app-header (toggle)="onToggle($event)" [sideNavOpened]="sideNavOpened"></app-header>
    </mat-toolbar>
    <div class="sidenav-container-outer">
      <div class="sidenav-container-inner">
        <mat-sidenav-container>
          <mat-sidenav [disableClose]="false" [mode]="isMobile ? 'over' : 'side'" [opened]="!isMobile || sideNavOpened"
                       #sidenav>
            <mat-nav-list>
              <!-- Sidenav links -->
              <a id="home" mat-list-item [routerLink]="['./initial']" (click)="close()">
                <mat-icon matListAvatar>
                  home
                </mat-icon>
                <h3 matLine>{{ 'home' | transloco }}</h3>
                <p matLine class="desc">{{ 'description' | transloco }}</p></a>
              <a id="employee" mat-list-item [routerLink]="['./employee']" (click)="close()">
                <mat-icon matListAvatar>
                  grid_on
                </mat-icon>
                <h3 matLine> {{ 'employeemanagement.Employee.navData' | transloco }} </h3>
                <p matLine class="desc"> {{ 'employeemanagement.Employee.navDataSub' | transloco }} </p></a>
            </mat-nav-list>
          </mat-sidenav>
          <mat-sidenav-content>
            <div class="content-container-outer">
              <div class="content-container-inner">
                <router-outlet></router-outlet>
              </div>
              <mat-toolbar class="public-footer">
                <span>devonfw Application</span>
                <span>devonfw</span>
              </mat-toolbar>
            </div>
          </mat-sidenav-content>
        </mat-sidenav-container>
      </div>
    </div>
  </div>
</div>
Open the command prompt and execute devon npm install from your application folder (workspaces/main/devon4ng-application-template), which would download all the required libraries.
Check the file environment.ts if the server path is correct. (for production you will have to change also the environment.prod.ts file)
In order to do that, it’s important to look at the application.properties to see the values as PATH, TCP port etc…
For example in this case the URL should be since the context path is empty the server URLS should be like:
export const environment = {
    production: false,
    restPathRoot: 'http://localhost:8081/',
    restServiceRoot: 'http://localhost:8081/services/rest/',
    security: 'csrf'
};Warning: REMEMBER to set security filed to CSRF , if it is not configured already.
Now run the devon ng serve -o command to run the Angular Application, from your application folder (workspaces/main/devon4ng-application-template), as done before.
If the command execution is successful, the below screen will appear and it would be automatically redirected to the URL:
http://localhost:4200/login
You can login in the Web Application, with admin user and password.
Obviously, the BackEnd part must be up & running during this test!
ANGULAR WebApp DONE
To generate Ionic structure, download or clone *devon4ng-application-template* from
https://github.com/devonfw/devon4ng-ionic-application-templateIMPORTANT when you download the zip of the source code of your FE application, the name of the app MUST BE devon4ng-ionic-application-template and you can extract it in your devonfw folder, under workspaces/main
Once downloaded the APP, you can open the application with your favorite IDE (IntelliJ, Visual Studio Code, …)
Instead, if you want to open this project with Eclipse, you have to follow these steps:
-
Right click on the left part of Eclipse, and click on "Import":
-
Click on "Projects from Folder or Archive"
-
Select your folder where you have saved the Angular
FEApplication, underworkspaces/main. Wait that all the dependencies are charged and then click on "Finish" -
At the end, you will have a structure like this:
Once done, Right click on the devonfw.yml as you already did before in order to use CobiGen. Click on the selected options as seen in the screenshot:
Click on Finish
The entire ionic structure will be auto generated.
Change (if necessary) the server URL (with correct serve URL) in environment.ts, environment.prod.ts and environment.android.ts files (i.e: itapoc\devon4ng-ionic-application-template\src\environments\).
The angular.json file inside the project has already a build configuration for android.
The only TWO thing that you have to modify, in this IONIC app is in employee-list.page.html and business-operator.service.ts.y
1:
You have to change this line:
<layoutheader Title="Employee"></layoutheader>with this line:
<app-layout-header title="Employee"></app-layout-header>2:
You have to change this line:
return this.restPath + '/security/v1/csrftoken';with this line:
return this.restPath + 'csrf/v1/token/';Once checked if all the files are correct, open a CMD devon CLI on the folder of the ionic template application (workspaces/main/devon4ng-ionic-application-template), under your devonFW workspace.
In this folder:
Run the command *devon npm install* in the root folder to download the dependencies.
Once finished, run the command *devon ionic serve*
Once the execution is successful, you can make the LOGIN with admin/admin and…
IONIC Mobile App DONE
So: Well Done!!!
Starting from an Entity class you’ve successfully generated the Backend layer (REST, SOAP, `DTO, Spring services, Hibernate DAO), the Angular Web App and the Ionic mobile App!`
APKSince We are going to create apk remember the following preconditions:
Now, open CMD and type the path where your devon4ng-ionic-application-template project is present.
Run the following commands:
-
npx cap init
-
ionic build --configuration=android
-
npx cap add android
-
npx cap copy
-
npx cap open android
Build the APK using Android studio.

You can find your apk file in: /devon4ng-ionic-application-template/android/app/build/outputs/apk/debug
Adapt Templates from CobiGen
Adapt CobiGen_Templates
After following this tutorial, you will have the CobiGen_Templates downloaded on your local machine. To import these templates you need to do the following:
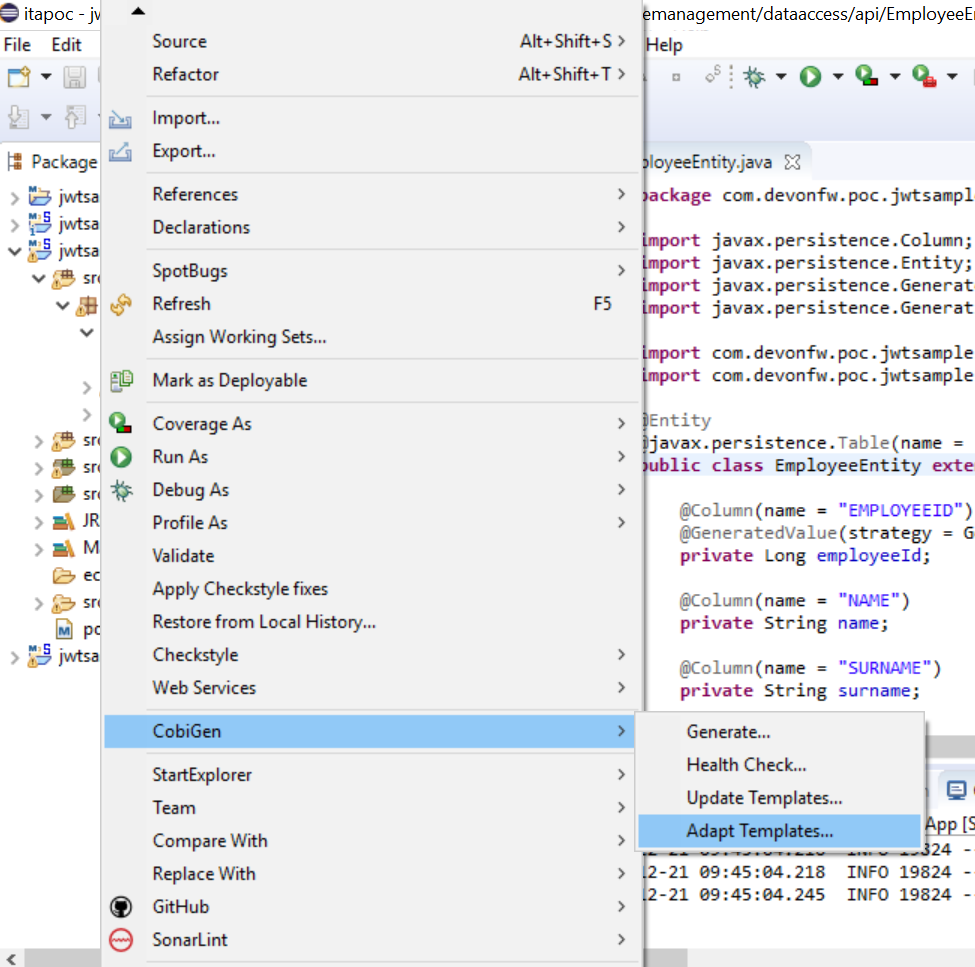
Right click in any part of the package explorer, then click on CobiGen → Adapt templates
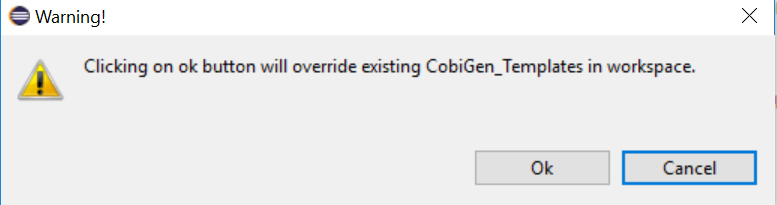
Click OK:
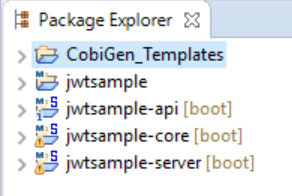
Now the CobiGen_Templates project will be automatically imported into your workspace, as shown on the image below:
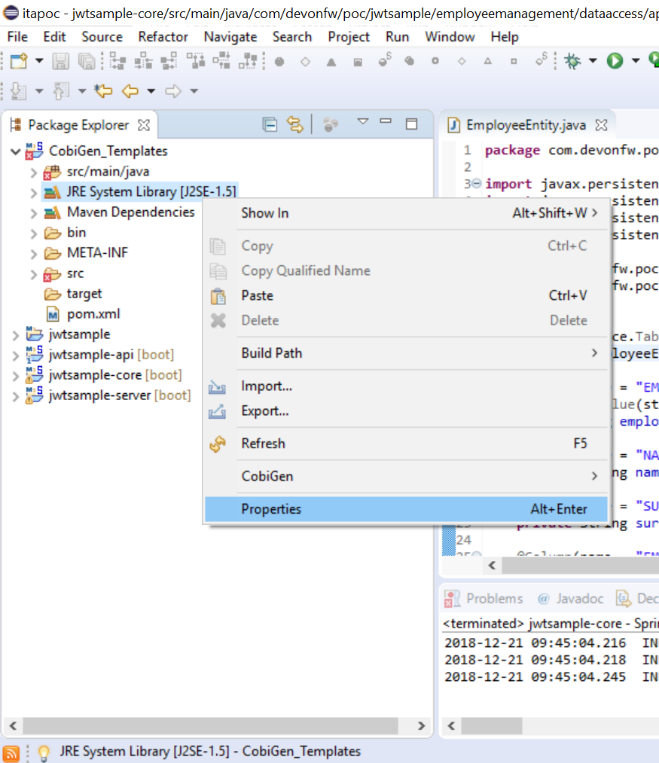
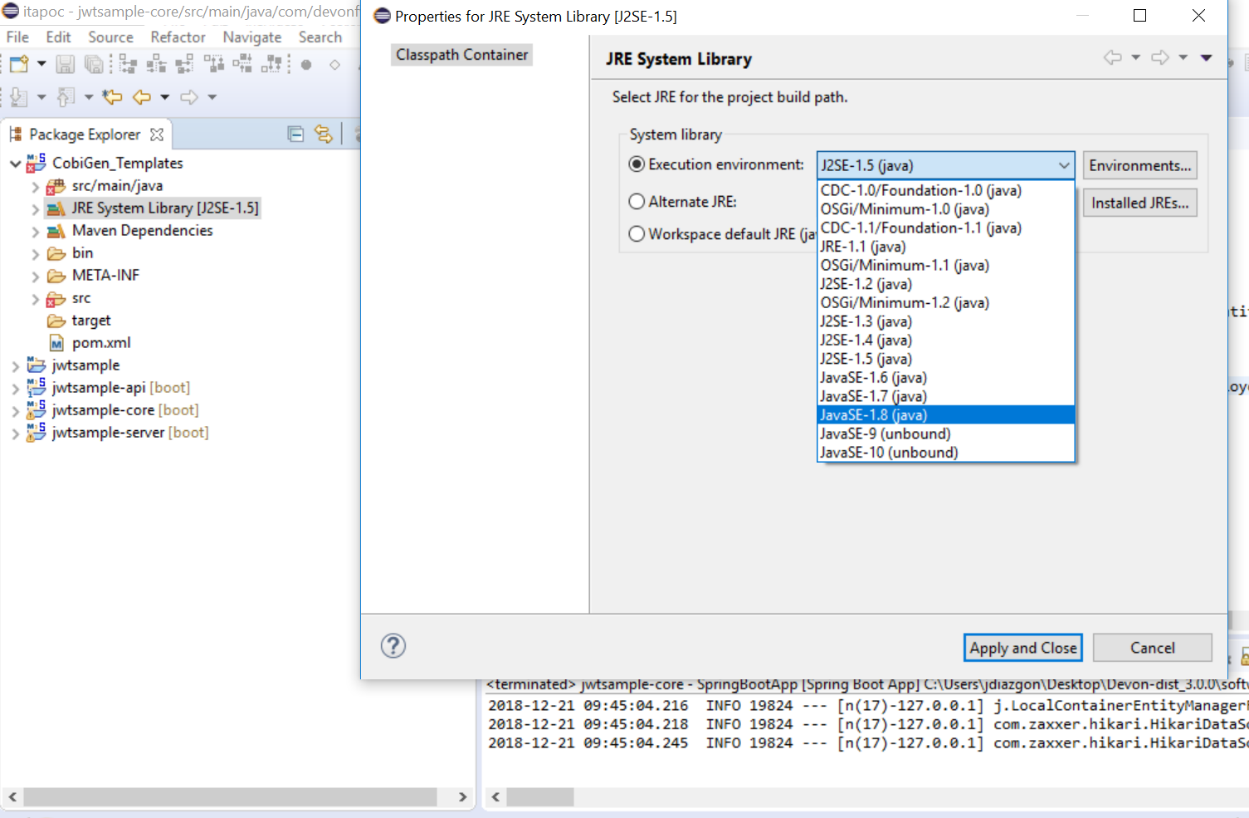
Now you just need to change the Java version of the project to JRE 1.8. Right click on the JRE system library, and then on Properties:
Now change the version to Java 1.8
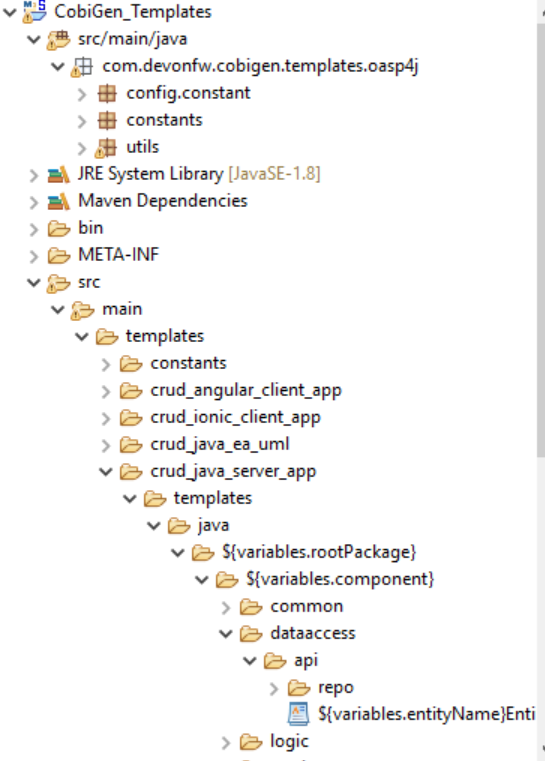
Now you have successfully imported the CobiGen templates. If you want to edit them, you will find them in the folder src/main/templates. For instance, the Java templates are located here:
Now you can adapt the templates as much as you want. Documentation about this can be found on:
https://github.com/devonfw/tools-cobigen/wiki/Guide-to-the-ReaderEnable Composite Primary Keys in Entity
In order to enable Composite Primary Keys in entity in CobiGen, the below approach is suggested
The templates in CobiGen have been enhanced to support Composite primary keys while still supporting the default devonfw/Cobigen values with Long id.
Also, the current generation from Entity still holds good - right click from an Entity object, CobiGen → Generate will show the CobiGen wizard relative to the entity generation.
After generating, below example shows how composite primary keys can be enabled.
@Entity
@Table(name = "employee")
public class EmployeeEntity {
	private CompositeEmployeeKey id;
	private String name;
	private String lastName;
	@Override
	@EmbeddedId
	public CompositeEmployeeKey getId() {
		return id;
	}
	@Override
	public void setId(CompositeEmployeeKey id) {
		this.id = id;
	}
	.
	.
	.
public class CompositeEmployeeKey implements Serializable {
private String companyId;
private String employeeId;Once the generation is complete, implement PersistenceEntity<ID>.java in the EmployeeEntity and pass the composite primary key object which is CompositeEmployeeKey in this case as the parameter ID.
import com.devonfw.module.basic.common.api.entity.PersistenceEntity;
@Entity
@Table(name = "employee")
public class EmployeeEntity implements PersistenceEntity<CompositeEmployeeKey> {
	private CompositeEmployeeKey id;
	private String name;
	private String lastName;
Also, the modificationCounter methods needs to be implemented from the interface PersistenceEntity<ID>. The sample implementation of the modification counter can be referred below.
@Override
  public int getModificationCounter() {
    if (this.persistentEntity != null) {
      // JPA implementations will update modification counter only after the transaction has been committed.
      // Conversion will typically happen before and would result in the wrong (old) modification counter.
      // Therefore we update the modification counter here (that has to be called before serialization takes
      // place).
      this.modificationCounter = this.persistentEntity.getModificationCounter();
    }
    return this.modificationCounter;
  }
  @Override
  public void setModificationCounter(int version) {
    this.modificationCounter = version;
  }