
Guides
Configuration
Internal Application Configuration
There usually is a main configuration registered with main Spring Boot App, but differing configurations to support automated test of the application can be defined using profiles (not detailed in this guide).
Spring Boot Application
For a complete documentation, see the Spring Boot Reference Guide.
With spring-boot you provide a simple main class (also called starter class) like this: com.devonfw.mtsj.application
@SpringBootApplication(exclude = { EndpointAutoConfiguration.class })
@EntityScan(basePackages = { "com.devonfw.mtsj.application" }, basePackageClasses = { AdvancedRevisionEntity.class })
@EnableGlobalMethodSecurity(jsr250Enabled = true)
@ComponentScan(basePackages = { "com.devonfw.mtsj.application.general", "com.devonfw.mtsj.application" })
public class SpringBootApp {

  /**
   * Entry point for spring-boot based app
   *
   * @param args - arguments
   */
  public static void main(String[] args) {

    SpringApplication.run(SpringBootApp.class, args);
  }
}
In an devonfw application this main class is always located in the <basepackage> of the application package namespace (see package-conventions). This is because a spring boot application will automatically do a classpath scan for components (spring-beans) and entities in the package where the application main class is located including all sub-packages. You can use the @ComponentScan and @EntityScan annotations to customize this behaviour.
If you want to map spring configuration properties into your custom code please see configuration mapping.
Standard beans configuration
For basic bean configuration we rely on spring boot using mainly configuration classes and only occasionally XML configuration files. Some key principle to understand Spring Boot auto-configuration features:
-
Spring Boot auto-configuration attempts to automatically configure your Spring application based on the jar dependencies and annotated components found in your source code.
-
Auto-configuration is non-invasive, at any point you can start to define your own configuration to replace specific parts of the auto-configuration by redefining your identically named bean (see also
excludeattribute of@SpringBootApplicationin example code above).
Beans are configured via annotations in your java code (see dependency-injection).
For technical configuration you will typically write additional spring config classes annotated with @Configuration that provide bean implementations via methods annotated with @Bean. See spring @Bean documentation for further details. Like in XML you can also use @Import to make a @Configuration class include other configurations.
More specific configuration files (as required) reside in an adequately named subfolder of:
src/main/resources/app
BeanMapper Configuration
In case you are still using dozer, you will find further details in bean-mapper configuration.
Security configuration
The abstract base class BaseWebSecurityConfig should be extended to configure web application security thoroughly.
A basic and secure configuration is provided which can be overridden or extended by subclasses.
Subclasses must use the @Profile annotation to further discriminate between beans used in production and testing scenarios. See the following example:
BaseWebSecurityConfig for Production and Test@Configuration
@EnableWebSecurity
@Profile(SpringProfileConstants.JUNIT)
public class TestWebSecurityConfig extends BaseWebSecurityConfig {...}
@Configuration
@EnableWebSecurity
@Profile(SpringProfileConstants.NOT_JUNIT)
public class WebSecurityConfig extends BaseWebSecurityConfig {...}See WebSecurityConfig.
WebSocket configuration
A websocket endpoint is configured within the business package as a Spring configuration class. The annotation @EnableWebSocketMessageBroker makes Spring Boot registering this endpoint.
package your.path.to.the.websocket.config;
...
@Configuration
@EnableWebSocketMessageBroker
public class WebSocketConfig extends AbstractWebSocketMessageBrokerConfigurer {
...
External Application Configuration
application.properties files
Here is a list of common properties provided by the Spring framework.
For a general understanding how spring-boot is loading and boostrapping your application.properties see spring-boot external configuration.
The following properties files are used in devonfw application:
-
src/main/resources/application.propertiesproviding a default configuration - bundled and deployed with the application package. It further acts as a template to derive a tailored minimal environment-specific configuration. -
src/main/resources/config/application.propertiesproviding additional properties only used at development time (for all local deployment scenarios). This property file is excluded from all packaging. -
src/test/resources/config/application.propertiesproviding additional properties only used for testing (JUnits based on spring test).
For other environments where the software gets deployed such as test, acceptance and production you need to provide a tailored copy of application.properties. The location depends on the deployment strategy:
-
standalone run-able Spring Boot App using embedded tomcat:
config/application.propertiesunder the installation directory of the spring boot application. -
dedicated tomcat (one tomcat per app):
$CATALINA_BASE/lib/config/application.properties -
tomcat serving a number of apps (requires expanding the wars):
$CATALINA_BASE/webapps/<app>/WEB-INF/classes/config
In this application.properties you only define the minimum properties that are environment specific and inherit everything else from the bundled src/main/resources/application.properties. In any case, make very sure that the classloader will find the file.
Database Configuration
The configuration for spring and Hibernate is already provided by devonfw in our sample application and the application template. So you only need to worry about a few things to customize.
Obviously you need to configure which type of database you want to use as well as the location and credentials to access it. The defaults are configured in application.properties that is bundled and deployed with the release of the software. The files should therefore contain the properties as in the given example:
  database.url=jdbc:postgresql://database.enterprise.com/app
  database.user.login=appuser01
  database.user.password=************
  database.hibernate.dialect = org.hibernate.dialect.PostgreSQLDialect
  database.hibernate.hbm2ddl.auto=validate
For further details about database.hibernate.hbm2ddl.auto please see here. For production and acceptance environments we use the value validate that should be set as default. In case you want to use Oracle RDBMS you can find additional hints here.
If your application supports multiples database types, set spring.profiles.active=XXX in src/main/resources/config/application.properties choose database of your choice. Also, one has to set all the active spring profiles in this application.properties and not in any of the other application.properties.
Add the following properties to application.properties to enable logging of database queries for debugging purposes.
spring.jpa.properties.hibernate.show_sql=true
spring.jpa.properties.hibernate.use_sql_comments=true
spring.jpa.properties.hibernate.format_sql=true
Security
Password Encryption
In order to support encrypted passwords in spring-boot application.properties all you need to do is to add jasypt-spring-boot as dependency in your pom.xml (please check for recent version here):
<dependency>
  <groupId>com.github.ulisesbocchio</groupId>
  <artifactId>jasypt-spring-boot-starter</artifactId>
  <version>3.0.3</version>
</dependency>
This will smoothly integrate jasypt into your spring-boot application. Read this HOWTO to learn how to encrypt and decrypt passwords using jasypt.
Next, we give a simple example how to encypt and configure a secret value.
We use the algorithm PBEWITHHMACSHA512ANDAES_256 that provides strong encryption and is the default of jasypt-spring-boot-starter.
However, different algorithms can be used if perferred (e.g. PBEWITHMD5ANDTRIPLEDES).
java -cp ${M2_REPO}/org/jasypt/jasypt/1.9.3/jasypt-1.9.3.jar org.jasypt.intf.cli.JasyptPBEStringEncryptionCLI password=masterpassword algorithm=PBEWITHHMACSHA512ANDAES_256 input=secret ivGeneratorClassName=org.jasypt.iv.RandomIvGenerator

----ENVIRONMENT-----------------

Runtime: AdoptOpenJDK OpenJDK 64-Bit Server VM 11.0.5+10


----ARGUMENTS-------------------

input: secret
password: masterpassword
ivGeneratorClassName: org.jasypt.iv.RandomIvGenerator
algorithm: PBEWITHHMACSHA512ANDAES_256


----OUTPUT----------------------

PoUxkNjY2juQMCyPu6ic5KJy1XfK+bX9vu2/mPj3pmcO4iydG6mhgZRZSw50z/oC
Of course the master-password (masterpassword) and the actual password to encrypt (secret) are just examples.
Please replace them with reasonable strong passwords for your environment.
Further, if you are using devonfw-ide you can make your life much easier and just type:
devon jasypt encryptSee jasypt commandlet for details.
Now the entire line after the OUTPUT block is your encrypted secret.
It even contains some random salt so that multiple encryption invocations with the same parameters (ARGUMENTS) will produce a different OUTPUT.
The master-password can be configured on your target environment via the property jasypt.encryptor.password. As system properties given on the command-line are visible in the process list, we recommend to use an config/application.yml file only for this purpose (as we recommended to use application.properties for regular configs):
jasypt:
    encryptor:
        password: masterpassword
Again masterpassword is just an example that your replace with your actual master password.
Now you are able to put encrypted passwords into your application.properties and specify the algorithm.
spring.datasource.password=ENC(PoUxkNjY2juQMCyPu6ic5KJy1XfK+bX9vu2/mPj3pmcO4iydG6mhgZRZSw50z/oC)
jasypt.encryptor.algorithm=PBEWITHHMACSHA512ANDAES_256
This application.properties file can be version controlled (git-opts) and without knowing the masterpassword nobody is able to decrypt this to get the actual secret back.
To prevent jasypt to throw an exception in dev or test scenarios you can simply put this in your local config (src/main/config/application.properties and same for test, see above for details):
jasypt.encryptor.password=noneMapping configuration to your code
If you are using spring-boot as suggested by devon4j your application can be configured by application.properties file as described in configuration.
To get a single configuration option into your code for flexibility, you can use
@Value("${my.property.name}")
private String myConfigurableField;
Now, in your application.properties you can add the property:
my.property.name=my-property-valueYou may even use @Value("${my.property.name:my-default-value}") to make the property optional.
Naming conventions for configuration properties
As a best practice your configruation properties should follow these naming conventions:
-
build the property-name as a path of segments separated by the dot character (
.) -
segments should get more specific from left to right
-
a property-name should either be a leaf value or a tree node (prefix of other property-names) but never both! So never have something like
foo.bar=valueandfoo.bar.child=value2. -
start with a segment namespace unique to your context or application
-
a good example would be
«myapp».billing.service.email.senderfor the sender address of billing service emails send by«myapp».
Mapping advanced configuration
However, in many scenarios you will have features that require more than just one property.
Injecting those via @Value is not leading to good code quality.
Instead we create a class with the suffix ConfigProperties containing all configuration properties for our aspect that is annotated with @ConfigurationProperties:
@ConfigurationProperties(prefix = "myapp.billing.service")
public class BillingServiceConfigProperties {

  private final Email email = new Email();
  private final Smtp smtp = new Smtp();

  public Email getEmail() { return this.email; }
  public Email getSmtp() { return this.smtp; }

  public static class Email {

    private String sender;
    private String subject;

    public String getSender() { return this.sender; }
    public void setSender(String sender) { this.sender = sender; }
    public String getSubject() { return this.subject; }
    public void setSubject(String subject) { this.subject = subject; }
  }

  public static class Smtp {

    private String host;
    private int port = 25;

    public String getHost() { return this.host; }
    public void setHost(String host) { this.host = host; }
    public int getPort() { return this.port; }
    public void setPort(int port) { this.port = port; }
  }

}
Of course this is just an example to demonstrate this feature of spring-boot.
In order to send emails you would typically use the existing spring-email feature.
But as you can see this allows us to define and access our configuration in a very structured and comfortable way.
The annotation @ConfigurationProperties(prefix = "myapp.billing.service") will automatically map spring configuration properties starting with myapp.billing.service via the according getters and setters into our BillingServiceConfigProperties.
We can easily define defaults (e.g. 25 as default value for myapp.billing.service.smtp.port).
Also Email or Smtp could be top-level classes to be reused in multiple configurations.
Of course you would also add helpful JavaDoc comments to the getters and classes to document your configuration options.
Further to access this configuration, we can use standard dependency-injection:
@Inject
private BillingServiceConfigProperties config;
For very generic cases you may also use Map<String, String> to map any kind of property in an untyped way.
An example for generic configuration from devon4j can be found in
ServiceConfigProperties.
For further details about this feature also consult Guide to @ConfigurationProperties in Spring Boot.
Generate configuration metadata
You should further add this dependency to your module containing the *ConfigProperties:
    <dependency>
      <groupId>org.springframework.boot</groupId>
      <artifactId>spring-boot-configuration-processor</artifactId>
      <optional>true</optional>
    </dependency>
This will generate configuration metadata so projects using your code can benefit from autocompletion and getting your JavaDoc as tooltip when editing application.properites what makes this approach very powerful.
For further details about this please read A Guide to Spring Boot Configuration Metadata.
Auditing
For database auditing we use hibernate envers. If you want to use auditing ensure you have the following dependency in your pom.xml:
<dependency>
  <groupId>com.devonfw.java.modules</groupId>
  <artifactId>devon4j-jpa-envers</artifactId>
</dependency><dependency>
<groupId>io.quarkus</groupId>
<artifactId>quarkus-hibernate-envers</artifactId>
</dependency>|
Note
|
The following part applies only to spring applications. At this point, the Quarkus extension does not provide any additional configurations. For Quarkus applications, simply use the @Audited annotation to enable auditing for an entity class, as described a few lines below or seen here.
|
Make sure that entity manager also scans the package from the devon4j-jpa[-envers] module in order to work properly. And make sure that correct Repository Factory Bean Class is chosen.
@EntityScan(basePackages = { "«my.base.package»" }, basePackageClasses = { AdvancedRevisionEntity.class })
...
@EnableJpaRepositories(repositoryFactoryBeanClass = GenericRevisionedRepositoryFactoryBean.class)
...
public class SpringBootApp {
  ...
}
Now let your [Entity]Repository extend from DefaultRevisionedRepository instead of DefaultRepository.
The repository now has a method getRevisionHistoryMetadata(id) and getRevisionHistoryMetadata(id, boolean lazy) available to get a list of revisions for a given entity and a method find(id, revision) to load a specific revision of an entity with the given ID or getLastRevisionHistoryMetadata(id) to load last revision. To enable auditing for a entity simply place the @Audited annotation to your entity and all entity classes it extends from.
@Entity(name = "Drink")
@Audited
public class DrinkEntity extends ProductEntity implements Drink {
...
When auditing is enabled for an entity an additional database table is used to store all changes to the entity table and a corresponding revision number. This table is called <ENTITY_NAME>_AUD per default. Another table called REVINFO is used to store all revisions. Make sure that these tables are available. They can be generated by hibernate with the following property (only for development environments).
database.hibernate.hbm2ddl.auto=createAnother possibility is to put them in your database migration scripts like so.
CREATE CACHED TABLE PUBLIC.REVINFO(
  id BIGINT NOT NULL generated by default as identity (start with 1),
  timestamp BIGINT NOT NULL,
  user VARCHAR(255)
);
...
CREATE CACHED TABLE PUBLIC.<TABLE_NAME>_AUD(
    <ALL_TABLE_ATTRIBUTES>,
    revtype TINYINT,
    rev BIGINT NOT NULL
);
Access-Control
Access-Control is a central and important aspect of Security. It consists of two major aspects:
-
devonfw-guide_devon4j.wiki_guide-access-control.asciidoc_Authentication (Who tries to access?)
-
devonfw-guide_devon4j.wiki_guide-access-control.asciidoc_Authorization (Is the one accessing allowed to do what he wants to do?)
Authentication
Definition:
Authentication is the verification that somebody interacting with the system is the actual subject for whom he claims to be.
The one authenticated is properly called subject or principal. There are two forms of principals you need to distinguish while designing your authentication: human users and autonomous systems. While e.g. a Kerberos/SPNEGO Single-Sign-On makes sense for human users, it is pointless for authenticating autonomous systems. For simplicity, we use the common term user to refer to any principal even though it may not be a human (e.g. in case of a service call from an external system).
To prove the authenticity, the user provides some secret called credentials. The most simple form of credentials is a password.
Implementations
|
Note
|
Please never implement your own authentication mechanism or credential store. You have to be aware of implicit demands such as salting and hashing credentials, password life-cycle with recovery, expiry, and renewal including email notification confirmation tokens, central password policies, etc. This is the domain of identity and access management (IAM). There are various existing products for IAM that already solve the problems better than you could ever implement it yourselve. In a business context you will typically already find a system for this purpose that you have to integrate (e.g. via JWT and OAuth). In case you have the freedom of choice, we recommend using keycloak. |
We recommend using JWT when possible. For KISS, also try to avoid combining multiple authentication mechanisms (form based, basic-auth, SAMLv2, OAuth, etc.) within the same application (for different URLs). Please note that inside an identity and access management (IAM) you have many different options for authentication. In case you are in charge of making decisions considere the following options according to your requirements and demands (esp. security):
For spring, check the Spring Security
For quarkus, check the Quarkus Authentication
Authorization
Definition:
Authorization is the verification that an authenticated user is allowed to perform the operation he intends to invoke.
Clarification of terms
For clarification we also want to give a common understanding of related terms that have no unique definition and consistent usage in the wild.
| Term | Meaning and comment |
|---|---|
Permission |
A permission is an object that allows a principal to perform an operation in the system. This permission can be granted (give) or revoked (taken away). Sometimes people also use the term right what is actually wrong as a right (such as the right to be free) can not be revoked. |
Group |
We use the term group in this context for an object that contains permissions. A group may also contain other groups. Then the group represents the set of all recursively contained permissions. |
Role |
We consider a role as a specific form of group that also contains permissions. A role identifies a specific function of a principal. A user can act in a role. For simple scenarios a principal has a single role associated. In more complex situations a principal can have multiple roles but has only one active role at a time that he can choose out of his assigned roles. For KISS it is sometimes sufficient to avoid this by creating multiple accounts for the few users with multiple roles. Otherwise at least avoid switching roles at run-time in clients as this may cause problems with related states. Simply restart the client with the new role as parameter in case the user wants to switch his role. |
Access Control |
Any permission, group, role, etc., which declares a control for access management. |
Suggestions on the access model
For the access model we give the following suggestions:
-
Each Access Control (permission, group, role, …) is uniquely identified by a human readable string.
-
We create a unique permission for each use-case.
-
We define groups that combine permissions to typical and useful sets for the users.
-
We define roles as specific groups as required by our business demands.
-
We allow to associate users with a list of Access Controls.
-
For authorization of an implemented use case we determine the required permission. Furthermore, we determine the current user and verify that the required permission is contained in the tree spanned by all his associated Access Controls. If the user does not have the permission we throw a security exception and thus abort the operation and transaction.
-
We avoid negative permissions, that is a user has no permission by default and only those granted to him explicitly give him additional permission for specific things. Permissions granted can not be reduced by other permissions.
-
Technically we consider permissions as a secret of the application. Administrators shall not fiddle with individual permissions but grant them via groups. So the access management provides a list of strings identifying the Access Controls of a user. The individual application itself contains these Access Controls in a structured way, whereas each group forms a permission tree.
Naming conventions
As stated above each Access Control is uniquely identified by a human readable string. This string should follow the naming convention:
«app-id».«local-name»For Access Control Permissions the «local-name» again follows the convention:
«verb»«object»The segments are defined by the following table:
| Segment | Description | Example |
|---|---|---|
«app-id» |
Is a unique technical but human readable string of the application (or microservice). It shall not contain special characters and especially no dot or whitespace. We recommend to use |
|
«verb» |
The action that is to be performed on «object». We use |
|
«object» |
The affected object or entity. Shall be named according to your data-model |
|
So as an example shop.FindProduct will reflect the permission to search and retrieve a Product in the shop application. The group shop.ReadMasterData may combine all permissions to read master-data from the shop. However, also a group shop.Admin may exist for the Admin role of the shop application. Here the «local-name» is Admin that does not follow the «verb»«object» schema.
devon4j-security
The module devon4j-security provides ready-to-use code based on spring-security that makes your life a lot easier.

The diagram shows the model of devon4j-security that separates two different aspects:
-
The Identity- and Access-Management is provided by according products and typically already available in the enterprise landscape (e.g. an active directory). It provides a hierarchy of primary access control objects (roles and groups) of a user. An administrator can grant and revoke permissions (indirectly) via this way.
-
The application security defines a hierarchy of secondary access control objects (groups and permissions). This is done by configuration owned by the application (see following section). The "API" is defined by the IDs of the primary access control objects that will be referenced from the Identity- and Access-Management.
Access Control Config
In your application simply extend AccessControlConfig to configure your access control objects as code and reference it from your use-cases. An example config may look like this:
@Named
public class ApplicationAccessControlConfig extends AccessControlConfig {

  public static final String APP_ID = "MyApp";

  private static final String PREFIX = APP_ID + ".";

  public static final String PERMISSION_FIND_OFFER = PREFIX + "FindOffer";

  public static final String PERMISSION_SAVE_OFFER = PREFIX + "SaveOffer";

  public static final String PERMISSION_DELETE_OFFER = PREFIX + "DeleteOffer";

  public static final String PERMISSION_FIND_PRODUCT = PREFIX + "FindProduct";

  public static final String PERMISSION_SAVE_PRODUCT = PREFIX + "SaveProduct";

  public static final String PERMISSION_DELETE_PRODUCT = PREFIX + "DeleteProduct";

  public static final String GROUP_READ_MASTER_DATA = PREFIX + "ReadMasterData";

  public static final String GROUP_MANAGER = PREFIX + "Manager";

  public static final String GROUP_ADMIN = PREFIX + "Admin";

  public ApplicationAccessControlConfig() {

    super();
    AccessControlGroup readMasterData = group(GROUP_READ_MASTER_DATA, PERMISSION_FIND_OFFER, PERMISSION_FIND_PRODUCT);
    AccessControlGroup manager = group(GROUP_MANAGER, readMasterData, PERMISSION_SAVE_OFFER, PERMISSION_SAVE_PRODUCT);
    AccessControlGroup admin = group(GROUP_ADMIN, manager, PERMISSION_DELETE_OFFER, PERMISSION_DELETE_PRODUCT);
  }
}
Configuration on Java Method level
In your use-case you can now reference a permission like this:
@Named
public class UcSafeOfferImpl extends ApplicationUc implements UcSafeOffer {

  @Override
  @RolesAllowed(ApplicationAccessControlConfig.PERMISSION_SAVE_OFFER)
  public OfferEto save(OfferEto offer) { ... }
  ...
}
JEE Standard
Role-based Access Control (RBAC) is commonly used for authorization. JSR 250 defines a number of common annotations to secure your application.
-
javax.annotation.security.PermitAllspecifies that no access control is required to invoke the specified method(s). -
javax.annotation.security.DenyAllspecifies that no access controls are allowed to invoke the specified method(s). -
javax.annotation.security.RolesAllowedspecifies that only a list of access controls are allowed to invoke the specified method(s). -
javax.annotation.security.DeclareRolesdefines roles for security checking. -
javax.annotation.security.RunAsspecifies the RunAs role for the given components.
@PermitAll, @Denyall, and @RolesAllowed annotations can be applied to both class and method.
A method-level annotation will override the behaviour of class-level annotation. Using multiple annotations of those 3 is not valid.
// invalid
@PermitAll
@DenyAll
public String foo()

// invalid and compilation fails
@RolesAllowed("admin")
@RolesAllowed("user")
public String bar()

// OK
@RolesAllowed("admin", "user")
public String bar()
Please note that when specifying multiple arguments to @RolesAllowed those are combined with OR (and not with AND).
So if the user has any of the specified access controls, he will be able to access the method.
As a best practice avoid specifying string literals to @RolesAllowed.
Instead define a class with all access controls as constants and reference them from there.
This class is typically called ApplicationAccessControlConfig in devonfw.
In many complicated cases where @PermitAll @DenyAll @RolesAllowed are insufficient e.g. a method should be accessed by a user in role A and not in role B at the same time, you have to verify the user role directly in the method. You can use SecurityContext class to get further needed information.
Spring Security also supports authorization on method level. To use it, you need to add the spring-security-config dependency. If you use Spring Boot, the dependency spring-boot-starter-security already includes spring-security-config. Then you can configure as follows:
-
prePostEnabledproperty enables Spring Security pre/post annotations.@PreAuthorizeand@PostAuthorizeannotations provide expression-based access control. See more here -
securedEnabledproperty determines if the@Securedannotation should be enabled.@Securedcan be used similarly as@RollesAllowed. -
jsr250Enabledproperty allows us to use the JSR-250 annotations such as@RolesAllowed.
@Configuration
@EnableGlobalMethodSecurity(
  prePostEnabled = true,
  securedEnabled = true,
  jsr250Enabled = true)
public class MethodSecurityConfig
  extends GlobalMethodSecurityConfiguration {
}
A further read about the whole concept of Spring Security Authorization can be found here.
Quarkus comes with built-in security to allow for RBAC based on the common security annotations @RolesAllowed, @DenyAll, @PermitAll on REST endpoints and CDI beans. Quarkus also provides the io.quarkus.security.Authenticated annotation that will permit any authenticated user to access the resource (equivalent to @RolesAllowed("**")).
Data-based Permissions
See data permissions
Access Control Schema (deprecated)
The access-control-schema.xml approach is deprecated. The documentation can still be found in access control schema.
Data-permissions
In some projects there are demands for permissions and authorization that is dependent on the processed data. E.g. a user may only be allowed to read or write data for a specific region. This is adding some additional complexity to your authorization. If you can avoid this it is always best to keep things simple. However, in various cases this is a requirement. Therefore the following sections give you guidance and patterns how to solve this properly.
Structuring your data
For all your business objects (entities) that have to be secured regarding to data permissions we recommend that you create a separate interface that provides access to the relevant data required to decide about the permission. Here is a simple example:
public interface SecurityDataPermissionCountry {

  /**
   * @return the 2-letter ISO code of the country this object is associated with. Users need
   *         a data-permission for this country in order to read and write this object.
   */
  String getCountry();
}
Now related business objects (entities) can implement this interface. Often such data-permissions have to be applied to an entire object-hierarchy. For security reasons we recommend that also all child-objects implement this interface. For performance reasons we recommend that the child-objects redundantly store the data-permission properties (such as country in the example above) and this gets simply propagated from the parent, when a child object is created.
Permissions for processing data
When saving or processing objects with a data-permission, we recommend to provide dedicated methods to verify the permission in an abstract base-class such as AbstractUc and simply call this explicitly from your business code. This makes it easy to understand and debug the code. Here is a simple example:
protected void verifyPermission(SecurityDataPermissionCountry entity) throws AccessDeniedException;For simple but cross-cutting data-permissions you may also use AOP. This leads to programming aspects that reflectively scan method arguments and magically decide what to do. Be aware that this quickly gets tricky:
-
What if multiple of your method arguments have data-permissions (e.g. implement
SecurityDataPermission*)? -
What if the object to authorize is only provided as reference (e.g.
LongorIdRef) and only loaded and processed inside the implementation where the AOP aspect does not apply? -
How to express advanced data-permissions in annotations?
What we have learned is that annotations like @PreAuthorize from spring-security easily lead to the "programming in string literals" anti-pattern. We strongly discourage to use this anti-pattern. In such case writing your own verifyPermission methods that you manually call in the right places of your business-logic is much better to understand, debug and maintain.
Permissions for reading data
When it comes to restrictions on the data to read it becomes even more tricky. In the context of a user only entities shall be loaded from the database he is permitted to read. This is simple for loading a single entity (e.g. by its ID) as you can load it and then if not permitted throw an exception to secure your code. But what if the user is performing a search query to find many entities? For performance reasons we should only find data the user is permitted to read and filter all the rest already via the database query. But what if this is not a requirement for a single query but needs to be applied cross-cutting to tons of queries? Therefore we have the following pattern that solves your problem:
For each data-permission attribute (or set of such) we create an abstract base entity:
@MappedSuperclass
@EntityListeners(PermissionCheckListener.class)
@FilterDef(name = "country", parameters = {@ParamDef(name = "countries", type = "string")})
@Filter(name = "country", condition = "country in (:countries)")
public abstract class SecurityDataPermissionCountryEntity extends ApplicationPersistenceEntity
    implements SecurityDataPermissionCountry {

  private String country;

  @Override
  public String getCountry() {
    return this.country;
  }

  public void setCountry(String country) {
    this.country = country;
  }
}
There are some special hibernate annotations @EntityListeners, @FilterDef, and @Filter used here allowing to apply a filter on the country for any (non-native) query performed by hibernate. The entity listener may look like this:
public class PermissionCheckListener {

  @PostLoad
  public void read(SecurityDataPermissionCountryEntity entity) {
    PermissionChecker.getInstance().requireReadPermission(entity);
  }

  @PrePersist
  @PreUpdate
  public void write(SecurityDataPermissionCountryEntity entity) {
    PermissionChecker.getInstance().requireWritePermission(entity);
  }
}
This will ensure that hibernate implicitly will call these checks for every such entity when it is read from or written to the database. Further to avoid reading entities from the database the user is not permitted to (and ending up with exceptions), we create an AOP aspect that automatically activates the above declared hibernate filter:
@Named
public class PermissionCheckerAdvice implements MethodBeforeAdvice {

  @Inject
  private PermissionChecker permissionChecker;

  @PersistenceContext
  private EntityManager entityManager;

  @Override
  public void before(Method method, Object[] args, Object target) {

    Collection<String> permittedCountries = this.permissionChecker.getPermittedCountriesForReading();
    if (permittedCountries != null) { // null is returned for admins that may access all countries
      if (permittedCountries.isEmpty()) {
        throw new AccessDeniedException("Not permitted for any country!");
      }
      Session session = this.entityManager.unwrap(Session.class);
      session.enableFilter("country").setParameterList("countries", permittedCountries.toArray());
    }
  }
}
Finally to apply this aspect to all Repositories (can easily be changed to DAOs) implement the following advisor:
@Named
public class PermissionCheckerAdvisor implements PointcutAdvisor, Pointcut, ClassFilter, MethodMatcher {

  @Inject
  private PermissionCheckerAdvice advice;

  @Override
  public Advice getAdvice() {
    return this.advice;
  }

  @Override
  public boolean isPerInstance() {
    return false;
  }

  @Override
  public Pointcut getPointcut() {
    return this;
  }

  @Override
  public ClassFilter getClassFilter() {
    return this;
  }

  @Override
  public MethodMatcher getMethodMatcher() {
    return this;
  }

  @Override
  public boolean matches(Method method, Class<?> targetClass) {
    return true; // apply to all methods
  }

  @Override
  public boolean isRuntime() {
    return false;
  }

  @Override
  public boolean matches(Method method, Class<?> targetClass, Object... args) {
    throw new IllegalStateException("isRuntime()==false");
  }

  @Override
  public boolean matches(Class<?> clazz) {
    // when using DAOs simply change to some class like ApplicationDao
    return DefaultRepository.class.isAssignableFrom(clazz);
  }
}
Managing and granting the data-permissions
Following our authorization guide we can simply create a permission for each country. We might simply reserve a prefix (as virtual «app-id») for each data-permission to allow granting data-permissions to end-users across all applications of the IT landscape. In our example we could create access controls country.DE, country.US, country.ES, etc. and assign those to the users. The method permissionChecker.getPermittedCountriesForReading() would then scan for these access controls and only return the 2-letter country code from it.
|
Caution
|
Before you make your decisions how to design your access controls please clarify the following questions: |
-
Do you need to separate data-permissions independent of the functional permissions? E.g. may it be required to express that a user can read data from the countries
ESandPLbut is only permitted to modify data fromPL? In such case a single assignment of "country-permissions" to users is insufficient. -
Do you want to grant data-permissions individually for each application (higher flexibility and complexity) or for the entire application landscape (simplicity, better maintenance for administrators)? In case of the first approach you would rather have access controls like
app1.country.GBandapp2.country.GB. -
Do your data-permissions depend on objects that can be created dynamically inside your application?
-
If you want to grant data-permissions on other business objects (entities), how do you want to reference them (primary keys, business keys, etc.)? What reference is most stable? Which is most readable?
JWT
JWT (JSON Web Token) is an open standard (see RFC 7519) for creating JSON based access tokens that assert some number of claims.
With an IT landscape divided into multiple smaller apps you want to avoid coupling all those apps or services tightly with your IAM (Identity & Access Management).
Instead your apps simply expects a JWT as bearer-token in the Authorization HTTP header field.
All it needs to do for authentication is validating this JWT.
The actual authentication is done centrally by an access system (IAM) that authors those JWTs.
Therefore we recommend to use strong asymmetric cryptography to sign the JWT when it is authored.
Create a keypair per environment and keep the private key as a secret only known to the access system authorizing the JWTs.
Your apps only need to know the public key in order to validate the JWT.
Any request without a JWT or with an invalid JWT will be rejected (with status code 401).
When using spring check the JWT Spring-Starter. For quarkus follow Using JWT RBAC.
Cross-site request forgery (CSRF)
CSRF is a type of malicious exploit of a web application that allows an attacker to induce users to perform actions that they do not intend to perform.

More details about csrf can be found at https://owasp.org/www-community/attacks/csrf.
Secure devon4j server against CSRF
In case your devon4j server application is not accessed by browsers or the web-client is using JWT based authentication, you are already safe according to CSRF. However, if your application is accessed from a browser and you are using form based authentication (with session coockie) or basic authentication, you need to enable CSRF protection. This guide will tell you how to do this.
Dependency
To secure your devon4j application against CSRF attacks, you only need to add the following dependency:
<dependency>
  <groupId>com.devonfw.java.starters</groupId>
  <artifactId>devon4j-starter-security-csrf</artifactId>
</dependency>
Starting with devon4j version 2020.12.001 application template, this is all you need to do.
However, if you have started from an older version or you want to understand more, please read on.
Pluggable web-security
To enable pluggable security via devon4j security starters you need to apply WebSecurityConfigurer to your BaseWebSecurityConfig (your class extending spring-boot’s WebSecurityConfigurerAdapter) as following:
  @Inject
  private WebSecurityConfigurer webSecurityConfigurer;

  public void configure(HttpSecurity http) throws Exception {
    // disable CSRF protection by default, use csrf starter to override.
	  http = http.csrf().disable();
	  // apply pluggable web-security from devon4j security starters
    http = this.webSecurityConfigurer.configure(http);
    .....
  }
Custom CsrfRequestMatcher
If you want to customize which HTTP requests will require a CSRF token, you can implement your own CsrfRequestMatcher and provide it to the devon4j CSRF protection via qualified injection as following:
@Named("CsrfRequestMatcher")
public class CsrfRequestMatcher implements RequestMatcher {
  @Override
  public boolean matches(HttpServletRequest request) {
    .....
  }
}
Please note that the exact name (@Named("CsrfRequestMatcher")) is required here to ensure your custom implementation will be injected properly.
CsrfRestService
With the devon4j-starter-security-csrf the CsrfRestService gets integrated into your app.
It provides an operation to get the CSRF token via an HTTP GET request.
The URL path to retrieve this CSRF token is services/rest/csrf/v1/token.
As a result you will get a JSON like the following:
{
  "token":"3a8a5f66-c9eb-4494-81e1-7cc58bc3a519",
  "parameterName":"_csrf",
  "headerName":"X-CSRF-TOKEN"
}
The token value is a strong random value that will differ for each user session.
It has to be send with subsequent HTTP requests (when method is other than GET) in the specified header (X-CSRF-TOKEN).
How it works
Putting it all together, a browser client should call the CsrfRestService after successfull login to receive the current CSRF token.
With every subsequent HTTP request (other than GET) the client has to send this token in the according HTTP header.
Otherwise the server will reject the request to prevent CSRF attacks.
Therefore, an attacker might make your browser perform HTTP requests towards your devon4j application backend via <image> elements, <iframes>, etc.
Your browser will then still include your session coockie if you are already logged in (e.g. from another tab).
However, in case he wants to trigger DELETE or POST requests trying your browser to make changes in the application (delete or update data, etc.) this will fail without CSRF token.
The attacker may make your browser retrieve the CSRF token but he will not be able to retrieve the result and put it into the header of other requests due to the same-origin-policy.
This way your application will be secured against CSRF attacks.
Configure devon4ng client for CSRF
Devon4ng client configuration for CSRF is described here
Aspect Oriented Programming (AOP)
AOP is a powerful feature for cross-cutting concerns. However, if used extensive and for the wrong things an application can get unmaintainable. Therefore we give you the best practices where and how to use AOP properly.
AOP Key Principles
We follow these principles:
-
We use spring AOP based on dynamic proxies (and fallback to cglib).
-
We avoid AspectJ and other mighty and complex AOP frameworks whenever possible
-
We only use AOP where we consider it as necessary (see below).
AOP Usage
We recommend to use AOP with care but we consider it established for the following cross cutting concerns:
-
Trace-Logging (for testing and debugging)
-
Exception facades for services but only if no other solution is possible (use alternatives such as JAX-RS provider instead).
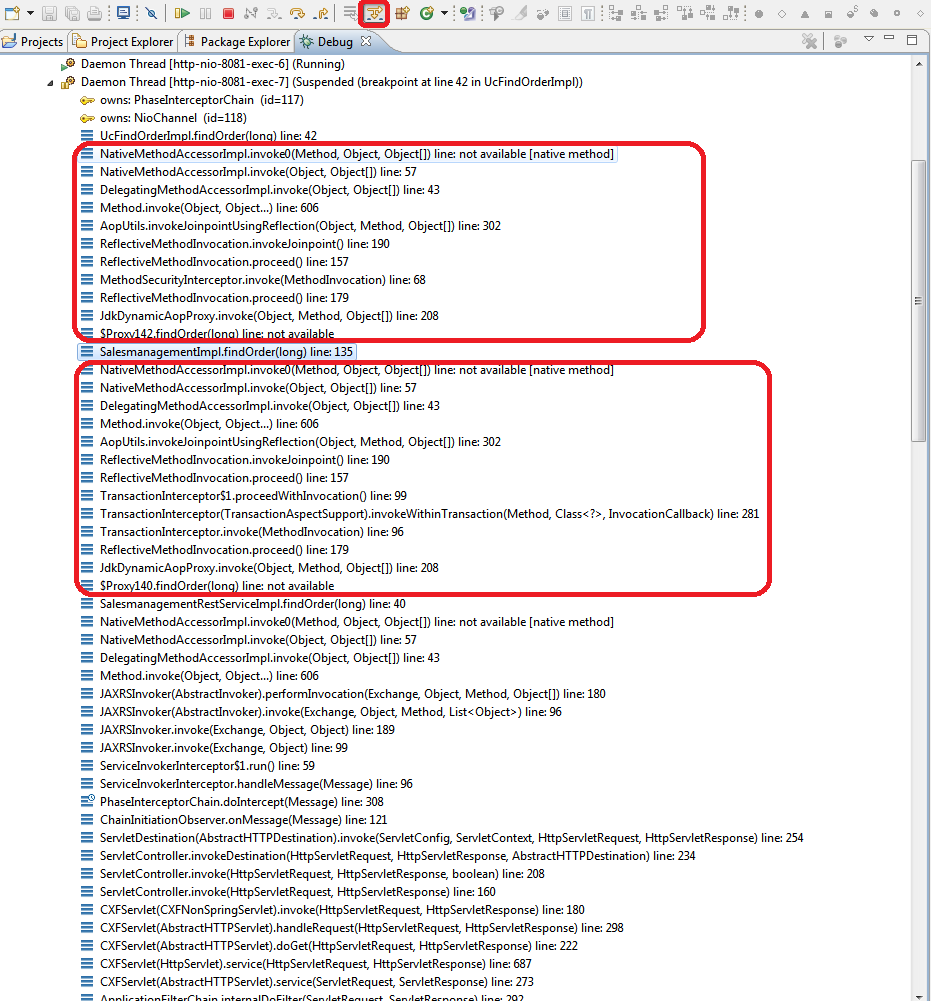
AOP Debugging
When using AOP with dynamic proxies the debugging of your code can get nasty. As you can see by the red boxes in the call stack in the debugger there is a lot of magic happening while you often just want to step directly into the implementation skipping all the AOP clutter. When using Eclipse this can easily be archived by enabling step filters. Therefore you have to enable the feature in the Eclipse tool bar (highlighted in read).
In order to properly make this work you need to ensure that the step filters are properly configured:
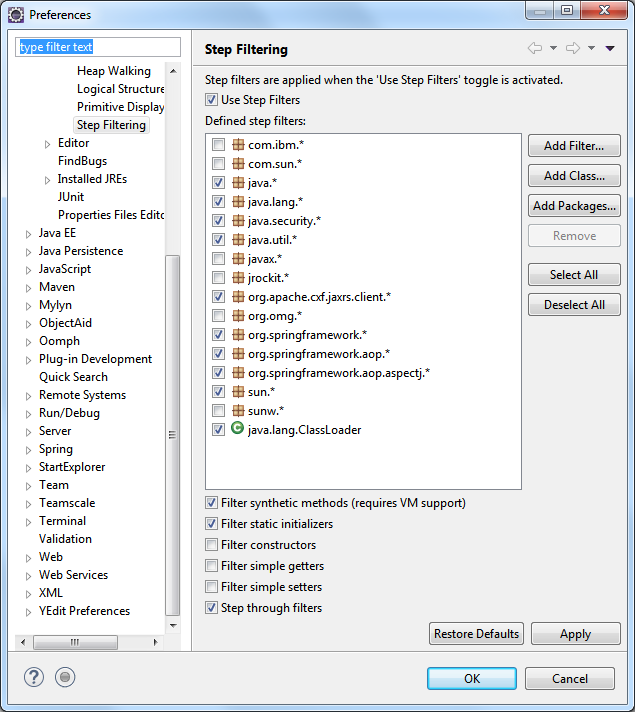
Ensure you have at least the following step-filters configured and active:
ch.qos.logback.*
com.devonfw.module.security.*
java.lang.reflect.*
java.security.*
javax.persistence.*
org.apache.commons.logging.*
org.apache.cxf.jaxrs.client.*
org.apache.tomcat.*
org.h2.*
org.springframework.*
Exception Handling
Exception Principles
For exceptions we follow these principles:
-
We only use exceptions for exceptional situations and not for programming control flows, etc. Creating an exception in Java is expensive and hence should not be done for simply testing whether something is present, valid or permitted. In the latter case design your API to return this as a regular result.
-
We use unchecked exceptions (RuntimeException) [1]
-
We distinguish internal exceptions and user exceptions:
-
Internal exceptions have technical reasons. For unexpected and exotic situations, it is sufficient to throw existing exceptions such as IllegalStateException. For common scenarios a own exception class is reasonable.
-
User exceptions contain a message explaining the problem for end users. Therefore, we always define our own exception classes with a clear, brief, but detailed message.
-
-
Our own exceptions derive from an exception base class supporting
All this is offered by mmm-util-core, which we propose as a solution. If you use the devon4j-rest module, this is already included. For Quarkus applications, you need to add the dependency manually.
If you want to avoid additional dependencies, you can implement your own solution for this by creating an abstract exception class ApplicationBusinessException extending from RuntimeException. For an example of this, see our Quarkus reference application.
Exception Example
Here is an exception class from our sample application:
public class IllegalEntityStateException extends ApplicationBusinessException {

  private static final long serialVersionUID = 1L;

  public IllegalEntityStateException(Object entity, Object state) {

    this((Throwable) null, entity, state);
  }


  public IllegalEntityStateException(Object entity, Object currentState, Object newState) {

    this(null, entity, currentState, newState);
  }

  public IllegalEntityStateException(Throwable cause, Object entity, Object state) {

    super(cause, createBundle(NlsBundleApplicationRoot.class).errorIllegalEntityState(entity, state));
  }

  public IllegalEntityStateException(Throwable cause, Object entity, Object currentState, Object newState) {

    super(cause, createBundle(NlsBundleApplicationRoot.class).errorIllegalEntityStateChange(entity, currentState,
        newState));
  }

}
The message templates are defined in the interface NlsBundleRestaurantRoot as following:
public interface NlsBundleApplicationRoot extends NlsBundle {


  @NlsBundleMessage("The entity {entity} is in state {state}!")
  NlsMessage errorIllegalEntityState(@Named("entity") Object entity, @Named("state") Object state);


  @NlsBundleMessage("The entity {entity} in state {currentState} can not be changed to state {newState}!")
  NlsMessage errorIllegalEntityStateChange(@Named("entity") Object entity, @Named("currentState") Object currentState,
      @Named("newState") Object newState);


  @NlsBundleMessage("The property {property} of object {object} can not be changed!")
  NlsMessage errorIllegalPropertyChange(@Named("object") Object object, @Named("property") Object property);

  @NlsBundleMessage("There is currently no user logged in")
  NlsMessage errorNoActiveUser();
Handling Exceptions
For catching and handling exceptions we follow these rules:
-
We do not catch exceptions just to wrap or to re-throw them.
-
If we catch an exception and throw a new one, we always have to provide the original exception as cause to the constructor of the new exception.
-
At the entry points of the application (e.g. a service operation) we have to catch and handle all throwables. This is done via the exception-facade-pattern via an explicit facade or aspect. The
devon4j-restmodule already provides ready-to-use implementations for this such as RestServiceExceptionFacade that you can use in your Spring application. For Quarkus, follow the Quarkus guide on exception handling.
The exception facade has to …-
log all errors (user errors on info and technical errors on error level)
-
ensure that the entire exception is passed to the logger (not only the message) so that the logger can capture the entire stacktrace and the root cause is not lost.
-
convert the error to a result appropriable for the client and secure for Sensitive Data Exposure. Especially for security exceptions only a generic security error code or message may be revealed but the details shall only be logged but not be exposed to the client. All internal exceptions are converted to a generic error with a message like:
An unexpected technical error has occurred. We apologize any inconvenience. Please try again later.
-
Common Errors
The following errors may occur in any devon application:
| Code | Message | Link |
|---|---|---|
|
An unexpected error has occurred! We apologize any inconvenience. Please try again later. |
|
|
«original message of the cause» |
Internationalization
Internationalization (I18N) is about writing code independent from locale-specific information. For I18N of text messages we are suggesting mmm native-language-support.
In devonfw we have developed a solution to manage text internationalization. devonfw solution comes into two aspects:
-
Bind locale information to the user.
-
Get the messages in the current user locale.
Binding locale information to the user
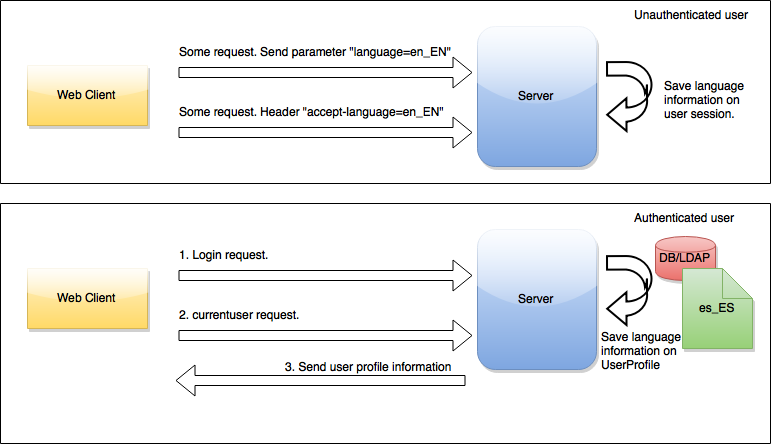
We have defined two different points to bind locale information to user, depending on user is authenticated or not.
-
User not authenticated: devonfw intercepts unsecured request and extract locale from it. At first, we try to extract a
languageparameter from the request and if it is not possible, we extract locale from Àccept-language` header. -
User authenticated. During login process, applications developers are responsible to fill
languageparameter in the UserProfile class. Thislanguageparameter could be obtain from DB, LDAP, request, etc. In devonfw sample we get the locale information from database.
This image shows the entire process:
Getting internationalizated messages
devonfw has a bean that manage i18n message resolution, the ApplicationLocaleResolver. This bean is responsible to get the current user and extract locale information from it and read the correct properties file to get the message.
The i18n properties file must be called ApplicationMessages_la_CO.properties where la=language and CO=country. This is an example of a i18n properties file for English language to translate devonfw sample user roles:
ApplicationMessages_en_US.properties
admin=AdminYou should define an ApplicationMessages_la_CO.properties file for every language that your application needs.
ApplicationLocaleResolver bean is injected in AbstractComponentFacade class so you have available this bean in logic layer so you only need to put this code to get an internationalized message:
String msg = getApplicationLocaleResolver().getMessage("mymessage");Service Client
This guide is about consuming (calling) services from other applications (micro-services). For providing services, see the Service-Layer Guide. Services can be consumed by the client or the server. As the client is typically not written in Java, you should consult the according guide for your client technology. In case you want to call a service within your Java code, this guide is the right place to get help.
Motivation
Various solutions already exist for calling services, such as RestTemplate from spring or the JAX-RS client API. Furthermore, each and every service framework offers its own API as well. These solutions might be suitable for very small and simple projects (with one or two such invocations). However, with the trend of microservices, the invocation of a service becomes a very common use-case that occurs all over the place. You typically need a solution that is very easy to use but supports flexible configuration, adding headers for authentication, mapping of errors from the server, logging success/errors with duration for performance analysis, support for synchronous and asynchronous invocations, etc. This is exactly what this devon4j service-client solution brings to you.
Usage
Spring
For Spring, follow the Spring rest-client guide.
Quarkus
For Quarkus, we recommend to follow the official Quarkus rest-client guide
Testing
General best practices
For testing please follow our general best practices:
-
Tests should have a clear goal that should also be documented.
-
Tests have to be classified into different integration levels.
-
Tests should follow a clear naming convention.
-
Automated tests need to properly assert the result of the tested operation(s) in a reliable way. E.g. avoid stuff like
assertThat(service.getAllEntities()).hasSize(42)or even worse tests that have no assertion at all. -
Tests need to be independent of each other. Never write test-cases or tests (in Java @Test methods) that depend on another test to be executed before.
-
Use AssertJ to write good readable and maintainable tests that also provide valuable feedback in case a test fails. Do not use legacy JUnit methods like
assertEqualsanymore! -
For easy understanding divide your test in three commented sections:
-
//given -
//when -
//then
-
-
Plan your tests and test data management properly before implementing.
-
Instead of having a too strong focus on test coverage better ensure you have covered your critical core functionality properly and review the code including tests.
-
Test code shall NOT be seen as second class code. You shall consider design, architecture and code-style also for your test code but do not over-engineer it.
-
Test automation is good but should be considered in relation to cost per use. Creating full coverage via automated system tests can cause a massive amount of test-code that can turn out as a huge maintenance hell. Always consider all aspects including product life-cycle, criticality of use-cases to test, and variability of the aspect to test (e.g. UI, test-data).
-
Use continuous integration and establish that the entire team wants to have clean builds and running tests.
-
Prefer delegation over inheritance for cross-cutting testing functionality. Good places to put this kind of code can be realized and reused via the JUnit @Rule mechanism.
Test Automation Technology Stack
For test automation we use JUnit. However, we are strictly doing all assertions with AssertJ. For mocking we use Mockito. In order to mock remote connections we use WireMock.
For testing entire components or sub-systems we recommend to use for Spring stack spring-boot-starter-test as lightweight and fast testing infrastructure that is already shipped with devon4j-test. For Quarkus, you can add the necessary extensions manually such as quarkus-junit5, quarkus-junit5-mockito, assertj-core etc.
In case you have to use a full blown JEE application server, we recommend to use arquillian. To get started with arquillian, look here.
Test Doubles
We use test doubles as generic term for mocks, stubs, fakes, dummies, or spys to avoid confusion. Here is a short summary from stubs VS mocks:
-
Dummy objects specifying no logic at all. May declare data in a POJO style to be used as boiler plate code to parameter lists or even influence the control flow towards the test’s needs.
-
Fake objects actually have working implementations, but usually take some shortcut which makes them not suitable for production (an in memory database is a good example).
-
Stubs provide canned answers to calls made during the test, usually not responding at all to anything outside what’s programmed in for the test. Stubs may also record information about calls, such as an email gateway stub that remembers the messages it 'sent', or maybe only how many messages it 'sent'.
-
Mocks are objects pre-programmed with expectations, which form a specification of the calls they are expected to receive.
We try to give some examples, which should make it somehow clearer:
Stubs
Best Practices for applications:
-
A good way to replace small to medium large boundary systems, whose impact (e.g. latency) should be ignored during load and performance tests of the application under development.
-
As stub implementation will rely on state-based verification, there is the threat, that test developers will partially reimplement the state transitions based on the replaced code. This will immediately lead to a black maintenance whole, so better use mocks to assure the certain behavior on interface level.
-
Do NOT use stubs as basis of a large amount of test cases as due to state-based verification of stubs, test developers will enrich the stub implementation to become a large monster with its own hunger after maintenance efforts.
Mocks
Best Practices for applications:
-
Replace not-needed dependencies of your system-under-test (SUT) to minimize the application context to start of your component framework.
-
Replace dependencies of your SUT to impact the control flow under test without establishing all the context parameters needed to match the control flow.
-
Remember: Not everything has to be mocked! Especially on lower levels of tests like isolated module tests you can be betrayed into a mocking delusion, where you end up in a hundred lines of code mocking the whole context and five lines executing the test and verifying the mocks behavior. Always keep in mind the benefit-cost ratio, when implementing tests using mocks.
WireMock
If you need to mock remote connections such as HTTP-Servers, WireMock offers easy to use functionality. For a full description see the homepage or the github repository. Wiremock can be used either as a JUnit Rule, in Java outside of JUnit or as a standalone process. The mocked server can be configured to respond to specific requests in a given way via a fluent Java API, JSON files and JSON over HTTP. An example as an integration to JUnit can look as follows.
import static com.github.tomakehurst.wiremock.core.WireMockConfiguration.wireMockConfig;
import com.github.tomakehurst.wiremock.junit.WireMockRule;

public class WireMockOfferImport{

  @Rule
  public WireMockRule mockServer = new WireMockRule(wireMockConfig().dynamicPort());

  @Test
  public void requestDataTest() throws Exception {
  int port = this.mockServer.port();
  ...}
This creates a server on a randomly chosen free port on the running machine. You can also specify the port to be used if wanted. Other than that there are several options to further configure the server. This includes HTTPs, proxy settings, file locations, logging and extensions.
  @Test
  public void requestDataTest() throws Exception {
      this.mockServer.stubFor(get(urlEqualTo("/new/offers")).withHeader("Accept", equalTo("application/json"))
      .withHeader("Authorization", containing("Basic")).willReturn(aResponse().withStatus(200).withFixedDelay(1000)
      .withHeader("Content-Type", "application/json").withBodyFile("/wireMockTest/jsonBodyFile.json")));
  }
This will stub the URL localhost:port/new/offers to respond with a status 200 message containing a header (Content-Type: application/json) and a body with content given in jsonBodyFile.json if the request matches several conditions.
It has to be a GET request to ../new/offers with the two given header properties.
Note that by default files are located in src/test/resources/__files/. When using only one WireMock server one can omit the this.mockServer in before the stubFor call (static method).
You can also add a fixed delay to the response or processing delay with WireMock.addRequestProcessingDelay(time) in order to test for timeouts.
WireMock can also respond with different corrupted messages to simulate faulty behaviour.
@Test(expected = ResourceAccessException.class)
public void faultTest() {

    this.mockServer.stubFor(get(urlEqualTo("/fault")).willReturn(aResponse()
    .withFault(Fault.MALFORMED_RESPONSE_CHUNK)));
...}
A GET request to ../fault returns an OK status header, then garbage, and then closes the connection.
Integration Levels
There are many discussions about the right level of integration for test automation. Sometimes it is better to focus on small, isolated modules of the system - whatever a "module" may be. In other cases it makes more sense to test integrated groups of modules. Because there is no universal answer to this question, devonfw only defines a common terminology for what could be tested. Each project must make its own decision where to put the focus of test automation. There is no worldwide accepted terminology for the integration levels of testing. In general we consider ISTQB. However, with a technical focus on test automation we want to get more precise.
The following picture shows a simplified view of an application based on the devonfw reference architecture. We define four integration levels that are explained in detail below. The boxes in the picture contain parenthesized numbers. These numbers depict the lowest integration level, a box belongs to. Higher integration levels also contain all boxes of lower integration levels. When writing tests for a given integration level, related boxes with a lower integration level must be replaced by test doubles or drivers.

The main difference between the integration levels is the amount of infrastructure needed to test them. The more infrastructure you need, the more bugs you will find, but the more instable and the slower your tests will be. So each project has to make a trade-off between pros and contras of including much infrastructure in tests and has to select the integration levels that fit best to the project.
Consider, that more infrastructure does not automatically lead to a better bug-detection. There may be bugs in your software that are masked by bugs in the infrastructure. The best way to find those bugs is to test with very few infrastructure.
External systems do not belong to any of the integration levels defined here. devonfw does not recommend involving real external systems in test automation. This means, they have to be replaced by test doubles in automated tests. An exception may be external systems that are fully under control of the own development team.
The following chapters describe the four integration levels.
Level 1 Module Test
The goal of a isolated module test is to provide fast feedback to the developer. Consequently, isolated module tests must not have any interaction with the client, the database, the file system, the network, etc.
An isolated module test is testing a single classes or at least a small set of classes in isolation. If such classes depend on other components or external resources, etc. these shall be replaced with a test double.
public class MyClassTest extends ModuleTest {

  @Test
  public void testMyClass() {

    // given
    MyClass myClass = new MyClass();
    // when
    String value = myClass.doSomething();
    // then
    assertThat(value).isEqualTo("expected value");
  }

}
For an advanced example see here.
Level 2 Component Test
A component test aims to test components or component parts as a unit. These tests can access resources such as a database (e.g. for DAO tests). Further, no remote communication is intended here. Access to external systems shall be replaced by a test double.
-
For Spring stack, they are typically run with a (light-weight) infrastructure such as spring-boot-starter-test. A component-test is illustrated in the following example:
@SpringBootTest(classes = { MySpringBootApp.class }, webEnvironment = WebEnvironment.NONE)
public class UcFindCountryTest extends ComponentTest {
  @Inject
  private UcFindCountry ucFindCountry;

  @Test
  public void testFindCountry() {

    // given
    String countryCode = "de";

    // when
    TestUtil.login("user", MyAccessControlConfig.FIND_COUNTRY);
    CountryEto country = this.ucFindCountry.findCountry(countryCode);

    // then
    assertThat(country).isNotNull();
    assertThat(country.getCountryCode()).isEqualTo(countryCode);
    assertThat(country.getName()).isEqualTo("Germany");
  }
}
This test will start the entire spring-context of your app (
MySpringBootApp). Within the test spring will inject according spring-beans into all your fields annotated with@Inject. In the test methods you can use these spring-beans and perform your actual tests. This pattern can be used for testing DAOs/Repositories, Use-Cases, or any other spring-bean with its entire configuration including database and transactions. -
For Quarkus, you can similarly inject the CDI beans and perform tests. An example is shown below:
@QuarkusTest
public class UcFindCountryTest {
  @Inject
  private UcFindCountry ucFindCountry;
  ...
When you are testing use-cases your authorization will also be in place. Therefore, you have to simulate a logon in advance what is done via the login method in the above Spring example. The test-infrastructure will automatically do a logout for you after each test method in doTearDown.
Level 3 Subsystem Test
A subsystem test runs against the external interfaces (e.g. HTTP service) of the integrated subsystem. Subsystem tests of the client subsystem are described in the devon4ng testing guide. In devon4j the server (JEE application) is the subsystem under test. The tests act as a client (e.g. service consumer) and the server has to be integrated and started in a container.
-
With devon4j and Spring you can write a subsystem-test as easy as illustrated in the following example:
@SpringBootTest(classes = { MySpringBootApp.class }, webEnvironment = WebEnvironment.RANDOM_PORT)
public class CountryRestServiceTest extends SubsystemTest {

  @Inject
  private ServiceClientFactory serviceClientFactory;

  @Test
  public void testFindCountry() {

    // given
    String countryCode = "de";

    // when
    CountryRestService service = this.serviceClientFactory.create(CountryRestService.class);
    CountryEto country = service.findCountry(countryCode);

    // then
    assertThat(country).isNotNull();
    assertThat(country.getCountryCode()).isEqualTo(countryCode);
    assertThat(country.getName()).isEqualTo("Germany");
  }
}
Even though not obvious on the first look this test will start your entire application as a server on a free random port (so that it works in CI with parallel builds for different branches) and tests the invocation of a (REST) service including (un)marshalling of data (e.g. as JSON) and transport via HTTP (all in the invocation of the
findCountrymethod).
Do not confuse a subsystem test with a system integration test. A system integration test validates the interaction of several systems where we do not recommend test automation.
Level 4 System Test
A system test has the goal to test the system as a whole against its official interfaces such as its UI or batches. The system itself runs as a separate process in a way close to a regular deployment. Only external systems are simulated by test doubles.
The devonfw only gives advice for automated system test (TODO see allure testing framework). In nearly every project there must be manual system tests, too. This manual system tests are out of scope here.
Classifying Integration-Levels
For Spring stack, devon4j defines Category-Interfaces that shall be used as JUnit Categories. Also devon4j provides abstract base classes that you may extend in your test-cases if you like.
devon4j further pre-configures the maven build to only run integration levels 1-2 by default (e.g. for fast feedback in continuous integration). It offers the profiles subsystemtest (1-3) and systemtest (1-4). In your nightly build you can simply add -Psystemtest to run all tests.
Implementation
This section introduces how to implement tests on the different levels with the given devonfw infrastructure and the proposed frameworks. For Spring, see Spring Test Implementation
Regression testing
When it comes to complex output (even binary) that you want to regression test by comparing with an expected result, you sould consider Approval Tests using ApprovalTests.Java. If applied for the right problems, it can be very helpful.
Deployment Pipeline
A deployment pipeline is a semi-automated process that gets software-changes from version control into production. It contains several validation steps, e.g. automated tests of all integration levels. Because devon4j should fit to different project types - from agile to waterfall - it does not define a standard deployment pipeline. But we recommend to define such a deployment pipeline explicitly for each project and to find the right place in it for each type of test.
For that purpose, it is advisable to have fast running test suite that gives as much confidence as possible without needing too much time and too much infrastructure. This test suite should run in an early stage of your deployment pipeline. Maybe the developer should run it even before he/she checked in the code. Usually lower integration levels are more suitable for this test suite than higher integration levels.
Note, that the deployment pipeline always should contain manual validation steps, at least manual acceptance testing. There also may be manual validation steps that have to be executed for special changes only, e.g. usability testing. Management and execution processes of those manual validation steps are currently not in the scope of devonfw.
Test Coverage
We are using tools (SonarQube/Jacoco) to measure the coverage of the tests. Please always keep in mind that the only reliable message of a code coverage of X% is that (100-X)% of the code is entirely untested. It does not say anything about the quality of the tests or the software though it often relates to it.
Test Configuration
This section covers test configuration in general without focusing on integration levels as in the first chapter.
-
For Spring, see Configure Test Specific Beans
-
For Quarkus, see here
Configure Test Specific Beans
Sometimes it can become handy to provide other or differently configured bean implementations via CDI than those available in production. For example, when creating beans using @Bean-annotated methods they are usually configured within those methods. WebSecurityBeansConfig shows an example of such methods.
@Configuration
public class WebSecurityBeansConfig {
  //...
  @Bean
  public AccessControlSchemaProvider accessControlSchemaProvider() {
    // actually no additional configuration is shown here
    return new AccessControlSchemaProviderImpl();
  }
  //...
}
AccessControlSchemaProvider allows to programmatically access data defined in some XML file, e.g. access-control-schema.xml. Now, one can imagine that it would be helpful if AccessControlSchemaProvider would point to some other file than the default within a test class. That file could provide content that differs from the default.
The question is: how can I change resource path of AccessControlSchemaProviderImpl within a test?
One very helpful solution is to use static inner classes.
Static inner classes can contain @Bean -annotated methods, and by placing them in the classes parameter in @SpringBootTest(classes = { /* place class here*/ }) annotation the beans returned by these methods are placed in the application context during test execution. Combining this feature with inheritance allows to override methods defined in other configuration classes as shown in the following listing where TempWebSecurityConfig extends WebSecurityBeansConfig. This relationship allows to override public AccessControlSchemaProvider accessControlSchemaProvider(). Here we are able to configure the instance of type AccessControlSchemaProviderImpl before returning it (and, of course, we could also have used a completely different implementation of the AccessControlSchemaProvider interface). By overriding the method the implementation of the super class is ignored, hence, only the new implementation is called at runtime. Other methods defined in WebSecurityBeansConfig which are not overridden by the subclass are still dispatched to WebSecurityBeansConfig.
//... Other testing related annotations
@SpringBootTest(classes = { TempWebSecurityConfig.class })
public class SomeTestClass {

  public static class TempWebSecurityConfig extends WebSecurityBeansConfig {

    @Override
    @Bean
    public AccessControlSchemaProvider accessControlSchemaProvider() {

      ClassPathResource resource = new ClassPathResource(locationPrefix + "access-control-schema3.xml");
      AccessControlSchemaProviderImpl accessControlSchemaProvider = new AccessControlSchemaProviderImpl();
      accessControlSchemaProvider.setAccessControlSchema(resource);
      return accessControlSchemaProvider;
    }
  }
}
The following chapter of the Spring framework documentation explains issue, but uses a slightly different way to obtain the configuration.
Test Data
It is possible to obtain test data in two different ways depending on your test’s integration level.
Debugging Tests
The following two sections describe two debugging approaches for tests. Tests are either run from within the IDE or from the command line using Maven.
Debugging with the IDE
Debugging with the IDE is as easy as always. Even if you want to execute a SubsystemTest which needs a Spring context and a server infrastructure to run properly, you just set your breakpoints and click on Debug As → JUnit Test. The test infrastructure will take care of initializing the necessary infrastructure - if everything is configured properly.
Debugging with Maven
Please refer to the following two links to find a guide for debugging tests when running them from Maven.
In essence, you first have to start execute a test using the command line. Maven will halt just before the test execution and wait for your IDE to connect to the process. When receiving a connection the test will start and then pause at any breakpoint set in advance. The first link states that tests are started through the following command:
mvn -Dmaven.surefire.debug testAlthough this is correct, it will run every test class in your project and - which is time consuming and mostly unnecessary - halt before each of these tests.
To counter this problem you can simply execute a single test class through the following command (here we execute the TablemanagementRestServiceTest from the restaurant sample application):
mvn test -Dmaven.surefire.debug test -Dtest=TablemanagementRestServiceTestIt is important to notice that you first have to execute the Maven command in the according submodule, e.g. to execute the TablemanagementRestServiceTest you have first to navigate to the core module’s directory.
Transfer-Objects
The technical data model is defined in form of persistent entities. However, passing persistent entities via call-by-reference across the entire application will soon cause problems:
-
Changes to a persistent entity are directly written back to the persistent store when the transaction is committed. When the entity is send across the application also changes tend to take place in multiple places endangering data sovereignty and leading to inconsistency.
-
You want to send and receive data via services across the network and have to define what section of your data is actually transferred. If you have relations in your technical model you quickly end up loading and transferring way too much data.
-
Modifications to your technical data model shall not automatically have impact on your external services causing incompatibilities.
To prevent such problems transfer-objects are used leading to a call-by-value model and decoupling changes to persistent entities.
In the following sections the different types of transfer-objects are explained. You will find all according naming-conventions in the architecture-mapping
To structure your transfer objects, we recommend the following approaches:
Also considering the following transfer objects in specific cases:
- SearchCriteriaTo
-
For searching we create or generate a
«BusinessObject»SearchCriteriaTorepresenting a query to find instances of«BusinessObject». - TO
-
There are typically transfer-objects for data that is never persistent. For very generic cases these just carry the suffix
To. - STO
-
We can potentially create separate service transfer objects (STO) (if possible named
«BusinessObject»Sto) to keep the service API stable and independent of the actual data-model. However, we usually do not need this and want to keep our architecture simple. Only create STOs if you need service versioning and support previous APIs or to provide legacy service technologies that require their own isolated data-model. In such case you also need beanmapping between STOs and ETOs/DTOs what means extra effort and complexity that should be avoided.
Bean Mapping in devon4j-spring
We have developed a solution that uses a BeanMapper that allows to abstract from the underlying implementation. As mentioned in the general bean mapping guide, we started with Dozer a Java Bean to Java Bean mapper that recursively copies data from one object to another. Now we recommend using Orika. This guide will show an introduction to Orika and Dozer bean-mapper.
Bean-Mapper Dependency
To get access to the BeanMapper we have to use either of the below dependency in our POM:
<dependency>
    <groupId>com.devonfw.java.modules</groupId>
    <artifactId>devon4j-beanmapping-orika</artifactId>
    <version>2020.12.002</version>
</dependency><dependency>
<groupId>com.devonfw.java.modules</groupId>
<artifactId>devon4j-beanmapping-dozer</artifactId>
<version>2020.12.002</version>
</dependency>Bean-Mapper Configuration
Bean-Mapper Configuration using Dozer
The BeanMapper implementation is based on an existing open-source bean-mapping framework.
In case of Dozer the mapping is configured src/main/resources/config/app/common/dozer-mapping.xml.
See the my-thai-star dozer-mapping.xml as an example.
Important is that you configure all your custom datatypes as <copy-by-reference> tags and have the mapping from PersistenceEntity (ApplicationPersistenceEntity) to AbstractEto configured properly:
 <mapping type="one-way">
    <class-a>com.devonfw.module.basic.common.api.entity.PersistenceEntity</class-a>
    <class-b>com.devonfw.module.basic.common.api.to.AbstractEto</class-b>
    <field custom-converter="com.devonfw.module.beanmapping.common.impl.dozer.IdentityConverter">
      <a>this</a>
      <b is-accessible="true">persistentEntity</b>
    </field>
</mapping>
Bean-Mapper Configuration using Orika
Orika with devonfw is configured by default and sets some custom mappings for GenericEntity.java to GenericEntityDto.java. To specify and customize the mappings you can create the class BeansOrikaConfig.java that extends the class BaseOrikaConfig.java from the devon4j.orika package. To register a basic mapping, register a ClassMap for the mapperFactory with your custom mapping, by extending the method configureCustomMapping in the class BaseOrikaConfig. See the example below and follow the basic Orika mapping configuration guide and the Orika advanced mapping guide.
Register Mappings:
@Override
protected MapperFactory configureCustomMapping(MapperFactory mapperFactory) {
  super.configureCustomMapping(mapperFactory);

  mapperFactory.classMap(UserEntity.class, UserEto.class)
			.field("email", "email")
			.field("username", "name")
			.byDefault()
			.register();

  return mapperFactory;
}
The call to super.configureCustomMapping allows to keep and extend the existing mapping (to support proper JPA @Version attribute when converting from ApplicationPersistenceEntity to AbstractEto like with Dozer above).
Bean-Mapper Usage
Then we can get the BeanMapper via dependency-injection what we typically already provide by an abstract base class (e.g. AbstractUc). Now we can solve our problem very easy:
...
UserEntity resultEntity = ...;
...
return getBeanMapper().map(resultEntity, UserEto.class);
Datatypes
A datatype is an object representing a value of a specific type with the following aspects:
It has a technical or business specific semantic.
Its JavaDoc explains the meaning and semantic of the value.
It is immutable and therefore stateless (its value assigned at construction time and can not be modified).
It is serializable.
It properly implements #equals(Object) and #hashCode() (two different instances with the same value are equal and have the same hash).
It shall ensure syntactical validation so it is NOT possible to create an instance with an invalid value.
It is responsible for formatting its value to a string representation suitable for sinks such as UI, loggers, etc. Also consider cases like a Datatype representing a password where toString() should return something like "**" instead of the actual password to prevent security accidents.
It is responsible for parsing the value from other representations such as a string (as needed).
It shall provide required logical operations on the value to prevent redundancies. Due to the immutable attribute all manipulative operations have to return a new Datatype instance (see e.g. BigDecimal.add(java.math.BigDecimal)).
It should implement Comparable if a natural order is defined.
Based on the Datatype a presentation layer can decide how to view and how to edit the value. Therefore a structured data model should make use of custom datatypes in order to be expressive. Common generic datatypes are String, Boolean, Number and its subclasses, Currency, etc. Please note that both Date and Calendar are mutable and have very confusing APIs. Therefore, use JSR-310 or jodatime instead. Even if a datatype is technically nothing but a String or a Number but logically something special it is worth to define it as a dedicated datatype class already for the purpose of having a central javadoc to explain it. On the other side avoid to introduce technical datatypes like String32 for a String with a maximum length of 32 characters as this is not adding value in the sense of a real Datatype. It is suitable and in most cases also recommended to use the class implementing the datatype as API omitting a dedicated interface.
datatype javadoc
See mmm datatype javadoc.
Datatype Packaging
For the devonfw we use a common packaging schema. The specifics for datatypes are as following:
| Segment | Value | Explanation |
|---|---|---|
<component> |
* |
Here we use the (business) component defining the datatype or general for generic datatypes. |
<layer> |
common |
Datatypes are used across all layers and are not assigned to a dedicated layer. |
<scope> |
api |
Datatypes are always used directly as API even tough they may contain (simple) implementation logic. Most datatypes are simple wrappers for generic Java types (e.g. String) but make these explicit and might add some validation. |
Technical Concerns
Many technologies like Dozer and QueryDSL’s (alias API) are heavily based on reflection. For them to work properly with custom datatypes, the frameworks must be able to instantiate custom datatypes with no-argument constructors. It is therefore recommended to implement a no-argument constructor for each datatype of at least protected visibility.
Datatypes in Entities
The usage of custom datatypes in entities is explained in the persistence layer guide.
Datatypes in Transfer-Objects
XML
For mapping datatypes with JAXB see XML guide.
JSON
For mapping datatypes from and to JSON see JSON custom mapping.
CORS configuration in Spring
Dependency
To enable the CORS support from the server side for your devon4j-Spring application, add the below dependency:
<dependency>
  <groupId>com.devonfw.java.starters</groupId>
  <artifactId>devon4j-starter-security-cors</artifactId>
</dependency>
Configuration
Add the below properties in your application.properties file:
#CORS support
security.cors.spring.allowCredentials=true
security.cors.spring.allowedOriginPatterns=*
security.cors.spring.allowedHeaders=*
security.cors.spring.allowedMethods=OPTIONS,HEAD,GET,PUT,POST,DELETE,PATCH
security.cors.pathPattern=/**| Attribute | Description | HTTP Header |
|---|---|---|
allowCredentials |
Decides the browser should include any cookies associated with the request ( |
Access-Control-Allow-Credentials |
allowedOrigins |
List of allowed origins (use |
Access-Control-Allow-Origin |
allowedMethods |
List of allowed HTTP request methods ( |
- |
allowedHeaders |
List of allowed headers that can be used during the request (use |
Access-Control-Allow-Headers |
pathPattern |
Ant-style pattern for the URL paths where to apply CORS. Use "/**" to match all URL paths. |
Microservices in devonfw
The Microservices architecture is an approach for application development based on a series of small services grouped under a business domain. Each individual service runs autonomously and communicating with each other through their APIs. That independence between the different services allows to manage (upgrade, fix, deploy, etc.) each one without affecting the rest of the system’s services. In addition to that the microservices architecture allows to scale specific services when facing an increment of the requests, so the applications based on microservices are more flexible and stable, and can be adapted quickly to demand changes.
However, this new approach, developing apps based on microservices, presents some downsides.
Let’s see the main challenges when working with microservices:
-
Having the applications divided in different services we will need a component (router) to redirect each request to the related microservice. These redirection rules must implement filters to guarantee a proper functionality.
-
In order to manage correctly the routing process, the application will also need a catalog with all the microservices and its details: IPs and ports of each of the deployed instances of each microservice, the state of each instance and some other related information. This catalog is called Service Discovery.
-
With all the information of the Service Discovery the application will need to calculate and select between all the available instances of a microservice which is the suitable one. This will be figured out by the library Client Side Load Balancer.
-
The different microservices will be likely interconnected with each other, that means that in case of failure of one of the microservices involved in a process, the application must implement a mechanism to avoid the error propagation through the rest of the services and provide an alternative as a process result. To solve this, the pattern Circuit Breaker can be implemented in the calls between microservices.
-
As we have mentioned, the microservices will exchange calls and information with each other so our applications will need to provide a secured context to avoid not allowed operations or intrusions. In addition, since microservices must be able to operate in an isolated way, it is not recommended to maintain a session. To meet this need without using Spring sessions, a token-based authentication is used that exchanges information using the json web token (JWT) protocol.
In addition to all of this we will find other issues related to this particular architecture that we will address fitting the requirements of each project.
-
Distributed data bases: each instance of a microservice should have only one data base.
-
Centralized logs: each instance of a microservice creates a log and a trace that should be centralized to allow an easier way to read all that information.
-
Centralized configuration: each microservice has its own configuration, so our applications should group all those configurations in only one place to ease the configuration management.
-
Automatized deployments: as we are managing several components (microservices, catalogs, balancers, etc.) the deployment should be automatized to avoid errors and ease this process.
To address the above, devonfw microservices has an alternative approach Microservices based on Netflix-Tools.
Caching
Caching is a technical approach to improve performance. While it may appear easy on the first sight it is an advanced topic. In general, try to use caching only when required for performance reasons. If you come to the point that you need caching first think about:
-
What to cache?
Be sure about what you want to cache. Is it static data? How often will it change? What will happen if the data changes but due to caching you might receive "old" values? Can this be tolerated? For how long? This is not a technical question but a business requirement. -
Where to cache?
Will you cache data on client or server? Where exactly? -
How to cache?
Is a local cache sufficient or do you need a shared cache?
Local Cache
Shared Cache
Distributed Cache
Feature-Toggles
The most software developing teams use Feature-Branching to be able to work in parallel and maintain a stable main branch in the VCS. However Feature-Branching might not be the ideal tool in every case because of big merges and isolation between development groups. In many cases, Feature-Toggles can avoid some of these problems, so these should definitely be considered to be used in the collaborative software development.
Implementation with the devonfw
To use Feature-Toggles with the devonfw, use the Framework Togglz because it has all the features generally needed and provides a great documentation.
For a pretty minimal working example, also see this fork.
Preparation
The following example takes place in the oasp-sample-core project, so the necessary dependencies have to be added to the according pom.xml file. Required are the main Togglz project including Spring support, the Togglz console to graphically change the feature state and the Spring security package to handle authentication for the Togglz console.
<!-- Feature-Toggle-Framework togglz -->
<dependency>
  <groupId>org.togglz</groupId>
  <artifactId>togglz-spring-boot-starter</artifactId>
  <version>2.3.0.RC2</version>
</dependency>

<dependency>
  <groupId>org.togglz</groupId>
  <artifactId>togglz-console</artifactId>
  <version>2.3.0.RC2</version>
</dependency>

<dependency>
  <groupId>org.togglz</groupId>
  <artifactId>togglz-spring-security</artifactId>
  <version>2.3.0.RC2</version>
</dependency>
In addition to that, the following lines have to be included in the spring configuration file application.properties
# configuration for the togglz Feature-Toggle-Framework
togglz.enabled=true
togglz.console.secured=false
Small features
For small features, a simple query of the toggle state is often enough to achieve the desired functionality. To illustrate this, a simple example follows, which implements a toggle to limit the page size returned by the staffmanagement. See here for further details.
This is the current implementation to toggle the feature:
// Uncomment next line in order to limit the maximum page size for the staff member search
// criteria.limitMaximumPageSize(MAXIMUM_HIT_LIMIT);
To realise this more elegantly with Togglz, first an enum is required to configure the feature-toggle.
public enum StaffmanagementFeatures implements Feature {
  @Label("Limit the maximum page size for the staff members")
  LIMIT_STAFF_PAGE_SIZE;

  public boolean isActive() {
    return FeatureContext.getFeatureManager().isActive(this);
  }
}
To familiarize the Spring framework with the enum, add the following entry to the application.properties file.
togglz.feature-enums=io.oasp.gastronomy.restaurant.staffmanagement.featuremanager.StaffmanagementFeaturesAfter that, the toggle can be used easily by calling the isActive() method of the enum.
if (StaffmanagementFeatures.LIMIT_STAFF_PAGE_SIZE.isActive()) {
  criteria.limitMaximumPageSize(MAXIMUM_HIT_LIMIT);
}
This way, you can easily switch the feature on or off by using the administration console at http://localhost:8081/devon4j-sample-server/togglz-console. If you are getting redirected to the login page, just sign in with any valid user (eg. admin).
Extensive features
When implementing extensive features, you might want to consider using the strategy design pattern to maintain the overview of your software. The following example is an implementation of a feature which adds a 25% discount to all products managed by the offermanagement.
-
Return the offers with the normal price
-
Return the offers with a 25% discount
The implementation is pretty straight forward so use this as a reference. Compare this for further details.
@Override
@RolesAllowed(PermissionConstants.FIND_OFFER)
public PaginatedListTo<OfferEto> findOfferEtos(OfferSearchCriteriaTo criteria) {
  criteria.limitMaximumPageSize(MAXIMUM_HIT_LIMIT);
  PaginatedListTo<OfferEntity> offers = getOfferDao().findOffers(criteria);


  if (OffermanagementFeatures.DISCOUNT.isActive()) {
    return getOfferEtosDiscount(offers);
  } else {
    return getOfferEtosNormalPrice(offers);
  }

}


// Strategy 1: Return the OfferEtos with the normal price
private PaginatedListTo<OfferEto> getOfferEtosNormalPrice(PaginatedListTo<OfferEntity> offers) {
  return mapPaginatedEntityList(offers, OfferEto.class);
}

// Strategy 2: Return the OfferEtos with the new, discounted price
private PaginatedListTo<OfferEto> getOfferEtosDiscount(PaginatedListTo<OfferEntity> offers) {
  offers = addDiscountToOffers(offers);
  return mapPaginatedEntityList(offers, OfferEto.class);
}

private PaginatedListTo<OfferEntity> addDiscountToOffers(PaginatedListTo<OfferEntity> offers) {
  for (OfferEntity oe : offers.getResult()) {
    Double oldPrice = oe.getPrice().getValue().doubleValue();

    // calculate the new price and round it to two decimal places
    BigDecimal newPrice = new BigDecimal(oldPrice * 0.75);
    newPrice = newPrice.setScale(2, RoundingMode.HALF_UP);

    oe.setPrice(new Money(newPrice));
  }

  return offers;
}
Guidelines for a successful use of feature-toggles
The use of feature-toggles requires a specified set of guidelines to maintain the overview on the software. The following is a collection of considerations and examples for conventions that are reasonable to use.
Minimize the number of toggles
When using too many toggles at the same time, it is hard to maintain a good overview of the system and things like finding bugs are getting much harder. Additionally, the management of toggles in the configuration interface gets more difficult due to the amount of toggles.
To prevent toggles from piling up during development, a toggle and the associated obsolete source code should be removed after the completion of the corresponding feature. In addition to that, the existing toggles should be revisited periodically to verify that these are still needed and therefore remove legacy toggles.
Consistent naming scheme
A consistent naming scheme is the key to a structured and easily maintainable set of features. This should include the naming of toggles in the source code and the appropriate naming of commit messages in the VCS. The following section contains an example for a useful naming scheme including a small example.
Every Feature-Toggle in the system has to get its own unique name without repeating any names of features, which were removed from the system. The chosen names should be descriptive names to simplify the association between toggles and their purpose. If the feature should be split into multiple sub-features, you might want to name the feature like the parent feature with a describing addition. If for example you want to split the DISCOUNT feature into the logic and the UI part, you might want to name the sub-features DISCOUNT_LOGIC and DISCOUNT_UI.
The entry in the togglz configuration enum should be named identically to the aforementioned feature name. The explicitness of feature names prevents a confusion between toggles due to using multiple enums.
Commit messages are very important for the use of feature-toggles and also should follow a predefined naming scheme. You might want to state the feature name at the beginning of the message, followed by the actual message, describing what the commit changes to the feature. An example commit message could look like the following:
DISCOUNT: Add the feature-toggle to the offermanagement implementation.Mentioning the feature name in the commit message has the advantage, that you can search your git log for the feature name and get every commit belonging to the feature. An example for this using the tool grep could look like this.
$ git log | grep -C 4 DISCOUNT

commit 034669a48208cb946cc6ba8a258bdab586929dd9
Author: Florian Luediger <florian.luediger@somemail.com>
Date:   Thu Jul 7 13:04:37 2016 +0100

DISCOUNT: Add the feature-toggle to the offermanagement implementation.
To keep track of all the features in your software system, a platform like GitHub offers issues. When creating an issue for every feature, you can retrace, who created the feature and who is assigned to completing its development. When referencing the issue from commits, you also have links to all the relevant commits from the issue view.
Placement of toggle points
To maintain a clean codebase, you definitely want to avoid using the same toggle in different places in the software. There should be one single query of the toggle which should be able to toggle the whole functionality of the feature. If one single toggle point is not enough to switch the whole feature on or off, you might want to think about splitting the feature into multiple ones.
Use of fine-grained features
Bigger features in general should be split into multiple sub-features to maintain the overview on the codebase. These sub-features get their own feature-toggle and get implemented independently.
Accessibility
TODO
| devon4j-kafka has been abandoned. Its main feature was the implementation of a retry pattern using multiple topics. This implementation has become an integral part of Spring Kafka. We recommend to use Spring Kafkas own implemenation for retries. |
Messaging Services
Messaging Services provide an asynchronous communication mechanism between applications. Technically this is implemented using Apache Kafka .
For spring, devonfw uses Spring-Kafka as kafka framework. For more details, check the devon4j-kafka.
For quarkus, follow Quarkus - Kafka Reference Guide.
Messaging
Messaging in Java is done using the JMS standard from JEE.
Products
For messaging you need to choose a JMS provider such as:
-
Oracle Advanced Queuing (esp. if you already use Oracle RDBMS)
Receiver
As a receiver of messages is receiving data from other systems it is located in the service-layer.
JMS Listener
A JmsListener is a class listening and consuming JMS messages. It should carry the suffix JmsListener and implement the MessageListener interface or have its listener method annotated with @JmsListener. This is illustrated by the following example:
@Named
@Transactional
public class BookingJmsListener /* implements MessageListener */ {

  @Inject
  private Bookingmanagement bookingmanagement;

  @Inject
  private MessageConverter messageConverter;

  @JmsListener(destination = "BOOKING_QUEUE", containerFactory = "jmsListenerContainerFactory")
  public void onMessage(Message message) {
    try {
      BookingTo bookingTo = (BookingTo) this.messageConverter.fromMessage(message);
      this.bookingmanagement.importBooking(bookingTo);
    } catch (MessageConversionException | JMSException e) {
      throw new InvalidMessageException(message);
    }
  }
}
Sender
The sending of JMS messages is considered as any other sending of data like kafka messages or RPC calls via REST using service-client, gRPC, etc. This will typically happen directly from a use-case in the logic-layer. However, the technical complexity of the communication and protocols itself shall be hidden from the use-case and not be part of the logic layer. With spring we can simply use JmsTemplate to do that.
Full Text Search
If you want to all your users fast and simple searches with just a single search field (like in google), you need full text indexing and search support.
Solutions
Maybe you also want to use native features of your database
Best Practices
TODO