Contribute to help us improve!
Are there edge cases or problems that we didn't consider? Is there a technical pitfall that we should add? Did we miss a comma in a sentence?
If you have any input for us, we would love to hear from you and appreciate every contribution. Our goal is to learn from projects for projects such that nobody has to reinvent the wheel.
Let's collect our experiences together to make room to explore the novel!
To contribute click on Contribute to this page on the toolbar.
Testing e2e with Cypress
This guide will cover the basics of e2e testing using Cypress.
Cypress is a framework “all in one” that provides the necessary libraries to write specific e2e tests, without the need of Selenium.
Why Cypress?
-
Uses JavaScript
-
It works directly with the browser so the compatibility with the front-end framework the project uses (in this case Angular) is not a problem.
-
Easy cross browser testing
Setup
Install
First of all we need to install it, we can use npm install:
$ npm install -D cypressOr we can install it with yarn:
$ yarn add -D cypressWe need to run Cypress in order to get the folder tree downloaded, then create a tsconfig.json file inside cypress folder to add the typescript configuration.
$ . /node_modules/.bin/cypress opentsconfig.json{
"compilerOptions": {
"strict": true,
"baseUrl": "../node_modules",
"target": "es5",
"lib": ["es5", "dom"],
"types": ["cypress"]
},
"include": [
"**/*.ts"
]
}BaseUrl
Let’s setup the base URL so when we run the tests cypress will "navigate" to the right place, go to cypress.json on the root of the project.
{
  "baseUrl": "http://localhost:4200"
}
Files / Structure
/cypress
  tsconfig.json
  /fixtures
    - example.json
  /integration
    - button.spec.ts
    - test.spec.ts
    /examples
  /plugins
    - index.js
  /support
    - commands.js
    - index.js
tsconfig.json for typescript configuration.
fixtures to store our mock data or files (images, mp3…) to use on our tests.
integration is where our tests go, by default it comes with an examples folder with tested samples.
plugins is where the configuration files of the plugins go.
support to add custom commands.
|
If you are using Nx, it automatically generates a e2e cypress project for every project that you generate. So you already get the configuration files like |
Tests
The structure is the same than Mocha.
First, we create a file, for example form.spec.ts, inside we define a context to group all our tests referred to the same subject.
context('Button page', () => {
beforeEach(() => {
cy.visit('/');
});
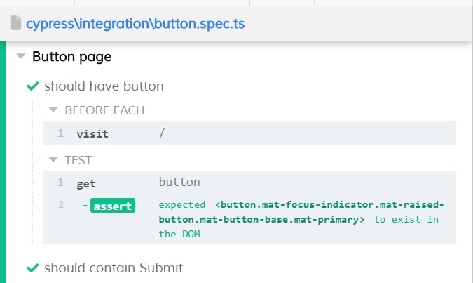
it('should have button',()=>{
cy.get('button').should('exist');
});
it('should contain PRESS',()=>{
cy.contains('button', 'PRESS');
});
});beforeEachVisit '/' before every test.
Inside we write the test.
The result:
For more info check Cypress documentation
On kitchensink you can find an official cypress demo with all the commands being used.
Fixtures
We use fixtures to mock data, it can be a json, an image, video…
{
  "name": "Dummy name",
  "phone": 999 99 99 99,
  "body": "Mock data"
}
You can store multiple mocks on the same fixture file.
{
  "create":{"name": "e2etestBox"},
  "boxFruit":{
    "uuid":"3376339576e33dfb9145362426a33333",
    "name":"e2etestBox",
    "visibility":true,
    "items":[
      {"name":"apple","units":3},
      {"name":"kiwi","units":2},
    ]
  },
}
To access data we don’t need to import any file, we just call cy.fixture(filename) inside the **.spec.ts. We can name it as we want.
cy.fixture('box.json').as('fruitBox')cy.fixture('box.json') we get access to box.json
.as(fruitBox) is used to create an alias (fruitBox) to the fixture.
For more info check Fixtures documentation
Request / Route
With cypress you can test your application with real data or with mocks.
Not using mocks guarantees that your tests are real e2e test but makes them vulnerable to external issues. When you mock data you don’t know exactly if the data and the structure received from the backend is correct because you are forcing a mock on the response, but you can avoid external issues, run test faster and have better control on the structure and status.
To get more information go to Testing Strategies
Route
Cypress can intercept a XHR request and interact with it.
cy.server();
cy.route(
  'GET',
  '/apiUrl/list',
  [{"name":"apple", "units":3},{"name":"kiwi", "units":2}]
)
cy.server(options) start a server to interact with the responses.
cy.route(options) intercepts a XMLHttpRequests-
method
GET -
URL
/apiUrl/list' -
response
[{"name":"apple", "units":3},{"name":"kiwi", "units":2}]
Waits
Every cypress action has a default await time to avoid asynchronous issues, but this time can be short for some particular actions like API calls, for those cases we can use cy.wait().
cy.server();
cy.route('/apiUrl/list').as('list');
cy.visit('/boxList');
cy.wait('@list');
You can find more information about cy.wait() here
To mock data with fixtures:
cy.fixture('box')
  .then(({boxFruit}) => {
    cy.route(
      'GET',
      '/apiUrl/list',
      boxFruit
    ).as('boxFruit');
    cy.get('#button').click();
    cy.wait('@journalsList');
    cy.get('#list').contains('apple');
  })
We get boxFruit data from the box fixture and then we mock the API call with it so now the response of the call is boxFruit object.
When the button is clicked, it waits to receive the response of the call and then checks if the list contains one of the elements of the fruitBox.
Request
Make a HTTP request.
cy.server();
cy.request('http://localhost:4200/')
  .its('body')
  .should('include', '<h1>Welcome to Devon4ngAngularElementsTest!</h1>');
If we have 'http://localhost:4200' as baseUrl on cypress.json
cy.server();
cy.request('/')
  .its('body')
  .should('include', '<h1>Welcome to Devon4ngAngularElementsTest!</h1>');
// Goes to http://localhost:4200/
We can add other options, like we can send the body of a form.
cy.server();
cy.request({
  method: 'POST',
  url: '/send',
  form: true,
  body: {
    name: 'name task',
    description: 'description of the task'
  }
});
Custom commands
If you see yourself writing the same test more than once (login is a common one), you can create a custom command to make things faster.
Cypress.Commands.add('name', ()⇒{}) to create the test.
Cypress.Commands.add('checkPlaceholder', (name) => {
  cy.get(`[name='${name}']`).click();
  cy.get('mat-form-field.mat-focused').should('exist');
});To use the commands we need to import the files on support/index.ts
import './commands'
import './file1'
import './folder/file2'
index.ts is where all our custom commands files unite so Cypress knows where to find them.
And as we are using typescript we need to define a namespace, interface and define our function.
-
index.d.ts
declare namespace Cypress {
  interface Chainable<Subject> {
    checkPlaceholder(name:string):Chainable<void>
  }
}Cross browser testing
By default the browser used by Cypress is Chrome, it has compatibility with it’s family browsers (including Microsoft Edge) and has beta support for Mozilla Firefox.
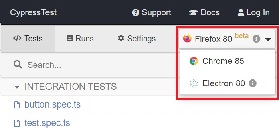
To change the browser on the panel we can do it by selecting the desired one on the browsers tab before running the spec file.
Cypress will detect and display, except electron, only the browsers that you have already installed on your machine.
Once the browser is selected, you can run your tests.
To change the browser on the automatic test run, you can add a flag on the node command
cypress run --browser edgeOnly if we use the cypress run command.
Or we can change the script file.
-
cypress/script.js
const runTests= async ()=>{
  ...
  const {totalFailed} = await cypress.run({browser:'edge'});
  ...
};Viewport
Cypress allow us to create tests depending on the Viewport, so we can test responsiveness.
There are different ways to use it:
Inside a test case
it('should change title when viewport is less than 320px', ()=>{
  cy.get('.title-l').should('be.visible');
  cy.get('.title-s').should('not.be.visible');
  cy.viewport(320, 480);
  cy.get('.title-l').should('not.be.visible');
  cy.get('.title-s').should('be.visible');
})
Passing the configuration as an option
describe('page display on medium size screen', {
  viewportHeight: 1000,
  viewportWidth: 400
}, () => {
  ...
})
Or we can set a default
-
cypress.json
...
{
 "viewportHeight": 1000
 "viewportWidth": 400,
}
...Test retries
We can get false negatives intermittently due external issues that can affect our tests, because of that we can add, in the configuration, a retries entry so Cypress can run again a certain failed test the selected number of times to verify that the error is real.
We can set retries for run or open mode.
-
cypress.json
...
"retries": {
    "runMode": 3,
    "openMode": 3
  }
...
The retries can be configured on the cypress.json or directly on a specific test.
it('should get button', {
  retries: {
    runMode: 2,
    openMode: 2
  }
}, () => {
  ...
})
This retries those not shown on the test log.
Check more on retries documentation
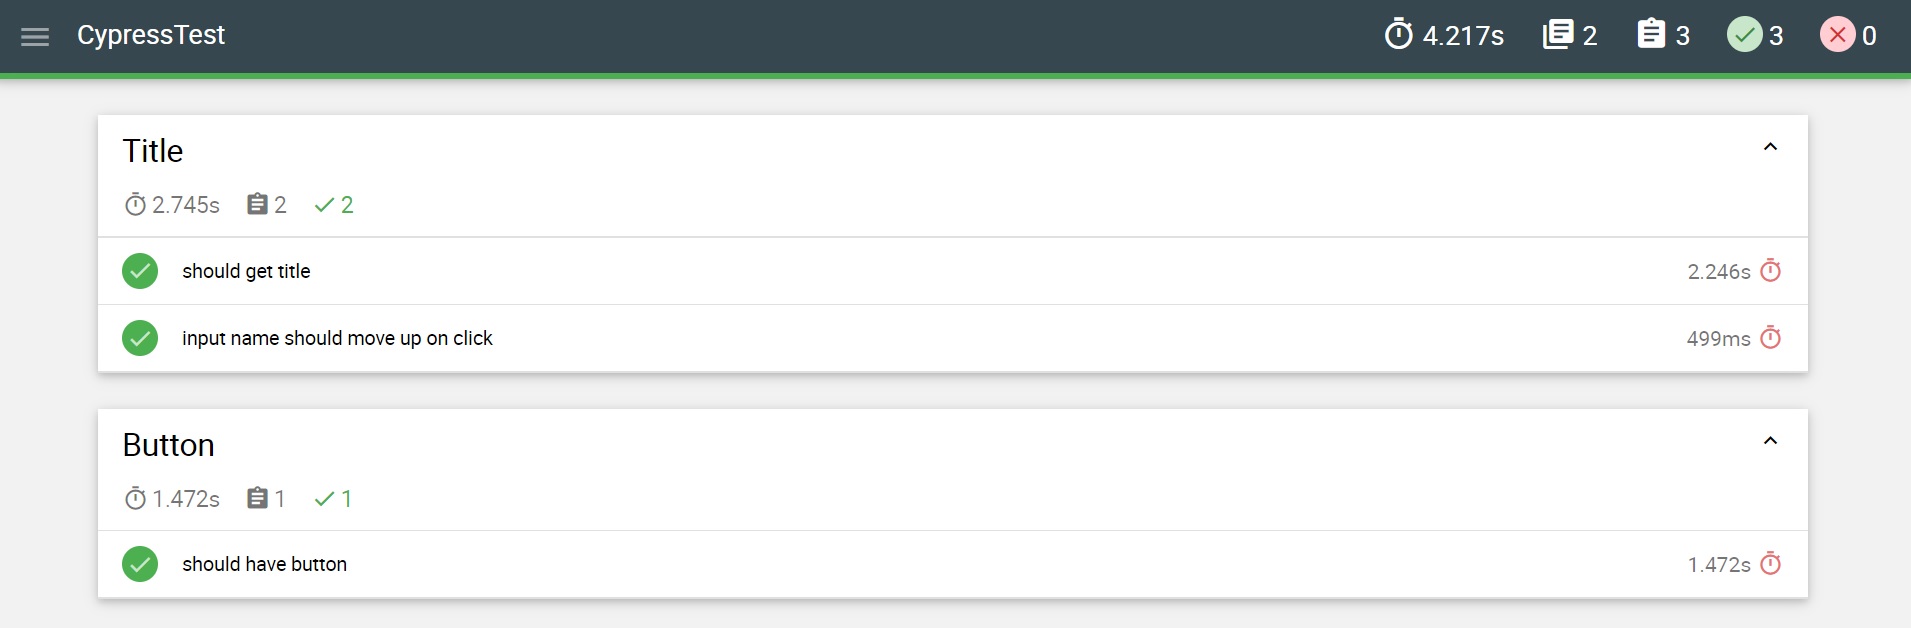
Reporter
The tests results appear on the terminal, but to have a more friendly view we can add a reporter.
Mochawesome
In this case we are going to use Mochawesome, initially its a Mocha reporter but as Cypress uses Mocha it works the same.
Install
npm
npm install --save-dev mochawesomeyarn
yarn add -D mochawesomeTo run the reporter:
cypress run --reporter mochawesomeMochawesome saves by default the generated files on `./mochawesome-report/` but we can add options to change this behavior.
Options can be passed to the reporter in two ways
Using a flag
cypress run --reporter mochawesome --reporter-options reportDir=reportOr on cypress.json
{
  "baseUrl": "http://localhost:4200",
  "reporter": "mochawesome",
  "reporterOptions": {
    "overwrite": false,
    "html": false,
    "json": true,
    "reportDir": "cypress/report"
  }
}
Overwrite:false to not overwrite every **:spec.ts test report, we want them to create a merged version later.
reportDir to set a custom directory.
html:false because we don’t need it.
json:true to save them on json.
Mochawesome only creates the html file of the last .spec.ts file that the tests run, that’s why we don’t generate html reports directly, in order to stack them all on the same final html we need to merge the reports.
Check the mochawesome documentation
mochawesome-merge
Mochawesome-merge is a library that helps us to merge the different json.
npm
npm install --save-dev mochawesome-merge
npm install --save-dev mochawesome-report-generator
yarn
yarn add -D mochawesome-merge
yarn add -D mochawesome-report-generator
To merge the files we execute this command:
mochawesome-merge cypress/report/*.json > cypress/reportFinal.jsonreportFinal.json is the result of this merge, whit that we have the data of all the spec files in one json.
We can also automate the test, merge and conversion to html using a script.
const cypress = require('cypress');
const fse = require('fs-extra');
const { merge } = require('mochawesome-merge');
const generator = require('mochawesome-report-generator');
const runTests= async ()=>{
  await fse.remove('mochawesome-report');
  await fse.remove('cypress/report');
  const {totalFailed} = await cypress.run();
  const reporterOptions = {
    files: ["cypress/report/*.json"]
  };
  await generateReport(reporterOptions);
  if(totalFailed !== 0){
    process.exit(2);
  };
};
const generateReport = (options)=> {
  return merge(options).then((jsonReport)=>{
    generator.create(jsonReport).then(()=>{
      process.exit();
    });
  });
};
runTests();
fse.remove() to remove older reports data.
cypress.run() to run the tests.
merge(options) we merge the json output from running the tests.
generator.create(jsonReport) then we generate the html view of the report.
Check the mochawesome-merge documentation
On kitchensink you can find an official cypress demo with all the commands being used.