
Understand the architecture principles followed by devon4ng (the angular asset of devonfw)
Prerequisites
Basic Angular knowledge
Learning goals
This tutorial aims to explain concepts and principles of devon4ng architecture by refering an Angular application template. Below are the steps we will go through to understand it clearly.
-
Understand Angular architectural terminology (components and modules)
-
Different layers of an Angular application
-
Different types of modules - feature, core, shared
You will be refering a devon4ng application while going through the theoretical aspects of the tutorial.
By end of this tutorial you will have detailed understanding of principles followed by devon4ng application as well as its structure and architecture.
The definition of each step of this tutorial can be found at https://github.com/devonfw-tutorials/tutorials/tree/main/devon4ng-architecture/.
Feel free to report any errors to us or fix them yourself. Errors can be reported by creating an issue in the tutorials repository. To fix the error fork the repository and create a pull request. Errors in the wiki can be reported and fixed in the Tutorial-compiler repository. You can find a description of what to look for when creating a pull request at the devonfw contribution guide: https://devonfw.com/website/pages/community/community.html#community.asciidoc_contributing-to-devonfw. If you want to create a tutorial you can start with the katacoda tutorial and read the description for creating your own tutorials: https://github.com/devonfw-tutorials/tutorials/wiki/Development.
devonfw setup
If you already installed the devonfw IDE, you can skip this step.
Prerequisites
-
You need to have a tool to extract
.tar.gzfiles. On Windows lower Windows 10 use can use 7-Zip. The most other platforms support this feature by default. -
You need to have Git and Curl installed. On Windows you have to install Git for Windows. On Linux systems you might need to install the following tools in case they are not present (
sudo apt-get install git curlorsudo yum install git-core curl)
Create a new directory in the location where you want to install the devonfw IDE. If you are using the terminal, navigate to this location and run mkdir devonfw and cd devonfw to create the directory and navigate into it.
Download
Now you have to download the latest release of the devonfw IDE. You can download it from here.
In the Terminal execute Invoke-WebRequest -OutFile devonfw-ide-scripts.tar.gz 'https://repository.sonatype.org/service/local/artifact/maven/redirect?r=central-proxy&g=com.devonfw.tools.ide&a=devonfw-ide-scripts&v=LATEST&p=tar.gz' if you are using Windows.
On Linux use wget -c 'https://repository.sonatype.org/service/local/artifact/maven/redirect?r=central-proxy&g=com.devonfw.tools.ide&a=devonfw-ide-scripts&v=LATEST&p=tar.gz' -O devonfw-ide-scripts.tar.gz -.
On MacOS, depending on your setup, you can either use the same wget command specified for the Linux installation (install wget via homebrew brew install wget) or use any other available download command i.e. curl -o devonfw-ide-scripts.tar.gz https://repository.sonatype.org/service/local/artifact/maven/redirect?r=central-proxy&g=com.devonfw.tools.ide&a=devonfw-ide-scripts&v=LATEST&p=tar.gz.
After that you need to extract the downloaded file. To do this, run tar -xvzf devonfw-ide-scripts.tar.gz. Or you can simply use a tool (e.g. 7-Zip) for this.
Setup
First, you need to prepare a settings repository to specify the tools to be installed within the devonfw IDE. Normally this is done by your project. If you just want to test the devonfw IDE, you can use the default URL, which is https://github.com/devonfw/ide-settings.
For now clone the repository on https://github.com/devonfw/ide-settings or your own fork of it.
For this tutorial you have to write DEVON_IDE_TOOLS=(npm ng vscode) into the devon.properties file of the cloned settings repository. These settings will now be passed into the installation process of the devonfw-ide.
Start the setup process by executing .\setup 'path/to/settings' (Windows) or bash setup path/to/settings.git (Linux).
You can also just execute .\setup (Windows) or bash setup (Linux) and press Enter when the setup assistent asks for the URL to the settings repository. This will also download the default settings and install the default tools within the devonfw IDE.
Run a setup script
Run a Script to setup the enviroment for the Tutorial.
Prerequisites
-
Any Editor that can edit files.
Create the Setupscript
Open a editor and create a new file by going to the file context menu in the top left corner of the editor and select New or New File or mostly also the keyboard shortcut ctrl+n will also work.
-
Windows
The editor opens a new editor window for an untitled file where you should insert the following text.cd devonfw/workspaces/main git clone https://github.com/devonfw/devon4ng-application-template.gitSave the file by selecting Save or Save as in the file context menu or by using the keyboard shortcut ctrl+s. A file explorer window opens where you should set the filename to cloneProject.ps1 and save it to your current directory.
-
Linux and macOS
The editor opens a new editor window for an untitled file where you can insert the following text.cd devonfw/workspaces/main git clone https://github.com/devonfw/devon4ng-application-template.gitSave the file by selecting Save or Save as in the file context menu or by using the keyboard shortcut ctrl+s. A file explorer window opens where you should set the filename to cloneProject.sh and save it to your current directory.
Run the setup script
-
Windows
Open the PowerShell in your current workspace and execute the command./cloneProject.ps1to run the script. -
Linux and macOS
Open the Terminal in your current workspace and execute the commandbash cloneProject.shto run the script.
Overview
An Angular application is component based like [devon4j](https://github.com/devonfw/devon4j), but different terminology is used as compared to devon4j. Primarily the term used is module instead of component. To clarify this:
-
A component describes an UI element containing HTML, CSS and JavaScript - structure, design and logic encapsulated inside a reusable container called component.
-
A module describes an applications feature area. The application flight-app may have a module called booking.
An application developed using Angular consists of multiple modules. There are feature modules and special modules - core and shared. Angular or Angular Styleguide give no guidance on how to structure a module internally. This is where this architecture comes in.
We will refer a devon4ng application for better understanding. But before that, let us understand the Architectural Layers of a devon4ng application.
Architectural Layers

The architecture describes two layers:
-
[Components Layer](https://devonfw.com/website/pages/docs/master-devon4ng.asciidoc_layers.html#components-layer.asciidoc) encapsulates components which present the current application state. Components are separated into [Smart and Dumb Components](https://devonfw.com/website/pages/docs/master-devon4ng.asciidoc_layers.html#components-layer.asciidoc_smart-and-dumb-components). The only logic present is view logic inside Smart Components.
-
[Services Layer](https://devonfw.com/website/pages/docs/master-devon4ng.asciidoc_layers.html#services-layer.asciidoc) is more or less what we call 'business logic layer' on the server side. The layer defines the applications state, the transitions between state and classic business logic. Stores contain application state over time to which Smart Components subscribe to. Adapters are used to perform XHRs, WebSocket connections, etc. The business model is described inside the module. Use case services perform business logic needed for use cases. A use case services interacts with the store and adapters. Methods of use case services are the API for Smart Components. Those methods are Actions in reactive terminology.
Let us refer the application to understand the above concepts.
Architectural Layers explained
The application you see here is a clone of devon4ng-application-template. You can find it [here](https://github.com/devonfw/devon4ng-application-template)
The SampleDataModule is a nice example of the different layers explained. It holds some components (representing the components layer) and also has a SampleDataService (representing the service layer) which is imported in the required components.
The service acts as the adapter element explained earlier (used to make XHR calls).
Modules
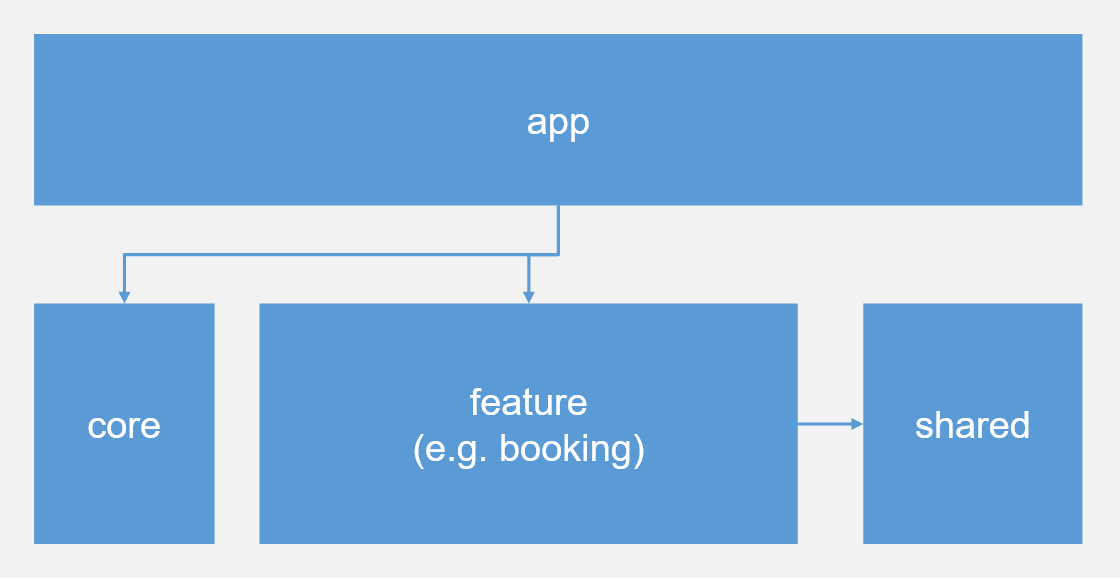
Every Angular application requires a module called app which is the main entrance to an application at runtime - this module gets bootstrapped. Angular Styleguide defines feature modules and two special modules - core and shared.
-
A feature module is basically a vertical cut through both layers.
-
The shared module consists of components shared across feature modules.
-
The core module holds services shared across modules.
So core module is a module only having a services layer and shared module is a module only having a components layer.
The SampleDataModule which we visitied earlier is a typical example of a feature module
Let us refer the application again for examples on core module and shared module.
Core module
In the CoreModule, you can see services like TranslocoRootModule (translation service), HttpRequestInterceptorService (HTTP interceptor sesrvice) and Angular Material related modules being part of this core module. This core module is then imported into every other module as the services are used throughout the application.
Shared module
In the LayoutModule, you can see components like NavBar and Header being part of this module. This module is comparable to a shared module which holds common components used throughout the application. The shared module is imported into other (feature) modules where the common components will be used.
You can study in more detail about Angular architecture by following [this document](https://devonfw.com/website/pages/docs/master-devon4ng.asciidoc_architecture.html#meta-architecture.asciidoc_devonfw-reference-client-architecture).
Conclusion
To conclude, in this tutorial you learned
-
the concepts of modules and components
-
the layers of the architecture - components and services
-
the different types of modules - core, shared and feature
Then we referred a devon4ng application by cloning it and traversing through its files. You can study in more detail about Angular architecture by following [this document](https://devonfw.com/website/pages/docs/master-devon4ng.asciidoc_architecture.html#meta-architecture.asciidoc_devonfw-reference-client-architecture).
The idea with devon4ng is to define an architecture which is a compromise between, on the one hand, leveraging the best practices and latest trends like reactive style development, on the other hand, providing a short onboarding time while still using an architecture that helps us scale and be productive at the same time.