
CobiGen is a generic incremental code generator. It allows you to generate application code based on the devonfw architecture including all software layers. There is also a CobiGen Command Line Interface(CLI) where you can start the setup following the generation of code.
This tutorial mainly focuses on the setup of CobiGen along with various commands to execute the generations. ## Prerequisites
-
devonfw IDE
-
User should have development experience of any language.
Learning goals.
Here in this tutorial you will learn
-
To setup CobiGen
-
To use commands on CobiGen CLI
-
To integrate Eclipse with CobiGen
The definition of each step of this tutorial can be found at https://github.com/devonfw-tutorials/tutorials/tree/main/cobigen-setup/.
Feel free to report any errors to us or fix them yourself. Errors can be reported by creating an issue in the tutorials repository. To fix the error fork the repository and create a pull request. Errors in the wiki can be reported and fixed in the Tutorial-compiler repository. You can find a description of what to look for when creating a pull request at the devonfw contribution guide: https://devonfw.com/website/pages/community/community.html#community.asciidoc_contributing-to-devonfw. If you want to create a tutorial you can start with the katacoda tutorial and read the description for creating your own tutorials: https://github.com/devonfw-tutorials/tutorials/wiki/Development.
devonfw setup
If you already installed the devonfw IDE, you can skip this step.
Prerequisites
-
You need to have a tool to extract
.tar.gzfiles. On Windows lower Windows 10 use can use 7-Zip. The most other platforms support this feature by default. -
You need to have Git and Curl installed. On Windows you have to install Git for Windows. On Linux systems you might need to install the following tools in case they are not present (
sudo apt-get install git curlorsudo yum install git-core curl)
Create a new directory in the location where you want to install the devonfw IDE. If you are using the terminal, navigate to this location and run mkdir devonfw and cd devonfw to create the directory and navigate into it.
Download
Now you have to download the latest release of the devonfw IDE. You can download it from here.
In the Terminal execute Invoke-WebRequest -OutFile devonfw-ide-scripts.tar.gz 'https://repository.sonatype.org/service/local/artifact/maven/redirect?r=central-proxy&g=com.devonfw.tools.ide&a=devonfw-ide-scripts&v=LATEST&p=tar.gz' if you are using Windows.
On Linux use wget -c 'https://repository.sonatype.org/service/local/artifact/maven/redirect?r=central-proxy&g=com.devonfw.tools.ide&a=devonfw-ide-scripts&v=LATEST&p=tar.gz' -O devonfw-ide-scripts.tar.gz -.
On MacOS, depending on your setup, you can either use the same wget command specified for the Linux installation (install wget via homebrew brew install wget) or use any other available download command i.e. curl -o devonfw-ide-scripts.tar.gz https://repository.sonatype.org/service/local/artifact/maven/redirect?r=central-proxy&g=com.devonfw.tools.ide&a=devonfw-ide-scripts&v=LATEST&p=tar.gz.
After that you need to extract the downloaded file. To do this, run tar -xvzf devonfw-ide-scripts.tar.gz. Or you can simply use a tool (e.g. 7-Zip) for this.
Setup
First, you need to prepare a settings repository to specify the tools to be installed within the devonfw IDE. Normally this is done by your project. If you just want to test the devonfw IDE, you can use the default URL, which is https://github.com/devonfw/ide-settings.
For now clone the repository on https://github.com/devonfw/ide-settings or your own fork of it.
For this tutorial you have to write DEVON_IDE_TOOLS=(java mvn) into the devon.properties file of the cloned settings repository. These settings will now be passed into the installation process of the devonfw-ide.
Start the setup process by executing .\setup 'path/to/settings' (Windows) or bash setup path/to/settings.git (Linux).
You can also just execute .\setup (Windows) or bash setup (Linux) and press Enter when the setup assistent asks for the URL to the settings repository. This will also download the default settings and install the default tools within the devonfw IDE.
The installer will also ask you if you want to enter secrets for your maven repository. You can simply skip this by pressing 'Enter'.
CobiGen Setup
devonfw IDE has been installed for you.
CobiGen CLI is installed inside your devonfw distribution. In order to execute it follow the next steps:
-
Execute the below command to navigate to devonfw installation directory repository.
cd devonfw{{execute T1}}
-
Execute below command to install CobiGen.
devon cobigen{{execute T1}}
-
Execute below command to setup devon environment.
devon{{execute T1}}
You have successfully setup CobiGen. Execute the below command to verify the installation.
cobigen -V{{execute T1}}
In next step, you will learn about CobiGen CLI commands.
CobiGen CLI Commands and Options
In this step, you will learn CobiGen commands.
-
Execute the below command to know available CobiGen Commands
`cobigen `{{execute T1}}
-
[generate, g]: Command used for code generation. To know more about implementation of this command you can follow https://katacoda.com/devonfw/scenarios/cobigen.
-
[adapt-templates, a]: Generates a new templates folder next to the Cobigen CLI and stores its location inside a configuration file. After executing this command, the CLI will attempt to use the specified Templates folder.
cobigen a{{execute T1}}
To get more information about rest of all the command visit on https://devonfw.com/website/pages/docs/master-cobigen.asciidoc_cobigen-cli.html
In next step, you will learn about how to integrate CobiGen with Eclipse.
Integrate Eclipse with CobiGen
Note: CobiGen comes preinstalled with devonfw IDE.
1.1 Preconditions - Eclipse 4.x
-
Atleast Java 7 Runtime (for starting eclipse with CobiGen). This is independent from the target version of your developed code
1.2. Installation steps * Open the eclipse installation dialog menu bar → Help → Install new Software
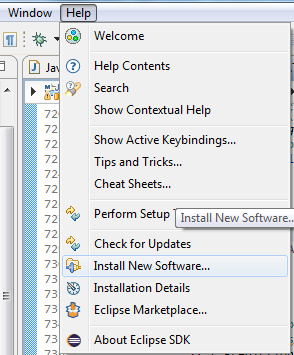
Select Update Site
Here you can select the updates. 2. Open CobiGen’s update site

Insert the update site of your interest into the filed Work with and press Add
Stable releases: https://dl.bintray.com/devonfw/cobigen.p2/
-
Follow the installation wizard Select CobiGen Eclipse Plug-in → Next → Next → accept the license → Finish → OK → Yes
-
Once installed, a new menu entry named "CobiGen" will show up in the Package Explorer’s context menu. In the sub menu there will the Generate command, which may ask you to update the templates, and then you can start the generation wizard of CobiGen.
-
You can adapt the templates by clicking on Adapt Templates which will give you the possibility to import the CobiGen_Templates automatically so that you can modified them.
-
Checkout (clone) your project’s templates folder or use the current templates released with CobiGen (https://github.com/devonfw/cobigen/tree/master/cobigen-templates) and then choose Import → General → Existing Projects into Workspace to import the templates into your workspace.
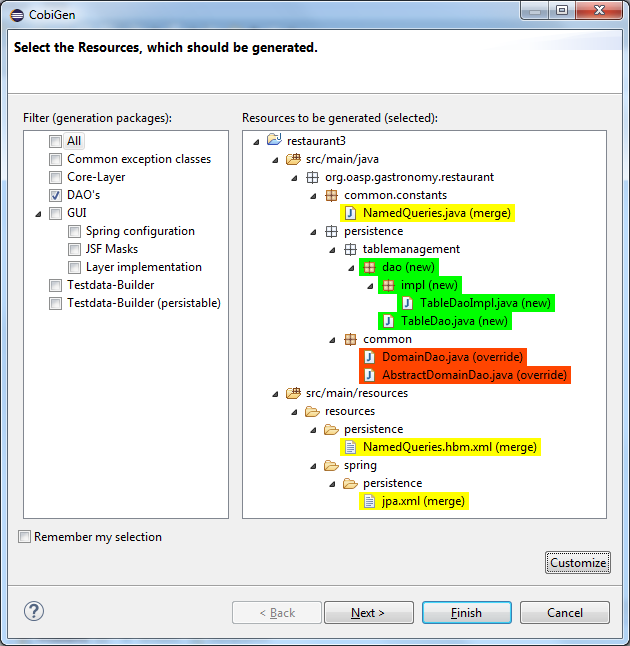
CobiGen Usage - Simple Mode
Selecting the menu entry Generate the generation wizard will be opened.
The left side of the wizard shows all available increments, which can be selected to be generated. Increments are a container like concept encompassing multiple files to be generated, which should result in a semantically closed generation output. The type of modification of each file will be encoded into following color scheme if the files are selected for generation:
-
green: files, which are currently non-existent in the file system. These files will be created during generation
-
yellow: files, which are currently existent in the file system and which are configured to be merged with generated contents.
-
red: files, which are currently existent in the file system. These files will be overwritten if manually selected.
-
no color: files, which are currently existent in the file system. Additionally files, which were unselected and thus will be ignored during generation.
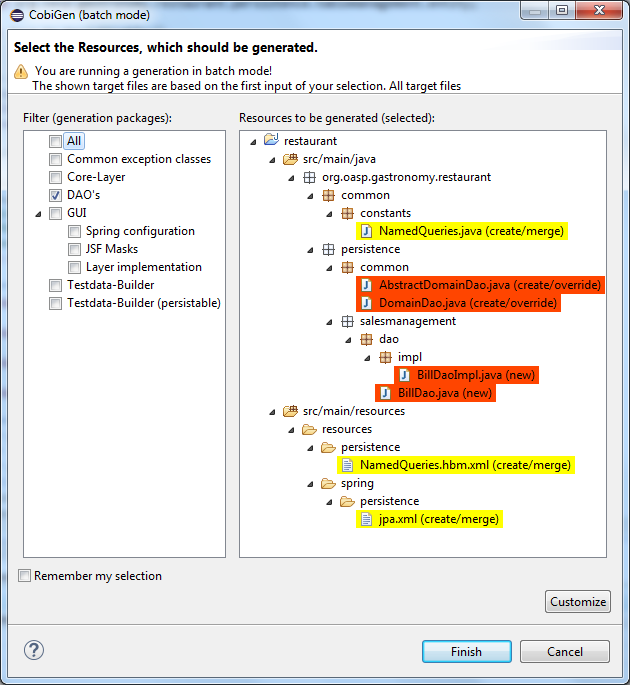
CobiGen Usage - Batch Mode
If there are multiple input elements selected, e.g., Java files, CobiGen will be started in batch mode. The generation preview will be constrained to the first selected input element. It does not preview the generation for each element of the selection or of a complex input. The selection of the files to be generated will be generated for each input element analogously afterwards.
Thus the color encoding differs also a little bit:
-
yellow: files, which are configured to be merged.
-
red: files, which are not configured with any merge strategy and thus will be created if the file does not exist or overwritten if the file already exists
-
no color: files, which will be ignored during generation
==
Health Check
However, you might face some errors while using CobiGen. So, we recommend to perform a Health Check for CobiGen Templates for better experience.
To get more information on Health Check for CobiGen Templates visit on https://devonfw.com/website/pages/docs/master-cobigen.asciidoc_eclipse-integration.html#cobigen-eclipse_usage.asciidoc_health-check
Troubleshooting CLI
When generating code from a Java file, CobiGen makes use of Java reflection for generating templates. In order to do that, the CLI needs to find the compiled source code of your project.
If you find an error like Compiled class foo\bar\EmployeeEntity.java has not been found, it means you need to run "mvn clean install" on the input project so that a new target folder gets created with the needed compiled sources.
Conclusion
From this tutorial you have learned the following: * You can do CobiGen set up in your system. * You can use the CobiGen CLI commands to generate the code. * You can now integrate CobiGen with Eclipse and generate your crud services. * Now you know how to use CobiGen in a particular project with Eclipse as well as CLI.
More information about CobiGen on https://devonfw.com/website/pages/docs/master-cobigen.asciidoc.html