
Test Framework Modules
In this section, it is possible to find all the information regarding the main modules of MrChecker:
Core Test Module
Core Test Module
What is Core Test Module
Core Test Module Functions
How to start?
Read: Framework Test Class
Allure Logger → BFLogger
In Allure E2E Test Framework you have ability to use and log any additional information crucial for:
-
test steps
-
test exection
-
page object actions, and many more.
Where to find saved logs
Every logged information is saved in a separate test file, as a result of parallel tests execution.
The places they are saved:
-
In test folder C:\Allure_Test_Framework\allure-app-under-test\logs
-
In every Allure Test report, logs are always embedded as an attachment, according to test run.
How to use logger:
-
Start typing
BFLogger -
Then type . (dot)
Type of logger:
-
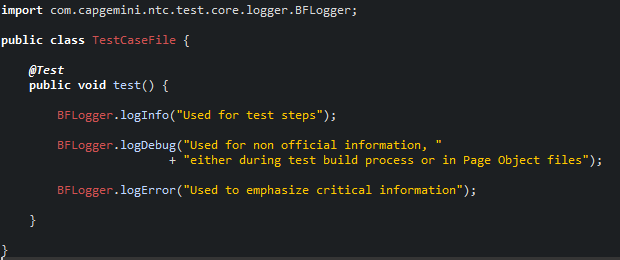
BFLogger.logInfo("Your text")- used for test steps -
BFLogger.logDebug("Your text")- used for non official information, either during test build process or in Page Object files -
BFLogger.logError("Your text")- used to emphasize critical information
Console output:
Allure Reports
Allure is a tool designed for test reports.
You can generate a report using one of the following commands:
Since mrchecker-core-module version 5.6.2.1:
mvn test allure:serve -Dgroups=TestsTag1
Prior to mrchecker-core-module version 5.6.2.1:
mvn test allure:serve -Dtest=TS_Tag1
A report will be generated into temp folder. Web server with results will start. You can additionally configure the server timeout. The default value is "3600" (one hour).
System property allure.serve.timeout.
Since mrchecker-core-module version 5.6.2.1:
mvn test allure:report -Dgroups=TestsTag1
Prior to mrchecker-core-module version 5.6.2.1:
mvn test allure:report -Dtest=TS_Tag1
A report will be generated tо directory: target/site/allure-maven/index.html
NOTE: Please open index.html file under Firefox. Chrome has some limitations to presenting dynamic content. If you want to open a report with a Chromium based Web Browser, you need to launch it first with --allow-file-access-from-files argument.
A report is created here allure-app-under-test\target\site\allure-report\index.html
NOTE: Please open index.html file under Firefox. Chrome has some limitations to presenting dynamic content. If you want to open a report with a Chromium based Web Browser, you need to launch it first with --allow-file-access-from-files argument.
In our case, we’ll use the Allure Jenkins plugin. When integrating Allure in a Jenkins job configuration, we’ll have direct access to the build’s test report.
There are several ways to access the Allure Test Reports:
-
Using the "Allure Report" button on the left navigation bar or center of the general job overview
-
Using the "Allure Report" button on the left navigation bar or center of a specific build overview
Afterwards you’ll be greeted with either the general Allure Dashboard (showing the newest build) or the Allure Dashboard for a specific (older) build.
Allure dashboard
The Dashboard provides a graphical overview on how many test cases were successful, failed or broken.
-
Passed means, that the test case was executed successfully.
-
Broken means, that there were mistakes, usually inside of the test method or test class. As tests are being treated as code, broken code has to be expected, resulting in occasionally broken test results.
-
Failed means that an assertion failed.
Defects
The defects tab lists out all the defects that occurred, and also descriptions thereof. Clicking on a list item displays the test case which resulted in an error. Clicking on a test case allows the user to have a look at the test case steps, as well as Log files or Screenshots of the failure.
Graph
The graph page includes a pie chart of all tests, showing their result status (failed, passed, etc.). Another graph allows insight into the time elapsed during the tests. This is a very useful information to find and eliminate possible bottlenecks in test implementations.
Why join Test Cases in groups - Test Suites
Regresion Suite:
Regression testing is a type of software testing which verifies that software which was previously developed and tested still performs the same way after it was changed or interfaced with another software.
-
Business vital functionalities
-
Full scope of test cases
Functional Suite:
-
Smoke
-
Business function A
-
Business function B
Single Responsibility Unit:
-
Single page
-
Specific test case
How to build a Test Suite based on tags
Structure of the Test Suite
Since mrchecker-core-module version 5.6.2.1:
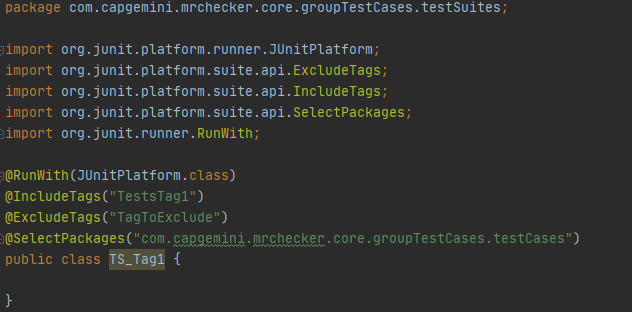
Where:
-
@RunWith(JUnitPlatform.class)- use Junit5 runner -
@IncludeTags({"TestsTag1"})- search all test files with the tag"TestsTag1" -
@ExcludeTags({"TagToExclude"})- exclude test files with the tag"TagToExclude" -
@SelectPackages("com.capgemini.mrchecker.core.groupTestCases.testCases")- search only test files in"com.capgemini.mrchecker.core.groupTestCases.testCases"package -
public class TS_Tag1- the name of the Test Suite is "TS_Tag1"
Most commonly used filters to build a Test Suite are ones using:
-
@IncludeTags({ }) -
@ExcludeTags({ })
Example:
-
@IncludeTags({ "TestsTag1" }) , @ExcludeTags({ })→ will execute all test cases with the tagTestsTag1 -
@IncludeTags({ "TestsTag1" }) , @ExcludeTags({ "SlowTest" })→ will execute all test cases with tag"TestsTag1"although it will exclude from this list the test cases with the tag"SlowTest" -
@IncludeTags({ }) , @ExcludeTags({ "SlowTest" })→ It will exclude test cases with the tag"SlowTest"
Prior to mrchecker-core-module version 5.6.2.1:
Where:
-
@RunWith(WildcardPatternSuiteBF.class)- search for test files under/src/test/java -
@IncludeCategories({ TestsTag1.class })- search for all test files with the tag"TestsTag1.class" -
@ExcludeCategories({ })- exclude test files. In this example, there is no exclusion -
@SuiteClasses({ "**/*Test.class" })- search only test files, where the file name ends with"<anyChar/s>Test.class" -
public class TS_Tag1- the name of the Test Suite is "TS_Tag1"
Most commonly used filters to build Test Suite are ones using:
-
@IncludeCategories({ }) -
@ExcludeCategories({ })
Example:
-
@IncludeCategories({ TestsTag1.class }) , @ExcludeCategories({ })→ will execute all test cases with the tagTestsTag1.class -
@IncludeCategories({ TestsTag1.class }) , @ExcludeCategories({ SlowTest.class })→ will execute all test cases with the tag"TestsTag1.class"although it will exclude from this list the test cases with the tag"SlowTest.class" -
@IncludeCategories({ }) , @ExcludeCategories({ SlowTest.class })→ will execute all test cases from/src/test/java, although it will exclude from this list the test cases with the tag"SlowTest.class"
Structure of Test Case
Since mrchecker-core-module version 5.6.2.1:
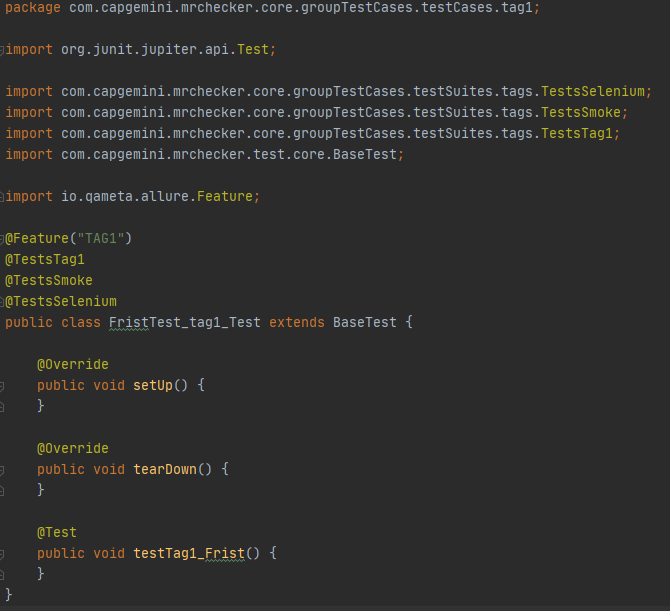
Where:
-
@TestsTag1, @TestsSmoke, @TestsSelenium- list of tags assigned to this test case -"TestsTag1, TestsSmoke, TestSelenium"annotations -
public class FristTest_tag1_Test- the name of the test case is"FristTest_tag1_Test"
Prior to mrchecker-core-module version 5.6.2.1:
Where:
-
@Category({ TestsTag1.class, TestsSmoke.class, TestSelenium.class })- list of tags / categories assigned to this test case -"TestsTag1.class, TestsSmoke.class, TestSelenium.class" -
public class FristTest_tag1_Test- the name of the test case is"FristTest_tag1_Test"
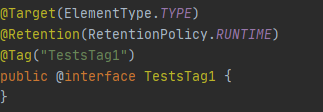
Structure of Tags / Categories
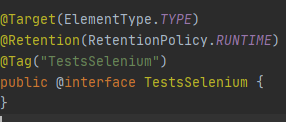
Since mrchecker-core-module version 5.6.2.1:
Tag name: TestsTag1 annotation
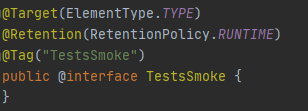
Tag name: TestsSmoke annotation
Tag name: TestSelenium annotation
Prior to mrchecker-core-module version 5.6.2.1:
Tag name: TestsTag1.class
Tag name: TestsSmoke.class
Tag name: TestSelenium.class
How to run Test Suite
To run a Test Suite you perform the same steps as you do to run a test case
Command line
Since mrchecker-core-module version 5.6.2.1:
JUnit5 disallows running suite classes from maven. Use -Dgroups=Tag1,Tag2 and -DexcludeGroups=Tag4,Tag5 to create test suites in maven.
mvn test site -Dgroups=TestsTag1
Prior to mrchecker-core-module version 5.6.2.1:
mvn test site -Dtest=TS_Tag1
Eclipse
Data driven approach
Data driven approach - External data driven
External data driven - Data as external file injected in test case
Test case - Categorize functionality and severity
You can find more information about data driven here and here
There are a few ways to define parameters for tests.
Internal Data driven approach
Data as part of test case
The different means to pass in parameters are shown below.
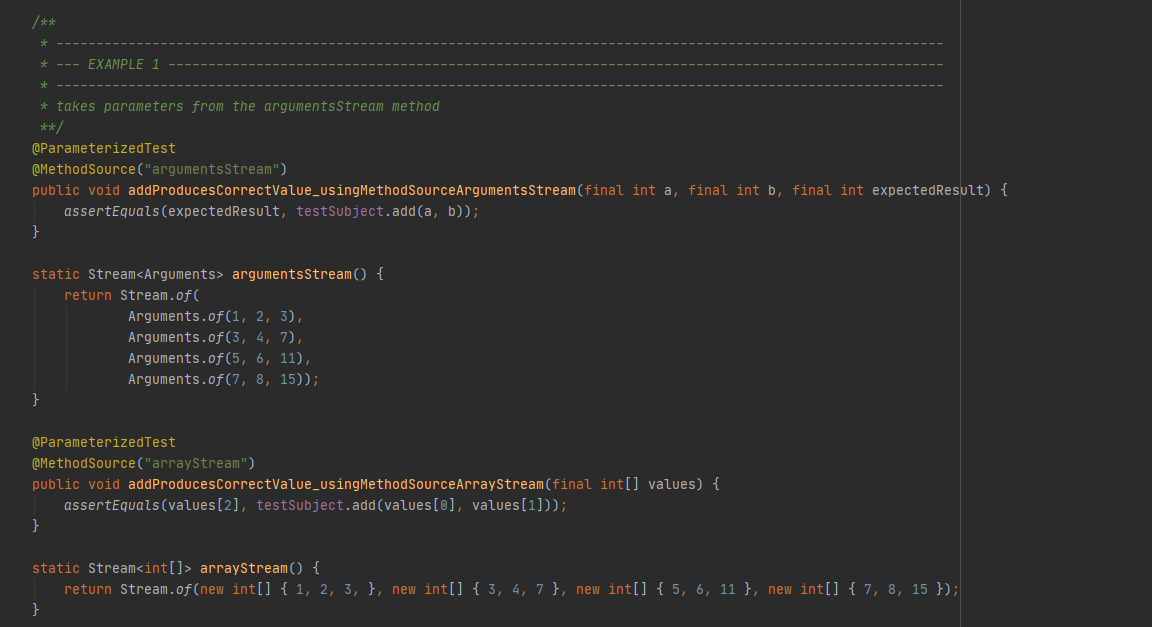
Since mrchecker-core-module version 5.6.2.1
Static methods are used to provide the parameters.
@ParameterizedTest
@MethodSource("argumentsStream")
OR
@ParameterizedTest
@MethodSource("arrayStream")
In the first case the arguments are directly mapped to the test method parameters. In the second case the array is passed as the argument.
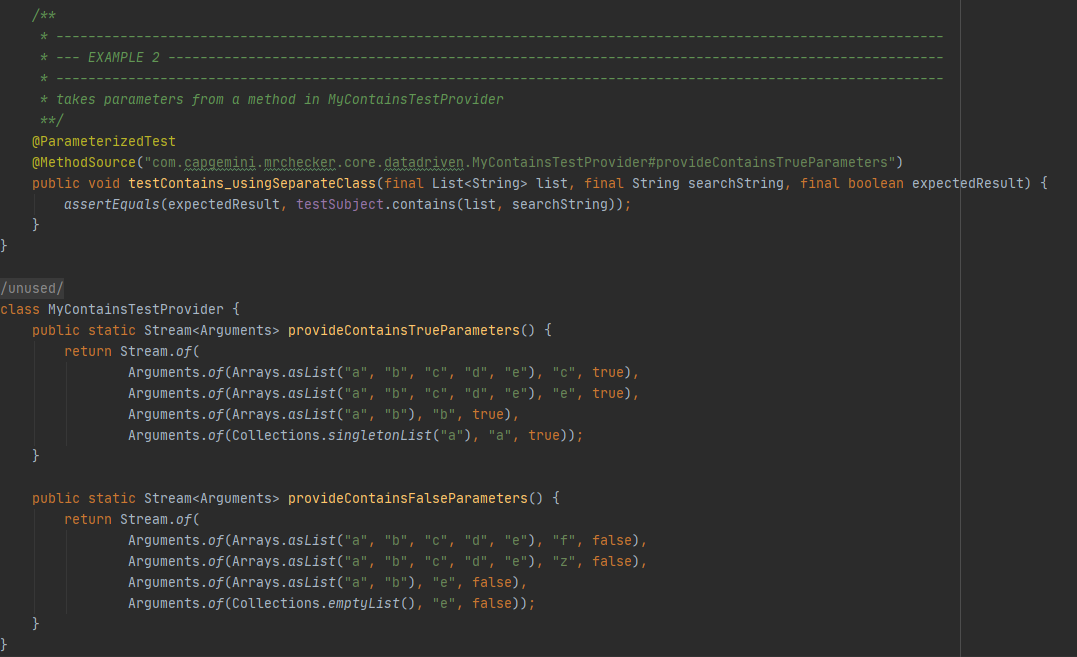
@ParameterizedTest
@MethodSource("com.capgemini.mrchecker.core.datadriven.MyContainsTestProvider#provideContainsTrueParameters")
Prior to mrchecker-core-module version 5.6.2.1
Parameters that are passed into tests using the @Parameters annotation must be _Object[]_s
@Parameters({"1, 2, 3", "3, 4, 7", "5, 6, 11", "7, 8, 15"})

The parameters must be primitive objects such as integers, strings, or booleans. Each set of parameters is contained within a single string and will be parsed to their correct values as defined by the test method’s signature.
@Parameters(method = "addParameters")
A separate method can be defined and referred to for parameters. This method must return an Object[] and can contain normal objects.
@Parameters(source = MyContainsTestProvider.class)
A separate class can be used to define parameters for the test. This test must contain at least one static method that returns an Object[], and its name must be prefixed with provide. The class could also contain multiple methods that provide parameters to the test, as long as they also meet the required criteria.
External Data Driven
Data as external file injected in test case
Since mrchecker-core-module version 5.6.2.1
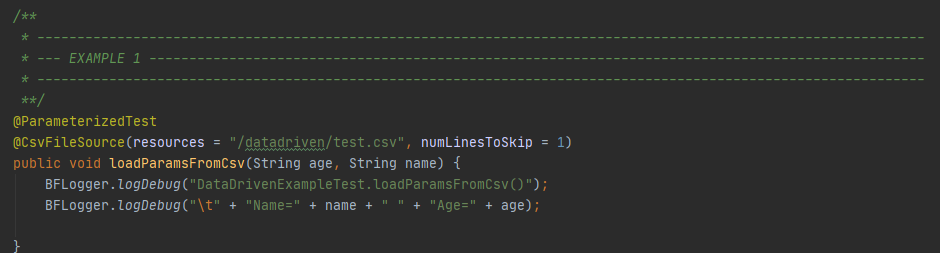
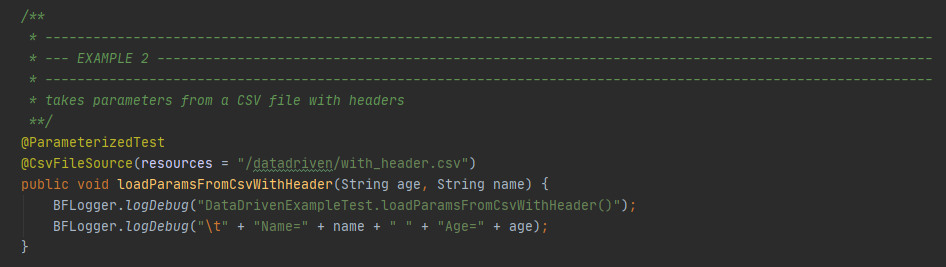
Tests use the annotation @CsvFileSource to inject CSVs file.
@CsvFileSource(resources = "/datadriven/test.csv", numLinesToSkip = 1)
A CSV can also be used to contain the parameters for the tests. It is pretty simple to set up, as it’s just a comma-separated list.
and CSV file structure

and CSV file structure
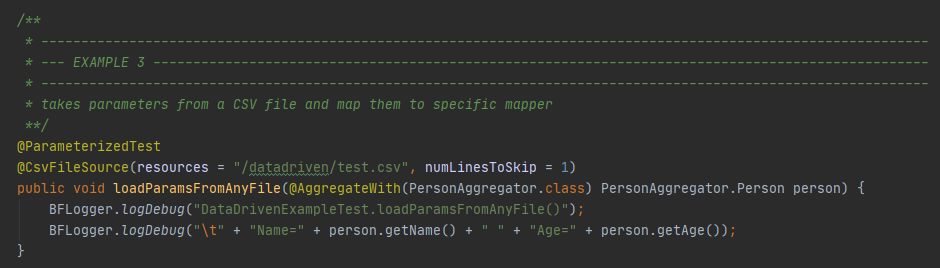
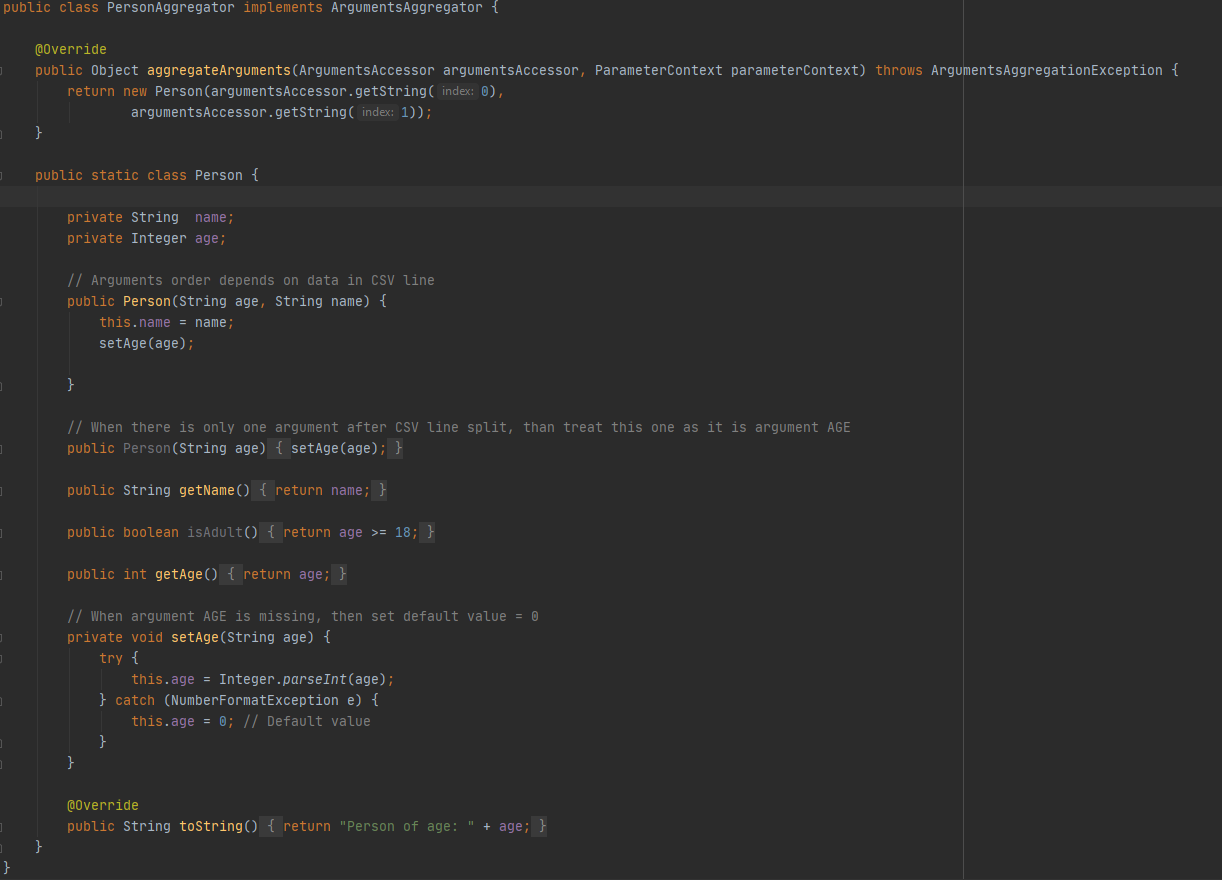
and Mapper implementation
Prior to mrchecker-core-module version 5.6.2.1
Tests use the annotation @FileParameters to inject CSVs file.
@FileParameters("src/test/resources/datadriven/test.csv")
A CSV can also be used to contain the parameters for the tests. It is pretty simple to set up, as it’s just a comma-separated list.
and CSV file structure
and CSV file structure

and Mapper implementation
What is "Parallel test execution" ?
Parallel test execution means many "Test Classes" can run simultaneously.
"Test Class", as this is a Junit Test class, it can have one or more test cases - "Test case methods"
How many parallel test classes can run simultaneously?
Since mrchecker-core-module version 5.6.2.1
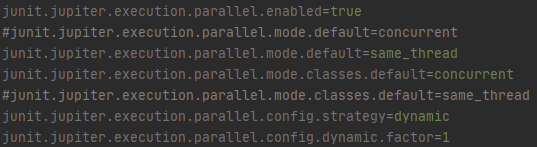
JUnit5 supports parallelism natively. The feature is configured using a property file located at src\test\resources\junit-platform.properties.
As per default configuration, concurrent test execution is set to run test classes in parallel using the thread count equal to a number of your CPUs.
Visit JUnit5 site to learn more about parallel test execution.
Prior to mrchecker-core-module version 5.6.2.1
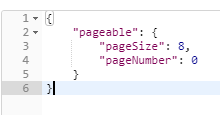
By default, number of parallel test classes is set to 8.
It can be updated as you please, on demand, by command line:
mvn test site -Dtest=TS_Tag1 -Dthread.count=16
-Dthread.count=16 - increase number of parallel Test Class execution to 16.
Overview
Cucumber / Selenium
Business and IT don’t always understand each other. Very often misunderstandings between business and IT result in the costly failure of IT projects. With this in mind, Cucumber was developed as a tool to support human collaboration between business and IT.
Cucumber uses executable specifications to encourage a close collaboration. This helps teams to keep the business goal in mind at all times. With Cucumber you can merge specification and test documentation into one cohesive whole, allowing your team to maintain one single source of truth. Because these executable specifications are automatically tested by Cucumber, your single source of truth is always up-to-date.
Cucumber supports testers when designing test cases. To automate these test cases, several languages can be used. Cucumber also works well with Browser Automation tools such as Selenium Webdriver.
Selenium automates browsers and is used for automating web applications for testing purposes. Selenium offers testers and developers full access to the properties of objects and the underlying tests, via a scripting environment and integrated debugging options.
Selenium consists of many parts. If you want to create robust, browser-based regression automation suites and tests, Selenium Webdriver is most appropriate. With Selenium Webdriver you can also scale and distribute scripts across many environments.
Those familiar with Behavior Driven Development (BDD) recognize Cucumber as an excellent open source tool that supports this practice.
With Cucumber / Selenium you can automate at the UI level. Automation at the unit or API level can also be implemented using Cucumber. This means all tests, regardless of the level at which they are implemented, can be implemented in one tool.
Many teams seem to prefer UI level automation, despite huge cost of maintaining UI level tests compared to the cost of maintaining API or unit tests. To lessen the maintenance of UI testing, when designing UI level functional tests, you can try describing the test and the automation at three levels: business rule, UI workflow, technical implementation.
When using Cucumber combined with Selenium, you can implement these three levels for better maintenance.
Executable specifications can and should be written before the functionality is implemented. By starting early, teams get most return on investment from their test automation.
Cucumber and Selenium are both open source tools with a large community, online resources and mailing lists.
How to run cucumber tests in Mr.Checker
-
Run cucumber tests and generate Allure report. Please use this for Jenkins execution. Report is saved under ./target/site.
mvn clean -P cucumber test site
-
Run and generate report
mvn clean -P cucumber test site allure:report
-
Run cucumber tests, generate Allure report and start standalone report server
mvn clean -P cucumber test site allure:serve
Tooling
Cucumber supports over a dozen different software platforms. Every Cucumber implementation provides the same overall functionality, but they also have their own installation procedure and platform-specific functionality. See https://cucumber.io/docs for all Cucumber implementations and framework implementations.
Also, IDEs such as Intellij offer several plugins for Cucumber support.
Selenium has the support of some of the largest browser vendors who have taken (or are taking) steps to make Selenium a native part of their browser. It is also the core technology in countless other browser automation tools, APIs and frameworks.
Test automation in Cucumber starts with writing a feature file. A feature normally consists of several (test)scenarios and each scenario consists of several steps.
Feature: Refund item
Scenario: Jeff returns a faulty microwave
Given Jeff has bought a microwave for $100
And he has a receipt
When he returns the microwave
Then Jeff should be refunded $100
Above example shows a feature “Refund item” with one scenario “Jeff returns a faulty microwave”. The scenario consists of four steps each starting with a key word (Given, And, When, Then).
Next the steps are implemented. Assuming we use Java to implement the steps, the Java code will look something like this.
public class MyStepdefs \{

	@Given("Jeff has bought a microwave for $(\d+)")

	public void Jeff_has_bought_a_microwave_for(int amount) \{

		// implementation can be plain java

		// or selenium

		driver.findElement(By.name("test")).sendKeys("This is an example\n");

		driver.findElement(By.name("button")).click();// etc
	}
}
Cucumber uses an annotation (highlighted) to match the step from the feature file with the function implementing the step in the Java class. The name of the class and the function can be as the developer sees fit. Selenium code can be used within the function to automate interaction with the browser.
There are several ways to run scenarios with Cucumber, for example the JUnit runner, a command line runner and several third party runners.
Cucumber can report results in several different formats, using formatter plugins
Cucumber executes your feature files. As shown in the example below, feature files in Gherkin are easy to read so they can be shared between IT and business. Data tables can be used to execute a scenario with different inputs.
Feature files are placed in a directory structure and together form a feature tree.
Tags can be used to group features based on all kinds of categories. Cucumber can include or exclude tests with certain tags when running the tests.
Cucumber can report results in several formats, using formatter plugins. Not supported option by Shared Services: The output from Cucumber can be used to present test results in Jenkins or Hudson depending of the preference of the project.
HOW IS Cucumber / Selenium USED AT Capgemini?
Cucumber and Selenium are chosen as one of Capgemini’s test automation industrial tools. We support the Java implementation of Cucumber and Selenium Webdriver. We can help with creating Cucumber, Selenium projects in Eclipse and IntelliJ.
In the context of industrialisation, Capgemini has developed a range of services to assist and support the projects in process and tools implementation.
In this context a team of experts assists projects using test automation.
The main services provided by the center of expertise are:
-
Advise on the feasibility of automation.
-
Support with installation.
-
Coaching teams in the use of BDD.
Run on independent Operation Systems
As E2E Allure test framework is build on top of:
-
Java 1.8
-
Maven 3.3
This guarantees portability to all operating systems.
E2E Allure test framework can run on OS:
-
Windows,
-
Linux and
-
Mac.
Test creation and maintenance in E2E Allure test framework can be done with any type of IDE:
-
Eclipse,
-
IntelliJ,
-
WebStorm,
-
Visual Studio Code,
-
many more that support Java + Maven.
System under test environments
-
Quality assurance or QA is a way of preventing mistakes or defects in manufactured products and avoiding problems when delivering solutions or services to customers; which ISO 9000 defines as "part of quality management focused on providing confidence that quality requirements will be fulfilled".
-
System integration testing or SIT is a high-level software testing process in which testers verify that all related systems maintain data integrity and can operate in coordination with other systems in the same environment. The testing process ensures that all sub-components are integrated successfully to provide expected results.
-
Development or Dev testing is performed by the software developer or engineer during the construction phase of the software development life-cycle. Rather than replace traditional QA focuses, it augments it. Development testing aims to eliminate construction errors before code is promoted to QA; this strategy is intended to increase the quality of the resulting software as well as the efficiency of the overall development and QA process.
-
Prod If the customer accepts the product, it is deployed to a production environment, making it available to all users of the system.
How to use system environment
In Page classes, when you load / start web, it is uncommon to save fixed main url.
Value flexibility is a must, when your web application under test, have different main url, dependence on environmnent (DEV, QA, SIT, …, PROD)
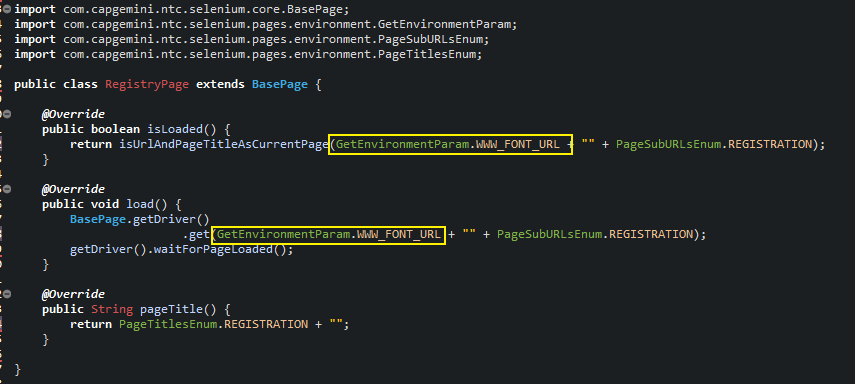
Instead of hard coded main url variable, you build your Page classe with dynamic variable.
Example of dynamic variable GetEnvironmentParam.WWW_FONT_URL
How to create / update system environment
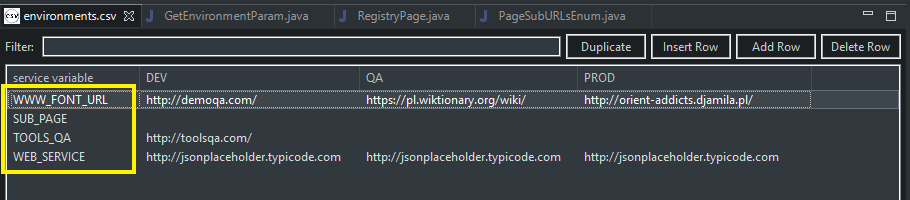
External file with variable values
Dynamic variable values are stored under path mrchecker-app-under-test\src\resources\enviroments\environments.csv.
NOTE: As environments.csv is Comma-separated file, please be aware of any edition and then save it under Excel.
Encrypting sensitive data
Some types of data you might want to store as environment settings are sensitive in nature (e.g. passwords). You might not want to store them (at least not in their plaintext form) in your repository. To be able to encrypt sensitive data you need to do following:
-
Create a secret (long, random chain of characters) and store it under mrchecker-app-under-test\src\resources\secretData.txt. Example:
LhwbTm9V3FUbBO5Tt5PiTUEQrXGgWrDLCMthnzLKNy1zA5FVTFiTdHRQAyPRIGXmsAjPUPlJSoSLeSBM -
Exclude the file from being checked into the git repository by adding it to git.ignore. You will need to pass the file over a different channel among your teammates.
-
Encrypt the values before putting them into the environments.csv file by creating following script (put the script where your jasypt library resides, e.g. C:\MrChecker_Test_Framework\m2\repository\org\jasypt\jasypt\1.9.2):
@ECHO OFF

set SCRIPT_NAME=encrypt.bat
set EXECUTABLE_CLASS=org.jasypt.intf.cli.JasyptPBEStringEncryptionCLI
set EXEC_CLASSPATH=jasypt-1.9.2.jar
if "%JASYPT_CLASSPATH%" == "" goto computeclasspath
set EXEC_CLASSPATH=%EXEC_CLASSPATH%;%JASYPT_CLASSPATH%

:computeclasspath
IF "%OS%" == "Windows_NT" setlocal ENABLEDELAYEDEXPANSION
FOR %%c in (%~dp0..\lib\*.jar) DO set EXEC_CLASSPATH=!EXEC_CLASSPATH!;%%c
IF "%OS%" == "Windows_NT" setlocal DISABLEDELAYEDEXPANSION

set JAVA_EXECUTABLE=java
if "%JAVA_HOME%" == "" goto execute
set JAVA_EXECUTABLE="%JAVA_HOME%\bin\java"

:execute
%JAVA_EXECUTABLE% -classpath %EXEC_CLASSPATH% %EXECUTABLE_CLASS% %SCRIPT_NAME% %*
-
Encrypt the values by calling
.\encrypt.bat input=someinput password=secret

----ENVIRONMENT-----------------

Runtime: Oracle Corporation Java HotSpot(TM) 64-Bit Server VM 25.111-b14


----ARGUMENTS-------------------

input: someinput
password: secret


----OUTPUT----------------------

JN3nOFol2GMZoUxR5z2wI2qdipcNH1UD
-
Mark the value as encrypted by adding a prefix 'ENC(' and suffix ')' like:
ENC(JN3nOFol2GMZoUxR5z2wI2qdipcNH1UD)
Bridge between external file nad Page class
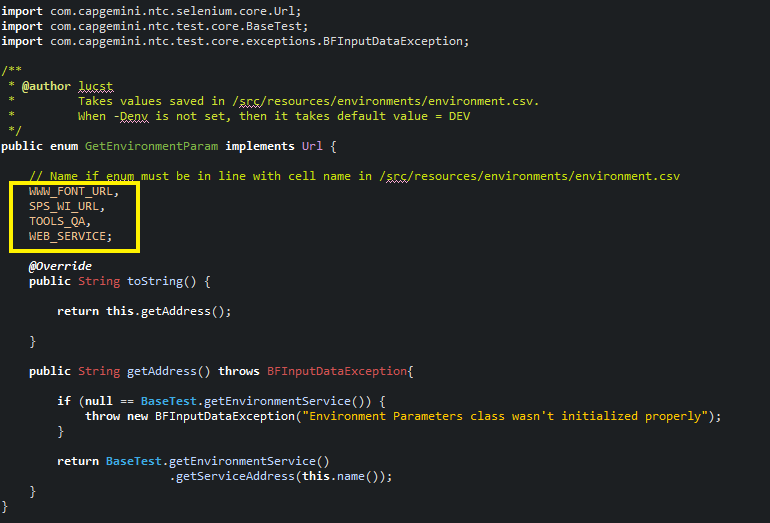
To map values from external file with Page class you ought to use class GetEnvironmentParam.
Therefore when you add new variable (row) in environments.csv you might need to add this variable to GetEnvironmentParam.
Run test case with system environment
To run test case with system environment, please use:
-
-Denv=<NameOfEnvironment>
-
<NameOfEnvironment> is taken as column name from file mrchecker-app-under-test\src\test\resources\enviroments\environments.csv
Command Line
mvn test site -Dtest=RegistryPageTest -Denv=DEV
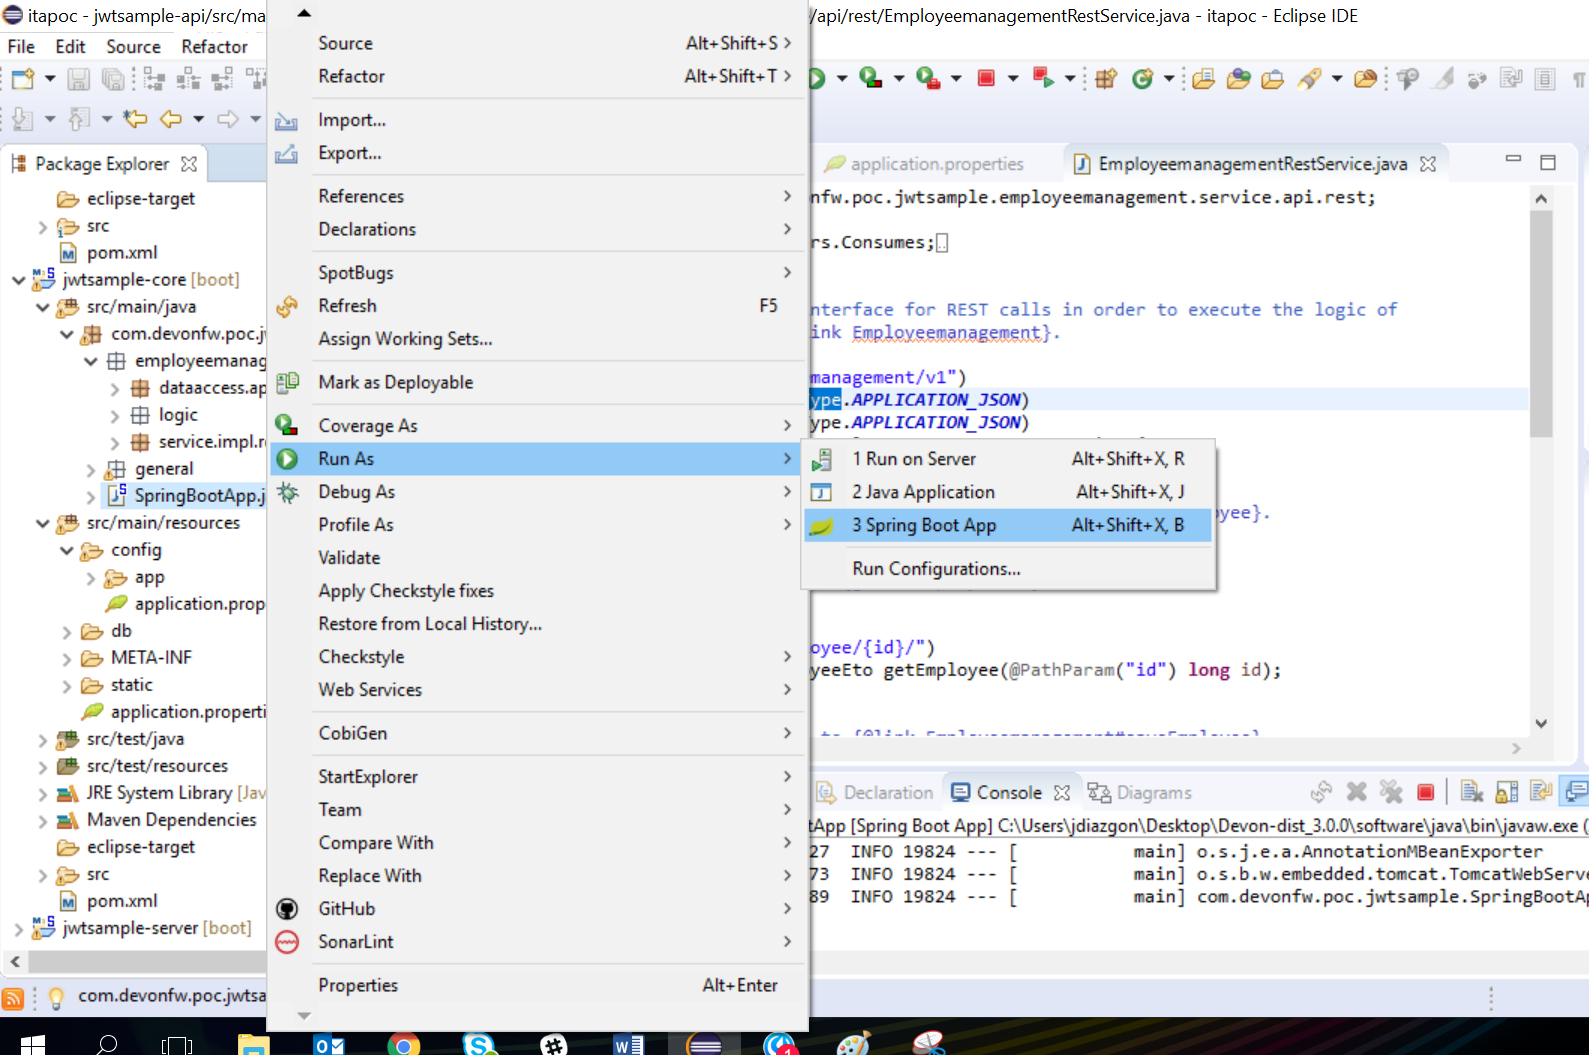
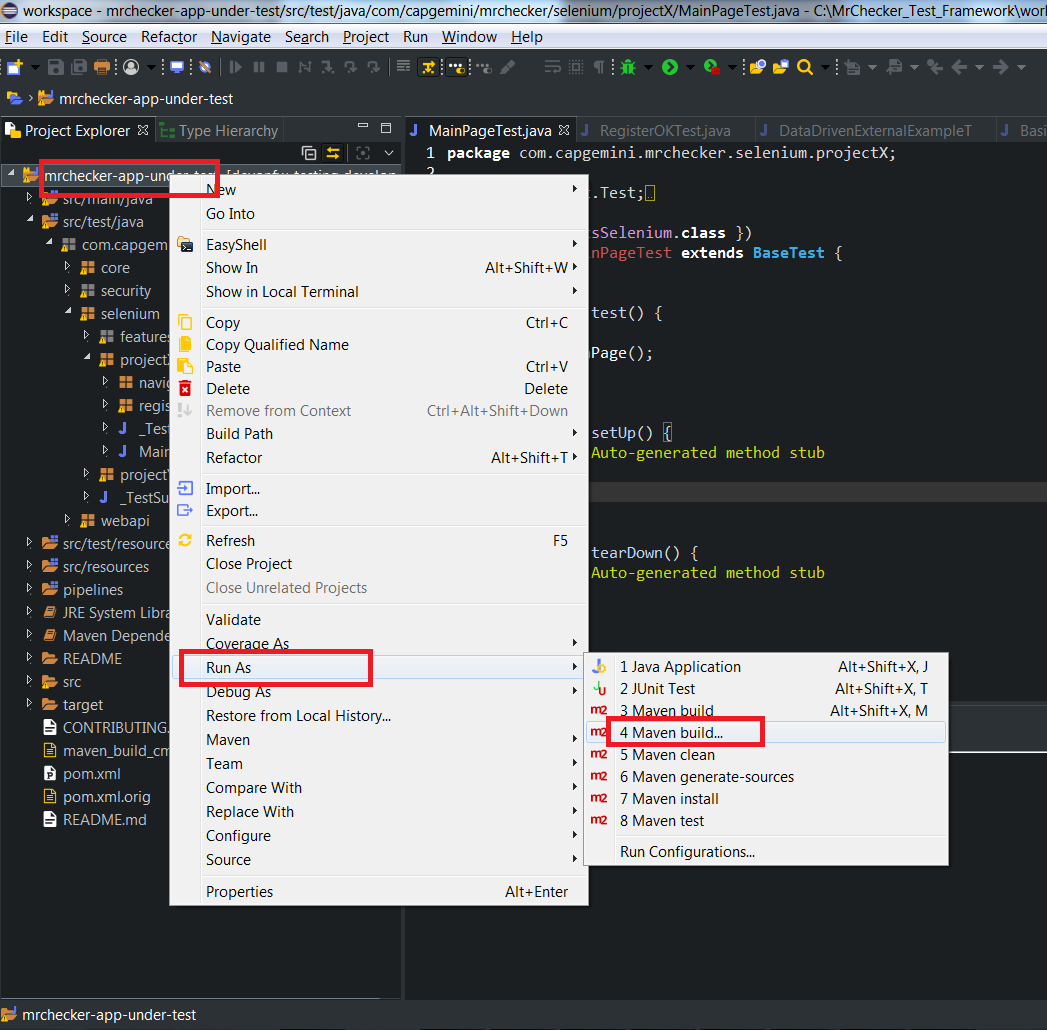
Eclipse


System under test environments

-
Quality assurance or QA is a way of preventing mistakes or defects in the manufactured products and avoiding problems when delivering solutions or services to customers which ISO 9000 defines as "part of quality management focused on providing confidence that quality requirements will be fulfilled".
-
System integration testing or SIT is a high-level software testing process in which testers verify that all related systems maintain data integrity and can operate in coordination with other systems in the same environment. The testing process ensures that all sub-components are integrated successfully to provide expected results.
-
Development or Dev testing is performed by the software developer or engineer during the construction phase of the software development life-cycle. Rather than replace traditional QA focuses, it augments it. Development testing aims to eliminate construction errors before code is promoted to QA; this strategy is intended to increase the quality of the resulting software as well as the efficiency of the overall development and QA process.
-
Prod If the customer accepts the product, it is deployed to a production environment, making it available to all users of the system.

How to use system environment
In Page classes, when you load / start web, it is uncommon to save fixed main url.
Value flexibility is a must, when your web application under test has different main url, depending on the environmnent (DEV, QA, SIT, …, PROD)
Instead of hard coded main url variable, you build your Page classes with dynamic variable.
An example of dynamic variable GetEnvironmentParam.WWW_FONT_URL
How to create / update system environment
External file with variable values
Dynamic variable values are stored under mrchecker-app-under-test\src\resources\enviroments\environments.csv.
NOTE: As environments.csv is a comma-separated file, please be careful while editing and then save it under Excel.
Encrypting sensitive data
Some types of data you might want to store as environment settings are sensitive in nature (e.g. passwords). You might not want to store them (at least not in their plaintext form) in your repository. To be able to encrypt sensitive data you need to do following:
-
Create a secret (long, random chain of characters) and store it under mrchecker-app-under-test\src\resources\secretData.txt. Example:
LhwbTm9V3FUbBO5Tt5PiTUEQrXGgWrDLCMthnzLKNy1zA5FVTFiTdHRQAyPRIGXmsAjPUPlJSoSLeSBM -
Exclude the file from being checked into the git repository by adding it to git.ignore. You will need to pass the file over a different channel among your teammates.
-
Encrypt the values before putting them into the environments.csv file by creating following script (put the script where your jasypt library resides, e.g. C:\MrChecker_Test_Framework\m2\repository\org\jasypt\jasypt\1.9.2):
@ECHO OFF

set SCRIPT_NAME=encrypt.bat
set EXECUTABLE_CLASS=org.jasypt.intf.cli.JasyptPBEStringEncryptionCLI
set EXEC_CLASSPATH=jasypt-1.9.2.jar
if "%JASYPT_CLASSPATH%" == "" goto computeclasspath
set EXEC_CLASSPATH=%EXEC_CLASSPATH%;%JASYPT_CLASSPATH%

:computeclasspath
IF "%OS%" == "Windows_NT" setlocal ENABLEDELAYEDEXPANSION
FOR %%c in (%~dp0..\lib\*.jar) DO set EXEC_CLASSPATH=!EXEC_CLASSPATH!;%%c
IF "%OS%" == "Windows_NT" setlocal DISABLEDELAYEDEXPANSION

set JAVA_EXECUTABLE=java
if "%JAVA_HOME%" == "" goto execute
set JAVA_EXECUTABLE="%JAVA_HOME%\bin\java"

:execute
%JAVA_EXECUTABLE% -classpath %EXEC_CLASSPATH% %EXECUTABLE_CLASS% %SCRIPT_NAME% %*
-
Encrypt the values by calling
.\encrypt.bat input=someinput password=secret

----ENVIRONMENT-----------------

Runtime: Oracle Corporation Java HotSpot(TM) 64-Bit Server VM 25.111-b14


----ARGUMENTS-------------------

input: someinput
password: secret


----OUTPUT----------------------

JN3nOFol2GMZoUxR5z2wI2qdipcNH1UD
-
Mark the value as encrypted by adding a prefix 'ENC(' and suffix ')' like:
ENC(JN3nOFol2GMZoUxR5z2wI2qdipcNH1UD)

Bridge between external file nad Page class
To map values from external file with Page class you ought to use class GetEnvironmentParam
Therefore when you add new variable (row) in environments.csv you might need to add this variable to GetEnvironmentParam.
Run test case with system environment
To run test case with system environment, please use: * -Denv=\<NameOfEnvironment\> * \<NameOfEnvironment\> is taken as column name from file mrchecker-app-under-test\src\test\resources\enviroments\environments.csv
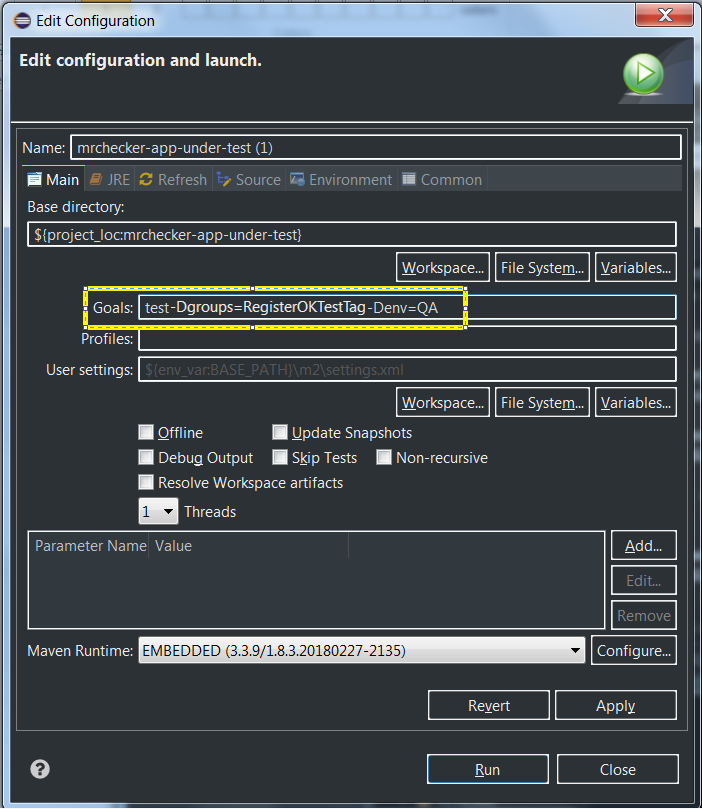
Since mrchecker-core-module version 5.6.2.1
Command Line
mvn test site -Dgroups=RegistryPageTestTag -Denv=DEV
Eclipse
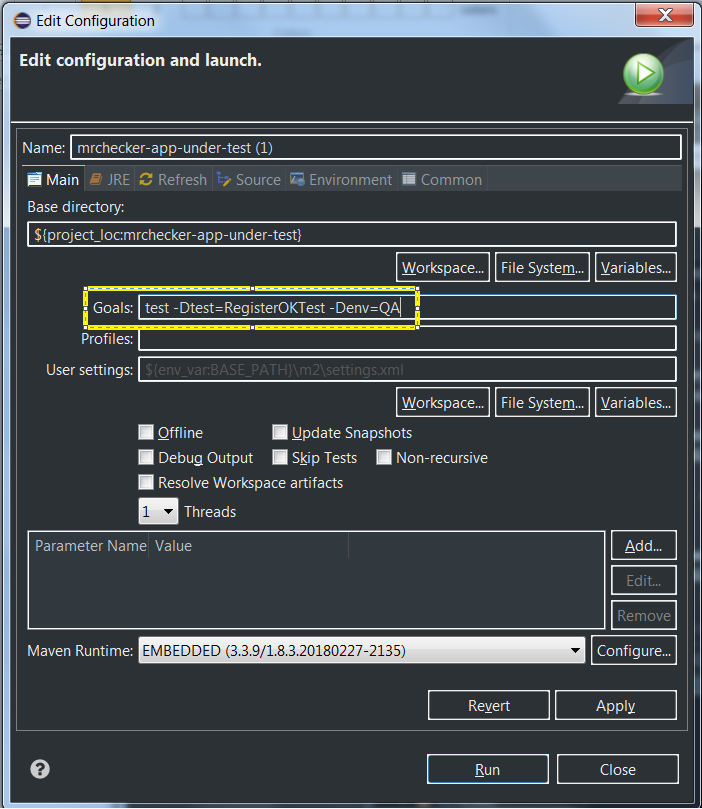
Prior to mrchecker-core-module version 5.6.2.1
Command Line
mvn test site -Dtest=RegistryPageTest -Denv=DEV
Eclipse
Selenium Module
Selenium Test Module
What is MrChecker E2E Selenium Test Module

Selenium Structure
Framework Features
-
Construction of Framework Page Class
-
Every Page class must extend BasePage
-
What are
isLoaded(),load()andpageTitle()for -
How to create selector variable -
private static final By ButtonOkSelector = By.Css(…) -
How to prepare an 'everlasting' selector
-
Method/action naming convention
-
Why we should use
findElementDynamic()andfindElementQuietly()instead of classic SeleniumfindElement -
List of well-rounded groups of user friendly actions (
ElementButton,ElementCheckbox,ElementInput, etc.) -
Verification points of well-defined Page classes and Test classes
-
-
Run on different browsers: Chrome, Firefox, IE, Safari, Edge
-
Run with full range of resolution (mobile, desktop): Testing responsible Design Webpage
How to start?
Read: My first Selenium Test
Selenium Best Practices
Selenium UFT Comparison
Selenium Structure
What is Selenium
Selenium is a framework for testing browser applications. The test automation supports:
-
Frequent regression testing
-
Repeating test case executions
-
Documentation of test cases
-
Finding defects
-
Multiple Browsers
The Selenium testing framework consists of multiple tools:
-
Selenium IDE
The Selenium Integrated Development Environment is a prototyping tool for building test scripts. It is a Firefox Plugin and provides an easy-to-use interface for developing test cases. Additionally, Selenium IDE contains a recording feature, that allows the user to record user inputs that can be automatically re-executed in future.
-
Selenium 1
Selenium 1, also known as Selenium RC, commands a Selenium Server to launch and kill browsers, interpreting the Selenese commands passed from the test program. The Server acts as an HTTP proxy. This tool is deprecated.
-
Selenium 2
Selenium 2, also known as Selenium WebDriver, is designed to supply a well-designed, object-oriented API that provides improved support for modern advanced web-app testing problems.
-
Selenium 3.0
The major change in Selenium 3.0 is removing the original Selenium Core implementation and replacing it with one backed by WebDriver. There is now a W3C specification for browser automation, based on the Open Source WebDriver.
-
Selenium Grid
Selenium Grid allows the scaling of Selenium RC test cases, that must be run in multiple and potentially variable environments. The tests can be run in parallel on different remote machines.
Selenium on the Production Line
More information on Selenium on the Production Line can be found here.
tl;dr
The Production Line has containers running Chrome and Firefox Selenium Nodes. The communication with these nodes is accomplished using Selenium Grid.
Having issues using Selenium on the Production Line? Check the Production Line issue list, maybe it’s a known issue that can be worked around.
What is WebDriver
On the one hand, it is a very convenient API for a programmer that allows for interaction with the browser, on the other hand it is a driver concept that enables this direct communication.
A tester, through their test script, can command WebDriver to perform certain actions on the WAUT on a certain browser. The way the user can command WebDriver to perform something is by using the client libraries or language bindings provided by WebDriver.
By using the language-binding client libraries, a tester can invoke browser-specific implementations of WebDriver, such as Firefox Driver, IE Driver, Opera Driver, and so on, to interact with the WAUT of the respective browser. These browser-specific implementations of WebDriver will work with the browser natively and execute commands from outside the browser to simulate exactly what the application user does.
After execution, WebDriver will send the test result back to the test script for developer’s analysis.
What is Page Object Model?
Creating Selenium test cases can result in an unmaintainable project. One of the reasons is that too much duplicated code is used. Duplicated code could result from duplicated functionality leading to duplicated usage of locators. The main disadvantage of duplicated code is that the project is less maintainable. If a locator changes, you have to walk through the whole test code to adjust locators where necessary. By using the page object model we can make non-brittle test code and reduce or eliminate duplicate test code. In addition, it improves the readability and allows us to create interactive documentation. Last but not least, we can create tests with less keystroke. An implementation of the page object model can be achieved by separating the abstraction of the test object and the test scripts.
Basic Web elements
This page will provide an overview of basic web elements.
| Name | Method to use element |
|---|---|
Form: Input Text |
|
Form: Label |
|
Form: Submit Button |
|
Page: Button |
|
Checkbox |
|
Radio |
|
Elements (Tabs, Cards, Account, etc.) |
|
Dropdown List |
|
Link |
- |
Combobox |
|
Comparision how picking value from checkbox can be done:
-
by classic Selenium atomic actions
-
by our enhanced Selenium wrapper
Classic Selenium atomic actions
List<WebElement> checkboxesList = getDriver()
                .findElements(selectorHobby);
WebElement currentElement;
for (int i = 0; i < checkboxesList.size(); i++) {
    currentElement = checkboxesList.get(i);
    if (currentElement.getAttribute("value")
                    .equals(hobby.toString()) && currentElement.isSelected() != true)
                        {
        currentElement.click();
            }
}
Enhanced Selenium in E2E test framework
getDriver().elementCheckbox(selectorHobby)
				.setCheckBoxByValue(hobby.toString());
Framework Features
Page Class
Page Object Models allow for the representation of a webpage as a Java Class. The class contains all required web elements like buttons, textfields, labels, etc. When initializing a new project, create a new package to store the Page Object Models in.
Initialization
Source folder: allure-app-under-test/src/main/java
Name: com.example.selenium.pages.YOUR_PROJECT
Classes being created inside of this new package have to extend the BasePage class. As a result, a few abstract methods from BasePage have to be implemented.
public class DemoPage extends BasePage {

	@Override
	public boolean isLoaded() {

	}

	@Override
	public void load() {

	}

	@Override
	public String pageTitle() {

	}
}
The example above demonstrates a minimum valid Page Object class with all required methods included.
The inherited method isLoaded() can be used to check if the current Page Object Model has been loaded correctly. There are multiple ways to verify a correctly loaded page. One example would be to compare the actual page title with the expected page title.
public boolean isLoaded() {
	if(getDriver().getTitle().equals("EXPECTED_TITLE")) {
		return true;
	}
	return false;
}
The method load() can be used to tell the webdriver to load a specific page.
public void load() {
	getDriver().get("http://SOME_PAGE");
}
The pageTitle() method returns a String containing the page title.
Creating a selector variable
To initialize web elements, a large variety of selectors can be used.
We recommend creating a private and constant field for every web element you’d like to represent in Java. Use the guide above to find the preferred selector and place it in the code below at "WEB_ELEMENT_SELECTOR".
private static final By someWebElementSelector = By.CSS("WEB_ELEMENT_SELECTOR");
As soon as you create the selector above, you can make use of it to initialize a WebElement object.
WebElement someWebElement = getDriver().findDynamicElement(someWebElementSelector);
Note: The examples displayed in the cssSelector.docx file use the Selenium method driver.findElement() to find elements. However, using this framework we recommend findDynamicElement() or findQuietlyElement().findDynamicElement() allows waiting for dynamic elements, for example buttons that pop up.
Creating a page method
To interact with the page object, we recommend creating methods for each action.
public void enterGoogleSearchInput(String query) {
	...
}
Creating a method like the one above allows the test case to run something like googleSearchPage.enterGoogleSearchInput("Hello") to interact with the page object.
Naming Conventions
For code uniformity and readability, we provide a few method naming conventions.
| Element | Action | Name (example) |
|---|---|---|
Form: Input text |
enter |
|
is (label) |
|
|
is (value) |
|
|
get |
|
|
Form: Label |
get |
|
is (value) |
|
|
is (label) |
|
|
Form: Submit Button |
submit |
|
is |
|
|
Page: Button |
click |
|
is |
|
|
Checkbox |
set |
|
unset |
|
|
is (present) |
|
|
is (value) |
|
|
Radio |
set |
|
is (present) |
|
|
is (visible) |
|
|
get |
|
|
Elements (Tabs, Cards, Account, etc.) |
click |
|
is |
|
|
Dropdown List |
select |
|
unselect |
|
|
multiple select |
|
|
is (list) |
|
|
is (element present) |
|
|
is (element selected) |
|
|
Link |
click |
|
is |
|
|
Combobox |
select |
|
is (present) |
|
|
is (contain) |
|
|
Element Attribute |
get |
|
get |
|
A css selector is used to select elements from an HTML page.
Selection by element tag, class or id are the most common selectors.
<p class='myText' id='123'>
This text element (p) can be found by using any one of the following selectors:
The HTML element: "p". Note: in practical use this will be too generic, if a preceding text section is added, the selected element will change.
The class attribute preceded by ".": ".myText"
The id attribute preceded by "#": "#123"
Using other attributes
When a class or an id attribute is not sufficient to identify an element, other attributes can be used as well, by using "[attribute=value]": For example:
<a href='https://ns.nl/example.html'>
This can be selected by using the entire value: "a[href='https://ns.nl/example.html'\]". For selecting links starting with, containing, ending with see the list below.
Using sub-elements
The css selectors can be stacked, by appending them:
<div id='1'><a href='ns.nl'></div>
<div id='2'><a href='nsinternational.nl'></div>
In the example above, the link element to nsinternational can be obtained with: "#2 a".
When possible avoid
-
Using paths of commonly used HTML elements within the containers (HTML: div). This will cause failures when a container is added, a common occurrence during development, e.g. "div div p". Use class or id instead, if those are not available, request them to be added in the production code.
-
Magic order numbers. It is possible to get the second text element in its parent container by using the selector "p:nth-child(2)". If the items are representing different items, ask the developer to add specific attributes. It is also possible to request all items, with a selector similar to ".myList li", and iterate through them later.
List
A good list with CSS Selectors can be found at W3Schools:
https://www.w3schools.com/cssref/css_selectors.asp
Selenium UFT Comparison
| Subject | HP UFT | HP LeanFT | Selenium | Selenium IDE |
|---|---|---|---|---|
Language |
VBScript |
Same as Selenium |
Supports several languages. Java |
Javascript |
Learning curve |
Based on VBScript which is relatively easy to learn |
Less intuitive, more coding knowledge necessary |
Less intuitive, more coding skills necessary |
Record/playback possible. Generated code difficult to maintain |
Project type |
Traditional |
Agile |
Agile |
Agile |
User oriented |
More Tester |
More Developer |
More Developer |
More Tester |
Object recognition |
Test object identification and storage in object repository |
Same as UFT |
With Firebug |
Same as SE |
Customizations |
Only the available standard. No custimization |
Same as UFT |
Lots of customizations possible |
Fewer then SE |
Framework |
Needed. Exists in ATaaS |
Needed. Integration with Fitnesse, Cucumber, Gauche |
No Framework. Limited capabilities of the tool. |
|
Operating System support |
Runs on Windows |
Runs on Windows |
Multiple OS support. With Grid: testing on multiple devices at same time |
Plugin for Firefox |
Application coverage |
Many |
Many |
Web only |
Web only |
Multiple browsers |
In UFT 12.5 available |
In 12.5 available |
Multiple tests in multiple browser windows at once and faster support for new browser versions |
Multiple tests in multiple browser windows at once and faster support for new browser versions |
System Load |
High system load (RAM & CPU usage) |
Lower load than HP UFT? |
Lower load than HP UFT |
Lower load than HP UFT |
ALM integration |
With HP ALM – full integration |
Jira, Jenkins Not with ALM tool |
Same as SE |
|
Integration with other tools |
A lot can be built, but many are already covered. |
More than UFT. |
Freeware and can be integrated with different open source tools |
Freeware and can be integrated with different open source tools |
Addins |
Add-ins necessary to access all capabilities of the tool – license related |
Same as UFT |
See integration with other tools |
See integration with other tools |
Reporting |
Complete, link to ALM |
Same as UFT |
No native mechanism for generating reports, but multiple plugins available for reporting |
No native mechanism for generating reports, but multiple plugins available for reporting |
Support |
HP full support |
Same as UFT |
Limited support as it is open source |
Limited support as it is open source |
License costs |
About 17K – Capgemini price 5K. Included in the S2 service charge |
Same price as HP UFT |
Free |
Free limited functionality (no iterations / conditional statements) |
iVAL Service |
ATaaS |
Not in a S2 service |
Not in a S2 service |
Not in a S2 service |
Bold for key differentiators.
Projects also choose an available resource and the knowledge of that resource.
Both: Framework determines the quality of automation. Needs to be set up by someone with experience with the tool
Run on different browsers
To execute each test with a chosen installed browser, specific arguments are required in Run configuration.
It is necessary to enter -Dbrowser= with browser parameter name as an argument (in 'Arguments' tab):
firefox ie phantomjs chrome chromeheadless For example: -Dbrowser=ie
_-ea_ should be entered as an argument to restore default settings.
Browser options
To run a browser with specific options during runtime, please use
-DbrowserOptions="< options >"
> mvn test -DbrowserOptions="param1"
> mvn test -DbrowserOptions="param1=value1"
examples:
-
One parameter -DbrowserOptions="headless"
-
One parameter -DbrowserOptions="--incognito"
-
Many parameters -DbrowserOptions="headless;param1=value1;testEquals=FirstEquals=SecondEquals;--testMe"
List of options/capabilites supported by:
Run with full range of resolution
In order to execute tests in different browser resolutions, it is required to provide these resolutions as a test parameter.
Test example with resolutions included may be found in ResolutionTest test class
Example of resolution notation is available in ResolutionEnum class

Test with given resolution parameters will be launched as many times as the number of resolutions provided.
Selenium Best Practices
The following table displays a few best practices that should be taken into consideration when developing Selenium test cases.
| Best Practices | Description |
|---|---|
"Keep it Simple" |
Do not force use every Selenium feature available - Plan before creating the actual test cases |
Using Cucumber |
Cucumber can be used to create initial testcases for further decision making |
Supporting multiple browsers |
Test on multiple browsers (in parallel, if applicable) if the application is expected to support multiple environments |
Test reporting |
Make use of test reporting modules like Junit which is included in the framework |
Maintainability |
Always be aware of the maintainability of tests - You should always be able to adapt to changes |
Testing types |
Which tests should be created? Rule of thumb: 70% Unit test cases, 20% Integration test cases and 10% UI Test cases |
Test data |
Consider before actually developing tests and choosing tools: Where to get test data from, how to reset test data |
Web API Module
Service Virtualization
Is it doable to keep pace in QA with today’s software agile approach?
DevOps + Microservices + Shift left + Time to Market == ? Service virtualization ?
Test pyramid

What is service virtualization
Service Virtualization has become recognized as one of the best ways to speed up testing and accelerate your time to market.
Service virtualization lets you automatically execute tests even when the application under test’s dependent system components (APIs, third-party applications, etc.) cannot be properly accessed or configured for testing. By simulating these dependencies, you can ensure that your tests will encounter the appropriate dependency behaviour and data each and every time that they execute.
Service virtualization is the simulation of interfaces – not the virtualization of systems.
According to Wikipedia’s service virtualization entry: Service virtualization emulates the behaviour of software components to remove dependency constraints on development and testing teams. Such constraints occur in complex, interdependent environments when a component connected to the application under test is:
-
Not yet completed
-
Still evolving
-
Controlled by a third-party or partner
-
Available for testing only in a limited capacity or at inconvenient times
-
Difficult to provision or configure in a test environment
-
Needed for simultaneous access by different teams with varied test data setup and other requirements
-
Restricted or costly to use for load and performance testing
For instance, instead of virtualizing an entire database (and performing all associated test data management as well as setting up the database for every test session), you monitor how the application interacts with the database, then you emulate the related database behaviour (the SQL queries that are passed to the database, the corresponding result sets that are returned, and so forth).
Mocks, stubs and virtual services
The most commonly discussed categories of test doubles are mocks, stubs and virtual services.
Stub: a minimal implementation of an interface that normally returns hardcoded data that is tightly coupled to the test suite. It is most useful when the suite of tests is simple and keeping the hardcoded data in the stub is not an issue. Some stubs are handwritten; some can be generated by tools. A stub is normally written by a developer for personal use. It can be shared with testers, but wider sharing is typically limited by interoperability issues related to software platform and deployment infrastructure dependencies that were hardcoded. A common practice is when a stub works in-process directly with classes, methods, and functions for the unit, module, and acceptance testing. Some developers will say that a stub can also be primed, but you cannot verify an invocation on a stub. Stubs can also be communicating "over the wire", for example, HTTP, but some would argue that they should be called virtual services in that case.
Mock: a programmable interface observer, that verifies outputs against expectations defined by the test. It is frequently created using a third party library, for example in Java that is Mockito, JMock or WireMock. It is most useful when you have a large suite of tests and a stub will not be sufficient because each test needs a different data set up and maintaining them in a stub would be costly. The mock lets us keep the data set-up in the test. A mock is normally written by a developer for personal use but it can be shared with testers. However, wider sharing is typically limited by interoperability issues related to software platform and deployment infrastructure dependencies that were hardcoded. They are most often work-in-progress directly with classes, methods, and functions for a unit, module, and acceptance testing. Mock provides responses based on a given request satisfying predefined criteria (also called request or parameter matching). A mock also focuses on interactions rather than state so mocks are usually stateful. For example, you can verify how many times a given method was called or the order of calls made to a given object.
Virtual service: a test double often provided as a Software-as-a-Service (SaaS), is always called remotely, and is never working in-process directly with methods or functions. A virtual service is often created by recording traffic using one of the service virtualization platforms instead of building the interaction pattern from scratch based on interface or API documentation. A virtual service can be used to establish a common ground for teams to communicate and facilitate artefact sharing with other development teams as well as testing teams. A virtual service is called remotely (over HTTP, TCP, etc.) normally supports multiple protocols (e.g. HTTP, MQ, TCP, etc.), while a stub or mock normally supports only one. Sometimes virtual services will require users to authorize, especially when deployed in environments with enterprise-wide visibility. Service virtualization tools used to create virtual services will most often have user interfaces that allow less tech-savvy software testers to hit the ground running, before diving into the details of how specific protocols work. They are sometimes backed by a database. They can also simulate non-functional characteristics of systems such as response times or slow connections. You can sometimes find virtual services that provide a set of stubbed responses for given request criteria and pass every other request to a live backend system (partial stubbing). Similar to mocks, virtual services can have quite complex request matchers, that allow having one response returned for many different types of requests. Sometimes, virtual services simulate system behaviours by constructing parts of the response based on request attributes and data.
It is often difficult to say definitely which of the following categories a test double fits into. They should be treated as a spectrum rather than strict definitions.
Plug in service virtualization
Classic application structure
This is a quite common application structure, where we have any of the following in Application Under Test (AUT):
-
UI / GUI
-
WebAPI
-
3rd party service
Classic application structure with virtualization
This classic application is quite fragile for development and/or test process. Especially so, if the component (WebAPI) connected to the Application Under Test is:
-
Not yet completed
-
Still evolving
-
Controlled by a third-party or partner
-
Available for testing only in limited capacity or at inconvenient times
-
Difficult to provision or configure in a test environment
-
Needed for simultaneous access by different teams with varied test data setup and other requirements
-
Restricted or costly to use for load and performance testing
You can find the full list of such "classic application structure" limitations here What-is-service-virtualization.
*Service virtualization is the key solution to address such a list of impediments. *
For simplicity, AUT connects to other components by TCP/IP protocol. Therefore AUT has an IP address and port number where given components operate. To plug in virtualization server, the author of AUT ought to switch IP and port to "proxy server" instead of real endpoint component (WebAPI) . Finally, "proxy server" maps requests come from AUT with either virtual assets or real endpoint component (WebAPI). How do maps work in such a "proxy server"? Have a look here How-to-make-virtual-asset
Therefore AUT is build either with:
-
switchable property file acquired on startup
or
-
"on the fly" operation to change IP and ports of connected components.
Classic APP structure with full scope - Binding in service virtualization

How to make a virtual asset
This can be done in four ways:
-
Record all traffic (Mappings and Responses) that comes through proxy - by UI
-
Record all traffic (Mappings and Responses) that comes through proxy - by Code
-
Create Mappings and Responses manually by text files
-
Create Mappings and Responses manually by code
Record all traffic (Mappings and Responses) that comes through proxy - UI
Full article here Wiremock record-playback.
First, start an instance of WireMock running standalone. Once that’s running, visit the recorder UI page at http://localhost:8080/__admin/recorder (assuming you started WireMock on the default port of 8080).
Enter the URL you wish to record from in the target URL field and click the Record button. You can use http://example.mocklab.io to try it out.
Now you need to make a request through WireMock to the target API so that it can be recorded. If you’re using the example URL, you can generate a request using curl:
$ curl http://localhost:8080/recordables/123
Now click stop. You should see a message indicating that one stub was captured.
You should also see that a file has been created called something like recordables_123-40a93c4a-d378-4e07-8321-6158d5dbcb29.json under the mappings directory created when WireMock started up, and that a new mapping has appeared at http://localhost:8080/__admin/mappings.
Requesting the same URL again (possibly disabling your wifi first if you want a firm proof) will now serve the recorded result:
$ curl http://localhost:8080/recordables/123

{
"message": "Congratulations on your first recording!"
}
Record all traffic (Mappings and Responses) that comes through proxy - by Code
An example of how such a record can be achieved
@Test
public void startRecording() {

    SnapshotRecordResult recordedMappings;

    DriverManager.getDriverVirtualService()
            .start();
    DriverManager.getDriverVirtualService()
            .startRecording("http://example.mocklab.io");
    recordedMappings = DriverManager.getDriverVirtualService()
            .stopRecording();

    BFLogger.logDebug("Recorded messages: " + recordedMappings.toString());

}
Create Mappings and Responses manually by text files
EMPTY
Create Mappings and Responses manually by code
Link to full file structure: REST_FarenheitToCelsiusMethod_Test.java
public void startVirtualServer() {

    // Start Virtual Server
    WireMockServer driverVirtualService = DriverManager.getDriverVirtualService();

    // Get Virtual Server running http and https ports
    int httpPort = driverVirtualService.port();
    int httpsPort = driverVirtualService.httpsPort();

    // Print is Virtual server running
    BFLogger.logDebug("Is Virtual server running: " + driverVirtualService.isRunning());

    String baseURI = "http://localhost";
    endpointBaseUri = baseURI + ":" + httpPort;
}
REST_FarenheitToCelsiusMethod_Test.java
public void activateVirtualAsset() {
    /*
    * ----------
    * Mock response. Map request with virtual asset from file
    * -----------
    */
    BFLogger.logInfo("#1 Create Stub content message");
    BFLogger.logInfo("#2 Add resource to virtual server");
    String restResourceUrl = "/some/thing";
    String restResponseBody = "{ \"FahrenheitToCelsiusResponse\":{\"FahrenheitToCelsiusResult\":37.7777777777778}}";

    new StubREST_Builder //For active virtual server ...
            .StubBuilder(restResourceUrl) //Activate mapping, for this Url AND
            .setResponse(restResponseBody) //Send this response  AND
            .setStatusCode(200) // With status code 200 FINALLY
            .build(); //Set and save mapping.

}
Link to full file structure: StubREST_Builder.java
Source link to How to create Stub.
StubREST_Builder.java
public class StubREST_Builder {

    // required parameters
    private String endpointURI;

    // optional parameters
    private int statusCode;

    public String getEndpointURI() {
        return endpointURI;
    }

    public int getStatusCode() {
        return statusCode;
    }

    private StubREST_Builder(StubBuilder builder) {
        this.endpointURI = builder.endpointURI;
        this.statusCode = builder.statusCode;
    }

    // Builder Class
    public static class StubBuilder {

        // required parameters
        private String endpointURI;

        // optional parameters
        private int     statusCode  = 200;
        private String  response    = "{ \"message\": \"Hello\" }";

        public StubBuilder(String endpointURI) {
            this.endpointURI = endpointURI;
        }

        public StubBuilder setStatusCode(int statusCode) {
            this.statusCode = statusCode;
            return this;
        }

        public StubBuilder setResponse(String response) {
            this.response = response;
            return this;
        }

        public StubREST_Builder build() {

            // GET
            DriverManager.getDriverVirtualService()
                    .givenThat(
                            // Given that request with ...
                            get(urlMatching(this.endpointURI))
                                    .withHeader("Content-Type", equalTo(ContentType.JSON.toString()))
                                    // Return given response ...
                                    .willReturn(aResponse()
                                            .withStatus(this.statusCode)
                                            .withHeader("Content-Type", ContentType.JSON.toString())
                                            .withBody(this.response)
                                            .withTransformers("body-transformer")));

            // POST
            DriverManager.getDriverVirtualService()
                    .givenThat(
                            // Given that request with ...
                            post(urlMatching(this.endpointURI))
                                    .withHeader("Content-Type", equalTo(ContentType.JSON.toString()))
                                    // Return given response ...
                                    .willReturn(aResponse()
                                            .withStatus(this.statusCode)
                                            .withHeader("Content-Type", ContentType.JSON.toString())
                                            .withBody(this.response)
                                            .withTransformers("body-transformer")));

            // PUT
            DriverManager.getDriverVirtualService()
                    .givenThat(
                            // Given that request with ...
                            put(urlMatching(this.endpointURI))
                                    .withHeader("Content-Type", equalTo(ContentType.JSON.toString()))
                                    // Return given response ...
                                    .willReturn(aResponse()
                                            .withStatus(this.statusCode)
                                            .withHeader("Content-Type", ContentType.JSON.toString())
                                            .withBody(this.response)
                                            .withTransformers("body-transformer")));

            // DELETE
            DriverManager.getDriverVirtualService()
                    .givenThat(
                            // Given that request with ...
                            delete(urlMatching(this.endpointURI))
                                    .withHeader("Content-Type", equalTo(ContentType.JSON.toString()))
                                    // Return given response ...
                                    .willReturn(aResponse()
                                            .withStatus(this.statusCode)
                                            .withHeader("Content-Type", ContentType.JSON.toString())
                                            .withBody(this.response)
                                            .withTransformers("body-transformer")));

            // CATCH any other requests
            DriverManager.getDriverVirtualService()
                    .givenThat(
                            any(anyUrl())
                                    .atPriority(10)
                                    .willReturn(aResponse()
                                            .withStatus(404)
                                            .withHeader("Content-Type", ContentType.JSON.toString())
                                            .withBody("{\"status\":\"Error\",\"message\":\"Endpoint not found\"}")
                                            .withTransformers("body-transformer")));

            return new StubREST_Builder(this);
        }
    }
}
Start a virtual server
The following picture presents the process of executing Smoke Tests in a virtualized environment:
Install docker service
If docker is not already installed on machine (this should be checked during C2C creation), install docker, docker-compose, apache2-utils, openssl (You can use script to install docker & docker-compose OR refer to this post and add Alias for this machine <C2C_Alias_Name>):
-
run the script
-
sudo apt-get install -y apache2-utils
Build a docker image
Dockerfile:
FROM docker.xxx.com/ubuntu:16.04
MAINTAINER Maintainer Name "maintainer@email.address"
LABEL name=ubuntu_java \
           version=v1-8.0 \
           base="ubuntu:16.04" \
           build_date="03-22-2018" \
           java="1.8.0_162" \
           wiremock="2.14.0" \
           description="Docker to use with Ubuntu, JAVA and WIREMOCK "

# Update and install the applications needed
COPY 80proxy /etc/apt/apt.conf.d/80proxy
RUN apt-get update
RUN apt-get install -y \
            wget \
            libfontconfig \
            unzip \
            zip
            ksh \
            curl \
            git

COPY wgetrc /etc/wgetrc

#Env parameters

### JAVA PART ###
#TO UPDATE:please verify url link to JDK http://www.oracle.com/technetwork/java/javase/downloads/jdk8-downloads-2133151.html
##Download and install JAVA JDK8
RUN mkdir /opt/jdk
RUN wget -qq --header "Cookie: oraclelicense=accept-securebackup-cookie" http://download.oracle.com/otn-pub/java/jdk/8u162-b12/0da788060d494f509bf8624735fa2f1/jdk-8u162-linux-x64.tar.gz && tar -zxf jdk-8u162-linux-x64.tar.gz -C /opt/jdk && rm jdk-8u162-linux-x64.tar.gz && update-alternatives --install /usr/bin/javac javac /opt/jdk/jdk1.8.0_162/bin/javac 100 && java -version && chmod 755 -R /opt/jdk/jdk1.8.0_162/
RUN java -version

##Add user
RUN useradd -u 29001 -g 100 srvpwiredev

##Add app
RUN mkdir -p -m 777 /app
COPY wiremock-standalone-2.14.0.jar /app/wiremock-standalone-2.14.0.jar

##Expose port
EXPOSE 8080

##Set workdir
WORKDIR /App

##Run app
CDM java -jar /app/wiremock-standalone-2.14.0.jar
Execute the following steps with a specified version to build a docker image and push it to the repository :
## Build image
sudo docker build -t docker.xxx.com/app/build/wiremock:v2.14.0.

## Push image
sudo docker login docker.xxx.com
sudo docker push docker.xxx.com/app/build/wiremock:v2.14.0.
Run docker image
To run a docker image, execute the following command:
sudo docker run -td -p 8080:8080 -v /home/wiremock/repo/app/docker/QA/mappings:/app/mappings -v /home/wiremock/repo/app/docker/QA/__files:/app/__files --restart always docker.xxx.com/app/build/wiremock:v2.14.0.
Where:
-p - publish a container’s port to the host
-v - bind mount a volume. WireMock server creates two directories under the current one: mappings and __files. It is necessary to mount directories with already created mappings and responses to make it work.
-restart always - restart policy to apply when a container exists
All of the parameters are described in: official docker documentation
Map requests with virtual assets
What is WireMock?
WireMock is an HTTP mock server. At its core it is a web server that can be primed to serve canned responses to particular requests (stubing) and that captures incoming requests so that they can be checked later (verification). It also has an assortment of other useful features including record/playback of interactions with other APIs, injection of faults and delays, simulation of stateful behaviour.
Full documentation can be found under the following xref:devonfw-guide/mrchecker.wiki/Who-Is-MrChecker/Test-Framework-Modules_ WireMock
Record / create virtual assets mappings
Record
WireMock can create stub mappings from requests it has received. Combined with its proxying feature, this allows you to "record" stub mappings from interaction with existing APIs.
Record and playback (Legacy): documentation
java -jar wiremock-standalone-2.16.0.jar --proxy-all="http://search.twitter.com" --record-mappings --verbose
Once it’s started and request is sent to it, it will be redirected to "http://search.twitter.com" and traffic (response) is saved to files in mappings and __files directories for further use.
Record and playback (New): documentation
Enable mappings in a virtual server
When the WireMock server starts, it creates two directories under the current one: mappings and __files. To create a stub, it is necessary to drop a file with a .json extension under mappings.
Run docker with mounted volumes
Mappings are in a repository. It is necessary to mount directories with already created mappings and responses to make it work:
sudo docker run -td -p 8080:8080 -v /home/wiremock/repo/app/docker/QA/mappings:/app/mappings -v /home/wiremock/repo/app/docker/QA/__files:/app/__files --restart always docker.xxx.com/app/build/wiremock:v2.14.0.
The description of how to build and run docker is available under: Docker run command description
Recorded mappings
Recorded mappings are kept in the project repository.
Create a user and map them to docker user
To enable the connection from Jenkins to Virtual Server (C2C), it is necessary to create a user and map them to docker group user. It can be done using the following command:
adduser -G docker -m wiremock
To set the password for a wiremock user:
passwd wiremock
Create SSH private and public keys for a wiremock user
SSH keys serve as a means of identifying yourself to an SSH server using public-key cryptography and challenge-response authentication. One immediate advantage this method has over traditional password is that you can be authenticated by the server without ever having to send your password over the network.
To create an SSH key, log in as wiremock (previously created user).
su wiremock
The .ssh directory is not by default created below user home directory. Therefore, it is necessary to create it:
mkdir ~/.ssh
Now we can proceed with creating an RSA key using ssh-keygen (a tool for creating new authentication key pairs for SSH):
ssh-keygen -t rsa
A key should be created under /.ssh/id_rsa Appending the public keys to authorized_keys:
wiremock@vc2crptXXXXXXXn:~/ssh$ cat id_rsa.pub >> authorized_keys
Install an SSH key in Jenkins
To add an SSH key to Jenkins, go to credentials in your job location. Choose the folder within credentials, then 'global credentials', 'Add credentials'. Fill in the fields. Finally, the entry should be created.
Build a Jenkins Groovy script
The description of how to use SSH Agent plugin in Jenkins pipeline can be found under: https://www.karthikeyan.tech/2017/09/ssh-agent-blue-ocean-via-jenkins.html
Example of use:
sshagent (credentials: [env.WIREMOCK_CREDENTIALS]) {
     sh """
         ssh -T -o StrictHostKeyChecking=no -l ${env.WIREMOCK_USERNAME} ${env.WIREMOCK_IP_ADDRESS} "docker container restart ${env.WIREMOCK_CONTAINER_NAME}"
     """
}
Where: env.WIREMOCK_CREDENTIALS is a credential id of previously created wiremock credentials. Now that it is present, we can execute commands on a remote machine, where in ssh command: env.WIREMOCK_USERNAME - user name of user connected with configured private key env.WIREMOCK_IP_ADDRESS - ip address of the machine where this user with this private key exists
Pull repository with virtual assets
To pull the repository on a remote machine, it is necessary to use the previously described SSH Agent plugin. An example of use:
sshagent (credentials: [env.WIREMOCK_CREDENTIALS]) {
withCredentials([usernamePassword(credentialsId: end.STASH_CREDENTIALS, passwordVariable: 'PASS', usernameVariable: 'USER')]) {
     sh """
         ssh -T -o StrictHostKeyChecking=no -l ${env.WIREMOCK_USERNAME} ${env.WIREMOCK_IP_ADDRESS} "cd ~/${env.APPLICATION_DIRECTORY_WIREMOCK}/${env.PROJET_HOME}; git fetch https://&USER:$PASS@${env.GIT_WITHOUT_HTTPS} ${env.GIT_BRANCH}; git reset --hard FETCH_HEAD; git clean -df"
      """
    }
}
Where:
withCredentials allows various kinds of credentials (secrets) to be used in idiosyncratic ways. Each binding will define an environment variable active within the scope of the step. Then the necessary commands are executed:
cd … - command will change from current directory to the specified directory with git repository
git fetch … ;git reset … ;git clean … - pull from GIT branch. Git pull or checkout are not used here to prevent the situation with wrong coding between Mac OSX/Linux etc.
PLEASE remember that when using this script for the first time, the code from previous block should be changed to:
stage("ssh-agent"){
        sshagent (credentials: [env.WIREMOCK_CREDENTIALS]) {
            withCredentials([usernamePassword(credentialsId: end.STASH_CREDENTIALS, passwordVariable: 'PASS', usernameVariable: 'USER')]) {
                sh """
                        ssh -T -o StrictHostKeyChecking=no -l ${env.WIREMOCK_USERNAME} ${env.WIREMOCK_IP_ADDRESS} "cd ~/${env.APPLICATION_DIRECTORY_WIREMOCK} ;git clone --depth=1 --branch=develop https://&USER:$PASS@${env.GIT_WITHOUT_HTTPS}"';
                """
    }
}
Install an application with Smoke environment
Update properties settings file
New settings file is pushed to the repository. Example configuration:
...
   <key>autocomplete</key>
   <string>http://server:port</string>
   <key>benefitsummary</key>
   <string>http://server:port</string>
   <key>checkscan</key>
   <string>http://server:port</string>
   <key>dpesb</key>
   <string>http://server:port</string>
...
Address of service (backend) should be changed to wiremock address as it is shown on listing to change the default route.
Build an application with updated properties file
New versions of application are prepared by Jenkins job.
Install an application on target properties file
Installation of an application is actually executed in a non-automated way using SeeTest environment.
UI tests
Run Jenkins job
Jenkinsfile:
// Jenkins parameters are overriding the properties below
def properties = [

          JENKINS_LABELS                                 : 'PWI_LINUX_DEV',
          APPLICATION_FOLDER                             : 'app_dir',
          PROJECT_HOME                                   : 'app_home_folder',

          //WIREMOCK
          WIREMOCK_CREDENTIALS                           : 'vc2crptXXXXXXn',
          WIREMOCK_USERNAME                              : 'wiremock',
          WIREMOCK_ADDRESS                               : 'http://vc2crptXXXXXXn.xxx.com:8080',
          WIREMOCK_IP_ADDRESS                            : '10.196.67.XXX',
          WIREMOCK_CONTAINER_NAME                        : 'wiremock',
          APPLICATION_DIRECTORY_WIREMOCK                 : 'repo',

          //GIT
          GIT_CREDENTIALS                                : 'e47742cc-bb66-4321-2341-a2342er24f2',
          GIT_BRANCH                                     : 'develop',
          GIT_SSH                                        : 'ssh://git@stash.xxx.com/app/app.git'
          GIT_HTTPS                                      : 'HTTPS://git@stash.xxx.com/app/app.git',

          STASH_CREDENTIALS                              : 'e47742cc-bb66-4321-2341-a2342er24f2',


          //DOCKER
          ARTIFACTORY_USER_CREDENTIALS                   : 'e47742cc-bb66-4321-2341-a2342er24f2',
          SEETEST_DOCKER_IMAGE                           : 'docker.xxx.com/project/images/app:v1-8.3',

          //SEETEST_DOCKER_IMAGE
          SEETEST_APPLICATION_FOLDER                     : 'seetest_dir',
          SEETEST_PROJECT_HOME                           : 'Automated Scripts',
          SEETEST_GIT_SSH                                : 'ssh://git@stash.xxx.com/pr/seetest_automation_cucumber.git'
          SEETEST_GIT_BRANCH                             : 'develop',
          SEETEST_GRID_USER_CREDENTIALS                  : 'e47742cc-bb66-4321-2341-a2342er24f2',
          SEETEST_CUCUMBER_TAG                           : '@Virtualization',
          SEETEST_CLOUD_NAME                             : 'Core Group',
          SEETEST_IOS_VERSION                            : '11',
          SEETEST_IOS_APP_URL                            : '',
          SEETEST_INSTALL_APP                            : 'No',
          SEETEST_APP_ENVIRONMENT                        : 'SmokeTests',
          SEETEST_DEVICE_QUERY                           : '',
]

node(properties.JENKINS_LABELS) {
    try {
        prepareEnv(properties)
        gitCheckout()
        stageStartVirtualServer()
        stageMapApiRequests()
        stageInstallApplication()
        stageUITests()
     } catch(Exception ex) {
        currentBuild.result = 'FAILURE'
        error = 'Error' + ex
     }
}

//====================================END OF PIPELINE==========================================

private void prepareEnv(properties) {
    cleanWorkspace()
    overrideProperties(properties)
    setWorkspace()
}

private void gitCheckout() {
    dir(env.APPLICATION_FOLDER) {
        checkout([$class: 'GitSCM', branches: [[devonfw-guide_mrchecker.wiki_Who-Is-MrChecker_Test-Framework-Modules_Web-API-Test-Module-Smoke-Tests-virtualization.asciidoc_name: env.GIT_BRANCH]], doGenerateSubmoduleConfiguration: false, extensions: [[devonfw-guide_mrchecker.wiki_Who-Is-MrChecker_Test-Framework-Modules_Web-API-Test-Module-Smoke-Tests-virtualization.asciidoc_$class: 'CloneOption', depth: 0, noTags: false, reference: '', shallow: false, timeout: 50]], gitTool: 'Default', submoduleCfg: [], userRemoteConfigs: [[devonfw-guide_mrchecker.wiki_Who-Is-MrChecker_Test-Framework-Modules_Web-API-Test-Module-Smoke-Tests-virtualization.asciidoc_credentialsId: env.GIT_CREDENTIALS, url: env.GIT_SSH]])
     }
}

private void stageStartVirtualServer() {
    def module = load "${env.SUBMODULES_DIR}/stageStartVirtualServer.groovy"
    module()
}

private void stageMapApiRequests() {
    def module = load "${env.SUBMODULES_DIR}/stageMapApiRequests.groovy"
    module()
}

private void stageInstallApplication() {
    def module = load "${env.SUBMODULES_DIR}/stageInstallApplication.groovy"
    module()
}

private void stageUITests() {
    def module = load "${env.SUBMODULES_DIR}/stageUITests.groovy"
    module()
}

private void setWorkspace() {
    String workspace = pwd()
    env.APPLICATION_DIRECTORY = "/${env.APPLICATION_DIRECTORY}"
    env.WORKSPACE_LOCAL - workspace + env.APPLICATION_DIRECTORY
    env.SEETEST_PROJECT_HOME_ABSOLute_PATH = "${workspace}/${env.SEETEST_APPLICATION_FOLDER}/${env.SEETEST_PROJECT_HOME}"
    env.SUBMODULES_DIR = env.WORKSPACE_LOCAL + "/pipelines/SmokeTests.submodules"
    env.COMMONS_DIR    = env.WORKSPACE_LOCAL + "/pipelines/commons"
}

/*
    function ovverrides env vales based on provided properties
*/
private void overrideProperties(properties) {
    for (param in properties) {
        if (env.(param.key) == null) {
           echo "Adding parameter '${param.key}' with default value: '$param.value}'"
           env.(param.key) = param.value
        } else {
           echo "Parameter '${param.key}' has overriden value: '${env.(param.key)}'"
        }
     }

     echo sh(script: "env | sort", returnStdout: true)
}

private void cleanWorkspace() {
   sh 'rm-rf *'
}
stageStartVirtualServer.groovy:
def call () {
    stage("Check virtual server") {
        def statusCode

        try {
            def response = httpRequest "${env.WIREMOCK_ADDRESS}/__admin/"
            statusCode = response.status
        } catch(Exception ex) {
            currentBuild.result = 'FAILURE'
            error 'WireMock server os unreachable.'
        }

        if(statusCode !=200) {
            currentBuild.result = 'FAILURE'
            error 'WireMock server is unreachable. Return code: ${statusCode}'
        }
    }
}
stageMapApiRequests.groovy:
def call() {
    stage("Map API requests with virtual assets") {
        checkoutRepository()
        restartWiremock()
        checkWiremockStatus()
     }
}

private checkoutRepository() {
    extractHTTPSUrl()
    sshagent (credentials: [env.WIREMOCK_CREDENTIALS]) {
        withCredentials([usernamePassword(credentialsId: env.STASH_CREDENTIALS, passwordVariable: 'PASS', usernameVariable: 'USER')]) {
            sh """
                ssh -T -o StrictHostKeyChecking=no -l ${env.WIREMOCK_USERNAME} ${env.WIREMOCK_IP_ADDRESS} "cd~/${env.APPLICATION_DIRECTORY_WIREMOCK}/${env.PROJECT_HOME}; git fetch https://$USER:$PASS@${env.GIT_WITHOUT_HTTPS} ${env.GIT_BRANCH}; git reset --hard FETCH_HEAD; git clean -df"
             """
         }
     }
}

private restartWiremock() {
    sshagent (credentials: [env.WIREMOCK_CREDENTIALS]) {
            sh """
                ssh -T -o StrictHostKeyChecking=no -l ${env.WIREMOCK_USERNAME} ${env.WIREMOCK_IP_ADDRESS} "docker container restart ${env.WIREMOCK_CONTAINER_NAME}"
             """
     }
}

private checkWiremockStatus() {
    int wiremockStatusCheckCounter =6
    int sleepTimeInSeconds = 10
    def wiremockStatus

    for (i = 0; i < wiremockStatusCheckCounter; i++) {
         try {
             wiremockStatus = getHttpRequestStatus()
             echo "WireMock server status code: ${wiremockStatus}"
         } catch(Exceprion ex) {
             echo "Exception when checking connection to WireMock"
         }
         if(wiremockStatus == 200) break
         else sh "sleep $(sleepTimeInSeconds}"
      }

      if(wiremockStatus != 200) {
          currentBuild.result = 'FAILURE'
          error 'WireMock server is unreachable. Return code: ${wiremockStatus}'
      }
}

private def getHttpRequestStatus() {
    def response = httpRequest "${env.WIREMOCK_ADDRESS}/__admin"
    return response.status

private extractHTTPSUrl() {
    env.GIT_WITHOUT_HTTPS = env.GIT_HTTPS.replace("https://", "")
}

return this
stageInstallApplication.groovy:
def call() {
    stage('Install application with smoke tests environment') {
        dir(env.SEETEST_APPLICATION_FOLDER) {
            checkout([$class: 'GitSCM', branches: [[devonfw-guide_mrchecker.wiki_Who-Is-MrChecker_Test-Framework-Modules_Web-API-Test-Module-Smoke-Tests-virtualization.asciidoc_name: env.SEETEST_GIT_BRANCH]], doGenerateSubmoduleConfigurations: false, extensions: [], gitTool: 'default', submoduleCfg: [], userRemoteConfigs: [[devonfw-guide_mrchecker.wiki_Who-Is-MrChecker_Test-Framework-Modules_Web-API-Test-Module-Smoke-Tests-virtualization.asciidoc_credentialsId: env.GIT_CREDENTIALS, url: env.SEETEST_GIT_SSH]])
        }
     }
}

return this
stageUITests.groovy:
def call() {
    stage('UI tests') {
        def utils = load "${env.SUBMODULES_DIR}/utils.groovy"

        try {
            utils.generateUserIDVariable(); //Generate USER_ID and USER_GROUP
            docker.image(env.SEETEST_DOCKER_IMAGE).inside("-u ${env.USER_ID}:${env.USER_GROUP}") {
                withCredentials([[devonfw-guide_mrchecker.wiki_Who-Is-MrChecker_Test-Framework-Modules_Web-API-Test-Module-Smoke-Tests-virtualization.asciidoc_$class: 'UsernamePasswordMultiBinding', credentialsId: "${env.ARTIFACTORY_USER_CREDENTIALS}", passwordVariable: 'ARTIFACTORY_PASSWORD', usernameVariable: 'ARTIFACTORY_USERNAME]]) {
                    executeTests()
                    compressArtifacts()
                    publishJUnitTestResultReport()
                    archiveArtifacts()
                    publishHTMLReports()
                    publishCucumberReports()
                 }
             }
        } catch (Exception exc) {
            throw exc
        }
   }
}

private executeTests() {
    withCredentials([usernamePassword(credentialsId: env.SEETEST_GRID_USER_CREDENTIALS, passwordVariable: 'GRID_USER_PASSWORD', usernameVariable: 'GRID_USER_NAME')]) {
            sh """
                cd ${env.SEETEST_PROJECT_HOME_ABSOLUTE_PATH}
                mvn clean test -B -Ddriver="grid" -Dtags="${env.SEETEST_CUCUMBER_TAG}" -DcloudName="${env.SEETEST_CLOUD_NAME}" -DdeviceQuery="${env.SEETEST_DEVICE_QUERY} -DgridUser="${GRID_USER_NAME}" -DgridPassword="${GRID_USER_PASSWORD}" -Dinstall="${env.SEETEST_INSTALL_APP}" -DiosUrl="${env.SEETEST_IOS_APP_URL}" -DdeviceType="iPhone" -DiosVersion="$env.SEETEST_IOS_VERSION}" -DparallelMode="allonall" -Denv="${env.SEETEST_APP_ENVIRONMENT}" site
             """
     }
}

private compressartifacts() {
    echo "Compressing artifacts from /target/site"
    sh """
        zip -r allure_report.zip **/${env.SEETEST_PROJECT_homE}/target/site
    """

private publishJUnitTestResultReport() {
    echo "Publishing JUnit reports from ${env.SEETEST_APPLICATION_FOLDER}/${env.SEETEST_PROJECT_HOME}/target/surefire-reports/junitreporters/*.xml"

    try {
        junit "${env.SEETEST_APPLICATION_FOLDER}/${env.SEETEST_PROJECT_HOME}/target/surefire-reports/junitreporters/*.xml"
    } catch(e) {
        echo("No JUnit report found")
    }
}

private archiveArtifacts() {
    echo "Archiving artifacts"

    try {
        archiveArtifacts allowEmptyArchive: true, artifacts: "**/allure_report.zip"
    } catch(e) {
        echo("No artifacts found")
    }
}

private publishHTMLReports() {
    echo "Publishing HTML reports from ${env.SEETEST_APPLICATION_FOLDER}/${env.SEETEST_PROJECT_HOME}/target/site/allure-maven-plugin"

    try {
        publishHTML([allowMissing: false, alwaysLinkToLastBuild: true, keepAll: true, reportDir: "${env.SEETEST_APPLICATION_FOLDER/${env.SEETEST_PROJECT_HOME}/target/site/allure-maven-plugin", reportFiles: 'index.html', reportName: 'Allure report', reportTitles: 'Allure report'])
    } catch(e) {
        echo("No artifacts found")
    }
}

private publishCucumberREPORTS() {
    echo "Publishing Cucumber reports from ${env.SEETEST_APPLICATION_FOLDER}/${env.SEETEST_PROJECT_HOME}/target/cucumber-parallel/*.json"

    try {
        step([$class: 'CucumberReportPublisher', fileExcludePattern '', fileIncludePattern: "#{env.SEETEST_APPLICATION_FOLDER}/${env.SEETEST_PROJECT_HOME}/target/cucumber-parallel/*.json", ignoreFailedTests: false, jenkinsBasePath: '', jsonReportDirectory: '', missingFails: false, parallelTesting: false, pendingFails: false, skippedFails: false, undefinedFails: false])
    } catch(e) {
        echo("No Cucumber report found")
    }
}

return this
Configuration
It is possible to configure Jenkins job in two ways. First one is to edit the Jenkinsfile. All of the properties are in properties collection as below:
def properties = [

          JENKINS_LABELS                                : 'PWI_LINUX_DEV'

          ...

          //Docker
          ARTIFACTORY_USER_CREDENTIALS                  : 'ba2e4f46-56f1-4467-ae97-17b356d6s643',
          SEETEST_DOCKER_IMAGE                          : 'docker.XXX.com/app/base-images/seetest:v1-8.3',

          //SeeTest
          SEETEST_APPLICATION_FOLDER                    : 'seetest_dit',
          SEETEST_PROJECT_HOME                          : 'Automated_Scripts',
          SEETEST_GIT_SSH                               : 'ssh://stash.xxx.com/app/seetest_automation_cucumber.git',
          SEETEST_GIT_BRANCH                            : 'develop',

          ...
]
Second way is to add properties in 'Configure job'. All of the properties there are overriding properties from Jenkinsfile (the have the highest priority). They can then be set durring 'Build with Paremeters' process.
Reports
After a job execution 'Allure report' and 'Cucumber-JVM' reports should be visible. If any tests fail, You can check on which screen (printscreen from failures is attached, why and etc.)
Security Module
Security Test Module
What is Security
Application Security is concerned with Integrity, Availability and Confidentiality of data processed, stored and transferred by the application.
Application Security is a cross-cutting concern which touches every aspect of the Software Development Lifecycle. You can introduce some SQL injection flaws in your application and make it exploitable, but you can also expose your secrets (which will have nothing to do with code itself) due to poor secret management process, and fail as well.
Because of this and many other reasons, not every aspect of security can be automatically verified. Manual tests and audits will still be needed. Nevertheless, every security requirement which is automatically verified will prevent code degeneration and misconfiguration in a continuous manner.
How to test Security
Security tests can be performed in many different ways, such as:
-
Static Code Analysis - improves the security by (usually) automated code review. A good way to search for vulnerabilities, which are 'obvious' on the code level ( e.g. SQL injection). The downside of this approach is that professional tools to perform such scans are very expensive and still produce many false positives.
-
Dynamic Code Analysis - tests are run against a working environment. A good way to search for vulnerabilities, which require all client- and server-side components to be present and running (like e.g. Cross-Site Scripting). Tests are performed in a semi-automated manner and require a proxy tool (like e.g. OWASP ZAP)
-
Unit tests - self-written and self-maintained tests. They usually work on the HTTP/REST level (this defines the trust boundary between the client and the server) and run against a working environment. Unit tests are best suited for verifying requirements which involve business knowledge of the system or which assure secure configuration on the HTTP level.
In the current release of the Security Module, the main focus will be Unit Tests.
Although the most common choice of environment for running security tests on will be integration(the environment offers the right stability and should mirror the production closely), it is not uncommon for some security tests to run on production as well. This is done for e.g. TLS configuration testing to ensure proper configuration of the most relevant environment in a continuous manner.
Database Module
Database Test Module
What is MrChecker Database Test Module
Database module is based on Object-Relational Mapping programming technique. All functionalities are built using Java Persistence API but examples use Hibernate as a main provider.
JPA structure schema
This module was written to allow the use of any JPA provider. The structure is represented in the schema below.

ORM representation applied in Framework
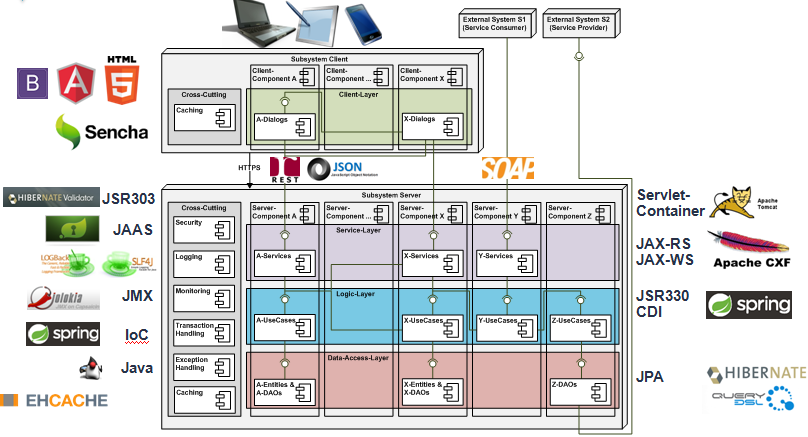
Mobile Test Module
Mobile Test Module
What is MrChecker E2E Mobile Test Module
MrChecker E2E Mobile test Module is a suitable solution for testing Remote Web Design, Mobile Browsers and application. A user can write tests suitable for all mobile browsers with a full range of resolution. The way of working is similar to Selenium and uses the same rules and patterns as the Web Driver. For more information please look in the Selenium test module.
What is Page Object Architecture
Creating Selenium test cases can result in an unmaintainable project. One of the reasons is that too many duplicated code is used. Duplicated code could be caused by the duplicated functionality and this will result in duplicated usage of locators. The disadvantage of duplicated code is that the project is less maintainable. If some locator will change, you have to walk through the whole test code to adjust locators where necessary. By using the page object model we can make non-brittle test code and reduce or eliminate duplicate test code. Beside of that it improves the readability and allows us to create interactive documentation. Last but not least, we can create tests with less keystroke. An implementation of the page object model can be achieved by separating the abstraction of the test object and the test scripts.
Page Object Pattern
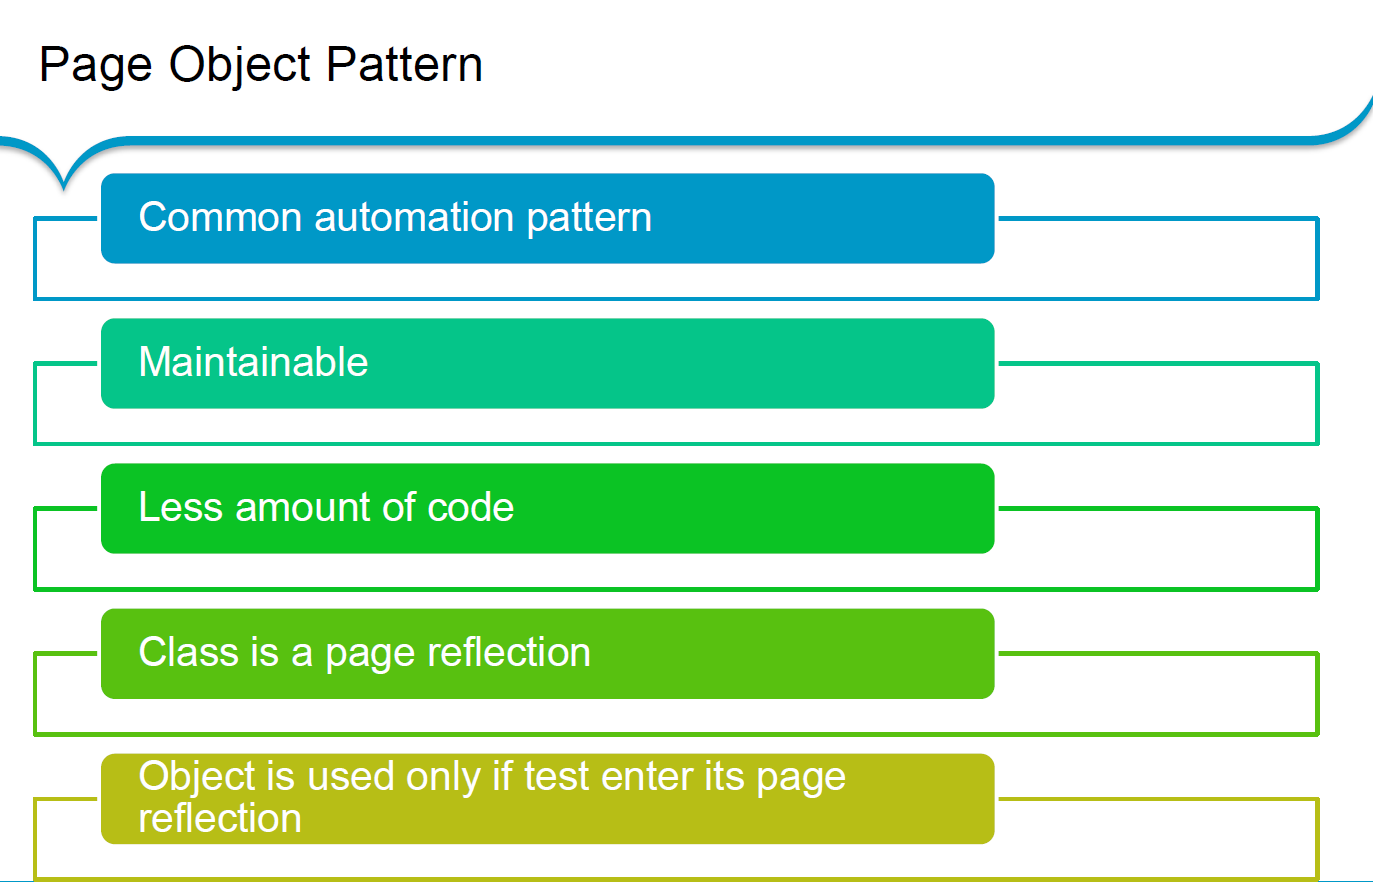
Mobile Structure
It is build on the top of the Appium library. Appium is an open-source tool for automating native, mobile web, and hybrid applications on iOS mobile, Android mobile, and Windows desktop platforms. Native apps are those written using iOS, Android, or Windows SDKs. Mobile web apps are web apps accessed using a mobile browser (Appium supports Safari on iOS and Chrome or the built-in 'Browser' app on Android). Hybrid apps have a wrapper around a "webview" - a native control that enables interaction with web content.
Run on different mobile devices
To execute each test with chosen connected mobile devices, it is required to use specific arguments in Run configuration.
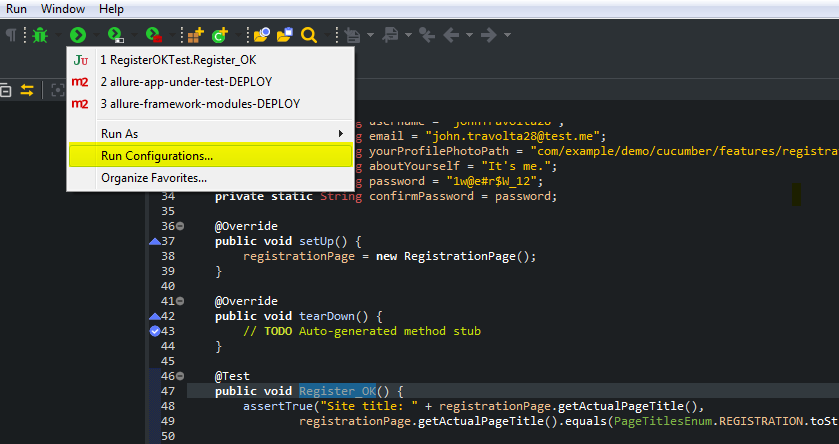
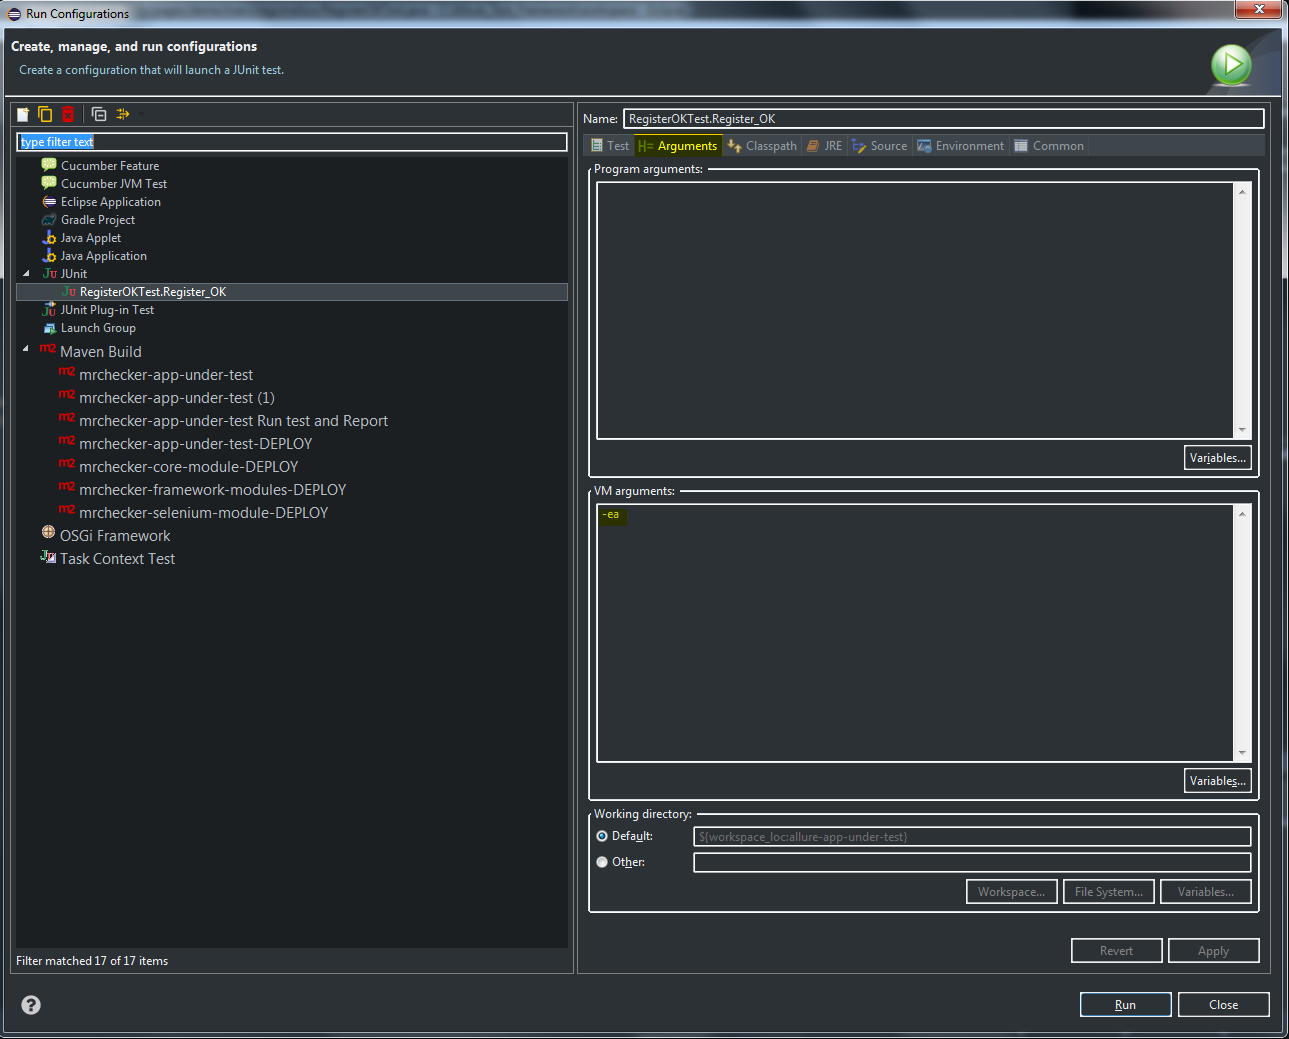
Default supported arguments in MrChecker:
-
deviceUrl- http url to Appium Server, default value "http://127.0.0.1:4723" -
automationName- which automation engine to use , default value "Appium" -
platformName- which mobile OS platform to use , default value "Appium" -
platformVersion- mobile OS version , default value "" -
deviceName- the kind of mobile device or emulator to use , default value "Android Emulator" -
app- the absolute local path or remote http URL to a .ipa file (IOS), .app folder (IOS Simulator), .apk file (Android) or .apks file (Android App Bundle), or a .zip file, default value "." -
browserName- name of mobile web browser to automate. Should be an empty string if automating an app instead, default value "" -
newCommandTimeout- how long (in seconds) Appium will wait for a new command from the client before assuming the client quit and ending the session, default value "4000" -
deviceOptions- any other capabilites not covered in essential ones, default value none
Example usage:
mvn clean test -Dtest=MyTest -DdeviceUrl="http://192.168.0.1:1234" -DplatformName="iOS" -DdeviceName="iPhone Simulator" -Dapp=".\\Simple_App.ipa"
mvn clean test -Dtest=MyTest -Dapp=".\\Simple_App.apk -DdeviceOptions="orientation=LANDSCAPE;appActivity=MainActivity;chromeOptions=['--disable-popup-blocking']"
Check also:
+ Full list of Generic Capabilities
+ List of additional capabilities for Android
+ List of additional capabilities for iOS
How to use mobile test Module
-
Install IDE with MrChecker
-
Switch branch to 'feature/Create-mobile-module-#213' - by default it is 'develop'
git checkout feature/Create-mobile-module-#213
-
Install and setup git checkout feature/Create-mobile-module-#213[Appium Server]
-
Connect to local Device by Appium Server
1. Install Android SDK https://developer.android.com/studio/index.html#command-tools -> 2. Download Platform and Build-Tools (Android versions - > https://en.wikipedia.org/wiki/Android_version_history ) * sdkmanager "platform-tools" "platforms;android-19" * sdkmanager "build-tools;19.0.0" * copy from /build-tools file "aapt.exe" to /platform-tools 3. Set Environment: ANDROID_SDK_ROOT = D:\sdk-tools-windows-4333796 PATH = %PATH%; %ANDROID_SDK_ROOT% 4. Start Appium Server 5. Start Session in Appium Server, capabilities { "platformName": "Android", "deviceName": "Android Emulator", "app": "D:\\Repo\\mrchecker-source\\mrchecker-framework-modules\\mrchecker-mobile-module\\src\\test\\resources\\Simple App_v2.0.1_apkpure.com.apk", "automationName": "UiAutomator1" } -
Run Mobile tests with runtime parameters. List of supported parameters could be found here
-
From command line (as in Jenkins):
-
mvn clean compile test -Dapp=".\\Simple_App_v2.0.1_apkpure.com.apk" -DautomationName="UiAutomator1" -Dthread.count=1
-
from IDE:

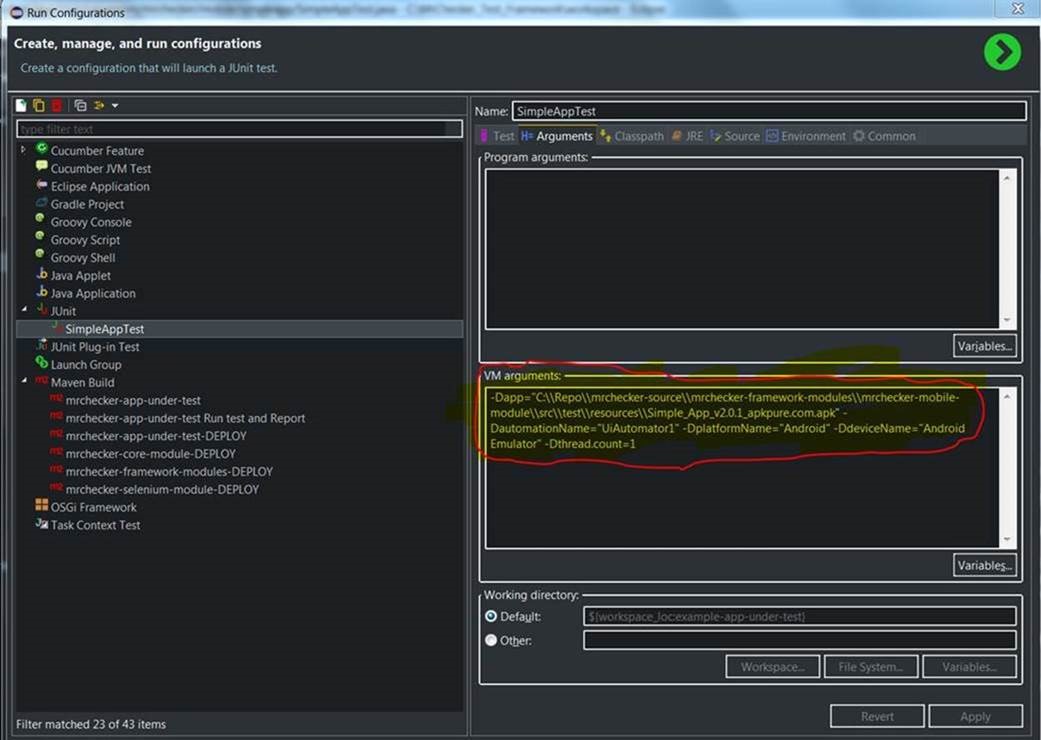
DevOps Test Module
DevOPS Test Module
What does DevOps mean for us?
DevOps consists of a mixture of three key components in a technical project:
-
People’s skills and mindset
-
Processes
-
Tools
Using E2E MrChecker Test Framework it is possible to cover the majority of these areas.
QA Team Goal
For QA engineers, it is essential to take care of the product code quality.
Therefore, we have to understand, that a test case is also code which has to be validated against quality gates. As a result, we must test our developed test case like it is done during standard Software Delivery Life Cycle.
Well rounded test case production process
-
How do we define top-notch test cases development process in E2E MrChecker Test Framework
Continuous Integration (CI) and Continuous Delivery (CD)
-
Continuous Integration (CI) - a procedure where quality gates validate test case creation process
-
Continuous Delivery (CD) - a procedure where we include created test cases, validated against CI, as smoke/regression/security
What should you receive from this DevOps module
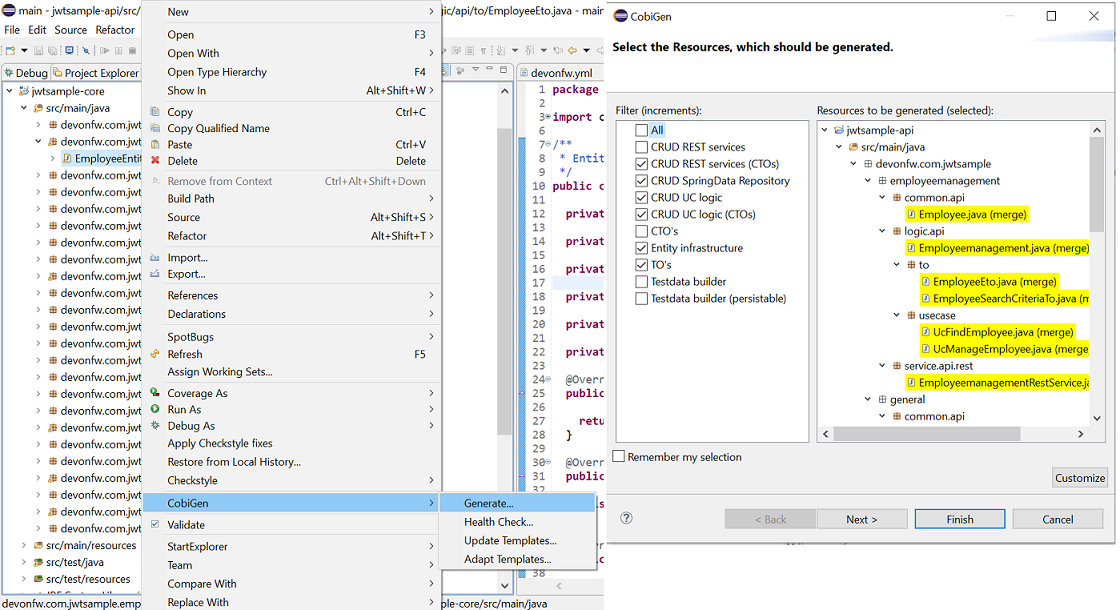
What will you gain with our DevOps module
The CI procedure has been divided into transparent modules. This solution makes configuration and maintenance very easy because everyone is able to manage versions and customize the configuration independently for each module. A separate security module ensures the protection of your credentials and assigned access roles regardless of changes in other modules.

Your CI process will be matched to the current project. You can easily go back to the previous configuration, test a new one or move a selected one to other projects.
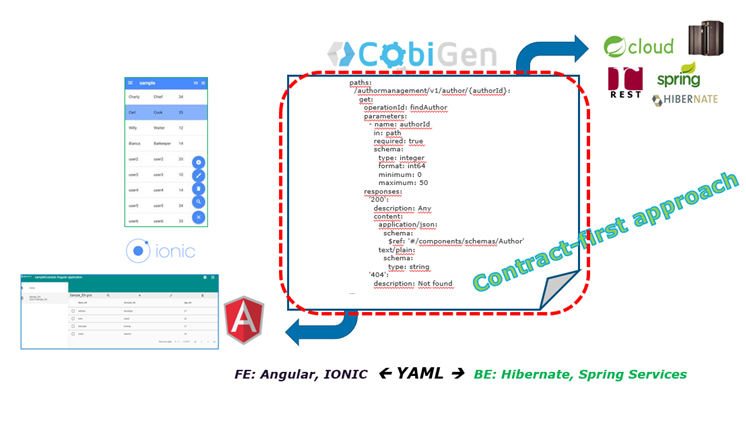
DevOps module supports a delivery model in which executors are made available to the user as needed. It has such advantages as:
-
Saving computing resources
-
Eliminating guessing on your infrastructure capacity needs
-
Not spending time on running and maintaining additional executors == How to build this DevOps module
Once you have implemented the module, you can learn more about it here:
Continuous Integration
Embrace quality with Continuous Integration while you produce test case(s).
Overview
There are two ways to set up your Continuous Integration environment:
-
Create a Jenkins instance from scratch (e.g. by using the Jenkins Docker image)
Using a clean Jenkins instance requires the installation of additional plugins. The plugins required and their versions can be found on this page.
-
Use thre pre-configured custom Docker image provided by us
No more additional configuration is required (but optional) using this custom Docker image. Additionally, this Jenkins setup allows dynamical scaling across multiple machines and even cloud (AWS, Azure, Google Cloud etc.).
Jenkins Overview
Jenkins is an Open Source Continuous Integration Tool. It allows the user to create automated build jobs which will run remotely on so called Jenkins Slaves. A build job can be triggered by several events, for example on new pull request on specified repositories or timed (e.g. at midnight).
Tests created by using the testing framework can easily be implemented on a Jenkins instance. The following chapter will describe such a job configuration. If you’re running your own Jenkins instance, you may have to install additional plugins listed on the page Jenkins Plugins for a trouble-free integration of your tests.
The test job is configured as a so-called parameterized job. This means, after starting the job, parameters can be specified, which will then be used in the build process. In this case, branch and testname will be expected when starting the job. These parameters specify which branch in the code repository should be checked out (possibly feature branch) and the name of the test that should be executed.
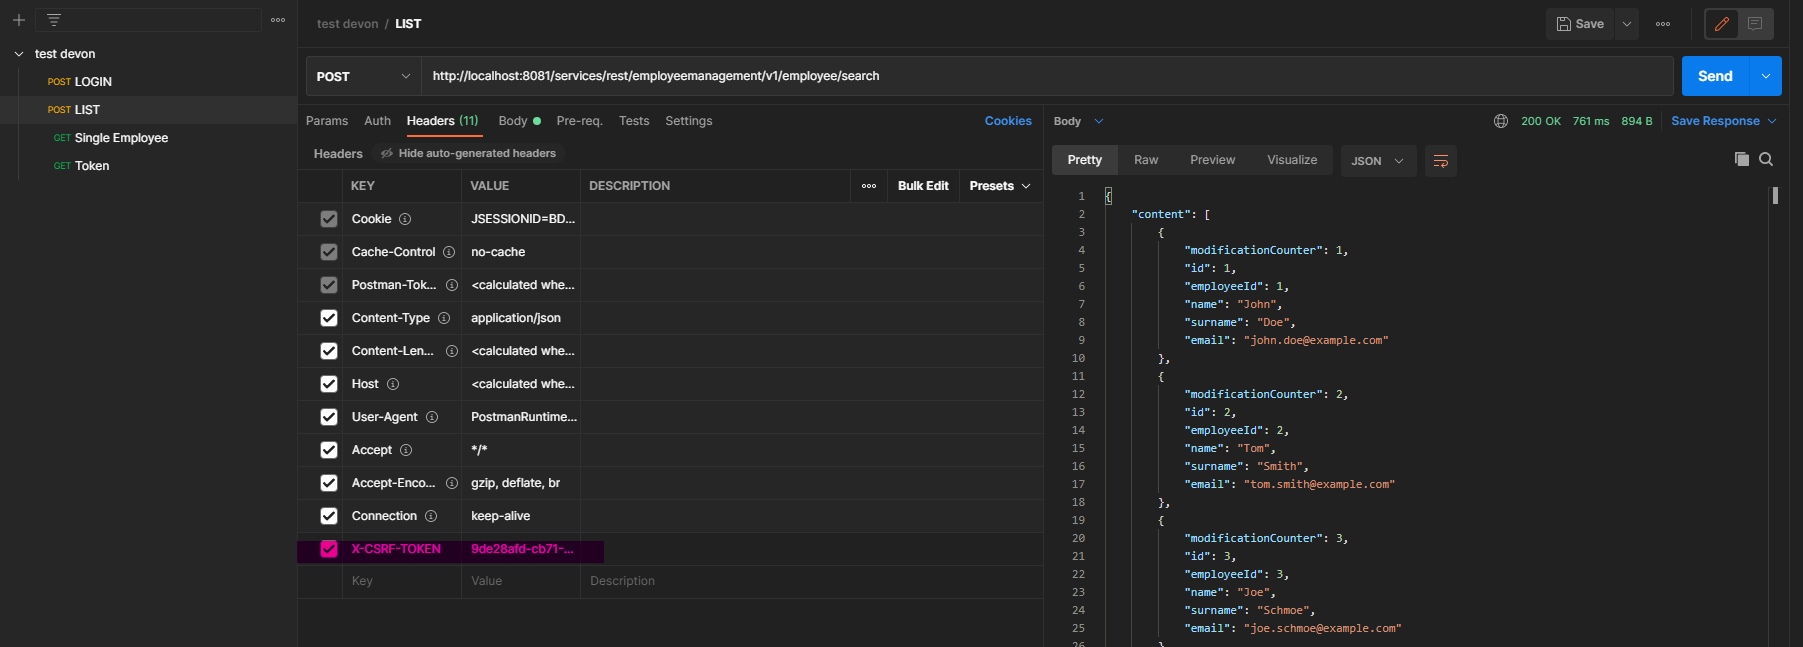
-
The first step inside the build process configuration is to get the author of the commit that was made. The mail will be extracted and gets stored in a file called build.properties. This way, the author can be notified if the build fails.

-
Next up, Maven will be used to check if the code can be compiled, without running any tests.
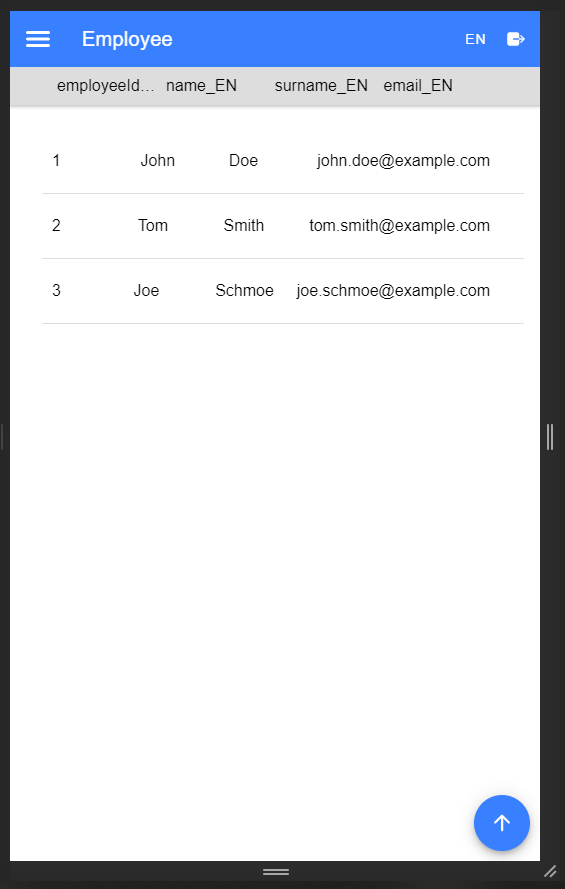
After making sure that the code can be compiled, the actual tests will be executed.
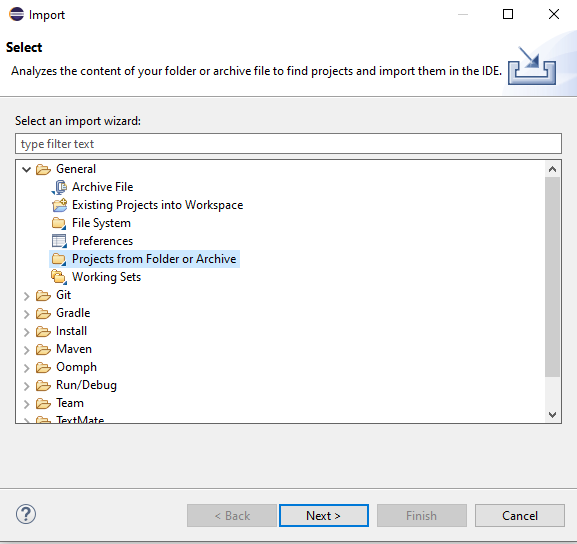
-
Finally, reports will be generated.
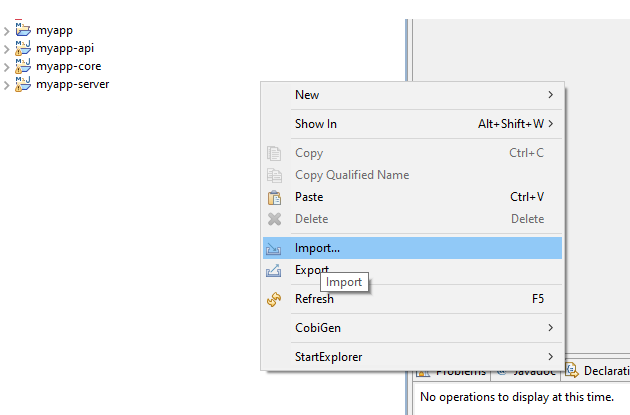
-
At first, the results will be imported to the Allure System
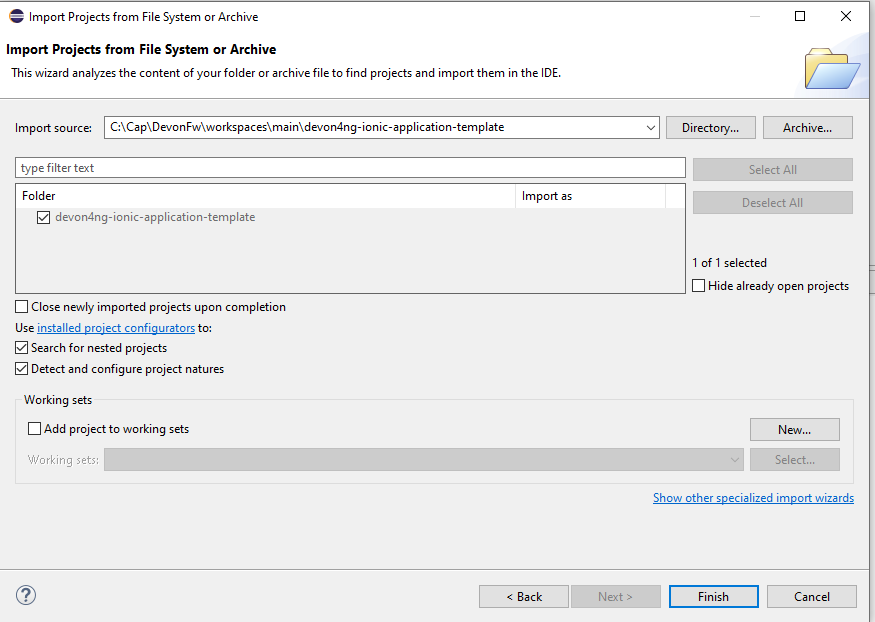
-
JUnit test results will be reported as well. Using this step, the test result trend graph will be displayed on the Jenkins job overview.
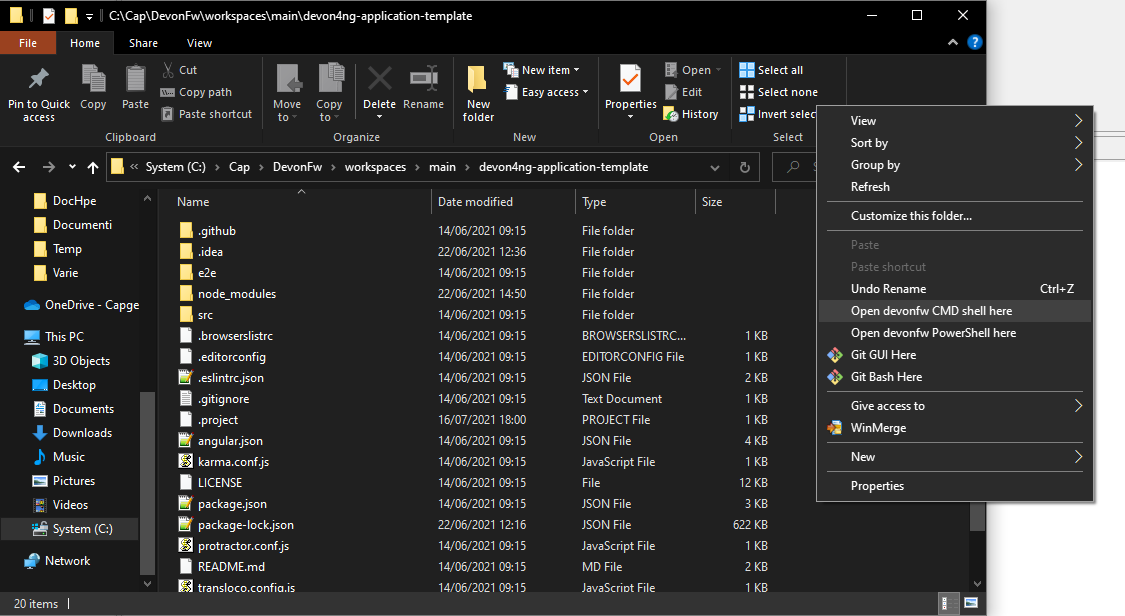
-
Finally, an E-Mail will be sent to the previously extracted author of the commit.
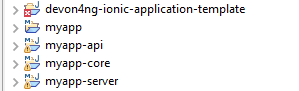
Using the Pre-Configured Custom Docker Image
If you are starting a new Jenkins instance for your tests, we’d suggest using the pre-configured Docker image. This image already contains all the configurations and additional features.
The configurations are e.g. Plugins and Pre-Installed job setup samples. This way, you don’t have to set up the entire CI-Environment from the ground up.
Additional features from this docker image allow dynamic creation and deletion of Jenkins slaves, by creating Docker containers. Also, Cloud Solutions can be implemented to allow wide-spread load balancing.
Continuous Delivery
Include quality with Continuous Delivery during product release.
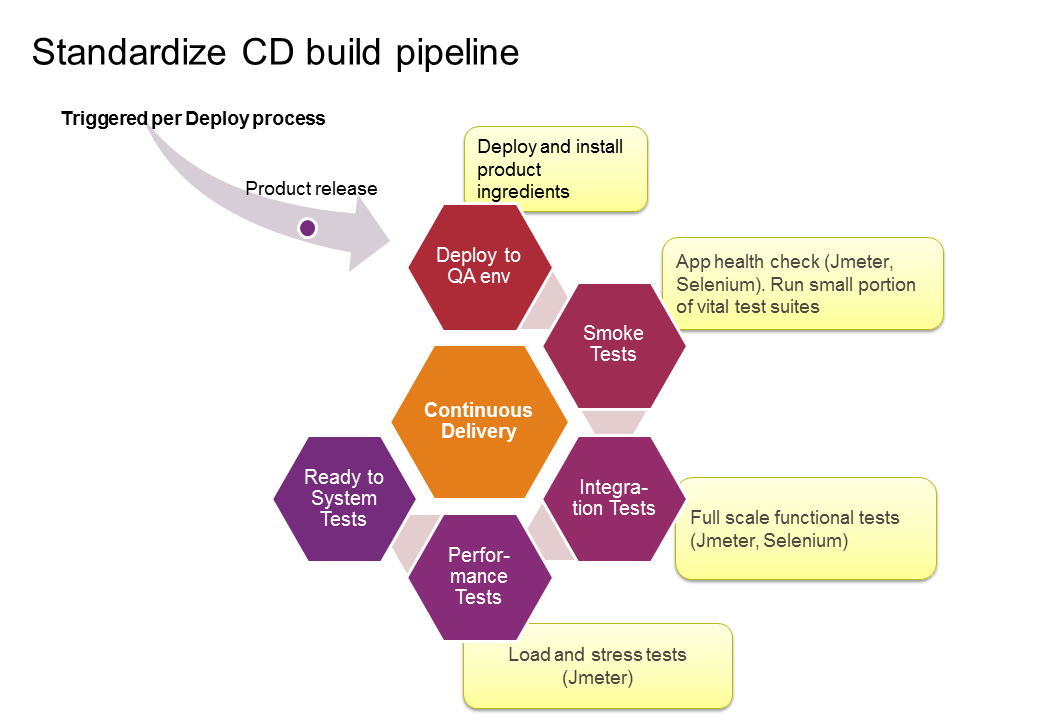
Overview
CD from Jenkins point of view does not change a lot from Continuous Integration one.
Jenkins Overview
Use the same Jenkins settings for Jenkins CD setup as for CI, please. link. The only difference is:
-
What type of test you will execute. Before, we have been choosing test case(s), now we will choose test suite(s)
-
Who will trigger the given Smoke/Integration/Performance job
-
What is the name of official branch. This branch ought always to use be used in every CD execution. It will be either master or develop.
Under construction - added when WebAPI module is included.
Pipeline structure
Pipeline configuration:
The default interaction with Jenkins required manual jobs. This keeps configuration of a job in Jenkins separate from source code. With Pipeline plugin users can implement a pipeline procedure in Jenkinsfile and store it in repository with other code. This approach is used in Mr Checker framework. More info: https://jenkins.io/solutions/pipeline/
Our CI & CD processes are divided into a few separate files: Jenkins_node.groovy is the file to manage all processes. It defines all operations executed on a Jenkins node, so all code in this file is closed in node closure. Workflow in Jenkinsfile:
-
Read all parameters from a Jenkins job
-
Execute stage to prepare the environment
-
Execute git pull command
-
Set Jenkins job description
-
Execute compilation of the project in a special prepared docker container
-
Execute unit tests
-
Execute integration tests
-
Deploy artifacts to a local repository
-
Deploy artifacts to an external repository (nexus/arifactory)
Not all the steps must be present in the Jenkins files. This should be configured for particular job requirements.
Description of stages:
First thing to do in this stage is overwriting properties loaded from Jenkins job. It is defined in “overrideProperties” function. The next function, “setJenkinsJobVariables” defines environment variables such as :
-
JOB_NAME_UPSTREAM
-
BUILD_DISPLAY_NAME_UPSTREAM
-
BUILD_URL_UPSTREAM
-
GIT_CREDENTIALS
-
JENKINS_CREDENTIALS
The last function in the stage – “setWorkspace” -creates an environment variable with path to local workspace. This is required beacuse when using pipeline plugin, Jenkins does not create the WORKSPACE env variables.
It pulls sources from the repository and loads “git pull” file which contains additional methods:
-
setGitAuthor – setting properties about git author to the file “build.properties” and loading created file
-
tryMergeWithBranch – checking if actual branch can be merged with default main branch
Verify with maven that code builds without errors
Execute unit tests with mvn surefire test and publish reports in junit and allure format
Execute integration tests with mvn surefire test and publish reports in junit and allure format
[[devonfw-guide_mrchecker.wiki_who-is-mrchecker_test-framework-modules_devops-test-module-pipeline-structure.asciidoc_stage-deploy-–-local-repo]] === Stage “Deploy – local repo”
Archive artifacts as a jar file in the local repository
[[devonfw-guide_mrchecker.wiki_who-is-mrchecker_test-framework-modules_devops-test-module-pipeline-structure.asciidoc_stage-deploy-–-nexu-repo]] === Stage ”Deploy – nexu repo”
Deploy to the external repository with maven release deploy command with credentials stored in Jenkins machine. Additional files:
-
mailSender.groovy – contains methods for sending mail with generated content
-
stashNotification.groovy – send job status for bitbucket by a curl command
-
utils.groovy - contains additional functions to load properties, files and generate additional data
Selenium Grid
What is Selenium Grid
Selenium Grid allows running web/mobile browsers test cases to fulfill basic factors, such as:
-
Independent infrastructure, similar to end-users'
-
Scalable infrastructure (\~50 simultaneous sessions at once)
-
Huge variety of web browsers (from mobile to desktop)
-
Continuous Integration and Continuous Delivery process
-
Supporting multi-type programming languages (java, javascript, python, …).

On a daily basis, a test automation engineer uses their local environments for test case execution/development. However, a created browser test case has to be able to run on any infrastructure. Selenium Grid enables this portability.
Selenium Grid Structure
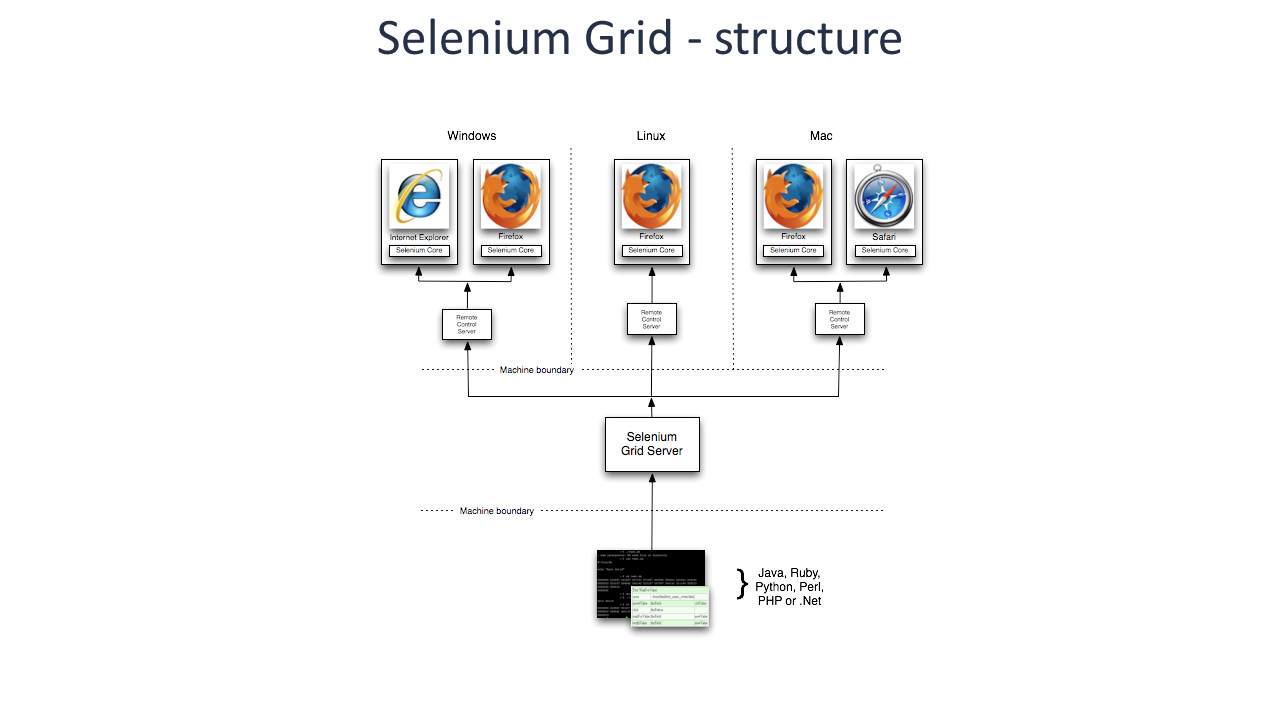
'Vanilla flavour' Selenium Grid is based on two, not very complicated ingredients:
-
Selenium Hub - as one machine, accepting connections to grid from test cases executors. It also plays a managerial role in connection to/from Selenium Nodes
-
Selenium Node - from one to many machines, where on each machine a browser used during test case execution is installed.
How to setup
There are two options of Selenium Grid setup:
Advantages and disadvantages of both solutions:
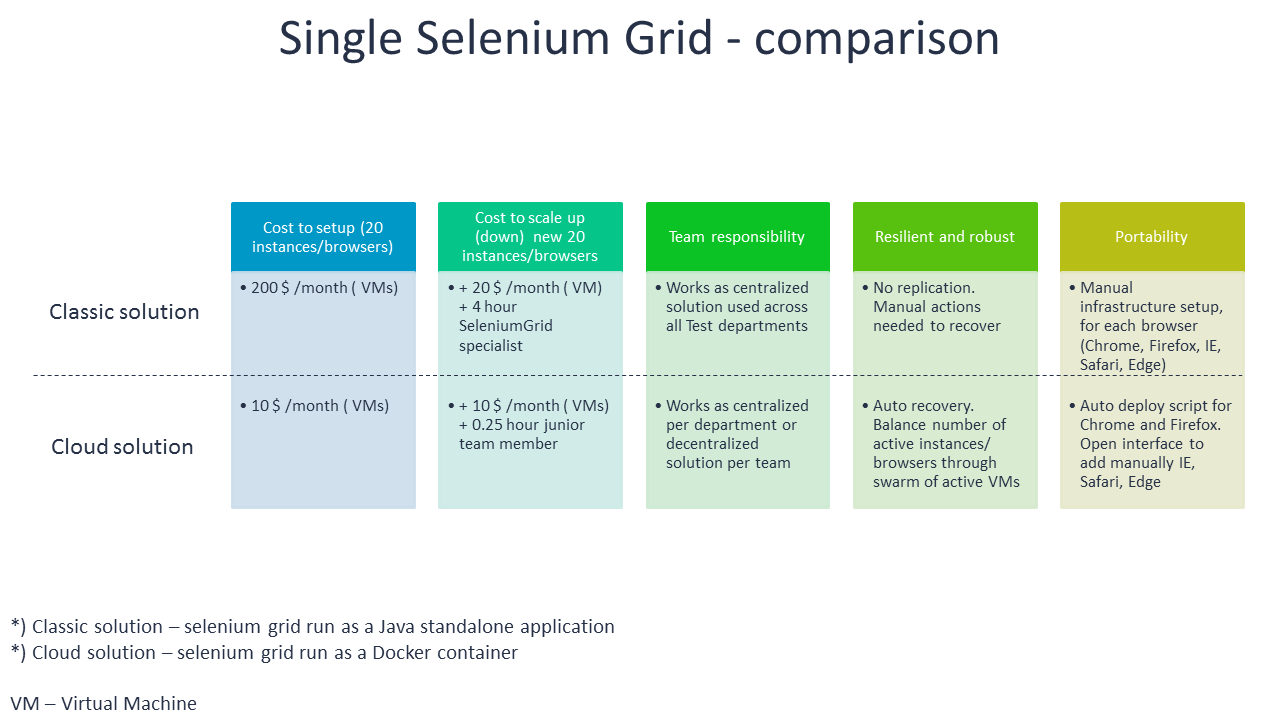
How to use Selenium Grid with E2E Mr Checker Test Frameworks
Run the following command either in Eclipse or in Jenkins:
> mvn test -Dtest=com.capgemini.ntc.selenium.tests.samples.resolutions.ResolutionTest -DseleniumGrid="http://10.40.232.61:4444/wd/hub" -Dos=LINUX -Dbrowser=chrome
As a result of this command:
-
-Dtest=com.capgemini.ntc.selenium.features.samples.resolutions.ResolutionTest- name of test case to execute -
-DseleniumGrid="http://10.40.232.61:4444/wd/hub"- IP address of Selenium Hub -
-Dos=LINUX- what operating system must be assumed during test case execution -
-Dbrowser=chrome- what type of browser will be used during test case execution
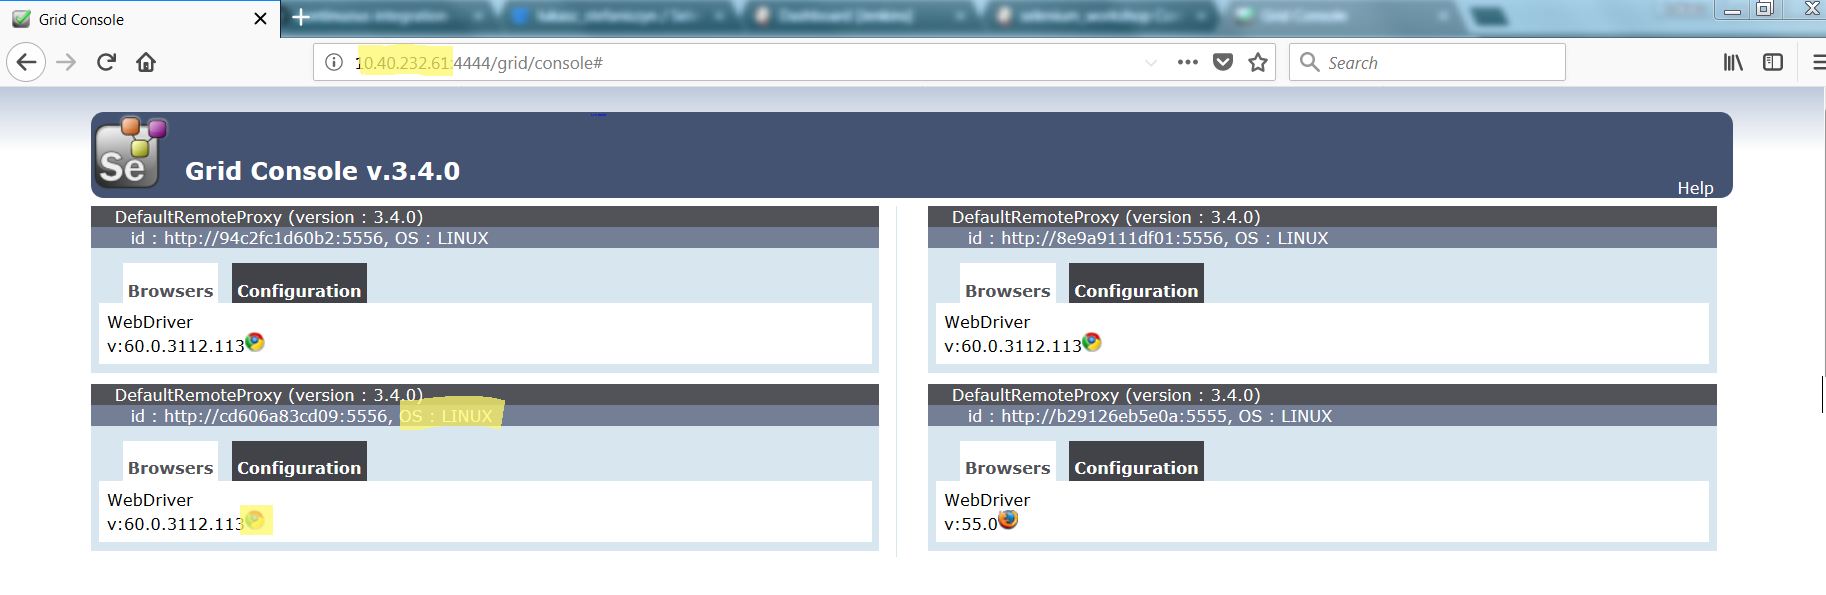
List of Jenkins Plugins
| Plugin Name | Version |
|---|---|
blueocean-github-pipeline |
1.1.4 |
blueocean-display-url |
2.0 |
blueocean |
1.1.4 |
workflow-support |
2.14 |
workflow-api |
2.18 |
plain-credentials |
1.4 |
pipeline-stage-tags-metadata |
1.1.8 |
credentials-binding |
1.12 |
git |
3.5.1 |
maven-plugin |
2.17 |
workflow-durable-task-step |
2.12 |
job-dsl |
1.64 |
git-server |
1.7 |
windows-slaves |
1.3.1 |
github |
1.27.0 |
blueocean-personalization |
1.1.4 |
jackson2-api |
2.7.3 |
momentjs |
1.1.1 |
workflow-basic-steps |
2.6 |
workflow-aggregator |
2.5 |
blueocean-rest |
1.1.4 |
gradle |
1.27.1 |
pipeline-maven |
3.0.0 |
blueocean-pipeline-editor |
0.2.0 |
durable-task |
1.14 |
scm-api |
2.2.2 |
pipeline-model-api |
1.1.8 |
config-file-provider |
2.16.3 |
github-api |
1.85.1 |
pam-auth |
1.3 |
workflow-cps-global-lib |
2.8 |
github-organization-folder |
1.6 |
workflow-job |
2.12.1 |
variant |
1.1 |
git-client |
2.5.0 |
sse-gateway |
1.15 |
script-security |
1.29.1 |
token-macro |
2.1 |
jquery-detached |
1.2.1 |
blueocean-web |
1.1.4 |
timestamper |
1.8.8 |
greenballs |
1.15 |
handlebars |
1.1.1 |
blueocean-jwt |
1.1.4 |
pipeline-stage-view |
2.8 |
blueocean-i18n |
1.1.4 |
blueocean-git-pipeline |
1.1.4 |
ace-editor |
1.1 |
pipeline-stage-step |
2.2 |
email-ext |
2.58 |
envinject-api |
1.2 |
role-strategy |
2.5.1 |
structs |
1.9 |
locale |
1.2 |
docker-workflow |
1.13 |
ssh-credentials |
1.13 |
blueocean-pipeline-scm-api |
1.1.4 |
metrics |
3.1.2.10 |
external-monitor-job |
1.7 |
junit |
1.21 |
github-branch-source |
2.0.6 |
blueocean-config |
1.1.4 |
cucumber-reports |
3.8.0 |
pipeline-model-declarative-agent |
1.1.1 |
blueocean-dashboard |
1.1.4 |
subversion |
2.9 |
blueocean-autofavorite |
1.0.0 |
pipeline-rest-api |
2.8 |
pipeline-input-step |
2.7 |
matrix-project |
1.11 |
pipeline-github-lib |
1.0 |
workflow-multibranch |
2.16 |
docker-plugin |
0.16.2 |
resource-disposer |
0.6 |
icon-shim |
2.0.3 |
workflow-step-api |
2.12 |
blueocean-events |
1.1.4 |
workflow-scm-step |
2.6 |
display-url-api |
2.0 |
favorite |
2.3.0 |
build-timeout |
1.18 |
mapdb-api |
1.0.9.0 |
pipeline-build-step |
2.5.1 |
antisamy-markup-formatter |
1.5 |
javadoc |
1.4 |
blueocean-commons |
1.1.4 |
cloudbees-folder |
6.1.2 |
ssh-slaves |
1.20 |
pubsub-light |
1.10 |
pipeline-graph-analysis |
1.4 |
allure-jenkins-plugin |
2.23 |
mailer |
1.20 |
ws-cleanup |
0.33 |
authentication-tokens |
1.3 |
blueocean-pipeline-api-impl |
1.1.4 |
ldap |
1.16 |
docker-commons |
1.8 |
branch-api |
2.0.10 |
workflow-cps |
2.36.1 |
pipeline-model-definition |
1.1.8 |
blueocean-rest-impl |
1.1.4 |
ant |
1.7 |
credentials |
2.1.14 |
matrix-auth |
1.7 |
pipeline-model-extensions |
1.1.8 |
pipeline-milestone-step |
1.3.1 |
jclouds-jenkins |
2.14 |
bouncycastle-api |
2.16.1 |
What is Docker
Docker is an open source software platform to create, deploy and manage virtualized application containers on a common operating system (OS), with an ecosystem of allied tools.
Where do we use Docker
DevOps module consists of Docker images
-
Jenkins image
-
Jenkins job image
-
Jenkins management image
-
Security image
in addition, each new node is also based on Docker
Exploring basic Docker options
Let’s show some of the most important commands that are needed when working with our DevOps module based on the Docker platform. Each command given below should be preceded by a sudo call by default. If you don’t want to use sudo command create a Unix group called docker and add a user to it.
$ sudo groupadd docker
$ sudo usermod -aG docker $USER
Build an image from a Dockerfile
# docker build [OPTIONS] PATH | URL | -
#
# Options:
#  --tag , -t : Name and optionally a tag in the ‘name:tag’ format

$ docker build -t vc_jenkins_jobs .
Container start
# docker run [OPTIONS] IMAGE[:TAG|@DIGEST] [COMMAND] [ARG...]
#
# Options:
# -d : To start a container in detached mode (background)
# -it : interactive terminal
# --name : assign a container name
# --rm : clean up
# --volumes-from="": Mount all volumes from the given container(s)
# -p : explicitly map a single port or range of ports
# --volume : storage associated with the image

$ docker run -d --name vc_jenkins_jobs vc_jenkins_jobs
Remove one or more containers
# docker rm [OPTIONS] CONTAINER
#
# Options:
# --force , -f : Force the removal of a running container

$ docker rm -f jenkins
List containers
# docker ps [OPTIONS]
# --all, -a : Show all containers (default shows just running)

$ docker ps
Pull an image or a repository from a registry
# docker pull [OPTIONS] NAME[:TAG|@DIGEST]

$ docker pull jenkins/jenkins:2.73.1
Push the image or a repository to a registry
Pushing new image takes place in two steps. First save the image by adding container ID to the commit command and next use push:
# docker push [OPTIONS] NAME[:TAG]

$ docker ps
  # copy container ID from the result
$ docker commit b46778v943fh vc_jenkins_mng:project_x
$ docker push vc_jenkins_mng:project_x
Return information on Docker object
# docker inspect [OPTIONS] NAME|ID [NAME|ID...]
#
# Options:
# --format , -f : output format

$ docker inspect -f '{{ .Mounts }}' vc_jenkins_mng
List images
# docker images [OPTIONS] [REPOSITORY[:TAG]]
#
# Options:
--all , -a : show all images with intermediate images

$ docker images
$ docker images jenkins
Remove one or more images
# docker rmi [OPTIONS] IMAGE [IMAGE...]
#
# Options:
#   --force , -f : Force removal of the image

$ docker rmi jenkins/jenkins:latest
Run a command in a running container
# docker exec [OPTIONS] CONTAINER COMMAND [ARG...]
# -d : run command in the background
# -it : interactive terminal
# -w : working directory inside the container
# -e : Set environment variables

$ docker exec vc_jenkins_jobs sh -c "chmod 755 config.xml"
Advanced commands
Remove dangling images
$ docker rmi $(docker images -f dangling=true -q)
Remove all images
$ docker rmi $(docker images -a -q)
Removing images according to a pattern
$ docker images | grep "pattern" | awk '{print $2}' | xargs docker rm
Remove all exited containers
$ docker rm $(docker ps -a -f status=exited -q)
Remove all stopped containers
$ docker rm $(docker ps --no-trunc -aq)
Remove containers according to a pattern
$ docker ps -a | grep "pattern" | awk '{print $1}' | xargs docker rmi
Remove dangling volumes
$ docker volume rm $(docker volume ls -f dangling=true -q)