
devon4net Guide
Introduction
Welcome to devon4net framework user guide. In this document you will find the information regarding how to start and deploy your project using the guidelines proposed in our solution.
All the guidelines shown and used in this document are a set of rules and conventions proposed and supported by Microsoft and the industry.
The package
Devon4Net package solution contains:
| File / Folder | Content |
|---|---|
Documentation |
User documentation in HTML format |
Modules |
Contains the source code of the different devon4net modules |
Samples |
Different samples implemented in .NET and .NET Core. Also includes My Thai Star Devon flagship restaurant application |
Templates |
Main .net Core template to start developing from scratch |
License |
License agreement |
README.md |
Github main page |
TERMS_OF_USE.asciidoc |
The devon4net terms of use |
LICENSE |
The devon license |
Other files |
Such the code of conduct and contributing guide |
Application templates
The application templates given in the bundle are ready to use.
At the moment .net Core template is supported. The template is ready to be used as a simple console Kestrel application or being deployed in a web server like IIS.
Samples
My Thai Star
You can find My Thai Star .NET port application at Github.
|
Note
|
As devon4net has been migrated to the latest version of .net core, the template is not finished yet. |
Cookbook
Data management
To use Entity Framework Core, install the package for the database provider(s) you want to target. This walk-through uses SQL Server.
For a list of available providers see Database Providers
-
Go to Tools > NuGet Package Manager > Package Manager Console
-
Run Install-Package Microsoft.EntityFrameworkCore.SqlServer
We will be using some Entity Framework Tools to create a model from the database. So we will install the tools package as well:
-
Run Install-Package Microsoft.EntityFrameworkCore.Tools
We will be using some ASP.NET Core Scaffolding tools to create controllers and views later on. So we will install this design package as well:
-
Run Install-Package Microsoft.VisualStudio.Web.CodeGeneration.Design
Entity Framework Code first
In order to design your database model from scratch, we encourage to follow the Microsoft guidelines described here.
Entity Framework Database first
-
Go to Tools > NuGet Package Manager > Package Manager Console
-
Run the following command to create a model from the existing database:
Scaffold-DbContext "Your connection string to existing database" Microsoft.EntityFrameworkCore.SqlServer -OutputDir ModelsThe command will create the database context and the mapped entities as well inside of Models folder.
Register your context with dependency injection
Services are registered with dependency injection during application startup.
In order to register your database context (or multiple database context as well) you can add the following line at ConfigureDbService method at startup.cs:
       private void SetupDatabase(IServiceCollection services)
        {
            services.SetupDatabase<TodoContext>(Configuration, "Default", WebAPI.Configuration.Enums.DatabaseType.InMemory);
        }
Where:
| Param | Description |
|---|---|
|
Is the database context definition |
Default |
Is the connection string defined at |
|
Is the database driver selection. In this case |
The supported databases are:
-
SqlServer
-
Sqlite
-
InMemory
-
Cosmos
-
PostgreSQL
-
MySql
-
MariaDb
-
FireBird
-
Oracle
-
MSAccess
Repositories and Services
Services and Repositories are an important part of devon4net proposal. To make them work properly, first of all must be declared and injected at Startup.cs at DI Region.
Services are declared in devon4net.Business.Common and injected in Controller classes when needed. Use services to build your application logic.
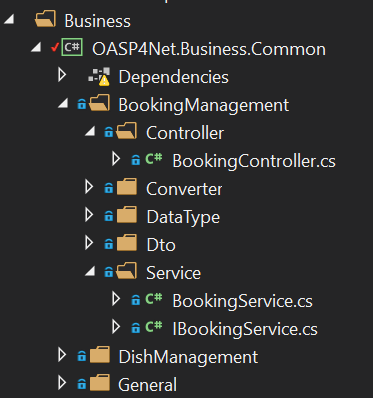
For example, My Thai Star Booking controller constructor looks like this:
        public BookingController(IBookingService bookingService, IMapper mapper)
        {
            BookingService = bookingService;
            Mapper = mapper;

        }
Currently devon4net has a Unit of Work class in order to perform CRUD operations to database making use of your designed model context.
Repositories are declared at devon4net.Domain.UnitOfWork project and make use of Unit of Work class.
The common methods to perform CRUD operations (where <T> is an entity from your model) are:
-
Sync methods:
IList<T> GetAll(Expression<Func<T, bool>> predicate = null);
T Get(Expression<Func<T, bool>> predicate = null);
IList<T> GetAllInclude(IList<string> include, Expression<Func<T, bool>> predicate = null);
T Create(T entity);
void Delete(T entity);
void DeleteById(object id);
void Delete(Expression<Func<T, bool>> where);
void Edit(T entity);
-
Async methods:
Task<IList<T>> GetAllAsync(Expression<Func<T, bool>> predicate = null);
Task<T> GetAsync(Expression<Func<T, bool>> predicate = null);
Task<IList<T>> GetAllIncludeAsync(IList<string> include, Expression<Func<T, bool>> predicate = null);
If you perform a Commit operation and an error happens, changes will be rolled back.
Swagger integration
The given templates allow you to specify the API contract through Swagger integration and the controller classes are the responsible of exposing methods making use of comments in the source code.
The next example shows how to comment the method with summaries in order to define the contract. Add (Triple Slash) XML Documentation To Swagger:
/// <summary>
/// Method to get reservations
/// </summary>
/// <response code="201">Ok.</response>
/// <response code="400">Bad request. Parser data error.</response>
/// <response code="401">Unauthorized. Authentication fail.</response>
/// <response code="403">Forbidden. Authorization error.</response>
/// <response code="500">Internal Server Error. The search process ended with error.</response>
[HttpPost]
[Route("/mythaistar/services/rest/bookingmanagement/v1/booking/search")]
//[Authorize(Policy = "MTSWaiterPolicy")]
[AllowAnonymous]
[EnableCors("CorsPolicy")]
public async Task<IActionResult> BookingSearch([FromBody]BookingSearchDto bookingSearchDto)
{
In order to be effective and make use of the comments to build the API contract, the project which contains the controller classes must generate the XML document file. To achieve this, the XML documentation file must be checked in project settings tab:
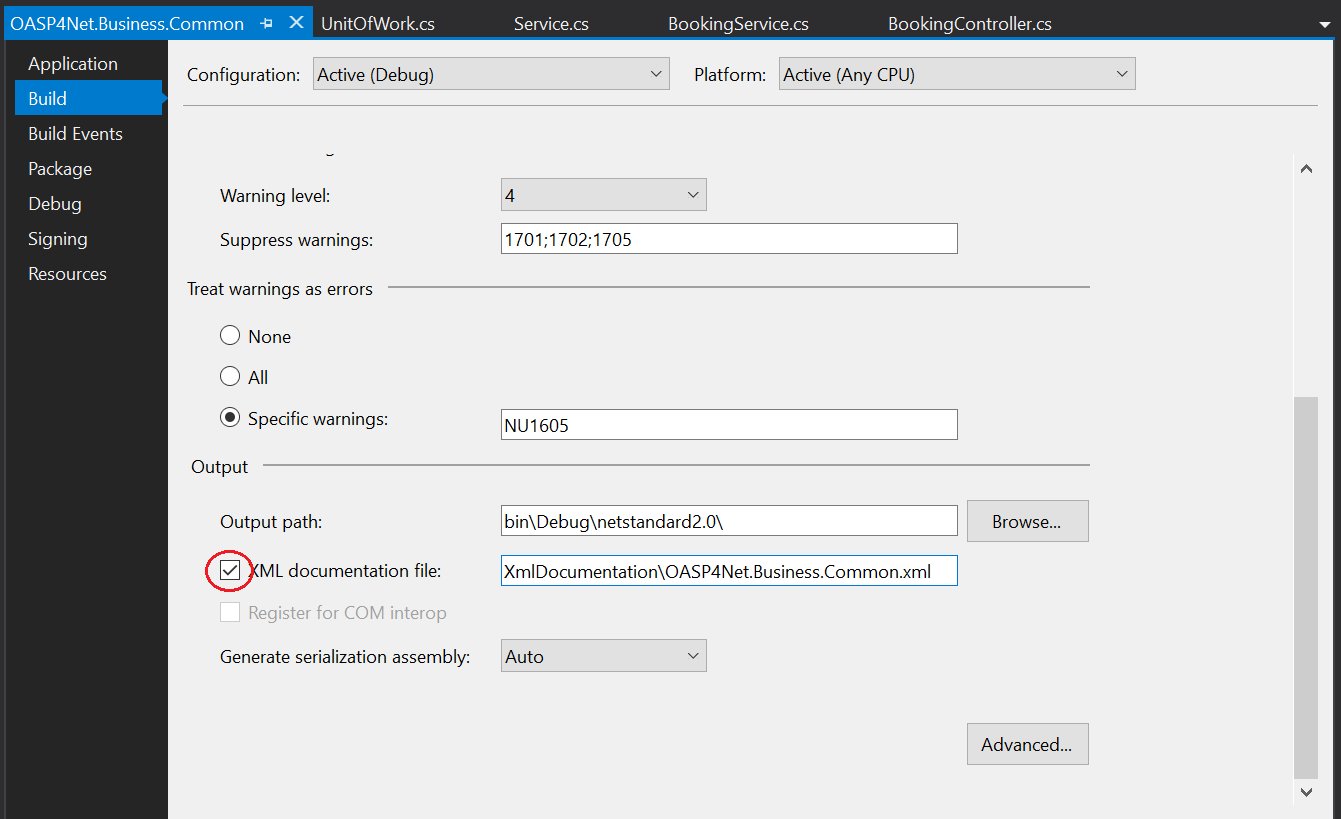
We propose to generate the file under the XmlDocumentation folder. For example in devon4net.Domain.Entities project in My Thai Star .NET implementation the output folder is:
`XmlDocumentation\devon4net.Business.Common.xml`
The file devon4net.Business.Common.xml won’t appear until you build the project. Once the file is generated, please modify its properties as a resource and set it to be Copy always .

Once you have this, the swagger user interface will show the method properties defined in your controller comments.
Making use of this technique controller are not encapsulated to the application project. Also, you can develop your controller classes in different projects obtain code reusability.
Swagger comment:
| Comment | Functionality |
|---|---|
<summary> |
Will map to the operation’s summary |
<remarks> |
Will map to the operation’s description (shown as "Implementation Notes" in the UI) |
<response code="###"> |
Specifies the different response of the target method |
<param> |
Will define the parameter(s) of the target method |
Please check Microsoft’s site regarding to summary notations.
Logging module
An important part of life software is the need of using log and traces. devon4net has a log module pre-configured to achieve this important point.
By default Microsoft provides a logging module on .NET Core applications. This module is open and can it can be extended. devon4net uses the Serilog implementation. This implementation provides a huge quantity information about events and traces.
Log file
devon4net can write the log information to a simple text file. You can configure the file name and folder at appsettings.json file (LogFile attribute) at devon4net.Application.WebApi project.
Database log
devon4net can write the log information to a SQLite database. You can configure the file name and folder at appsettings.json file (LogDatabase attribute) at devon4net.Application.WebApi project.
With this method you can launch queries in order to search the information you are looking for.
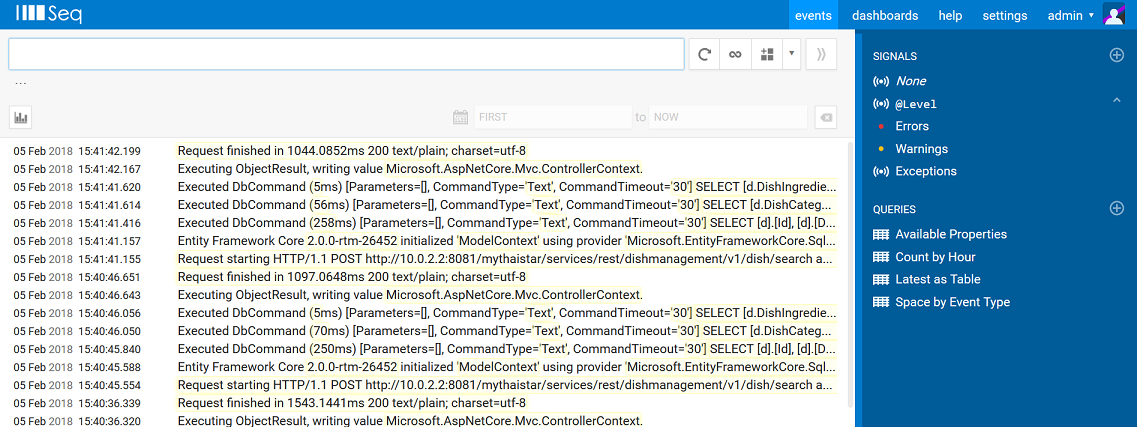
Seq log
devon4net can write the log information to a Serilog server. You can configure the Serilog URL at appsettings.json file (SeqLogServerUrl attribute) at devon4net.Application.WebApi project.
With this method you can make queries via HTTP.
By default you can find the log information at Logs folder.
JWT module
JSON Web Tokens are an open, industry standard RFC 7519 method for representing claims securely between two parties allowing you to decode, verify and generate JWT.
You should use JWT for:
-
Authentication : allowing the user to access routes, services, and resources that are permitted with that token.
-
Information Exchange: JSON Web Tokens are a good way of securely transmitting information between parties. Additionally, as the signature is calculated using the header and the payload, you can also verify that the content.
The JWT module is configured at Startup.cs inside devon4net.Application.WebApi project from .NET Core template. In this class you can configure the different authentication policy and JWT properties.
Once the user has been authenticated, the client perform the call to the backend with the attribute Bearer plus the token generated at server side.
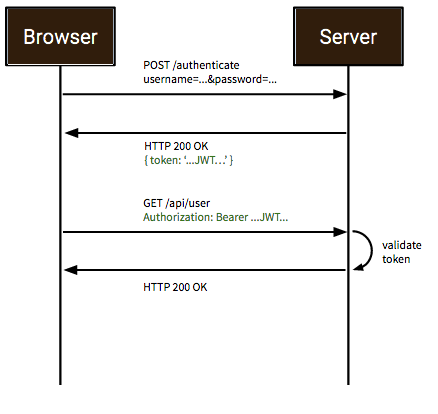
On My Thai Star sample there are two predefined users: user0 and Waiter. Once they log in the application, the client (Angular/Xamarin) will manage the server call with the json web token. With this method we can manage the server authentication and authorization.
You can find more information about JWT at jwt.io
AOP module
AOP (Aspect Oriented Programming) tracks all information when a method is call.AOP also tracks the input and output data when a method is call.
By default devon4net has AOP module pre-configured and activated for controllers at Startup.cs file at devon4net.Application.WebApi:
options.Filters.Add(new Infrastructure.AOP.AopControllerAttribute(Log.Logger));

options.Filters.Add(new Infrastructure.AOP.AopExceptionFilter(Log.Logger));
This configuration allows all Controller classes to be tracked. If you don’t need to track the info comment the lines written before.
Docker support
devon4net Core projects are ready to be integrated with docker.
My Thai Star application sample is ready to be use with linux docker containers. The Readme file explains how to launch and setup the sample application.
-
angular : Angular client to support backend. Just binaries.
-
database : Database scripts and .bak file
-
mailservice: Microservice implementation to send notifications.
-
netcore: Server side using .net core 2.0.x.
-
xamarin: Xamarin client based on Excalibur framework from The Netherlands using XForms.
Docker configuration and docker-compose files are provided.
Testing with XUnit
xUnit.net is a free, open source, community-focused unit testing tool for the .NET Framework. Written by the original inventor of NUnit v2, xUnit.net is the latest technology for unit testing C#, F#, VB.NET and other .NET languages. xUnit.net works with
ReSharper,CodeRush,TestDriven.NETand Xamarin. It is part of the .NET Foundation, and operates under their code of conduct. It is licensed under Apache 2 (an OSI approved license).
https://xunit.github.io/#documentation
Facts are tests which are always true. They test invariant conditions.
Theories are tests which are only true for a particular set of data.
The first test
using Xunit;

namespace MyFirstUnitTests
{
    public class Class1
    {
        [Fact]
        public void PassingTest()
        {
            Assert.Equal(4, Add(2, 2));
        }

        [Fact]
        public void FailingTest()
        {
            Assert.Equal(5, Add(2, 2));
        }

        int Add(int x, int y)
        {
            return x + y;
        }
    }
}
The first test with theory
Theory attribute is used to create tests with input params:
[Theory]
[InlineData(3)]
[InlineData(5)]
[InlineData(6)]
public void MyFirstTheory(int value)
{
    Assert.True(IsOdd(value));
}

bool IsOdd(int value)
{
    return value % 2 == 1;
}
Cheat Sheet
| Operation | Example |
|---|---|
Test |
[Fact] [Source,c#] ---- public void Test() { } |
Setup |
public class TestFixture { public TestFixture() { … } } |
Teardown |
public class TestFixture : IDisposable { public void Dispose() { … } } ---- |
Console runner return codes
| Code | Meaning |
|---|---|
0 |
The tests ran successfully. |
1 |
One or more of the tests failed. |
2 |
The help page was shown, either because it was requested, or because the user did not provide any command line arguments. |
3 |
There was a problem with one of the command line options passed to the runner. |
4 |
There was a problem loading one or more of the test assemblies (for example, if a 64-bit only assembly is run with the 32-bit test runner). |
Publishing
Nginx
In order to deploy your application to a Nginx server on Linux platform you can follow the instructions from Microsoft here.
IIS
In this point is shown the configuration options that must implement the .Net Core application.
Supported operating systems:
-
Windows 7 and newer
-
Windows Server 2008 R2 and newer*
WebListener server will not work in a reverse-proxy configuration with IIS. You must use the Kestrel server.
IIS configuration
Enable the Web Server (IIS) role and establish role services.
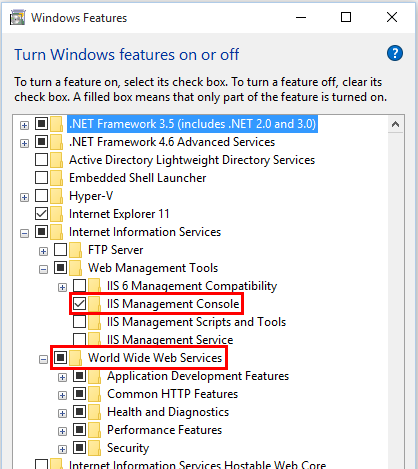
Windows desktop operating systems
Navigate to Control Panel > Programs > Programs and Features > Turn Windows features on or off (left side of the screen). Open the group for Internet Information Services and Web Management Tools. Check the box for IIS Management Console. Check the box for World Wide Web Services. Accept the default features for World Wide Web Services or customize the IIS features to suit your needs.
*Conceptually, the IIS configuration described in this document also applies to hosting ASP.NET Core applications on Nano Server IIS, but refer to ASP.NET Core with IIS on Nano Server for specific instructions.
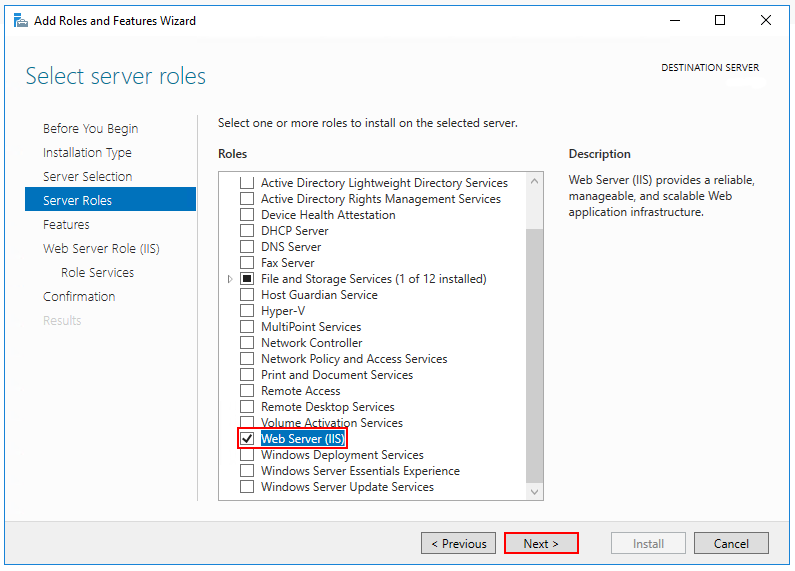
Windows Server operating systems For server operating systems, use the Add Roles and Features wizard via the Manage menu or the link in Server Manager. On the Server Roles step, check the box for Web Server (IIS).
On the Role services step, select the IIS role services you desire or accept the default role services provided.
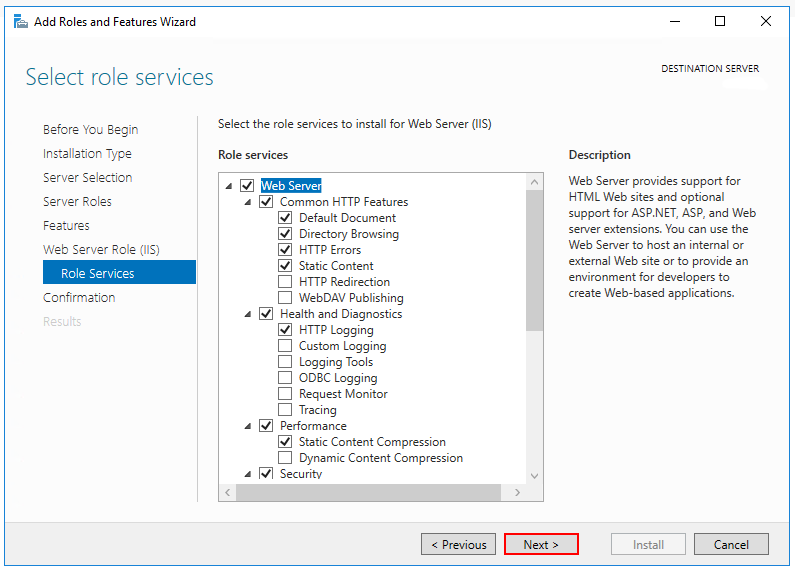
Proceed through the Confirmation step to install the web server role and services. A server/IIS restart is not required after installing the Web Server (IIS) role.
Install the .NET Core Windows Server Hosting bundle
-
Install the .NET Core Windows Server Hosting bundle on the hosting system. The bundle will install the .NET Core Runtime, .NET Core Library, and the ASP.NET Core Module. The module creates the reverse-proxy between IIS and the Kestrel server. Note: If the system doesn’t have an Internet connection, obtain and install the Microsoft Visual C++ 2015 Re-distributable before installing the .NET Core Windows Server Hosting bundle.
-
Restart the system or execute net stop was /y followed by net start w3svc from a command prompt to pick up a change to the system
PATH.
|
Note
|
If you use an IIS Shared Configuration, see ASP.NET Core Module with IIS Shared Configuration. |
To configure IISIntegration service options, include a service configuration for IISOptions in ConfigureServices:
services.Configure<IISOptions>(options =>
{
    ...
});| Option | Default | Setting |
|---|---|---|
|
true |
If true, the authentication middleware sets the |
|
null |
Sets the display name shown to users on login pages. |
|
true |
If true and the |
web.config
The web.config file configures the ASP.NET Core Module and provides other IIS configuration. Creating, transforming, and publishing web.config is handled by Microsoft.NET.Sdk.Web, which is included when you set your project’s SDK at the top of your .csproj file, <Project Sdk="Microsoft.NET.Sdk.Web">. To prevent the MSBuild target from transforming your web.config file, add the <IsTransformWebConfigDisabled> property to your project file with a setting of true:
<PropertyGroup>
  <IsTransformWebConfigDisabled>true</IsTransformWebConfigDisabled>
</PropertyGroup>
Azure
In order to deploy your application to Azure platform you can follow the instructions from Microsoft:
Set up the development environment
-
Install the latest Azure SDK for Visual Studio. The SDK installs Visual Studio if you don’t already have it.
-
Verify your Azure account. You can open a free Azure account or Activate Visual Studio subscriber benefits.
Create a web app
In the Visual Studio Start Page, select File > New > Project…

Complete the New Project dialog:
-
In the left pane, select .NET Core.
-
In the center pane, select ASP.NET Core Web Application.
-
Select OK.

In the New ASP.NET Core Web Application dialog:
-
Select Web Application.
-
Select Change Authentication.

The Change Authentication dialog appears.
-
Select Individual User Accounts.
-
Select OK to return to the New ASP.NET Core Web Application, then select OK again.

Visual Studio creates the solution.
Run the app locally
-
Choose Debug then Start Without Debugging to run the app locally.
-
Click the About and Contact links to verify the web application works.

-
Select Register and register a new user. You can use a fictitious email address. When you submit, the page displays the following error:
"Internal Server Error: A database operation failed while processing the request. SQL exception: Cannot open the database. Applying existing migrations for Application DB context may resolve this issue."
-
Select Apply Migrations and, once the page updates, refresh the page.

The app displays the email used to register the new user and a Log out link.

Deploy the app to Azure
Close the web page, return to Visual Studio, and select Stop Debugging from the Debug menu.
Right-click on the project in Solution Explorer and select Publish….

In the Publish dialog, select Microsoft Azure App Service and click Publish.

-
Name the app a unique name.
-
Select a subscription.
-
Select New… for the resource group and enter a name for the new resource group.
-
Select New… for the app service plan and select a location near you. You can keep the name that is generated by default.

-
Select the Services tab to create a new database.
-
Select the green + icon to create a new SQL Database

-
Select New… on the Configure SQL Database dialog to create a new database.

The Configure SQL Server dialog appears.
-
Enter an administrator user name and password, and then select OK. Don’t forget the user name and password you create in this step. You can keep the default Server Name.
-
Enter names for the database and connection string.
"admin" is not allowed as the administrator user name.

-
Select OK.
Visual Studio returns to the Create App Service dialog.
-
Select Create on the Create App Service dialog.

-
Click the Settings link in the Publish dialog.

On the Settings page of the Publish dialog:
-
Expand Databases and check Use this connection string at runtime.
-
Expand Entity Framework Migrations and check Apply this migration on publish.
-
Select Save. Visual Studio returns to the Publish dialog.

Click Publish. Visual Studio will publish your app to Azure and launch the cloud app in your browser.
Test your app in Azure
-
Test the About and Contact links
-
Register a new user

Update the app
-
Edit
the Pages/About.cshtml Razorpage and change its contents. For example, you can modify the paragraph to say "Hello ASP.NET Core!":html<button class="action copy" data-bi-name="copy">Copy</button>
@page
@model AboutModel
@{
    ViewData["Title"] = "About";
}
<h2>@ViewData["Title"]</h2>
<h3>@Model.Message</h3>

<p>Hello ASP.NET Core!</p>-
Right-click on the project and select Publish… again.
-
After the app is published, verify the changes you made are available on Azure.

Clean up
When you have finished testing the app, go to the Azure portal and delete the app.
-
Select Resource groups, then select the resource group you created.

-
In the Resource groups page, select Delete.

-
Enter the name of the resource group and select Delete. Your app and all other resources created in this tutorial are now deleted from Azure.