
CobiGen CLI
CobiGen CLI
The command line interface (CLI) for CobiGen enables the generation of code using few commands. This feature allows us to decouple CobiGen from Eclipse.
Install CobiGen CLI
In order to install the CobiGen CLI you will need to use the devonfw/ide. In a console run devon cobigen.
Commands and options
Using the following command and option you will be able to customize your generation as follows:
-
cobigen, cg: Main entry point of the CLI. If no arguments are passed, man page will be printed. -
[generate, g]: Command used for code generation.-
InputGlob: Glob pattern of the input file or the whole path of the input file from which the code will be generated. -
< --increment, -i >: Specifies an increment ID to be generated. You can also search increments by name and CobiGen will output the resultant list. If an exact match found, code generation will happen. -
< --template, -t >: specifies a template ID to be generated. You can also search templates by name and CobiGen will output the resultant list. -
< --outputRootPath, -out >: The project file path in which you want to generate your code. If no output path is given, CobiGen will use the project of your input file.
-
-
[adapt-templates, a]: Generates a new templates folder next to the CobiGen CLI and stores its location inside a configuration file. After executing this command, the CLI will attempt to use the specified Templates folder. -
< --verbose, -v >: Prints debug information, verbose log. -
< --help, -h >: Prints man page. -
< update, u>: This command compare the artificial pom plug-ins version with central latest version available and user can update any outdated plug-ins version .
CLI Execution steps:
CobiGen CLI is installed inside your devonfw distribution. In order to execute it follow the next steps:
-
Run
console.bat, this will open a console. -
Execute
cobigenorcgand the man page should be printed. -
Use a valid CobiGen input file and run
cobigen generate <pathToInputFile>. Note: On the first execution of the CLI, CobiGen will download all the needed dependencies, please be patient. -
A list of increments will be printed so that you can start the generation.
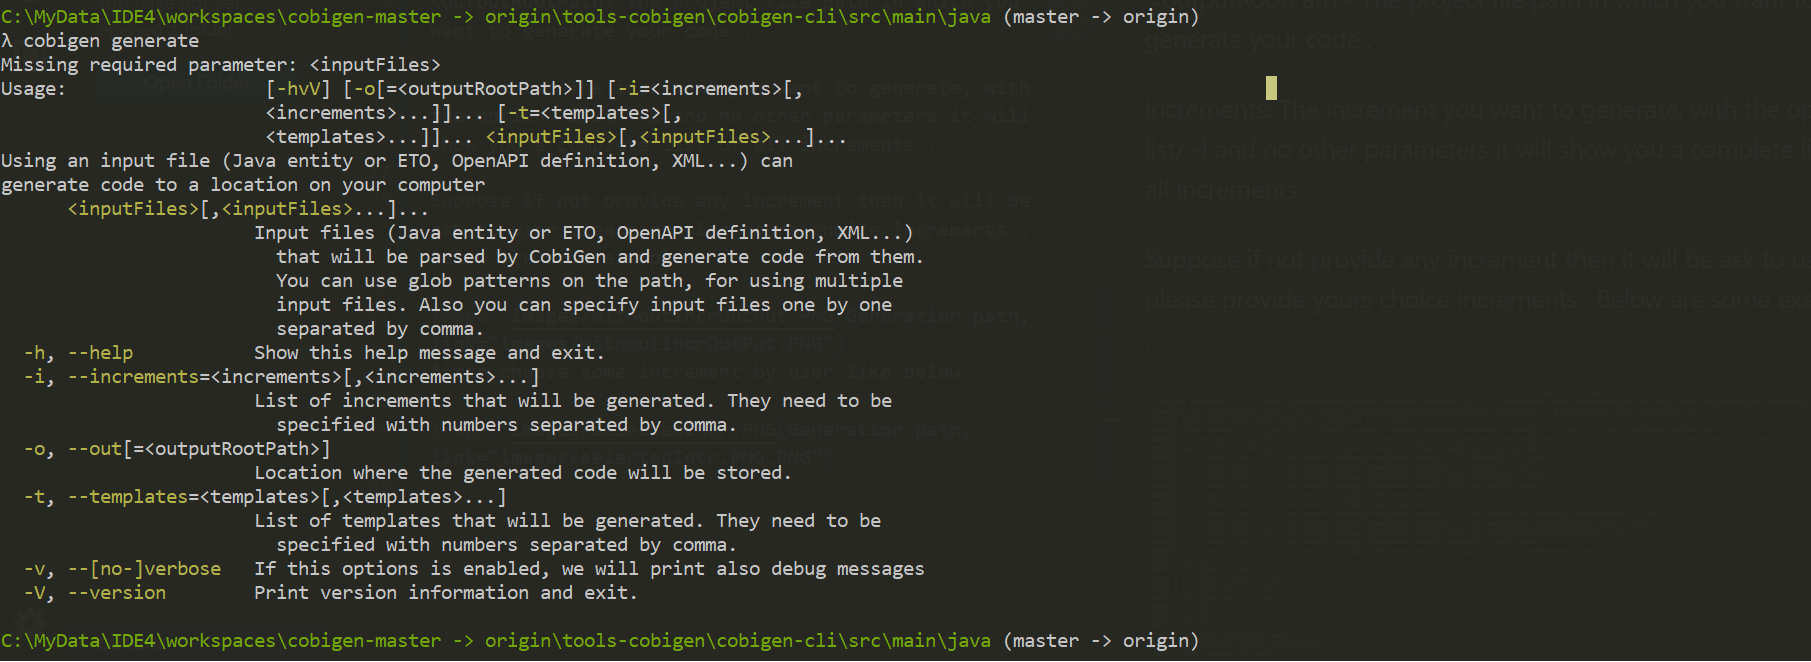
Preview of the man page for generate command:
Examples
A selection of commands that you can use with the CLI:
-
cobigen generate foo\bar\EmployeeEntity.java: As no output path has been defined, CobiGen will try to find thepom.xmlof the current project in order to set the generation root path. -
cobigen generate foo\bar\*.java --out other\project: Will retrieve all the Java files on that input folder and generate the code on the path specified by--out. -
cg g foo\bar\webServices.yml --increment TO: Performs a string search usingTOand will print the closest increments like in the following image:

-
cg g foo\bar\webServices.yml -i 1,4,6: Directly generates increments with IDs1,4and6. CobiGen will not request you any other input. -
cg a: Downloads the latest CobiGen_Templates and unpacks them next to the CLI. CobiGen will from now on use these unpacked Templates for generation. -
cg a -cl C:\my\custom\location: Downloads the latest CobiGen_Templates and unpacks them inC:\my\custom\location. CobiGen will from now on use these unpacked Templates for generation.
CLI update command
Example of Update Command :

Select the plug-ins which you want to update like below :

CLI custom templates
To use custom templates, it’s necessary to set up a custom configuration path as described here.
Troubleshooting
When generating code from a Java file, CobiGen makes use of Java reflection for generating templates. In order to do that, the CLI needs to find the compiled source code of your project.
If you find an error like Compiled class foo\bar\EmployeeEntity.java has not been found, it means you need to run mvn clean install on the input project so that a new target folder gets created with the needed compiled sources.