
cicdgen Schematics
CICDGEN SCHEMATICS
We use angular schematics to create and update an existing devonfw project in order to adapt it to a CICD environment. All schematics are prepared to work with Production Line, a Capgemini CICD platform, but it can also work in other environment which have the following tools:
-
Jenkins
-
GitLab
-
Nexus 3
-
SonarQube
The list of available schematics are:
How to run the schematics
You can run the schematics using the schematics CLI provided by the angular team, but the easiest way to run it is using the cicdgen CLI which is a wrapper for the schematics CLI in order to use it in a easy way.
To generate files you only need to run the command
$ cicdgen generate <schematic-name> [arguments]
<schematic-name> is the name of the schematic that you want to execute.
You can find all information about arguments in the schematic section.
Merge Strategies
When you execute cicdgen in a project, is possible that you already have some files that cicdgen will generate. Until version 1.5 the behaviour in these cases was to throw an error and not create/modify any file. Since version 1.6 you can choose what to do in case of conflict. In this page we will explain who to choose one merge strategy and how it works.
To choose a merge strategy, you must pass to cicdgen the merge parameter followed by the name of the strategy. The strategies available are: error, keep, override, combine.
Example:
$ cicdgen generate devon4j --merge keep
-
error: The error strategy is the same as until version 1.5, throwing an error and do not create/modify any file. This is the default value, if you do not pass the merge parameter this value will be taken.
-
keep: The keep strategy will keep the actual content of your files in case of conflict. If there is no conflict, the file will be created with the new content.
-
override: The override strategy will override your current files, without throwing any error, and create a new ones with the new content. If there is no conflict, the file will be created with the new content.
-
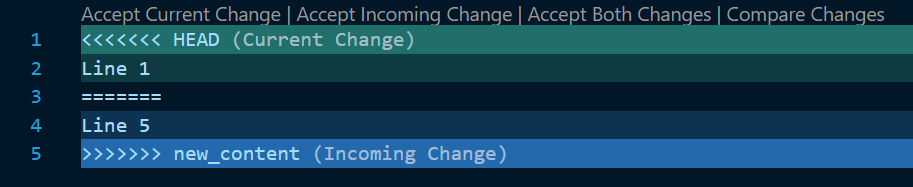
combine: The combine strategy will create a new file combining the current content with the new content. In order to combine both files, it will apply a diff algorithm and it will show the conflicts in the same way that git does. If there is no conflict, the file will be created with the new content.
By resolving the conflicts in the same way as git, you can use the same tools in order to solve them. For example, you can use VSCode:
Examples:
keep Current file:
Line 1
Line 2
Line 3
Line 4
New file:
Line 5
Line 2
Line 3
Line 4
The result will be:
Line 1
Line 2
Line 3
Line 4
override Current file:
Line 1
Line 2
Line 3
Line 4
New file:
Line 5
Line 2
Line 3
Line 4
The result will be:
Line 5
Line 2
Line 3
Line 4
combine Current file:
Line 1
Line 2
Line 3
Line 4
New file:
Line 5
Line 2
Line 3
Line 4
The result will be:
<<<<<<< HEAD
Line 1
=======
Line 5
>>>>>>> new_content
Line 2
Line 3
Line 4
devon4j schematic
With the cicdgen generate devon4j command you will be able to generate some files required for CICD. In this section we will explain the arguments of this command and also the files that will be generated.
devon4j schematic arguments
When you execute the cicdgen generate devon4j command you can also add some arguments in order to modify the behaviour of the command. Those arguments are:
-
--docker
The type of this parameter if boolean. If it is present, docker related files and pipeline stage will be also generated. For more details see docker section of Jenkinsfile and files generated for docker
-
--dockerurlThe URL of your external docker daemon. Example: tcp://127.0.0.1:2376
-
--dockercertidThe Jenkins credential id for your docker daemon certificate. It is only required when your docker daemon is secure.
-
--registryurlYour docker registry URL. It is required when
--dockeris true, and it will be used to know where the docker image will be uploaded. -
--openshiftThe type of this parameter if boolean. If it is present, OpenShift related files and pipeline stage will be also generated. For more details see OpenShift section of Jenkinsfile and files generated for docker (same as
--docker) -
--ocnameThe name used for register your OpenShift cluster in Jenkins.
-
--ocnOpenShift cluster namespace
-
--teams
With this argument we can add the teams notification option in the Jenkinsfile.
-
--teamsnameThe name of the Microsoft Teams
webhook. It is defined at Microsoft Teams connectors. -
--teamsurlThe url of the Microsoft Teams
webhook. It is returned by Microsoft Teams when you create a connector. -
--merge
If you have used cicdgen previously, you can choose what you want to do in case of file conflict. The default behavior is to throw an error and not modify any file. You can see the other strategies on their specific page.
-
--commit
If true, all changes will be committed at the end of the process (if possible). In order to send a false value, you need to write
--commit=false
Devon4ng generated files
When you execute the generate devon4ng command, some files will be added/updated in your project.
-
.gitignore
Defines all files that git will ignore. e.g: compiled files, IDE configurations. It will download the content from: https://gitignore.io/api/java,maven,eclipse,intellij,intellij+all,intellij+iml,visualstudiocode
-
pom.xml
The pom.xml is modified in order to add, if needed, the
distributionManagement. -
Jenkinsfile
The Jenkinsfile is the file which define the Jenkins pipeline of our project. With this we can execute the test, build the application and deploy it automatically following a CICD methodology. This file is prepared to work with the Production Line default values, but it is also fully configurable to your needs.
-
Prerequisites
-
A Production Line instance. It can works also if you have a Jenkins, SonarQube and Nexus3, but in this case maybe you need to configure them properly.
-
Java 11 installed in Jenkins as a global tool.
-
SonarQube installed in Jenkins as a global tool.
-
Maven3 installed in Jenkins as a global tool.
-
A maven global settings properly configured in Jenkins.
-
If you will use docker to deploy:
-
Docker installed in Jenkins as a global custom tool.
-
The Nexus3 with a docker repository.
-
A machine with docker installed where the build and deploy will happen.
-
A docker network called application.
-
-
If you will use OpenShift to deploy:
-
An OpenShift instance
-
The OpenShift projects created
-
-
-
The Jenkins syntax
In this section we will explain a little bit the syntax of the Jenkins, so if you need to change something you will be able to do it properly.
-
agent: Here you can specify the Jenkins agent where the pipeline will be executed. The default value is any.
-
options: Here you can set global options to the pipeline. By default, we add a build discarded to delete old artifacts/build of the pipeline and also we disable the concurrent builds.
If the teams option is passed to cicdgen, we add a new option in order to send notifications to Microsoft Teams with the status of the pipeline executions.
-
environment: Here all environment variables are defined. All values defined here matches with the Production Line defaults. If you Jenkins has other values, you need to update it manually.
-
stages: Here are defined all stages that our pipeline will execute. Those stages are:
-
Loading Custom Tools: Load some custom tools that can not be loaded in the tools section. Also set some variables depending on the git branch which you are executing. Also, we set properly the version number in all pom files. It means that if your branch is develop, your version should end with the word
-SNAPSHOT, in order case, if-SNAPSHOTis present it will be removed. -
Fresh Dependency Installation: install all packages need to build/run your java project.
-
Unit Tests: execute the
mvn testcommand. -
SonarQube code analysis: send the project to SonarQube in order to get the static code analysis of your project.
-
Deliver application into Nexus: build the project and send all bundle files to Nexsus3.
-
If
--dockeris present: -
If
--openshiftis present:-
Create the Docker image: build a new docker image that contains the new version of the project using a OpenShift build config.
-
Deploy the new image: deploy a new version of the application in OpenShift.
-
Check pod status: checks that the application deployed in the previous stage is running properly. If the application does not run the pipeline will fail.
-
-
-
post: actions that will be executed after the stages. We use it to clean up all files.
-
-
devon4j Docker generated files
When you generate the files for a devon4ng you can also pass the option --docker. It will generate also some extra files related to docker.
If you pass the --docker option the option --registryurl is also required. It will be used to upload the images to a docker registry. Example: if your registry url is docker-registry-test.s2-eu.capgemini.com you should execute the command in this way: cicdgen generate devon4node --groupid com.devonfw --docker --registryurl docker-registry-test.s2-eu.capgemini.com.
|
-
Dockerfile
This file contains the instructions to build a docker image for you project. This Dockerfile is for local development purposes, you can use it in your machine executing:
$ cd <path-to-your-project>
$ docker build -t <project-name>/<tag> .
This build is using a multi-stage build. First, it use a maven image in order to compile the source code, then it will use a java image to run the application. With the multi-stage build we keep the final image as clean as possible.
-
Dockerfile.ciThis file contains the instructions to create a docker image for you project. The main difference with the Dockerfile is that this file will be only used in the Jenkins pipeline. Instead of compiling again the code, it takes the compiled war from Jenkins to the image.
devon4ng schematic
With the cicdgen generate devon4ng command you can generate some files required for CICD. In this section we will explain the arguments of this command and also the files that will be generated.
devon4ng schematic arguments
When you execute the cicdgen generate devon4ng command you can also add some arguments in order to modify the behaviour of the command. Those arguments are:
-
--docker
The type of this parameter if boolean. If it is present, docker related files and pipeline stage will be also generated. For more details see docker section of Jenkinsfile and files generated for docker
-
--dockerurlThe URL of your external docker daemon. Example: tcp://127.0.0.1:2376
-
--dockercertidThe Jenkins credential id for your docker daemon certificate. It is only required when your docker daemon is secure.
-
--registryurlYour docker registry URL. It is required when
--dockeris true, and it will be used to know where the docker image will be uploaded. -
--openshiftThe type of this parameter if boolean. If it is present, OpenShift related files and pipeline stage will be also generated. For more details see OpenShift section of Jenkinsfile and files generated for OpenShift (same as
--docker) -
--ocnameThe name used for register your OpenShift cluster in Jenkins.
-
--ocnOpenShift cluster namespace
-
--groupid
The project
groupId. This argument is required. It will be used for store the project in a maven repository at Nexus 3. Why maven? Because is the kind of repository where we can upload/download a zip file easily. Npm repository needs a package.json file but, as we compile the angular application to static javascript and html files, the package.json is no needed anymore. -
--teams
With this argument we can add the teams notification option in the
Jenkinsfile. -
--teamsnameThe name of the Microsoft Teams
webhook. It is defined at Microsoft Teams connectors. -
--teamsurlThe url of the Microsoft Teams
webhook. It is returned by Microsoft Teams when you create a connector. -
--merge
If you have used cicdgen previously, you can choose what you want to do in case of file conflict. The default behavior is to throw an error and not modify any file. You can see the other strategies on their specific page.
-
--commit
If true, all changes will be committed at the end of the process (if possible). In order to send a false value, you need to write
--commit=false
devon4ng generated files
When you execute the generate devon4ng command, some files will be added/updated in your project.
Files
-
angular.json
The angular.json is modified in order to change the compiled files destination folder. Now, when you make a build of your project, the compiled files will be generated into dist folder instead of dist/<project-name> folder.
-
package.json
The package.json is modified in order to add a script for test the application using Chrome Headless instead of a regular chrome. This script is called test:ci.
-
karma.conf.js
The karma.conf.js is also modified in order to add the Chrome Headless as a browser to execute test. The coverage output folder is change to ./coverage instead of ./coverage/<project-name>
-
Jenkinsfile
The Jenkinsfile is the file which define the Jenkins pipeline of our project. With this we can execute the test, build the application and deploy it automatically following a CICD methodology. This file is prepared to work with the Production Line default values, but it is also fully configurable to your needs.
-
Prerequisites
-
A Production Line instance. It can works also if you have a Jenkins, SonarQube and Nexus3, but in this case maybe you need to configure them properly.
-
NodeJS installed in Jenkins as a global tool.
-
Google Chrome installed in Jenkins as a global custom tool.
-
SonarQube installed in Jenkins as a global tool.
-
Maven3 installed in Jenkins as a global tool.
-
A maven global settings properly configured in Jenkins.
-
If you will use docker :
-
Docker installed in Jenkins as a global custom tool.
-
The Nexus3 with a docker repository.
-
A machine with docker installed where the build and deploy will happen.
-
A docker network called application.
-
If you will use OpenShift :
-
An OpenShift instance
-
The OpenShift projects created
-
The Jenkins syntax
In this section we will explain a little bit the syntax of the Jenkins, so if you need to change something you will be able to do it properly.
-
agent: Here you can specify the Jenkins agent where the pipeline will be executed. The default value is any.
-
options: Here you can set global options for the pipeline. By default, we add a build discarded to delete old artifacts/build of the pipeline and also we disable the concurrent builds.
If the teams option is passed to cicdgen, we add a new option in order to send notifications to Microsoft Teams with the status of the pipeline executions.
-
tools: Here we define the global tools configurations. By default a version of nodejs is added here.
-
environment: Here all environment variables are defined. All values defined here matches with the Production Line defaults. If you Jenkins has other values, you need to update it manually.
-
stages: Here are defined all stages that our pipeline will execute. Those stages are:
-
Loading Custom Tools: in this stage some custom tools are loaded. Also we set some variables depending on the git branch which you are executing.
-
Fresh Dependency Installation: install all packages need to build/run your angular project.
-
Code Linting: execute the linter analysis.
-
Execute Angular tests: execute the angular test in a Chrome Headless.
-
SonarQube code analysis: send the project to SonarQube in order to get the static code analysis of your project.
-
Build Application: compile the application to be ready to deploy in a web server.
-
Deliver application into Nexus: store all compiled files in Nexus3 as a zip file.
-
If --docker is present:
-
Create the Docker image: build a new docker image that contains the new version of the project.
-
Deploy the new image: deploy a new version of the application using the image created in the previous stage. The previous version is removed.
-
If --openshift is present:
-
Create the Docker image: build a new docker image that contains the new version of the project using a OpenShift build config.
-
Deploy the new image: deploy a new version of the application in OpenShift.
-
Check pod status: checks that the application deployed in the previous stage is running properly. If the application does not run the pipeline will fail.
-
post: actions that will be executed after the stages. We use it to clean up all files.
devon4ng Docker generated files
When you generate the files for a devon4ng you can also pass the option --docker. It will generate also some extra files related to docker.
If you pass the --docker option the option --registryurl is also required. It will be used to upload the images to a docker registry. Example: if your registry url is docker-registry-test.s2-eu.capgemini.com you should execute the command in this way: cicdgen generate devon4node --groupid com.devonfw --docker `--registryurl docker-registry-test.s2-eu.capgemini.com`.
Files
-
.dockerignore
In this files are defined the folders that will not be copied to the docker image. Fore more information read the official documentation.
-
Dockerfile
This file contains the instructions to build a docker image for you project. This Dockerfile is for local development purposes, you can use it in your machine executing:
$ cd <path-to-your-project>
$ docker build -t <project-name>/<tag> .
This build is using a multi-stage build. First, it use a node image in order to compile the source code, then it will use a nginx image as a web server for our devon4ng application. With the multi-stage build we avoid everything related to node.js in our final image, where we only have a nginx with our application compiled.
-
Dockerfile.ci
This file contains the instructions to create a docker image for you project. The main difference with the Dockerfile is that this file will be only used in the Jenkins pipeline. Instead of compiling again the code, it takes all compiled files and the nginx.conf from Jenkins to the image.
devon4net schematic
With the cicdgen generate devon4net command you can generate some files required for CICD. In this section we will explain the arguments of this command and also the files that will be generated.
devon4net schematic arguments
When you execute the cicdgen generate devon4net command you can also add some arguments in order to modify the behaviour of the command. Those arguments are:
-
--appname
The name of your devon4net application.
-
--appversion
The initial version of your devon4net application
-
--docker
The type of this parameter if boolean. If it is present, docker related files and pipeline stage will be also generated. For more details see docker section of Jenkinsfile and files generated for docker
-
--dockerurl
The URL of your external docker daemon. Example: tcp://127.0.0.1:2376
-
--dockercertid
The Jenkins credential id for your docker daemon certificate. It is only required when your docker daemon is secure.
-
--registryurl
Your docker registry URL. It is required when --docker is true, and it will be used to know where the docker image will be uploaded.
-
--openshift
The type of this parameter if boolean. If it is present, OpenShift related files and pipeline stage will be also generated. For more details see OpenShift section of Jenkinsfile and files generated for OpenShift (same as --docker)
-
--ocname
The name used for register your OpenShift cluster in Jenkins.
-
--ocn
OpenShift cluster namespace
-
--groupid
The project groupId. This argument is required. It will be used for store the project in a maven repository at Nexus 3. Why maven? Because is the kind of repository where we can upload/download a zip file easily. Npm repository needs a package.json file but, as we compile the angular application to static javascript and html files, the package.json is no needed anymore.
-
--teams
With this argument we can add the teams notification option in the Jenkinsfile.
-
--teamsname
The name of the Microsoft Teams webhook. It is defined at Microsoft Teams connectors.
-
--teamsurl
The url of the Microsoft Teams webhook. It is returned by Microsoft Teams when you create a connector.
-
--merge
If you have used cicdgen previously, you can choose what you want to do in case of file conflict. The default behavior is to throw an error and not modify any file. You can see the other strategies on their specific page.
-
--commit
If true, all changes will be committed at the end of the process (if possible). In order to send a false value, you need to write --commit=false
devon4net generated files
When you execute the generate devon4net command, some files will be added/updated in your project.
Files
-
Jenkinsfile
The Jenkinsfile is the file which define the Jenkins pipeline of our project. With this we can execute the test, build the application and deploy it automatically following a CICD methodology. This file is prepared to work with the Production Line default values, but it is also fully configurable to your needs.
-
Prerequisites
-
A Production Line instance. It can works also if you have a Jenkins, SonarQube and Nexus3, but in this case maybe you need to configure them properly.
-
dotnet core installed in Jenkins as a global tool.
-
SonarQube installed in Jenkins as a global tool.
-
Maven3 installed in Jenkins as a global tool.
-
A maven global settings properly configured in Jenkins.
-
If you will use docker :
-
Docker installed in Jenkins as a global custom tool.
-
The Nexus3 with a docker repository.
-
A machine with docker installed where the build and deploy will happen.
-
If you will use OpenShift :
-
An OpenShift instance
-
The OpenShift projects created
-
The Jenkins syntax
In this section we will explain a little bit the syntax of the Jenkins, so if you need to change something you will be able to do it properly.
-
agent: Here you can specify the Jenkins agent where the pipeline will be executed. The default value is any.
-
options: Here you can set global options for the pipeline. By default, we add a build discarded to delete old artifacts/build of the pipeline and also we disable the concurrent builds.
If the teams option is passed to cicdgen, we add a new option in order to send notifications to Microsoft Teams with the status of the pipeline executions.
-
tools: Here we define the global tools configurations. By default a version of nodejs is added here.
-
environment: Here all environment variables are defined. All values defined here matches with the Production Line defaults. If you Jenkins has other values, you need to update it manually.
-
stages: Here are defined all stages that our pipeline will execute. Those stages are:
-
Loading Custom Tools: in this stage some custom tools are loaded. Also we set some variables depending on the git branch which you are executing.
-
Fresh Dependency Installation: install all dependencies need to build/run your dotnet project.
-
Execute dotnet tests: execute the tests.
-
SonarQube code analysis: send the project to SonarQube in order to get the static code analysis of your project.
-
Build Application: compile the application to be ready to deploy in a web server.
-
Deliver application into Nexus: store all compiled files in Nexus3 as a zip file.
-
If --docker is present:
-
Create the Docker image: build a new docker image that contains the new version of the project.
-
Deploy the new image: deploy a new version of the application using the image created in the previous stage. The previous version is removed.
-
If --openshift is present:
-
Create the Docker image: build a new docker image that contains the new version of the project using a OpenShift build config.
-
Deploy the new image: deploy a new version of the application in OpenShift.
-
Check pod status: checks that the application deployed in the previous stage is running properly. If the application does not run the pipeline will fail.
-
post: actions that will be executed after the stages. We use it to clean up all files.
devon4net Docker generated files
When you generate the files for devon4net you can also pass the option --docker. It will generate also some extra files related to docker.
If you pass the --docker option the option --registryurl is also required. It will be used to upload the images to a docker registry. Example: if your registry url is docker-registry-test.s2-eu.capgemini.com you should execute the command in this way: cicdgen generate devon4net --groupid com.devonfw --docker `--registryurl docker-registry-test.s2-eu.capgemini.com`.
Files
-
.dockerignore
In this files are defined the folders that will not be copied to the docker image. Fore more information read the official documentation.
-
Dockerfile
This file contains the instructions to build a docker image for your project. This Dockerfile is for local development purposes, you can use it in your machine executing:
$ cd <path-to-your-project>
$ docker build -t <project-name>/<tag> .
-
Dockerfile.ci
This file contains the instructions to create a docker image for you project. The main difference with the Dockerfile is that this file will be only used in the Jenkins pipeline. Instead of compiling again the code, it takes all compiled files from Jenkins to the image.
devon4node schematic
With the cicdgen generate devon4node command you can generate some files required for CICD. In this section we will explain the arguments of this command and also the files that will be generated.
devon4node schematic arguments
When you execute the cicdgen generate devon4node command you can also add some arguments in order to modify the behaviour of the command. Those arguments are:
-
--docker
The type of this parameter if boolean. If it is present, docker related files and pipeline stage will be also generated. For more details see docker section of Jenkinsfile and files generated for docker
-
--dockerurl
The URL of your external docker daemon. Example: tcp://127.0.0.1:2376
-
--dockercertid
The Jenkins credential id for your docker daemon certificate. It is only required when your docker daemon is secure.
-
--registryurl
Your docker registry URL. It is required when --docker is true, and it will be used to know where the docker image will be uploaded.
-
--openshift
The type of this parameter if boolean. If it is present, OpenShift related files and pipeline stage will be also generated. For more details see OpenShift section of Jenkinsfile and files generated for OpenShift (same as --docker)
-
--ocname
The name used for register your OpenShift cluster in Jenkins.
-
--ocn
OpenShift cluster namespace
-
--groupid
The project groupId. This argument is required. It will be used for store the project in a maven repository at Nexus 3. Why maven? Because is the kind of repository where we can upload/download a zip file easily. Npm repository needs a package.json file but, as we compile the angular application to static javascript and html files, the package.json is no needed anymore.
-
--teams
With this argument we can add the teams notification option in the Jenkinsfile.
-
--teamsname
The name of the Microsoft Teams webhook. It is defined at Microsoft Teams connectors.
-
--teamsurl
The url of the Microsoft Teams webhook. It is returned by Microsoft Teams when you create a connector.
-
--merge
If you have used cicdgen previously, you can choose what you want to do in case of file conflict. The default behavior is to throw an error and not modify any file. You can see the other strategies on their specific page.
-
--commit
If true, all changes will be committed at the end of the process (if possible). In order to send a false value, you need to write --commit=false
devon4node generated files
When you execute the generate devon4node command, some files will be added/updated in your project.
Files
-
package.json
The package.json is modified in order to add a script for run the linter and generate the json report. This script is called lint:ci.
-
Jenkinsfile
The Jenkinsfile is the file which define the Jenkins pipeline of our project. With this we can execute the test, build the application and deploy it automatically following a CICD methodology. This file is prepared to work with the Production Line default values, but it is also fully configurable to your needs.
-
Prerequisites
-
A Production Line instance. It can works also if you have a Jenkins, SonarQube and Nexus3, but in this case maybe you need to configure them properly.
-
NodeJS installed in Jenkins as a global tool.
-
SonarQube installed in Jenkins as a global tool.
-
Maven3 installed in Jenkins as a global tool.
-
A maven global settings properly configured in Jenkins.
-
If you will use docker :
-
Docker installed in Jenkins as a global custom tool.
-
The Nexus3 with a docker repository.
-
A machine with docker installed where the build and deploy will happen.
-
If you will use OpenShift :
-
An OpenShift instance
-
The OpenShift projects created
-
The Jenkins syntax
In this section we will explain a little bit the syntax of the Jenkins, so if you need to change something you will be able to do it properly.
-
agent: Here you can specify the Jenkins agent where the pipeline will be executed. The default value is any.
-
options: Here you can set global options for the pipeline. By default, we add a build discarded to delete old artifacts/build of the pipeline and also we disable the concurrent builds.
If the teams option is passed to cicdgen, we add a new option in order to send notifications to Microsoft Teams with the status of the pipeline executions.
-
tools: Here we define the global tools configurations. By default a version of nodejs is added here.
-
environment: Here all environment variables are defined. All values defined here matches with the Production Line defaults. If you Jenkins has other values, you need to update it manually.
-
stages: Here are defined all stages that our pipeline will execute. Those stages are:
-
Loading Custom Tools: in this stage some custom tools are loaded. Also we set some variables depending on the git branch which you are executing.
-
Fresh Dependency Installation: install all packages need to build/run your node project.
-
Code Linting: execute the linter analysis.
-
Execute tests: execute the tests.
-
SonarQube code analysis: send the project to SonarQube in order to get the static code analysis of your project.
-
Build Application: compile the application to be ready to deploy in a web server.
-
Deliver application into Nexus: store all compiled files in Nexus3 as a zip file.
-
If --docker is present:
-
Create the Docker image: build a new docker image that contains the new version of the project.
-
Deploy the new image: deploy a new version of the application using the image created in the previous stage. The previous version is removed.
-
If --openshift is present:
-
Create the Docker image: build a new docker image that contains the new version of the project using a OpenShift build config.
-
Deploy the new image: deploy a new version of the application in OpenShift.
-
Check pod status: checks that the application deployed in the previous stage is running properly. If the application does not run the pipeline will fail.
-
post: actions that will be executed after the stages. We use it to clean up all files.
devon4node Docker generated files
When you generate the files for a devon4node you can also pass the option --docker. It will generate also some extra files related to docker.
If you pass the --docker option the option --registryurl is also required. It will be used to upload the images to a docker registry. Example: if your registry url is docker-registry-test.s2-eu.capgemini.com you should execute the command in this way: cicdgen generate devon4node --groupid com.devonfw --docker `--registryurl docker-registry-test.s2-eu.capgemini.com`.
Files
-
.dockerignore
In this files are defined the folders that will not be copied to the docker image. Fore more information read the official documentation.
-
Dockerfile
This file contains the instructions to build a docker image for you project. This Dockerfile is for local development purposes, you can use it in your machine executing:
$ cd <path-to-your-project>
$ docker build -t <project-name>/<tag> .
This build is installs all dependencies in ordre to build the project and then remove all devDependencies in order to keep only the production dependencies.
-
.dockerignore.ci
Another .dockerignore. The purpose of this one is to define de file exclusions in your CI pipeline.
-
Dockerfile.ci
This file contains the instructions to create a docker image for you project. The main difference with the Dockerfile is that this file will be only used in the Jenkins pipeline. Instead of compiling again the code, it takes all compiled files from Jenkins to the image.
Unresolved directive in master.asciidoc - include::hangar.wiki/hangar.asciidoc[leveloffset=+1]