
Templates
WebAPI Template
This section contains all of the information about the template that corresponds to the Devon4net WebAPI. This template will allow you to easily create a functional API with everything set up so you can start coding for your specific domain.
Firstly, all the details about the contents of the package will be explained. Going through all of the directory tree explaining the most imporant concepts. Then we will show an example of how to add the entity Student from the domain layer all the way to the controller, so you can understand how the architecture works on this template and how the layers interact with each other.
Devon4Net.Application.WebAPI
This is the startup project of the template. Its main purpose is to launch the api and configure it using the settings files. The following figure shows the directory tree you will find when you first use the template.
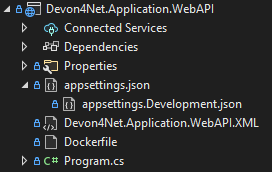
Everything will be set up in the Program.cs file as for any .Net 6 Core API project. Going through this file, you will find all the configuration included with the template, such as middlewares and Dependency Injection.
appsettings.json
{
  "devonfw": {
    "UseDetailedErrorsKey": true,
    "UseIIS": false,
    "UseSwagger": true,
    "UseXsrf": true,
    "UseModelStateValidation": true,
    "Environment": "Development",
    "ForceUseHttpsRedirection": false,
    "Kestrel": {
      "UseHttps": false,
      "HttpProtocol": "Http1AndHttp2",
      "ApplicationPort": 8085,
      "SslProtocol": "Tls12",
      "ExtraSettings": {
        "KeepAliveTimeout": 120,
        "MaxConcurrentConnections": 100,
        "MaxConcurrentUpgradedConnections": 100,
        "MaxRequestBodySize": 28.6,
        "Http2MaxStreamsPerConnection": 100,
        "Http2InitialConnectionWindowSize": 131072,
        "Http2InitialStreamWindowSize": 98304,
        "AllowSynchronousIO": true
      }
    },
    "IIS": {
      "ForwardClientCertificate": true,
      "AutomaticAuthentication": true,
      "AuthenticationDisplayName": ""
    }
  }
}
In the following list all the configuration fields are described:
-
UseIIS: Boolean that indicates if IIS is used. -
ValidateIssuerSigningKey: Boolean that controls if validation of the security key that signed the securityToken is called. -
UseXsrf: Boolean that adds Anti Forgery middleware to prevent XSRF attacks. -
UseModelStateValidation: Boolean that indicates if model validation is called. -
Environment: Running environment to load the corresponding configuration (Development, Production…) -
ForceUseHttpsRedirection: Boolean to force adding a middleware that redirects HTTP requests to HTTPS. -
Kestrel: Kestrel server configuration-
UseHttps: Boolean to indicate if the connection needs to be secured via HTTPS. -
HttpProtocol: Hypertext protocol used.Protocol
Description
Http1HTTP/1.x (default)
Http2HTTP/2
Http1andHttp2Both HTTP/1.x and HTTP/2
none -
ApplicationPort: Port number where the API will listen -
SslProtocol: SSL encrytion protocol for HttpsProtocol
Description
Tls12TLS 1.2 (default, needed for Https2)
Tls13TLS 1.3
none -
ExtraSettings: Some extra settings for Kestrel-
KeepAliveTimeout: Sets the keep-alive timeout in seconds. -
MaxConcurrentConnections: Maximum number of open connections. Null is unlimited. Default is 100. -
MaxConcurrentUpgradedConnections: Maximum number of open upgraded connectinos. Null is unlimited. An upgraded connection is one that has been switched from HTTP to another protocol. Default is 100. -
MaxRequestBodySize: Maximum allowed size of any request body in MB. Default is 28.6MB. -
Http2MaxStreamsPerConnection: Maximum number of concurrent request streams per HTTP/2 connection. Excess streams will be refused. Default is 100. -
Http2InitialConnectionWindowSize: Indicates how much request body data the server is willing to receive and buffer at a time aggregated across all requests (streams) per connection. Value must be greater or equal to 65,535 and less than 2^31. Defaults to 128 KB. -
Http2InitialStreamWindowSize: Indicates how much request body data the server is willing to receive and buffer at a time per stream. -
AllowSynchronousIO: Boolean that controls wether Synchronous IO operations are allowed in requests.
-
-
-
IIS: Internet Information Services configuration-
ForwardClientCertificate: Populates the ITLSConnectionFeature if the MS-ASPNETCORE-CLIENTCERT request header is present -
AutomaticAuthentication: If true the middleware should set HttpContext.User. If false the middleware will only provide an identity when explicitly requested by the AuthenticationScheme. Note Windows Authentication must also be enabled in IIS for this to work. -
AuthenticationDisplayName: Sets the display name shown to users on login pages. The default is null
-
For each environment you can have a different configuration if you wish. You will find an appsettings.Development.json file where the configuration for the different components used in the template is placed. Please go through the documentation of each component to learn more about how are they configured.
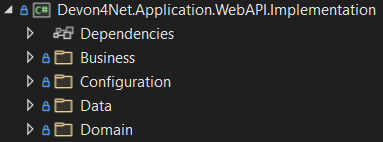
Devon4Net.Application.Implementation
This is where all the magic happens. This project holds all the classes needed to implement the API end-points. The following image shows the structure you will find in this project.
| Please refer to documentation about Architecture to understand better the proposed architecture which is Onion Architecture. |
Configuration
In this directory the Configuration is placed, you will find all the dependency injection code for this project in the static class DevonConfiguration. The code is divided into many private extensions based on their intended use, all of which are called by one main public extension for the IServiceCollection interface in the Program.cs file.
| If you need to segregate chunks of code, don’t be afraid to add extra static classes. This will improve reading and it will make it much easier to locate items later. |
Domain
As you may have learned thanks to the architecture document, this is the core of the application. It holds the entities and the contracts for the operations you can execute on them, that last being the repository interfaces.
You will be able to find also the different database contexts for the application in the Database directory. These contexts will allow EntityFramework to work properly by extending DbContext class.
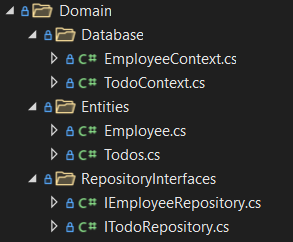
The repositories interfaces extend from a generic repository interface IRepository<T> available in Devon4Net. As you can see in figure 3, Devon4Net already comes with some examples of implementation for some entities. Please revise them so that you have a better understanding of how they work.
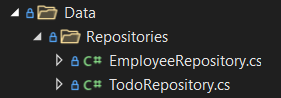
Data
The Data directory corresponds to the Data Layer and implements all the interfaces contracts. This Repositories extend from a generic repository implementation Repository<T> available in Devon4Net. As you can see in the next figure, the template also come with some examples of implementation.
Business
The Business directory is where all the application logic is placed, it corresponds to the Business Layer. You will find a lot of implemented examples as shown in the next image.
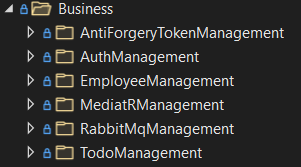
These are:
-
AntiForgeryTokenManagement: This is an example of how to use the XSRF protection in API controllers. It contains a controller class with a working example.
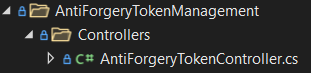 Figure 150. AntiForgeryTokenManagement directory
 -
AuthManagement: This example shows how to use Authorization in API controllers thanks to Json Web Tokens. It contains a controller class and some response entities needed to return information.
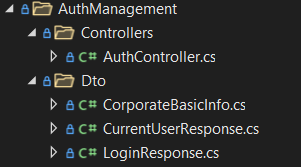 Figure 151. AuthManagement directory
 -
EmployeeManagement: This directory contains all the implementation classes for entity type Employee.
 Figure 152. EmployeeManagement directory
 -
MediatRManagement: Example of how implement MediatR for using CQRS pattern.
 Figure 153. MediatRManagement directory
 -
RabbitMqManagement: Sample of implementation of RabbitMq queues.
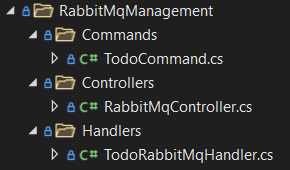 Figure 154. RabbitMqManagement directory
 -
TodoManagement: Implementation sample of entity type Todo.
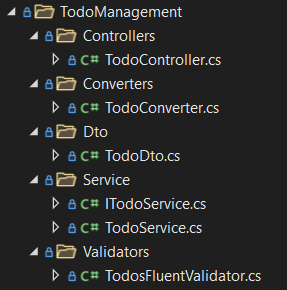 Figure 155. TodoManagement directory
Sample of use
| If you don’t know how to install and use this template, please refer to documentation on how to do it. |
In this part we will be creating CRUD (Create, Read, Update and Delete) operations for the entity type Student. Before that, we will delete the samples that come with the template.
Step 1: Entity
First we will need the object Student. For that we will need to create a new Student.cs class in Domain\Entities:
public class Student
{
    public long Id { get; set; }
    public string Name { get; set; }
    public string Surname { get; set; }
}
Our student should have an Identifier, and we will also put some interesting properties, name and surname for example.
Is good practice to override object methods: Equals(object o), GetHashCode() and ToString().
|
Step 2: Context
EntityFramework will need a context to be able to work with Students. Lets create a StudentContext.cs class in Domain\Database:
public class StudentContext : DbContext
{
    public virtual DbSet<Student> Students { get; set; }
    public StudentContext(DbContextOptions<StudentContext> options) : base(options)
    {
    }
}
Step 3: Repository contract
The repository contract in Data\RepositoryInterfaces will allow us to inject the repository and will increase decoupling. It will be implemented in the next step. You can inherit methods from Devon4Net IRepository as shown, but we will be also implementing a couple of queries:
public interface IStudentRepository : IRepository<Student>
{
    Task<long> DeleteById(long id);
}
Everything should be asynchronous making use of the Task class.
Step 4: Repository implementation
Now we will need a repository implementation for the previous interface. It will be placed in Data\Repositories, it will inherit also from Devon4Net generic repository and will implement interface methods:
public class StudentRepository : Repository<Student>, IStudentRepository
{
    public StudentRepository(StudentContext context) : base(context)
    {
    }

    public async Task<long> DeleteById(long id)
    {
        var deleted = await Delete(t => t.Id == id).ConfigureAwait(false);
        if (deleted) return id;
        throw  new ArgumentException($"The Todo entity {id} has not been deleted.");
    }
}
Step 5: StudentDto
To increase decoupling, we will create a copy of the entity Student in Business\Dto for the Business layer. To make it a little different we will be including the surname in the property FullName and it will be separated before being stored in the database and viceversa:
public class StudentDto
{
    public long Id { get; set; }
    public string FullName { get; set; }
}
We will need also a converter placed in Business\Converters so we can transform it in both directions:
public static class StudentConverter
{
    public static StudentDto EntityToDto(Student item)
    {
        if (item == null) return new StudentDto();
        return new StudentDto
        {
            Id = item.Id,
            FullName = item.Name + " " + item.Surname
        };
    }

    public static Student DtoToEntity(StudentDto item)
    {
        if (item == null) return new Student();
        return new Student
        {
            Id = item.Id,
            Name = item.FullName.Split(" ")[0],
            Surname = item.FullName.Split(" ")[1]
        };
    }
}
Step 6: Service
Now we will need a service in Business\StudentManagement\Service. The service will execute all the necessary operations. In this case as it is a simple CRUD it will only call the repository. The Devon4Net Service class implements Unit of Work pattern.
public interface IStudentService
{
    Task<IEnumerable<StudentDto>> GetAllStudents();
    Task<Student> CreateStudent(StudentDto student);
    Task<long> DeleteStudentById(long id);
}
public class StudentService: Service<StudentContext>, IStudentService
{
private readonly IStudentRepository _studentRepository;
public StudentService(IUnitOfWork<StudentContext> uoW) : base(uoW)
{
_studentRepository = uoW.Repository<IStudentRepository>();
}
public async Task<IEnumerable<StudentDto>> GetAllStudents()
{
Devon4NetLogger.Debug("GetTodo method from service TodoService");
var result = await _studentRepository.Get().ConfigureAwait(false);
return result.Select(StudentConverter.EntityToDto);
}
public async Task<StudentDto> CreateStudent(StudentDto student)
{
var result = await _studentRepository.Create(StudentConverter.DtoToEntity(student));
return StudentConverter.EntityToDto(result);
}
public async Task<long> DeleteStudentById(long id)
{
var todo = await _studentRepository.GetFirstOrDefault(t => t.Id == id).ConfigureAwait(false);
if (todo == null) throw new ArgumentException($"The provided Id {id} does not exist");
return await _studentRepository.DeleteById(id).ConfigureAwait(false);
}
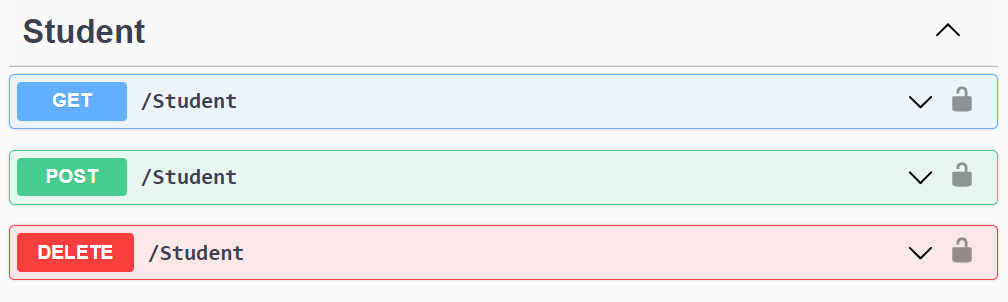
}Step 7: Controller
The controller will end up looking like this and needs to be placed in Business\StudentManagement\Controllers. It uses the IStudentService via dependency injection.
[EnableCors("CorsPolicy")]
[ApiController]
[Route("[controller]")]
public class StudentController : ControllerBase
{
    private readonly IStudentService _studentService;

    public StudentController(IStudentService studentService)
    {
        _studentService = studentService;
    }

    [HttpGet]
    [ProducesResponseType(typeof(List<StudentDto>), StatusCodes.Status200OK)]
    [ProducesResponseType(StatusCodes.Status400BadRequest)]
    [ProducesResponseType(StatusCodes.Status404NotFound)]
    [ProducesResponseType(StatusCodes.Status500InternalServerError)]
    public async Task<ActionResult> GetStudents()
    {
        return Ok(await _studentService.GetAllStudents().ConfigureAwait(false));
    }

    [HttpPost]
    [ProducesResponseType(typeof(StudentDto), StatusCodes.Status201Created)]
    [ProducesResponseType(StatusCodes.Status400BadRequest)]
    [ProducesResponseType(StatusCodes.Status404NotFound)]
    [ProducesResponseType(StatusCodes.Status500InternalServerError)]
    public async Task<ActionResult> Create(StudentDto student)
    {
        var result = await _studentService.CreateStudent(student).ConfigureAwait(false);
        return StatusCode(StatusCodes.Status201Created, result);
    }

    [HttpDelete]
    [ProducesResponseType(typeof(long), StatusCodes.Status200OK)]
    [ProducesResponseType(StatusCodes.Status400BadRequest)]
    [ProducesResponseType(StatusCodes.Status404NotFound)]
    [ProducesResponseType(StatusCodes.Status500InternalServerError)]
    public async Task<ActionResult> Delete(long id)
    {
        return Ok(await _studentService.DeleteStudentById(id).ConfigureAwait(false));
    }
}
Step 8: Dependency Injection
Now we are ready to inject the context in Configuration\DevonConfiguration.cs. In this example we are creating a database stored in memory:
services.SetupDatabase<StudentContext>(configuration, "Default", DatabaseType.InMemory).ConfigureAwait(false);Also the repository and the service, so we can use them in the entire solution.
services.AddTransient<IStudentRepository, StudentRepository>();
services.AddTransient<IStudentService, StudentService>();
Test
Now you can run the application and go to the path swagger/index.html.
| take a look at your application port and the protocol you configured (http or https). |
gRPC Template
In this part of the document you will learn what is gRPC and how the devon4net gRPC template works.
To help you understand how the template works, we will first go over some general concepts concerning gRPC technology in broad strokes. Then continue describing the contract shared between client and server and how it is formed using Google’s Protocol Buffers. And last but not least, both the GrpcClient and the GrpcServer will be explained.
gRPC
gRPC is a modern open source high performance Remote Procedure Call (RPC) framework. It is totally independent of the language used on the client side and the server side.
In gRPC a client app can directly call a method on a server application. Both parts need to share a file that acts as a contract. This way compatibility is ensured between client and server without taking languages into account.
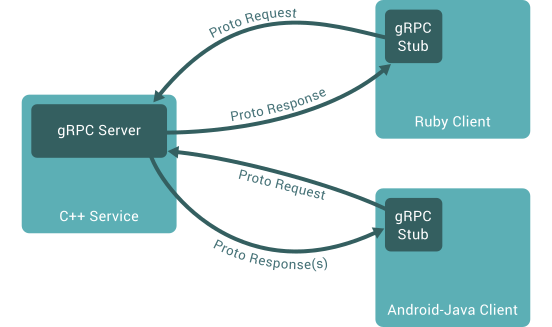
On the server side, we need to develop a service that implements the contract shared between both parts and also listens to client calls and process them using this implementation.
On the client side, the client can use the methods provided by this contract thanks to the "stub" (gRPC client).
This file is the Protocol Buffer (".proto" file)and needs to be both in the client and the server for them to understand each other.
Protocol Buffers
Protocol buffers provide a cross-platform mechanism for serializing structured data. It is like a JSON file, but smaller and faster.
This protocol buffers are written in an language called proto3. The following piece of code describes an example:
syntax = "proto3";

option csharp_namespace = "Devon4Net.Application.GrpcClient.Protos";

package greet;

// The greeting service definition.
service Greeter {
  // Sends a greeting
  rpc SayHello (HelloRequest) returns (HelloReply);
}

// The request message containing the user's name.
message HelloRequest {
  string name = 1;
}

// The response message containing the greetings.
message HelloReply {
  string message = 1;
}
The first line, specifies that you are using the proto3 version. There are other versions such as proto2.
The option csharp_namespace specifies the namespace of the proto file in C#.
A message types are definitions of object structures. A message might have different fields, that have:
-
Type: Type of the field value. It can be any scalar type (int32, double, string…) or composite type (enumerations, other messages…).
-
Number: Each field has a unique number which is used to identify the field.
-
Rule: Singular (can have zero or one) or repeated (can be zero or multiple times rpeated)
You can also see a service contract, which is called Greeter and has a method SayHello that accepts a HelloRequest and returns a HelloReply, both also defined on the file.
Devon4Net.Application.GrpcServer
This project will launch the server that will be called from the GrpcClient and will manage the rpc calls to the available methods.
The proto file, which is shown in the previous section, defines the contract for the service, that will need to be implemented in this same project.
As you can see in the following figure, the proto file is placed in the directory Protos.
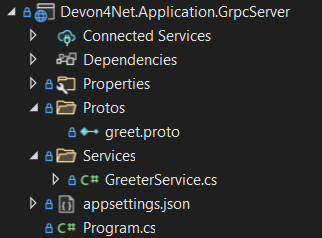
The service GreeterService, will need to extend Greeter.GreeterBase which is generated automatically thanks to the service named Greeter in the proto file.
This service will need to override the method SayHello defined in the proto file. This method can be overriden from the class Greeter.GreeterBase as it was already implemented:
[GrpcDevonService]
public class GreeterService : Greeter.GreeterBase
{
    public GreeterService()
    {
    }

    public override Task<HelloReply> SayHello(HelloRequest request, ServerCallContext context)
    {
        return Task.FromResult(new HelloReply
        {
            Message = "Hello " + request.Name
        });
    }
}
Notice the attribute GrpcDevonService. All services marked with this attribute will be auto registered in the Program.cs when adding the following line:
builder.Services.AddGrpc();
.
.
.
app.SetupGrpcServices(new List<string> { "Devon4Net.Application.GrpcServer" });
The list of strings provided as argument is the list of assemblies where devon will look for gRPC services tagged with that attribute.
| Check the component documentation to learn more. |
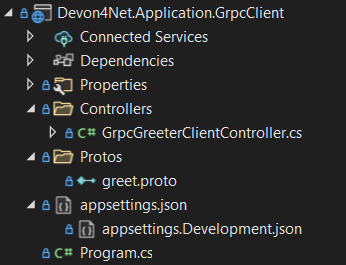
Devon4Net.Application.GrpcClient
The client project will access the GrpcServer project end-point thanks to the protocol buffer and the configuration in the appsettings.{environment}.json. For trying out the communication between the client and the server, you will find an end-point in the GrpcGreeterController class.
The configuration is done adding the following options to the settings file:
 "Grpc": {
    "EnableGrpc": true,
    "UseDevCertificate": true,
    "GrpcServer": "https://localhost:5002",
    "MaxReceiveMessageSize": 16,
    "RetryPatternOptions": {
      "MaxAttempts": 5,
      "InitialBackoffSeconds": 1,
      "MaxBackoffSeconds": 5,
      "BackoffMultiplier": 1.5,
      "RetryableStatus": "Unavailable"
    }
  },
GrpcServer is the direction of the gRPC end-points. To learn more about the component configuration please visit the package documentation.
|
The following line will configure the component to use this configuration in the Program.cs:
builder.Services.SetupGrpc(builder.Configuration);The greeter controller will use a GrpcChannel injected in the constructor as follows:
[ApiController]
[Route("[controller]")]
public class GrpcGreeterClientController : ControllerBase
{
    private GrpcChannel GrpcChannel { get; }

    public GrpcGreeterClientController(GrpcChannel grpcChannel)
    {
        GrpcChannel = grpcChannel;
    }
You will find that the end-point that accesses the gRPC service looks like this:
[HttpGet]
public async Task<HelloReply> Get(string name)
{
    try
    {
        var client = new Greeter.GreeterClient(GrpcChannel);
        return await client.SayHelloAsync(new HelloRequest { Name = name }).ResponseAsync.ConfigureAwait(false);
    }
    catch (Exception ex)
    {
        Devon4NetLogger.Error(ex);
        throw;
    }
}
The Greeter.GreeterClient is created automatically and can be used when adding the reference to the proto file namespace with the using directive.
AWS Templates
The devon4net stack includes a variety of templates aimed at developing applications with Amazon Web Services (AWS). AWS is the most used cloud computing platform and that is why Devon gives you the resources you need to make designing and developing for this cloud technology much more simpler and efficient.
AWS Introduction
Amazon Web Services (AWS) is a collection of cloud computing services that Amazon provides an online scalable and cost-effective platform to developers and companies dedicated to software.
It’s mainly directed to online services and its the leading cloud provider in the marketplace providing over 100+ services and a platform to manage them all.
Devon4Net.Application.Lambda
This package is a template for constructing Lambda Functions for AWS. It makes use of the Devon4Net.Infrastructure.AWS.Lambda, so please read the documentation about this component before starting to use the template. You also have a 'How to: AWS Lambda' tutorial that shows you how you can develop a lambda function making use of this template.
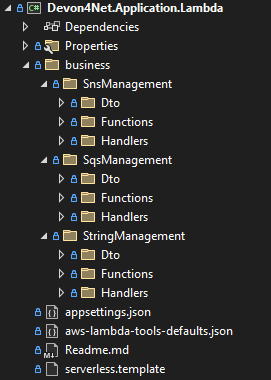
In the previous figure you can see the whole structure of the package. It has one main directory called business where you can find three different examples of Lambda functions that will be explained further on this document.
Each of the three management directories is divides as follows:
-
Dto: Here are placed the necessary classes of the custom objects that are used to input and output the data in the lambda functions. -
Functions: This folder will contain the function definition for the lambda functions. -
Handlers: In this directory the classes that implement theFunctionHandlermethod that will define the lambda function behaviour.
You will also find in the same level as the business directory some configuration files and a Readme.md file with some extra information.
Configuration
The configuration files are the following:
This file contains the configuration for all of the components and the project in general. It can contain subversions following the structure appsettings.{environment}.json and it contains the following:
{
  "AWS": {
    "UseSecrets": true,
    "UseParameterStore": true,
    "Credentials": {
      "Profile": "",
      "Region": "eu-west-1",
      "AccessKeyId": "",
      "SecretAccessKey": ""
    }
  }
}-
UseSecrets: Boolean to indicate if AWS Secrets Manager is being used. -
UseParameterStore: Boolean to indicate if AWS Parameter Store is being used. -
Credentials: Credentials for connecting the app with your AWS profile.
| Read the AWS components documentation to learn more about the configuration you can do in this type of files. |
This file provides default values to the AWS CLI for configuring and deploy with Visual Studio.
Run this command to learn more:
dotnet lambda deploy-serverless --helpThis is the file:
{
  "Information": [
    "This file provides default values for the deployment wizard inside Visual Studio and the AWS Lambda commands added to the .NET Core CLI.",
    "To learn more about the Lambda commands with the .NET Core CLI execute the following command at the command line in the project root directory.",
    "dotnet lambda help",
    "All the command line options for the Lambda command can be specified in this file."
  ],
  "profile": "default",
  "region": "eu-west-1",
  "framework": "net6.0",
  "configuration": "Release",
  "s3-prefix": "AWSServerlessTest/",
  "function-memory-size": 256,
  "function-timeout": 30,
  "function-handler": "Devon4Net.Application.Lambda::AWSLambda.Bussiness.StringManagement.UpperFunction::FunctionHandler",
  "template": "serverless.template"
}
The function-handler option is the function handler location in the form of Assembly::Namespace.ClassName::MethodName. And the template option will point to a configuration file for the cloud formation.
| Read the AWS documentation to learn more about this configuration. |
This configuration provides all the information to the Cloud System so that you don’t have to adjust anything for deploying the function/s.
{
  "AWSTemplateFormatVersion": "2010-09-09",
  "Transform": "AWS::Serverless-2016-10-31",
  "Description": "An AWS Serverless Application that uses the ASP.NET Core framework running in Amazon Lambda.",
  "Parameters": {},
  "Conditions": {},
  "Resources": {
    "ToUpperFunction": {...},
    "ToLowerFunction": {...},
    "SnsManagementFunction": {...},
    "SqsManagementFunction": {...},
  },
  "Outputs": {
    "ApiURL": {
      "Description": "API endpoint URL for Prod environment",
      "Value": {
        "Fn::Sub": "https://${ServerlessRestApi}.execute-api.${AWS::Region}.amazonaws.com/Prod/"
      }
    }
  }
}
As you will notice, the Resources part contains the configuration for each function.
This configuration will look like this:
"ToUpperFunction": {
  "Type": "AWS::Serverless::Function",
  "Properties": {
    "Handler": "Devon4Net.Application.Lambda::Devon4Net.Application.Lambda.Business.StringManagement.Functions.Upper.UpperFunction::FunctionHandler",
    "Runtime": "dotnet6",
    "CodeUri": "",
    "MemorySize": 256,
    "Timeout": 30,
    "Role": null,
    "Policies": [
      "AWSLambdaFullAccess",
      "AmazonSSMReadOnlyAccess",
      "AWSLambdaVPCAccessExecutionRole"
    ],
    "Environment": {
      "Variables": {}
    },
    "Events": {
      "ProxyResource": {
        "Type": "Api",
        "Properties": {
          "Path": "/{proxy+}",
          "Method": "ANY"
        }
      },
      "RootResource": {
        "Type": "Api",
        "Properties": {
          "Path": "/",
          "Method": "ANY"
        }
      }
    }
  }
},
The Properties section will have the value of the location as we saw on the aws-lambda-tools-defaults.json file in the form of {DLL_NAME}::{NAMESPACE}::{FUNCTION_HANDLER_NAME}.
| Read the AWS documentation to learn more about this configuration. |
Samples
As you may know as this point this template includes three samples that show you how to develop lambda functions and also how to interact with other services such as SNS and SQS.
| Please go through the code slowly to understand the trace it follows and what it does. |
Amazon Simple Notification Service (Amazon SNS) is a fully managed messaging service for both application-to-application (A2A) and application-to-person (A2P) communication.
This Sample shows you the proper way of handling SNS Events and processing messages in a Lambda Function.
Amazon Simple Queue Service (SQS) is a fully managed message queuing service that enables you to decouple and scale microservices, distributed systems, and serverless applications.
This Sample shows you to handle and process Messages from an AWS Queue service directly in a Lambda Function
This is a very simple function that shows how you can perform a lambda to process a string and transform it to uppercase or lowercase.
Devon4Net.Application.WebAPI.Serverless
This package contains a template for building a serverless WebAPI.
It makes use of the Devon4Net.Infrastructure.WebAPI.Serverless component, therefore please read the documentation about it before using the template.
You also have a 'How to: AWS Serverless' guide that demonstrates you how to use this template to create a serverless WebAPI.
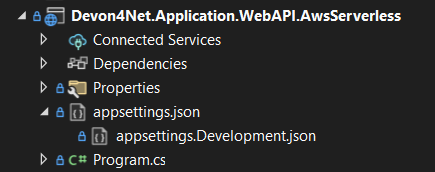
In the previous figure you can see the whole structure of the package.
Configuration
The configuration files are the following:
It’s the configuration file for the component. It can contain subversions following the structure appsettings.{environment}.json.
{
    "AWS": {
    "EnableAws": true,
    "UseSecrets": true,
    "UseParameterStore": true,
    "Credentials": {
      "Profile": "default",
      "Region": "eu-west-1",
      "AccessKeyId": "",
      "SecretAccessKey": ""
    },
    "Cognito": {
      "IdentityPools": [
        {
          "IdentityPoolId": "",
          "IdentityPoolName": "",
          "ClientId": ""
        }
      ]
    },
    "SqSQueueList": [
      {
        "QueueName": "", // Mandatory. Put the name of the queue here
        "Url": "", //optional. If it is not present, it will be requested to AWS
        "UseFifo": false,
        "MaximumMessageSize": 256,
        "NumberOfThreads": 2,
        "DelaySeconds": 0,
        "ReceiveMessageWaitTimeSeconds": 0,
        "MaxNumberOfMessagesToRetrievePerCall": 1,
        "RedrivePolicy": {
          "MaxReceiveCount": 1,
          "RedrivePolicy": {
            "MaxReceiveCount": 1,
            "DeadLetterQueueUrl": ""
          }
        }
      }
    ]
  }
}-
UseSecrets: Boolean to indicate if AWS Secrets Manager is being used. -
UseParameterStore: Boolean to indicate if AWS Parameter Store is being used. -
Credentials: Credentials for connecting the app with your AWS profile. -
Cognito: Amazon Cognito identity pools provide temporary AWS credentials for users who are guests (unauthenticated) and for users who have been authenticated and received a token. An identity pool is a store of user identity data specific to your account. In this section you can configure multiple IdentityPools. -
SqSQueueList: This section is used to configure the Amazon Simple Queue Service (SQS). You must configure some parameters about the queue:-
QueueName: The name of the queue, this field is required. -
Url: The queue’s url, this parameter is optional. -
UseFifo: We have two queue types in Amazon SQS, use false for Standard Queues or set this parameter to true for FIFO Queues. -
MaximumMessageSize: The maximum message size for this queue. -
NumberOfThreads: The number of threads of the queue. -
DelaySeconds: The amount of time that Amazon SQS will delay before delivering a message that is added to the queue. -
ReceiveMessageWaitTimeSeconds: The maximum amount of time that Amazon SQS waits for messages to become available after the queue gets a receive request. -
MaxNumberOfMessagesToRetrievePerCall: The maximum number of messages to retrieve per call. -
RedrivePolicy: Defines which source queues can use this queue as the dead-letter queue
-
| Read the AWS SQS documentation to learn more about the configuration of this kind of queues. |
Devon4Net.Application.DynamoDb
This package contains a template for building a DynamoDb database.
It makes use of the Devon4Net.Infrastructure.DynamoDb component, therefore please read the documentation about it before using the template.
You also have a 'How to: DynamoDb' section that explains how to use the component with some examples.
| This template uses Lambda functions to get and set data into the DynamoDb database. if you don’t know about lambda functions, please read the 'How to: AWS Lambda Function' documentation. |
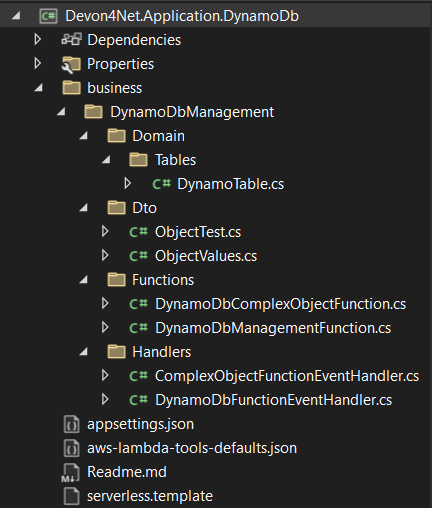
In the previous figure you can see the whole structure of the package:
-
Domain: Here are placed the necessary classes of the custom objects that are used to input and output the data in the lambda functions. TheEntity Repositoryis used to manage these objects. -
Dto: Here are placed the necessary classes of the custom objects that are used to input and output the data in the lambda functions. These objects are managed with theTable Repository. -
Functions: This folder will contain the function definition for the lambda functions. -
Handlers: In this directory the classes that implement theFunctionHandlermethod that will define the lambda function behaviour.In this case, we have a function that creates a DynamoDb table if it does not already exist and inserts data into it, it returns the value that was entered into the database.
This has been achieved in two ways: by making use of the Table repository (low-level model) or through the use of the Entity repository (persistence programming model)
| If you need more information about Table or Entity Repository please check the documentation about the DynamoDb component. |
Configuration
The configuration files are the following:
This file contains the configuration for all of the components and the project in general. It can contain subversions following the structure appsettings.{environment}.json and it contains the following:
{
  "AWS": {
    "UseSecrets": true,
    "UseParameterStore": true,
    "Credentials": {
      "Profile": "",
      "Region": "eu-west-1",
      "AccessKeyId": "",
      "SecretAccessKey": ""
    }
  }
}-
UseSecrets: Boolean to indicate if AWS Secrets Manager is being used. -
UseParameterStore: Boolean to indicate if AWS Parameter Store is being used. -
Credentials: Credentials for connecting the app with your AWS profile.
This file provides default values to the AWS CLI for configuring and deploy with Visual Studio.
You can run this command to learn more:
dotnet lambda deploy-serverless --helpThis is the file:
{
  "Information": [
    "This file provides default values for the deployment wizard inside Visual Studio and the AWS Lambda commands added to the .NET Core CLI.",
    "To learn more about the Lambda commands with the .NET Core CLI execute the following command at the command line in the project root directory.",
    "dotnet lambda help",
    "All the command line options for the Lambda command can be specified in this file."
  ],
  "profile": "default",
  "region": "eu-west-1",
  "framework": "net6.0",
  "function-runtime": "dotnet6",
  "configuration": "Release",
  "s3-prefix": "AWSServerlessTest/",
  "function-memory-size": 256,
  "function-timeout": 30,
  "function-handler": "Devon4Net.Application.DynamoDb::Devon4Net.Application.DynamoDb.business.DynamoDbManagement.Functions.DynamoDbManagementFunction::FunctionHandler",
  "template": "serverless.template"
}
The function-handler option is the function handler location in the form of Assembly::Namespace.ClassName::MethodName. And the template option will point to a configuration file for the cloud formation.
| Read the AWS documentation to learn more about this configuration. |
This configuration sends all of the information to the Cloud System, so you don’t have to change anything when deploying the functions.
{
  "AWSTemplateFormatVersion": "2010-09-09",
  "Transform": "AWS::Serverless-2016-10-31",
  "Description": "An AWS Serverless Application that uses the ASP.NET Core framework running in Amazon Lambda.",
  "Parameters": {},
  "Conditions": {},
  "Resources": {
    "DynamoDbFunction": {...},
    "DynamoDbComplesObjectFunctionEventHandler": {...},
  },
  "Outputs": {
    "ApiURL": {
      "Description": "API endpoint URL for Prod environment",
      "Value": {
        "Fn::Sub": "https://${ServerlessRestApi}.execute-api.${AWS::Region}.amazonaws.com/Prod/"
      }
    }
  }
}
As you can see, the Resources section includes the configuration for each function.
This configuration will appear as follows:
"DynamoDbFunction": {
      "Type": "AWS::Serverless::Function",
      "Properties": {
        "Handler": "Devon4Net.Application.DynamoDb::Devon4Net.Application.DynamoDb.business.DynamoDbManagement.Functions.DynamoDbManagementFunction::FunctionHandler",
        "Runtime": "dotnet6",
        "CodeUri": "",
        "MemorySize": 256,
        "Timeout": 30,
        "Role": null,
        "Policies": [
          "AWSLambdaFullAccess",
          "AmazonSSMReadOnlyAccess",
          "AWSLambdaVPCAccessExecutionRole"
        ],
        "Environment": {
          "Variables": {}
        },
        "Events": {
          "ProxyResource": {
            "Type": "Api",
            "Properties": {
              "Path": "/{proxy+}",
              "Method": "ANY"
            }
          },
          "RootResource": {
            "Type": "Api",
            "Properties": {
              "Path": "/",
              "Method": "ANY"
            }
          }
        }
      }
    },
The Properties section will contain the value of the location, as seen in the aws-lambda-tools-defaults.json file in the form of Assembly::Namespace.ClassName::MethodName.