Samples
My Thai Star Restaurant
Angular requirements
Angular client
-
Install Node.js LTS version
-
Install Angular CLI from command line:
-
npm install -g @angular/cli
-
-
Install Yarn
-
Go to Angular client from command line
-
Execute : yarn install
-
Launch the app from command line: ng serve and check http://localhost:4200
-
You are ready
.Net Core server
Basic architecture details
Following the devonfw conventions the .Net Core 2.0 My Thai Star backend is going to be developed dividing the application in Components and using a n-layer architecture.
Components
The application is going to be divided in different components to encapsulate the different domains of the application functionalities.
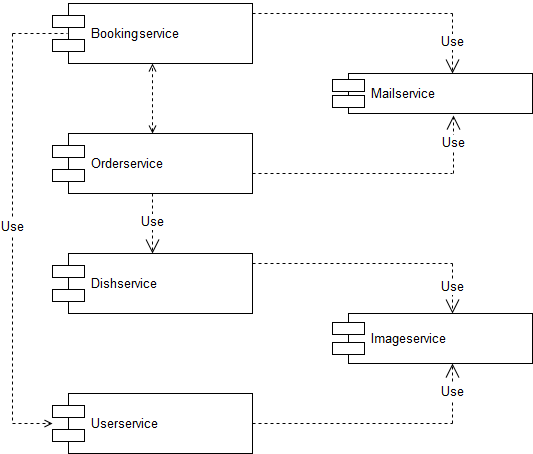
As main components we will find:
-
_BookingService: Manages the bookings part of the application. With this component the users (anonymous/logged in) can create new bookings or cancel an existing booking. The users with waiter role can see all scheduled bookings.
-OrderService: This component handles the process to order dishes (related to bookings). A user (as a host or as a guest) can create orders (that contain dishes) or cancel an existing one. The users with waiter role can see all ordered orders.
-
DishService: This component groups the logic related to the menu (dishes) view. Its main feature is to provide the client with the data of the available dishes but also can be used by other components (Ordermanagement) as a data provider in some processes. -
UserService: Takes care of the User Profile management, allowing to create and update the data profiles.
As common components (that don’t exactly represent an application’s area but provide functionalities that can be used by the main components):
-
Mailservice: with this service we will provide the functionality for sending email notifications. This is a shared service between different app components such as bookingmanagement or ordercomponent.
Other components:
-
Security (will manage the access to the private part of the application using a jwt implementation).
-
Twitter integration: planned as a Microservice will provide the twitter integration needed for some specific functionalities of the application.
Layers
Introduction
The .Net Core backend for My Thai Star application is going to be based on:
-
devon4NET as the .Net Core framework
-
VSCode as the Development environment
-
TOBAGO as code generation tool
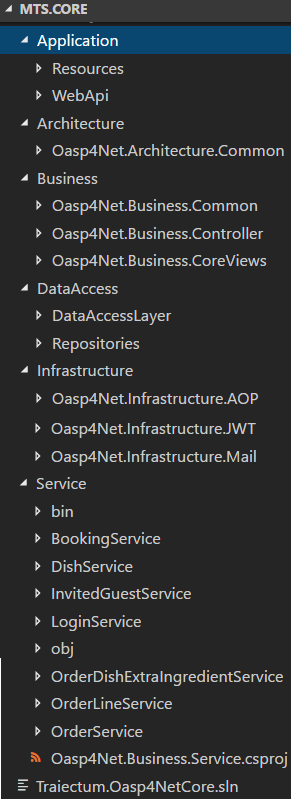
Application layer
This layer will expose the REST api to exchange information with the client applications.
The application will expose the services on port 8081 and it can be launched as a self host console application (microservice approach) and as a Web Api application hosted on IIS/IIS Express.
Business layer
This layer will define the controllers which will be used on the application layer to expose the different services. Also, will define the swagger contract making use of summary comments and framework attributes.
This layer also includes the object response classes in order to interact with external clients.
Service layer
The layer in charge of hosting the business logic of the application. Also orchestrates the object conversion between object response and entity objects defined in Data layer.
Data layer
The layer to communicate with the data base.
Data layer makes use of Entity Framework.
The Database context is defined on DataAccessLayer assembly (ModelContext).
This layer makes use of the Repository pattern and Unit of work in order to encapsulate the complexity. Making use of this combined patterns we ensure an organized and easy work model.
As in the previous layers, the data access layer will have both interface and implementation tiers. However, in this case, the implementation will be slightly different due to the use of generics.
Cross-Cutting concerns
the layer to make use of transversal components such JWT and mailing.
Jwt basics
-
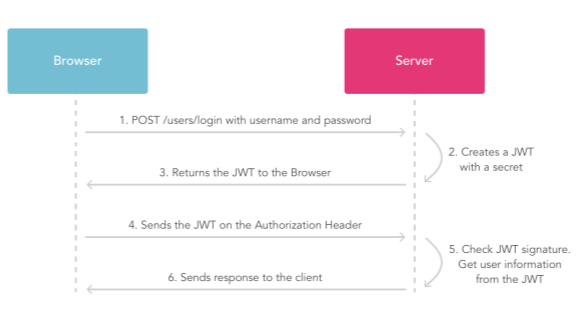
A user will provide a username / password combination to our auth server.
-
The auth server will try to identify the user and, if the credentials match, will issue a token.
-
The user will send the token as the Authorization header to access resources on server protected by JWT Authentication.
Jwt implementation details
The Json Web Token pattern will be implemented based on the jwt on .net core framework that is provided by default in the devon4Net projects.
Authentication
Based on Microsoft approach, we will implement a class to define the security entry point and filters. Also, as My Thai Star is a mainly public application, we will define here the resources that won’t be secured.
On devon4Net.Infrastructure.JWT assembly is defined a subset of Microsoft’s authorization schema Database. It is started up the first time the application launches.
You can read more about _Authorization on:
Dependency injection
As it is explained in the Microsoft documentation we are going to implement the dependency injection pattern basing our solution on .Net Core.
-
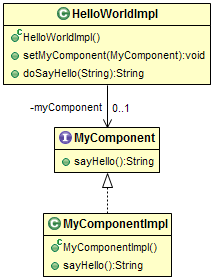
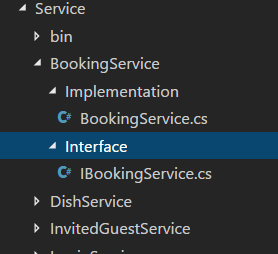
Separation of API and implementation: Inside each layer we will separate the elements in different tiers: interface and implementation. The interface tier will store the interface with the methods definition and inside the implementation we will store the class that implements the interface.
Layer communication method
The connection between layers, to access to the functionalities of each one, will be solved using the dependency injection.
Connection BookingService - Logic
 public class BookingService : EntityService<Booking>, IBookingService
    {
        private readonly IBookingRepository _bookingRepository;
        private readonly IRepository<Order> _orderRepository;
        private readonly IRepository<InvitedGuest> _invitedGuestRepository;
        private readonly IOrderLineRepository _orderLineRepository;
        private readonly IUnitOfWork _unitOfWork;

        public BookingService(IUnitOfWork unitOfWork,
            IBookingRepository repository,
            IRepository<Order> orderRepository,
            IRepository<InvitedGuest> invitedGuestRepository,
            IOrderLineRepository orderLineRepository) : base(unitOfWork, repository)
        {
            _unitOfWork = unitOfWork;
            _bookingRepository = repository;
            _orderRepository = orderRepository;
            _invitedGuestRepository = invitedGuestRepository;
            _orderLineRepository = orderLineRepository;
        }
}
To give service to the defined User Stories we will need to implement the following services:
-
provide all available dishes.
-
save a booking.
-
save an order.
-
provide a list of bookings (only for waiters) and allow filtering.
-
provide a list of orders (only for waiters) and allow filtering.
-
login service (see the Security section).
-
provide the current user data (see the Security section)
Following the [naming conventions] proposed for devon4Net applications we will define the following end points for the listed services.
-
(POST)
/mythaistar/services/rest/dishmanagement/v1/dish/search. -
(POST)
/mythaistar/services/rest/bookingmanagement/v1/booking. -
(POST)
/mythaistar/services/rest/ordermanagement/v1/order. -
(POST)
/mythaistar/services/rest/bookingmanagement/v1/booking/search. -
(POST)
/mythaistar/services/rest/ordermanagement/v1/order/search. -
(POST)
/mythaistar/services/rest/ordermanagement/v1/order/filter(to filter with fields that does not belong to the Order entity). -
(POST)
/mythaistar/login. -
(GET)
/mythaistar/services/rest/security/v1/currentuser/.
You can find all the details for the services implementation in the Swagger definition included in the My Thai Star project on Github.
Api Exposed
The devon4Net.Business.Controller assembly in the business layer of a component will store the definition of the service by a interface. In this definition of the service we will set-up the endpoints of the service, the type of data expected and returned, the HTTP method for each endpoint of the service and other configurations if needed.
        /// <summary>
        /// Method to make a reservation with potential guests. The method returns the reservation token with the format: {(CB_|GB_)}{now.Year}{now.Month:00}{now.Day:00}{_}{MD5({Host/Guest-email}{now.Year}{now.Month:00}{now.Day:00}{now.Hour:00}{now.Minute:00}{now.Second:00})}
        /// </summary>

        /// <param name="bookingView"></param>
        /// <response code="201">Ok.</response>
        /// <response code="400">Bad request. Parser data error.</response>
        /// <response code="401">Unauthorized. Authentication fail.</response>
        /// <response code="403">Forbidden. Authorization error.</response>
        /// <response code="500">Internal Server Error. The search process ended with error.</response>
        [HttpPost]
        [HttpOptions]
        [Route("/mythaistar/services/rest/bookingmanagement/v1/booking")]
        [AllowAnonymous]
        [EnableCors("CorsPolicy")]
        public IActionResult BookingBooking([FromBody]BookingView bookingView)
        {
...
Using the summary annotations and attributes will tell to swagger the contract via the XML doc generated on compiling time. This doc will be stored in XmlDocumentation folder.
The Api methods will be exposed on the application layer.
Google Mail API Consumer
Application |
|
Config file |
|
Default port |
8080 |
Overview
-
Execute
MyThaiStarEmailService.exe. -
The first time google will ask you for credentials (just one time) in your default browser:
-
Account: mythaistarrestaurant@gmail.com
-
Password: mythaistarrestaurant2501
-
-
Visit the url: http://localhost:8080/swagger
-
Your server is ready!
JSON Example
This is the JSON example to test with swagger client. Please read the swagger documentation.
{
   "EmailFrom":"mythaistarrestaurant@gmail.com",
   "EmailAndTokenTo":{
      "MD5Token1":" Email_Here!@gmail.com",
      "MD5Token2":" Email_Here!@gmail.com"
   },
   "EmailType":0,
   "DetailMenu":[
      "Thai Spicy Basil Fried Rice x2",
      "Thai green chicken curry x2"
   ],
   "BookingDate":"2017-05-31T12:53:39.7864723+02:00",
   "Assistants":2,
   "BookingToken":"MD5Booking",
   "Price":20.0,
   "ButtonActionList":{
      "http://accept.url":"Accept",
      "http://cancel.url":"Cancel"
   },
   "Host":{
      " Email_Here!@gmail.com":"José Manuel"
   }
}
Configure the service port
If you want to change the default port, please edit the config file and
change the next entry in appSettings node:
<appSettings>
   <add key="LocalListenPort" value="8080" />
</appSettings>

